
Spring is almost here and I cannot wait to get some fresh herbs into my home. I thought I would create something for the kitchen that shows my love for fresh herbs, hence these faux embossed herb plaques were born. I call it faux embossing because embossing means to raise the surface of the material you are working with. While these letters appear raised, they are actually added to the wood with three dimensional paints. Ready to see how?
 This is a project I created for Holly Lobby via DecoArt. They needed a spring project using their Americana Acrylic paints, and what says spring more that the growth of seedlings? Herbs, flowers, bulbs, all of these things came to mind, but herbs are what stuck in my head.
 The printable directions are below, here are some highlights along the way:
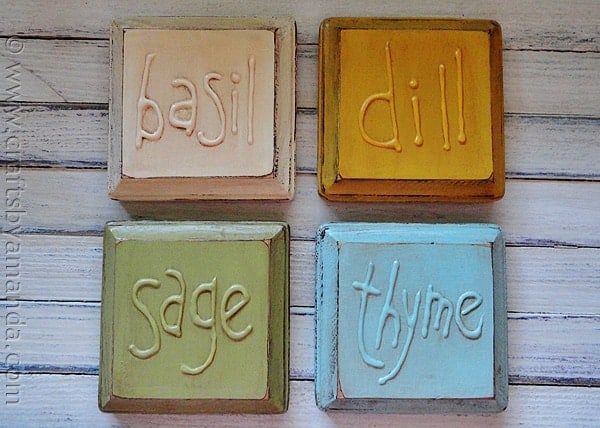
 Paint the outer edges of the plaques with Espresso. Paint all four sides. Write out herb names (I used dill, sage, thyme, and basil) onto post it notes. Place the post its on the plaques to get an idea of what they will look like. Once you are happy with the lettering, you can trace the letters so that the pen creates an indent onto the wood plaques.
 Write the words onto the plaques using the white Americana Writer, use the indents as your guide. Once the dimensional writer paint has dried, lightly paint over the brown sides and edges of the plaques with each color of Americana paint. Load the paintbrush, then wipe off the excess onto a paper towel and dry brush it over the Espresso. This will create a rustic look to the edge of the plaques.
 Paint over the dimensional lettering with the appropriate color paint. After that coat has dried, add another coat. Mix the 1 part antiquing gel with 1 part Espresso paint. Brush it onto all the edges and wipe back. Repeat for the top of the plaque, wiping off the excess with a soft rag. When dry, add a coat of Duraclear Varnish.


Rustic Faux Embossed Herb Plaques
Supplies
- Americana Writer – White three dimensional paint
- Antiquing Gel
- Duraclear Satin Varnish
- 4 square wooden plaques
- Sandpaper
- Square post it notes
Americana paint colors:
- Espresso
- Light Buttermilk
- Wasabi Green
- Spa Blue
- Golden Straw
Instructions
- Use paintbrush to paint the outer edges of the plaques with Espresso. Paint all four sides.
- Write out herb names (we used dill, sage, thyme, and basil) using a pen or pencil onto post its. Place the post its on the plaques to get an idea of what they will look like. Once you are happy with the lettering, you can trace the letters so that the pen creates an indent onto the wood plaques.
- Write the words onto the plaques using the white Americana Writer, use the indents as your guide.
- Once the dimensional writer paint has dried, lightly paint over the brown sides and edges of the plaques with each color of Americana paint. We did Wasabi Green for the sage plaque, Spa Blue for thyme, Golden Straw for dill and Light Buttermilk for basil. Load the paintbrush, then wipe off the excess onto a paper towel and dry brush it over the Espresso. This will create a rustic look to the edge of the plaques. Use sandpaper to rough up the edges and expose a little of the wood.
- Paint over the dimensional lettering with the appropriate color paint. After that coat has dried, add another coat.
- Mix the 1 part antiquing gel with 1 part Espresso paint. Brush it onto all the edges and wipe back. Repeat for the top of the plaque, wiping off the excess with a soft rag.
- When dry, add a coat of Duraclear Varnish.
- DIY Mosquito Repellent Candles - July 10, 2026
- Mason Jar Solar Lights - July 3, 2026
- Patriotic Pinwheels - June 23, 2026


Arlene says
What do you use the sandpaper for?
Amanda Formaro says
Thnks for pointing that out! I’ve corrected the instructions to include sanding the edges of the plaques.
Jana says
I seen your blog featured over at Today’s Creative Blog and I have to say these are the cutest plaques. I made something similar years ago doing my kiddos names. Cute ideas and great site~think I will look around some more.
Bethany @ A Fish Who Likes Flowers says
These are really cute! I have a few small wood pieces I was thinking of making some small plaques with and this gives me some inspiration. Thanks for sharing!
Kathy says
LOVE this idea & the colors are awesome!!! Thnx so much for the printable project directions! I’m thinking of doing this with the words “Live, Laugh, Love”…so many different ideas would be great!! <3
admin says
Live Laugh Love would be awesome! :)
Jamie says
These came out great…love! I totally want to make some now! Thanks for sharing! :)
admin says
Thanks Jamie!
patti says
These are so cute. Thank you so much for the easy to follow directions and pics! Very nice.
kimbowest says
you are famous! http://todayscreativeblog.net/crafts-diy/?utm_source=feedburner&utm_medium=feed&utm_campaign=Feed%3A+todayscreativeblog+%28Todays+Creative+Blog%29 (and i totally love these plaques and will be linking up to them in my shout out sunday! awesome job amanda!
admin says
Haha thanks Kimbo! Wasn’t that awesome of her??? What a rockstar!
Erika says
These are so neat and the possibilities are endless!
Julie Warner says
I love those. The colors are so earthy just like herbs. And what I really like is they look like an easy afternoon craft. Thanks for sharing these.
Jill says
Love this! We have our Kitchen Fun and Crafty Friday Link Party going on now and would love for you to share this! http://kitchenfunwithmy3sons.blogspot.com/2012/02/kitchen-fun-and-crafty-friday-link_23.html
Noahla says
Clever!!
Natasha says
wow! these are great
Natasha
Cookie 17 says
WoW these are pretty Amanda As all ways you did a great job,I think I may try these .Thank’s Keep up great work~~~~Cookie17
Teresa says
Love this! Pinned it of course, thanks tons for the printable instructions, that rocks!
admin says
Thanks Teresa!
Laura @ Ms Smartie Pants says
Very cute idea! I am redoing my kitchen right now and looking for some new things for the walls, this would be perfect!