• Home
  • About
    • About Crafts by Amanda
    • Visit Our Recipe Site
  • Work With Us
  • Join
    • Free Newsletters
    • Join our Facebook craft group
↑
  • Tutorials
    • Tutorial Index
    • Adult Crafts
    • Crafts for Kids
    • Crafts for Seniors
    • Recycled Crafts
    • Seasonal Crafts
    • Holiday Crafts
    • Free Printables
    • Craft Collections
  • Adult Crafts
    • Bath & Body
    • Beach Crafts
    • Clay Pot Crafts
    • Crafts for Seniors
    • Decoupage Crafts for Adults
    • DIY Gift ideas
    • Garden Crafts
    • Home Decor Projects
    • Kitchen Crafts
    • Light Bulb Crafts
    • Luminary Crafts
    • Mason Jar Crafts
    • Needlework
    • Photo Display Ideas
    • Recycled Crafts for Adults
    • Wearable Crafts for Adults
  • Crafts for Kids
    • Animal Crafts for Kids
    • Back to School Crafts
    • Beach Crafts for Kids
    • Camp Crafts
    • Cardboard Tube Crafts for Kids
    • Decoupage Crafts for Kids
    • Easy Crafts for Kids
    • Nature Crafts for Kids
    • Other Kid’s Crafts
    • Paper Plate Crafts for Kids
    • Recycled Crafts for Kids
    • Slimes, Doughs, & Clay
    • Wearable Crafts for Kids
  • Holiday Crafts
    • 4th of July Crafts
    • Christmas Crafts
    • DIY Gift ideas
    • Earth Day Crafts
    • Easter Crafts
    • Father’s Day Crafts
    • Halloween Crafts
    • Memorial Day Crafts
    • Mother’s Day Crafts
    • New Year’s
    • Other Holidays
    • Patriot Day Crafts
    • St. Patrick’s Day Crafts
    • Thanksgiving Crafts
    • Valentine’s Day Crafts
  • Seasonal Crafts
    • Winter Crafts
    • Spring Crafts
    • Summer Crafts
    • Fall Crafts
  • Skip to primary navigation
  • Skip to main content
  • Skip to primary sidebar
  • Skip to footer

Crafts by Amanda

crafts for adults and kid's crafts

  • Tutorials
    • Tutorial Index
    • Adult Crafts
    • Crafts for Kids
    • Crafts for Seniors
    • Recycled Crafts
    • Seasonal Crafts
    • Holiday Crafts
    • Free Printables
    • Craft Collections
  • Adult Crafts
    • Bath & Body
    • Beach Crafts
    • Clay Pot Crafts
    • Crafts for Seniors
    • Decoupage Crafts for Adults
    • DIY Gift ideas
    • Garden Crafts
    • Home Decor Projects
    • Kitchen Crafts
    • Light Bulb Crafts
    • Luminary Crafts
    • Mason Jar Crafts
    • Needlework
    • Photo Display Ideas
    • Recycled Crafts for Adults
    • Wearable Crafts for Adults
  • Crafts for Kids
    • Animal Crafts for Kids
    • Back to School Crafts
    • Beach Crafts for Kids
    • Camp Crafts
    • Cardboard Tube Crafts for Kids
    • Decoupage Crafts for Kids
    • Easy Crafts for Kids
    • Nature Crafts for Kids
    • Other Kid’s Crafts
    • Paper Plate Crafts for Kids
    • Recycled Crafts for Kids
    • Slimes, Doughs, & Clay
    • Wearable Crafts for Kids
  • Holiday Crafts
    • 4th of July Crafts
    • Christmas Crafts
    • DIY Gift ideas
    • Earth Day Crafts
    • Easter Crafts
    • Father’s Day Crafts
    • Halloween Crafts
    • Memorial Day Crafts
    • Mother’s Day Crafts
    • New Year’s
    • Other Holidays
    • Patriot Day Crafts
    • St. Patrick’s Day Crafts
    • Thanksgiving Crafts
    • Valentine’s Day Crafts
  • Seasonal Crafts
    • Winter Crafts
    • Spring Crafts
    • Summer Crafts
    • Fall Crafts
Craft Tutorials | Holiday Crafts | Christmas Crafts | Santa Chimney Place Setting

Santa Chimney Place Setting

Author by Amanda Davis on December 7, 2011 Updated on January 15, 2019

5 from 16 votes
Jump to Project
Santa Chimney
2432 shares
  • Share
  • Tweet
  • Flipboard
  • Email

Santa Chimney Place Setting


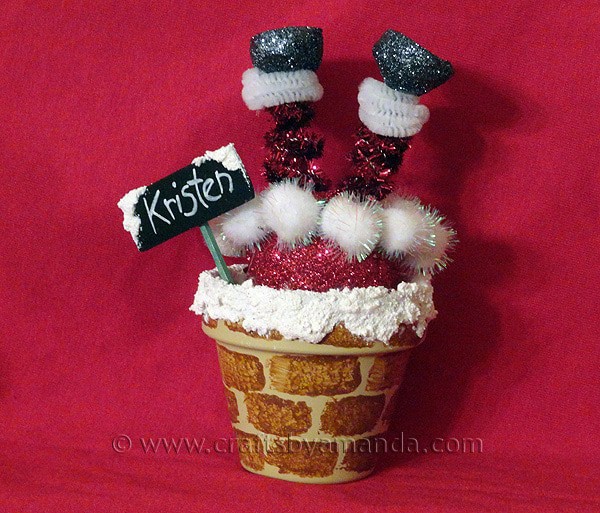
One day I was standing in line at Walgreens and sitting right there by the register was this adorable hat. It was shaped like a top hat, the hat portion being the chimney, and Santa’s legs were sticking out of the top. The hat was musical and cute and whimsical. That immediately made me think what a cute Christmas craft that would make!
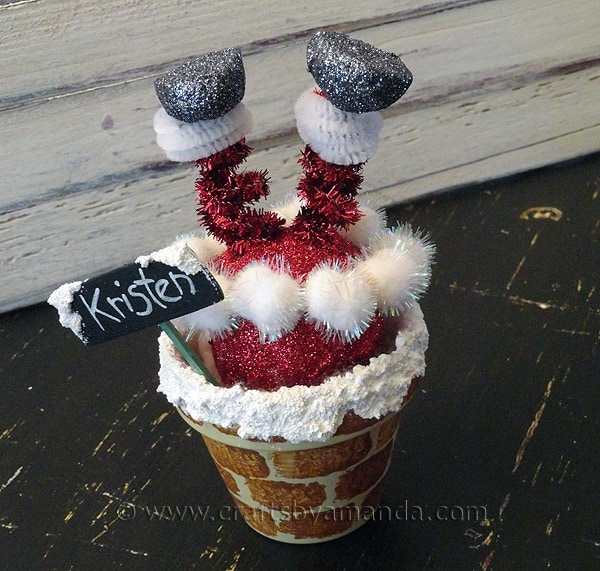
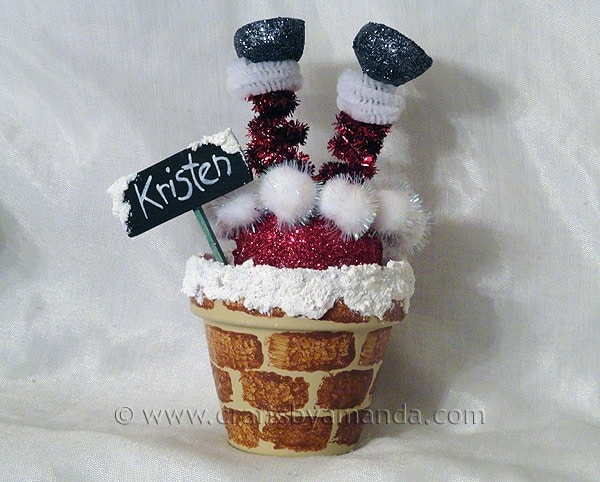
Santa Chimney Place SettingBut what to use? I mulled it over in my head, thinking of all sorts of things. That’s when the clay pot came in to play. I knew I had a few in my supply stash, I just needed to come up with how to create Santa, his legs, and the bricks. I craft by the seat of my pants, so the ideas started coming when I sat down to actually make this. I love how it turned out, and I hope you do too! Crazy cute! :)

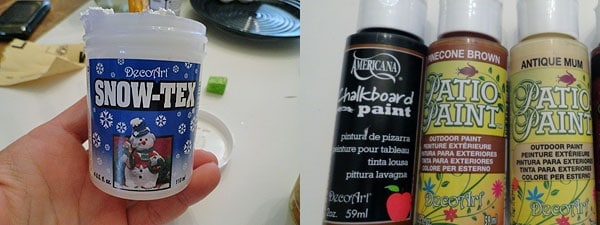
Santa ChimneyFor this project I used Sno-Tex snow texture paint, Chalkboard paint, and Patio Paint. Man I love this Patio Paint! Have you ever used this? This was my first time and the coverage on this pot is amazing. I’ve painted a LOT of clay pots in my time and after this will never use regular acrylic paint again. Ev-er.

Santa Chimney Place SettingFirst you’ll paint the clay pot. To make the bricks, just use a small rectangle cut from a household sponge. Then put a layer of Snotex around the rim.

Santa Chimney Place SettingTo make the legs you’ll twist chenille together to make it a fatter piece, then twist them around a pencil or paint brush to coil them.

Santa Chimney Place SettingHis body is made from a Styrofoam egg. Paint glue on the fat end and cover in glitter. Put a toothpick into the narrow end, this helps it stand up in the pot. The legs go in the ‘red’ end, using a toothpick to create holes in the egg helps a lot. The shoes are made from a small egg cut in half and glittered in black. I actually didn’t have a small egg, so I used half of a ball, cut that in half, then shaped them. The egg would be easier, hence me suggesting it to you ;-)

Santa Chimney Place SettingThe full instructions are below, hope you have fun!

Santa Chimney
Print Project
5 from 16 votes

Santa Chimney Place Setting

Author: Amanda Formaro

Supplies

Supplies:

  • 1 small terra cotta pot
  • Patio Paint: cream and reddish-brown
  • Black chalkboard paint
  • SnoTex snow texture paint
  • 1 medium Styrofoam egg
  • 1 small Styrofoam egg
  • 2 glittery red chenille stems
  • 1 white chenille stem
  • 10 small glittery white pom poms
  • Fine glitter: red and black
  • 2 to othpicks
  • 1 small wood rectangle cardboard will work too!

You'll also need:

  • household sponge
  • paintbrush
  • white craft glue
  • hot glue gun
  • white chalkboard pen
  • cotton balls

Instructions

  • First, paint your terra cotta pot with cream paint. Allow it to dry, then use a small rectangular piece cut from a household sponge to add the reddish-brown bricks. Let dry.
  • Apply snow texture paint to the rim of the pot using a palette or a paintbrush. Set aside to dry.
  • Fold a red chenille stem in half and cut to create two equal pieces. Twist the two pieces together to form one thicker piece. Repeat with second chenille stem. Now coil each of them around a pencil or pen, slide off.
  • Cut the small Styrofoam egg in half lengthwise, these are Santa’s boots. Insert a coiled chenille stem into the round half of one of the egg pieces. Repeat with other chenille stem. Coat the “boots” with white glue and sprinkle with black glitter. Tap off excess and set aside to dry.
  • Insert a toothpick into the smaller end of the large Styrofoam egg. Paint the larger end with white glue. Sprinkle red glitter all over the glue and tap off excess. Set aside to dry (hint: if you have floral foam stick the toothpick into the foam. If not, simply use a cardboard egg carton).
  • While the painted pot and the glitter eggs are drying, paint the wood rectangle with black chalkboard paint. Hot glue the second toothpick to the back of the “sign”. Use chalkboard pen to write your guest’s name on the sign. Add some snow texture paint to the top of the sign. Allow everything to dry.
  • Place 2-3 cotton balls inside the clay pot. With toothpick pointing down, insert the large red glitter egg into the pot. Pull additional cotton balls into pieces and tuck them into the pot around the glitter egg to help support it.
  • Cut white chenille stem in half. Carefully twist around Santa’s legs to create pant cuffs. Secure with glue. Insert the chenille legs into the red glitter egg (Santa’s bottom) and secure with white glue. You can create small holes in the egg first by poking a pencil into it, then inserting the chenille.
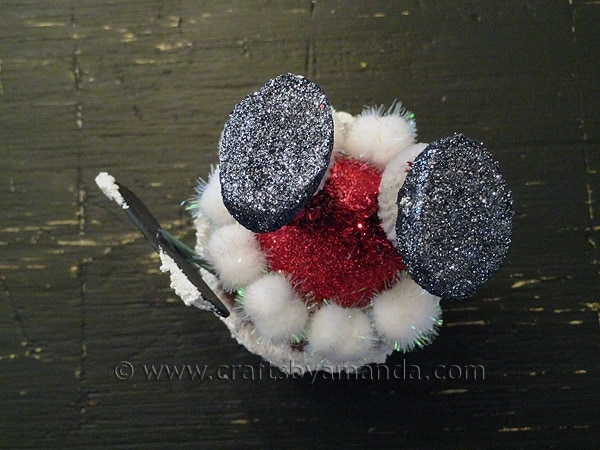
  • Hot glue the white glitter pom poms in a circle around the red glitter egg to create the bottom of Santa’s coat.
  • Insert the personalized sign into the terra cotta pot and secure with glue.


Santa Chimney


');

  • Author
  • Recent Posts
Amanda Davis
Amanda Davis is the crafty, entrepreneurial mother of four children. She loves to bake, cook, make kid's crafts and create decorative items for her home. She is a crafting expert and guru in the kitchen and has appeared online and in print publications many times over the years.
Latest posts by Amanda Davis (see all)
  • Recycled Plastic Lid Windchime - July 11, 2025
  • Rainbow Tie Dye Shirts - July 4, 2025
  • Mason Jar Solar Lights - June 27, 2025
2432 shares
  • Share
  • Tweet
  • Flipboard
  • Email

Filed Under: Christmas Crafts, Clay Pot Crafts Tagged With: adult, adult craft ideas, adult crafts, adults, christmas, clay pots, crafts for adults, glitter, holidays, kid's crafts, place setting, santa

Reader Interactions

Free CraftsBy email every week

Latest crafts straight to your inbox!

Comments

  1. Norman Sappenfield NDS CRAFTS says

    July 7, 2017 at 9:01 pm

    what size pot……and size of the large egg,,,,,,,

    Reply
    • Amanda Formaro says

      July 9, 2017 at 10:20 am

      Hi, Norman. You’ll want to use a small terra cotta pot (2-4″) – there is a list of materials you will need listed above :)

      Reply
      • Norman Sappenfield NDS CRAFTS says

        July 10, 2017 at 8:28 pm

        thank you…I used a 4 ” pot

        Reply
    • Karen toth says

      October 22, 2024 at 7:08 pm

      hi amanda

      i love this project. but could you add the sizes of terrace pot (3″), size of styrofoam eggs, pom poms.

      karen

      Reply
  2. marianne says

    November 24, 2016 at 1:44 pm

    Amanda…i made these a few years ago and left the name plates blank, i sold them at a craft fair and the fact that they could be personalized on the spot was a GREAT selling feature. Needless to say, they sold really well and fast, and HECK they were a BLAST to make too…GLAD i found your page, will watch for MORE ideas. Cheers, and thanks for sharing your creativity.
    ~marianne

    Reply
    • Amanda Formaro says

      November 28, 2016 at 4:17 pm

      Oh that is SO FUN! Thanks so much for sharing that story Marianne!

      Reply
  3. Susan says

    October 12, 2014 at 4:11 pm

    When I wrote to you the other day I got mixed up what pattern I wanted. It was a wooden Santa made from blocks of wood. Could I please have that one? Thank you. Sincerely Susan Colbert

    Reply
    • Amanda Formaro says

      October 15, 2014 at 9:00 am

      Hi Susan. I must have missed the original message, is it this one you are looking for? https://craftsbyamanda.com/2009/12/country-wooden-santa.html

      Reply
  4. Sherry Whitaker says

    December 13, 2013 at 6:21 pm

    I LOVE LOVE LOVE It.It is so cute & adorable.Thank You sooooooooo much.I might not get to it this Christmas…but it will be on my good list for next year.THANK YOU!!!!!!!!

    Reply
    • Amanda Formaro says

      December 14, 2013 at 9:09 am

      Thanks Sherry! That’s so nice of you :)

      Reply
  5. Gerry says

    November 28, 2012 at 5:21 pm

    Love your “pots” and “bulbs” ideas..I’m also fan of pot ideas, just finished Vampires and bats with pots..love the Santa chimney idea..keep it up!!!!

    Reply
    • Amanda says

      December 1, 2012 at 6:15 pm

      Thank you Gerry!

      Reply
  6. Angell @ Passionate and Creative Homemaking says

    July 20, 2012 at 2:24 pm

    Just letting you know that I featured this today on my Christmas in July blog celebration

    http://passionateandcreativehomemaking.blogspot.com/2012/07/day-20-christmas-in-july.html

    Reply
  7. Melissa says

    January 9, 2012 at 7:07 pm

    Oh this is adorable! I know it’s past Christmas but I love to use the long boring winter to make crafts for the next year. I will make this one for sure!

    Reply
  8. Darlene Castor says

    December 19, 2011 at 9:33 pm

    This is so cute…I had accidently stamped “HO HO HO” upside down once on a card and then got the idea to put Santa updise down in the chimney and purposely stamp “OH! OH! OH!” That would be cute on the sign as well! I may have to try this!
    Isn’t Christmas crafting fun?

    Reply
  9. Lindsi B says

    December 18, 2011 at 6:20 pm

    Ha! That literally made me laugh out loud! He is so cute! Thanks for sharing your adorable santa! Would you please share this with my readers for Fun Stuff Fridays? http://www.toysinthedryer.com/2011/12/fun-stuff-fridays-4-3-weeks-long-for.html

    Reply
  10. Trish@MomOnTimeout says

    December 15, 2011 at 5:26 am

    Just too cute! I love it! I’d also love for you to share with my readers if you get a chance: http://www.momontimeout.com/2011/12/taking-timeout-thursday-no-8.html

    Reply
  11. Jill @ KitchenFunWithMy3Sons.com says

    December 9, 2011 at 10:55 pm

    Such a cute idea! Just shared this on our Fun Finds Friday… http://kitchenfunwithmy3sons.blogspot.com/2011/12/fun-finds-friday_09.html

    Reply
    • Amanda Formaro says

      December 12, 2011 at 9:47 pm

      Thanks so much jill!

      Reply
  12. Lauren says

    December 9, 2011 at 3:47 am

    How stinkin cute is this!! I love it!

    I’d love for you to link up and share: http://tutusandteaparties.blogspot.com/search/label/Link%20Party

    Reply
  13. Katrina says

    December 8, 2011 at 9:35 pm

    So cute! You rock crafts!

    Reply
  14. Kate says

    December 8, 2011 at 6:43 pm

    I just listened to you on The Motherhood’s Live Chat and had to check out your site for this craft (I am looking for the pinecone snowman next). I love this and I am in awe of your creatvity!

    Reply
    • Amanda Formaro says

      December 8, 2011 at 9:24 pm

      Thanks so much Kate! So glad you enjoyed the show, it was fun for me too :) The snowman ornament is actually on Kaboose’s website, you can find it here http://crafts.kaboose.com/pinecone-snowman.html

      Reply
  15. maggy,red ted art says

    December 8, 2011 at 6:13 pm

    Oh my!! How cute is that Santa!!!!! I love him to bits!

    Thank you for sharing on Kids Get Crafty!

    Maggy

    Reply
  16. Kim says

    December 8, 2011 at 4:40 pm

    Seriously SO CUTE!

    Reply
  17. Erika says

    December 8, 2011 at 2:56 am

    That is so funny!

    Reply
  18. Marilyn says

    December 7, 2011 at 11:51 pm

    Hilariously cute! Thanks for sharing.♥♫

    Reply
  19. Kari Sanchez says

    December 7, 2011 at 8:32 pm

    How dang cute is this…for creating as you go you did a fantastic job! :) TFS

    Reply
  20. Barbara' Cookie" says

    December 7, 2011 at 6:17 pm

    This is darling Thank’s Amanda Merry Christmas to you & your family,,Cookie 17

    Reply
  21. tina says

    December 7, 2011 at 3:17 pm

    Oh my gosh, this is so darn CUTE!!! LOVE this idea! Don’t know if I’ll get around to it this year, but if not, then definitely next year! Thanks for sharing how to make them, and Happy Holidays! ~tina

    Reply
5 from 16 votes (10 ratings without comment)

Leave a Reply Cancel reply

Your email address will not be published. Required fields are marked *

Rate This Project


The maximum upload file size: 640 MB. You can upload: image, video. Links to YouTube, Facebook, Twitter and other services inserted in the comment text will be automatically embedded. Drop files here

Primary Sidebar

Hi! I’m Amanda and I’m the founder and head designer of Crafts by Amanda. I have spent over 25 years creating projects to share, but it’s not just me anymore! It’s turned into a complete family affair. Come and meet the Creative Team!

Free CraftsBy email every week

Latest crafts straight to your inbox!

All Time Favorites

Learn to make these adorable ladybug painted rocks. use special outdoor paint for this adorable garden craft so you can keep garden ladybugs all summer!

Ladybug Painted Rocks…

These colorful little ladybug painted rocks are the ... Go To project

snowy pinecone candle jar luminaries

Winter Luminaries: Snowy Pinecone…

Make pretty winter luminaries that appear to be covered ... Go To project

Make this wonderful deco mesh pumpkin wreath to hang on your door this fall!

Deco Mesh Pumpkin Wreath…

Adorn your door this fall with a pretty deco mesh ... Go To project

Reuse those empty prescription pill bottles in all sorts of ways. From organizing to making cookies. Yes, cookies! See how to use your empty pill bottles!

20 Uses for Prescription Pill…

You've been collecting prescription pill bottles for ... Go To project

Meet the Family

Amanda

Founder and Designer

Kristen

Editorial Manager

Lindsay

Social Media Manager

As seen on:

Footer

Favorites

  • Jar Photo Frames
  • No-Sew Roman Shade
  • Paper Flowers
  • How to Make a Scrunchie
  • Mermaid Slime

About

  • Home
  • Meet the Creative Team
  • Work with Us
  • Privacy Policy
  • Accessibility
  • Contact Us

Images/text copyright Amanda Formaro 2020. To feature a post from Crafts by Amanda, you may use one photo credited and linked back directly to the project post.

Free CraftsBy email every week

Latest crafts straight to your inbox!

Copyright ©2025, Crafts by Amanda. All Rights Reserved.
Design by Pixel Me Designs

Rate This Tutorial

Your vote:


To share a photo with your comment click here!

A rating is required
A name is required
An email is required

Recipe Ratings without Comment

Something went wrong. Please try again.