I’ve seen several string art projects around lately and love them all. String art is time-consuming, but the end result is beautiful and well worth the effort. When I decided to turn my last set of studio wall letters into string art, it wasn’t before going through several other ideas first.

Before the string art idea hit me, I thought about covering the letters in colorful buttons, or maybe wrapping them in different yarn colors. I even had an idea that involved picking up a lot of sticks in the yard. But when I saw this pin, I drew my inspiration and started on this project.

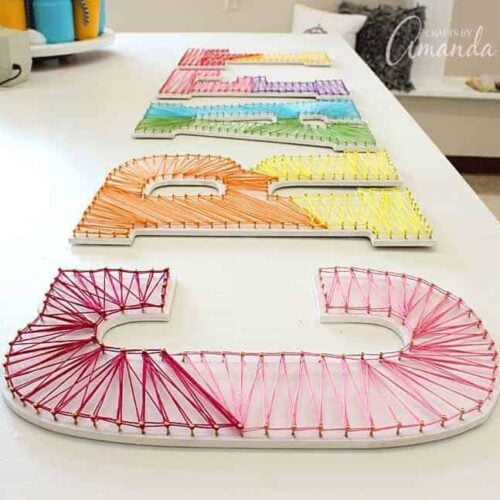
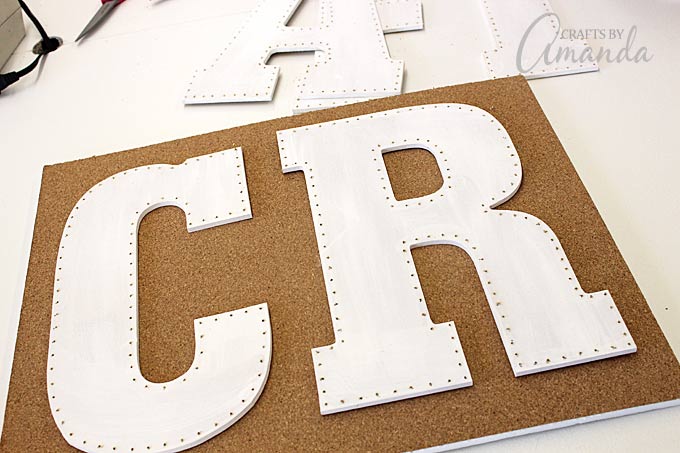
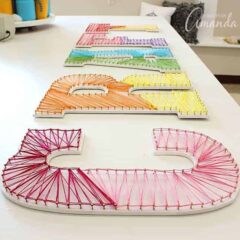
If you follow along here, you know that I have a studio and that I have already created these flower wall letters and these burlap wall letters to go over my windows. The final letters, C-R-A-F-T, finished off the walls over the far right window.

String Art Wall Letters
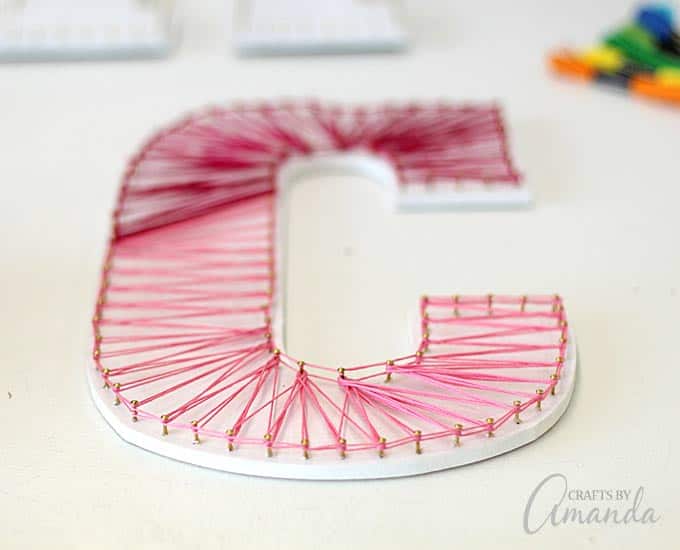
The decor in my studio is all about colors. Lots and lots of color, so when deciding on the string art design, I decided to use two colors on each letter.

This project took me a couple of days, just like this State String Art did. The first day I spent a few hours on it, the second day almost all day. I used approximately 2-3 skeins of floss for each letter. Some letters needed more than others.

For this reason it’s good to have a sizable package of floss. I had this pack of 36 with different colors. Pretty, yes?

I found the MDF letters at Hobby Lobby, at the time they were less than $3.00 each. You don’t have to use individual letters like I did for your string art. There are several other ways to create similar projects. Find the one that you like best and go from there.
My tutorial focuses on using these MDF letters, which are hard to hammer into. For that reason I used a simple power drill with the smallest drill bit to make the holes. I also used glue and what seemed like a gazillion small nails.
For this string art you will need:
- White paint
- MDF letters
- Pencil
- Drill and small drill bit
- Small nails
- Hammer
- White craft glue
- Embroidery floss (2-3 skeins per letter)
- Command strips
Paint the letters white. It doesn’t need to be perfect, it will just give the string a bright background to bounce off of.
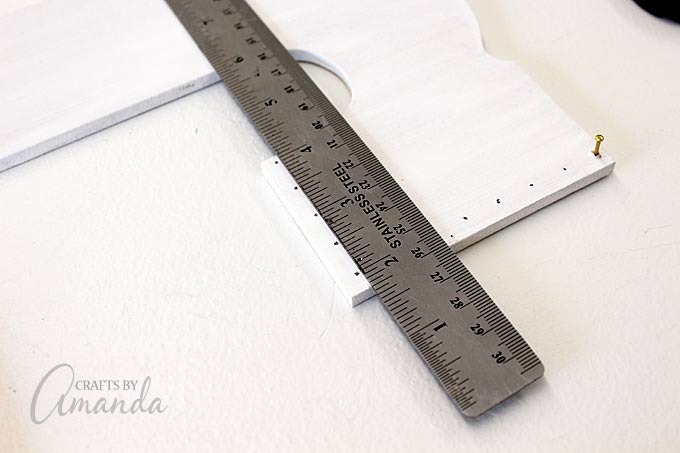
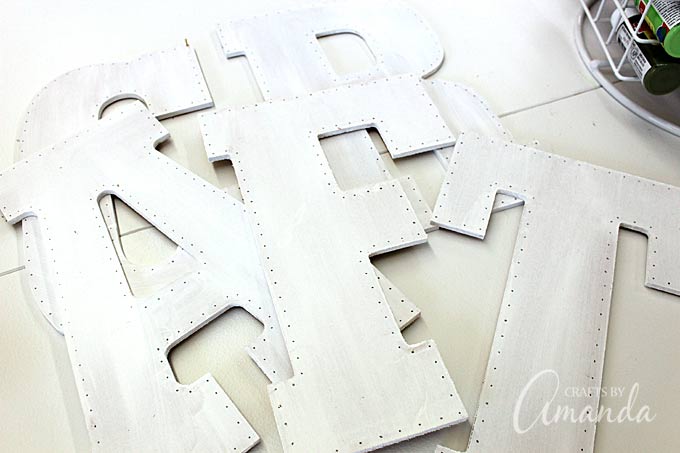
Use a pencil to mark small dots where you want your nails to go. Mine were approximately every half-inch.
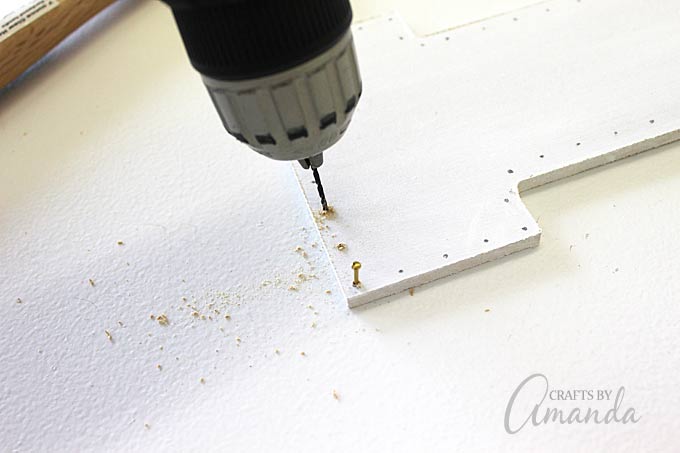
Drill holes about halfway through the letter (don’t go all the way through the MDF), just to give the nail a head start.
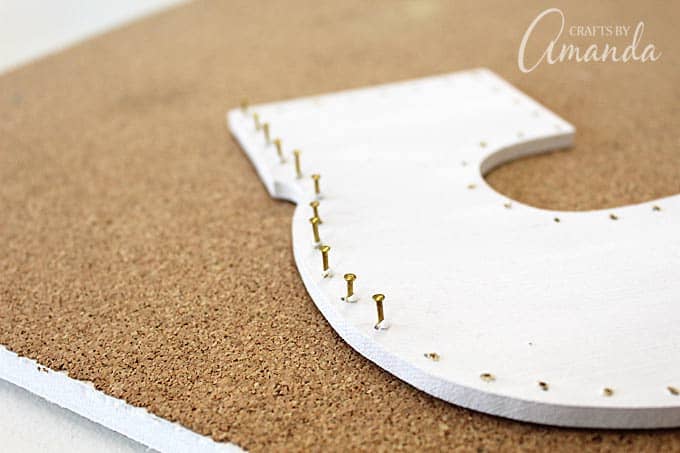
Squeeze out a puddle of white glue onto a plate. Dip the tip of the nail into the glue then place it in a drilled hole.
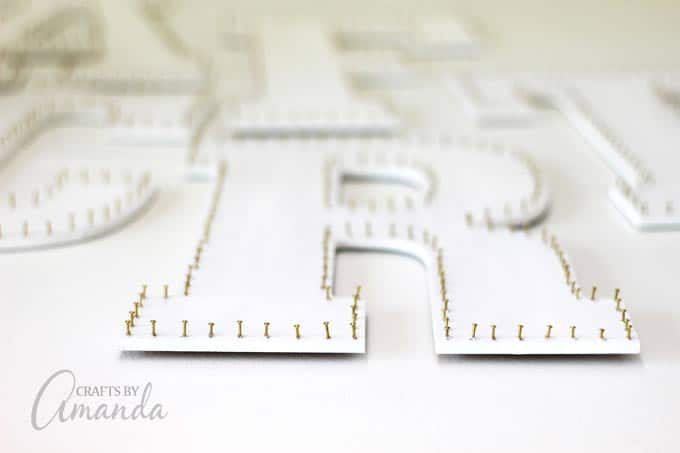
Tap the nail 2-3 times with the hammer to seat it in the hole. The glue will help secure the nail in place.
TIP: I found a great tip over at Dear McKenzie that says to use a pair of needle nose pliers to hold your nail if you aren’t drilling holes!

Choose where you want to start your string and tie the string in a knot around a nail, just underneath the nail head. Add a dab of white glue to the knot. Don’t trim off the excess string right away, allow the glue to set while you move on to the next step.
TIP: Hold the string taught the entire time you are wrapping. If you loosen it, your hard work will unravel.

Do a border first by wrapping to string once around the second nail, then around the third nail and so on.

If doing two colors on one letter like I did, decide where you want the color to stop and pull the string across the letter to the other side. Continue the border around the letter until you finish where you started.
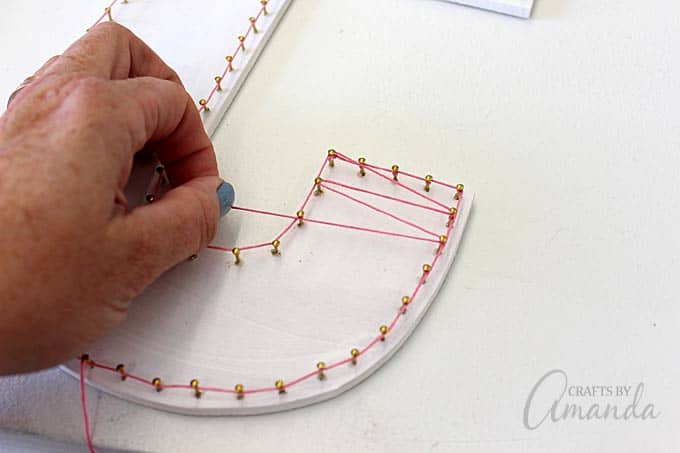
Now wrap the string back and forth across the letter using a zig-zag pattern.
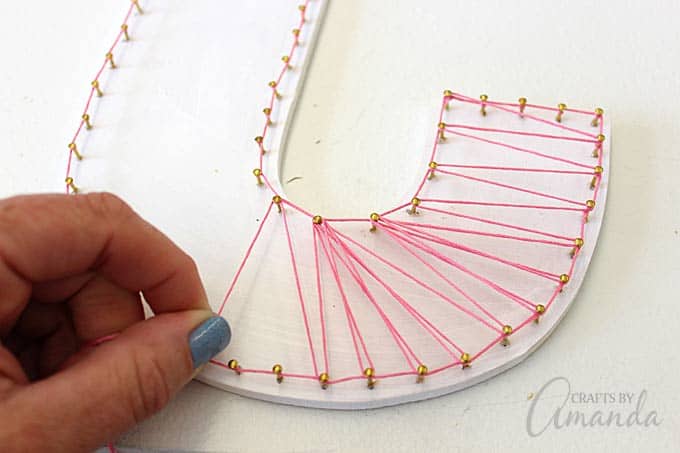
When going around curves you will not have an even number of nails across from each other. You will need to wrap one nail multiple times as you zig zag.
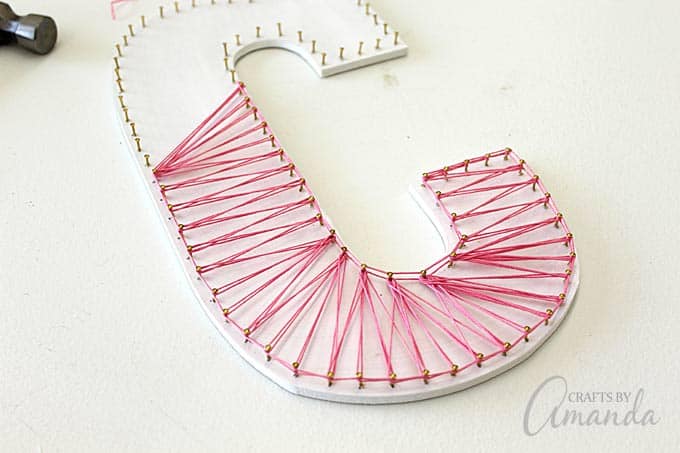
Go over the string pattern a second time then do the border again. Each time you need to tie off the string when it ends, be sure to add glue to the knot.
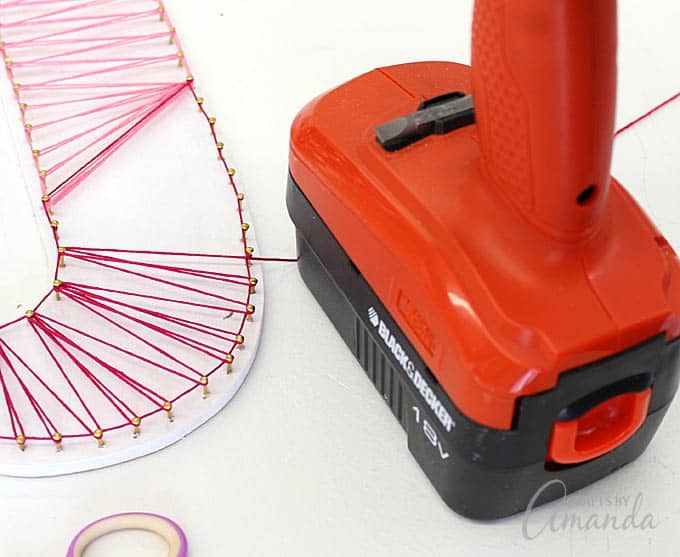
TIP: Occasionally the trailing end of your string may tangle. Because you must keep the string taught to avoid unravelling your project, place a heavy object on your string (I used my drill) so that your hands can be freed to untangle the end.
When you are finished and the glue has had a chance to set, use a tiny pair of sewing scissors to carefully trim off excess strings from any knots.
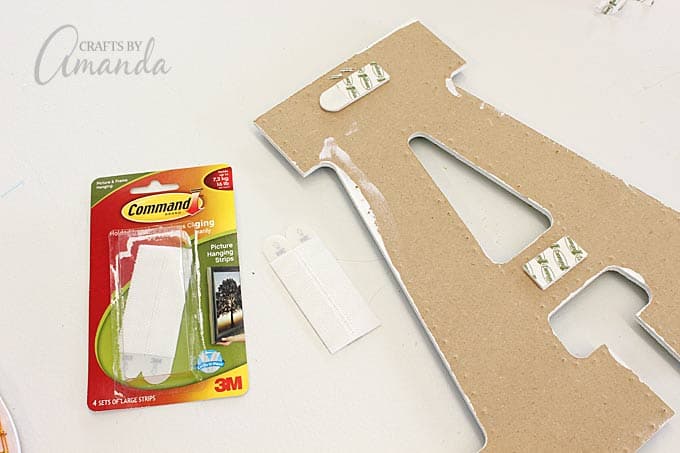
To hang your letters, place Command Strips on the back and gently but firmly press to the wall.


I’m really happy with how my letters turned out! I’m glad I decided on the string art and making them so colorful. It really fits well in my studio!

Have you ever tried string art before?


String Art Wall Letters
Supplies
- White paint
- MDF letters
- Pencil
- Drill and small drill bit
- Small nails
- Hammer
- White craft glue
- Embroidery floss 2-3 skeins per letter
- Command strips
Instructions
- Paint the letters white. It doesn’t need to be perfect, it will just give the string a bright background to bounce off of.
- Use a pencil to mark small dots where you want your nails to go. Mine were approximately every half-inch.
- Drill holes about halfway through the letter (don’t go all the way through the MDF), just to give the nail a head start.
- Squeeze out a puddle of white glue onto a plate. Dip the tip of the nail into the glue then place it in a drilled hole.
- Tap the nail 2-3 times with the hammer to seat it in the hole. The glue will help secure the nail in place.
- Choose where you want to start your string and tie the string in a knot around a nail, just underneath the nail head. Add a dab of white glue to the knot. Don’t trim off the excess string right away, allow the glue to set while you move on to the next step.
- TIP: Hold the string taught the entire time you are wrapping. If you loosen it, your hard work will unravel.
- Do a border first by wrapping to string once around the second nail, then around the third nail and so on.
- If doing two colors on one letter like I did, decide where you want the color to stop and pull the string across the letter to the other side. Continue the border around the letter until you finish where you started.
- Now wrap the string back and forth across the letter using a zig-zag pattern.
- When going around curves you will not have an even number of nails across from each other. You will need to wrap one nail multiple times as you zig zag.
- Go over the string pattern a second time then do the border again. Each time you need to tie off the string when it ends, be sure to add glue to the knot.
- TIP: Occasionally the trailing end of your string may tangle. Because you must keep the string taught to avoid unravelling your project, place a heavy object on your string (I used my drill) so that your hands can be freed to untangle the end.
- When you are finished and the glue has had a chance to set, use a tiny set of sewing scissors to carefully trim off excess strings from any knots.
- To hang your letters, place Command Strips on the back and gently but firmly press to the wall.
- Swirling Twirling Ladybugs - July 21, 2026
- Drip Tie Dye Backpack - July 17, 2026
- Mini Coastal Clay Houses - July 14, 2026


Kelly says
how did you make the flowers on the wall
Amanda Formaro says
Hi, Kelly. You can find out how to make the Deco Mesh Flowers here >> https://craftsbyamanda.com/deco-mesh-flowers/ :)
Mary ann says
Since you used embroidery floss, did you separate it and only use one piece at a time? Or did you use all the pieces together?
Amanda Formaro says
Hi, Mary Ann. You will want to separate the string so it’s thin when you are wrapping it around the nails. :)
Amanda Formaro says
That is a good question Mary Ann and I apologize for not seeing this comment earlier. I did not separate the floss, I used it as is.
Deborah says
This is a fantastic tutorial! I love the vibrance and motion the letters recieve from the use of the two colors. Your studio looks amazing! Thank you for the detailed tutorial and great pictures.
Janet says
I love this craft and would like to do it with a birthday party. Do you have to drill the holes first before putting in the nails? If they could just hammer in their own nails that would be easier. Thanks!
Amanda Formaro says
I drilled them first because the MDF letters were not very thick AND it proved difficult to just hammer them in. However, I recently helped a friend’s daughter create a piece of string art on a much thicker piece of wood and hammering without drilling worked just fine.
Rhonda says
Looks awesome. Can you tell me what color your walls are painted? I love how colors pop against it!!
Amanda Formaro says
They were already painted when I moved in here. It’s a very light beige color, but I’m afraid that’s the best I can offer :(
Overstitch says
What a happy work space. Full of light! Love the colorful craft letters!
Amanda Formaro says
Thanks so much!
Linda Wagner says
Love this idea. Would love to make the names for grand kids to hang in room. Going to try it using yard since I am a crocheter and have tons of yarn.
Amanda Formaro says
Just make sure you use bigger nails. Yarn is much thicker and these small nails wouldn’t be able to support it :)
Courtney @ Crafts by Courtney says
These look so pretty!! What an awesome idea, your space is so motivating! I would love to craft here.
Amanda Formaro says
Thanks Courtney! Wish you could come visit :)