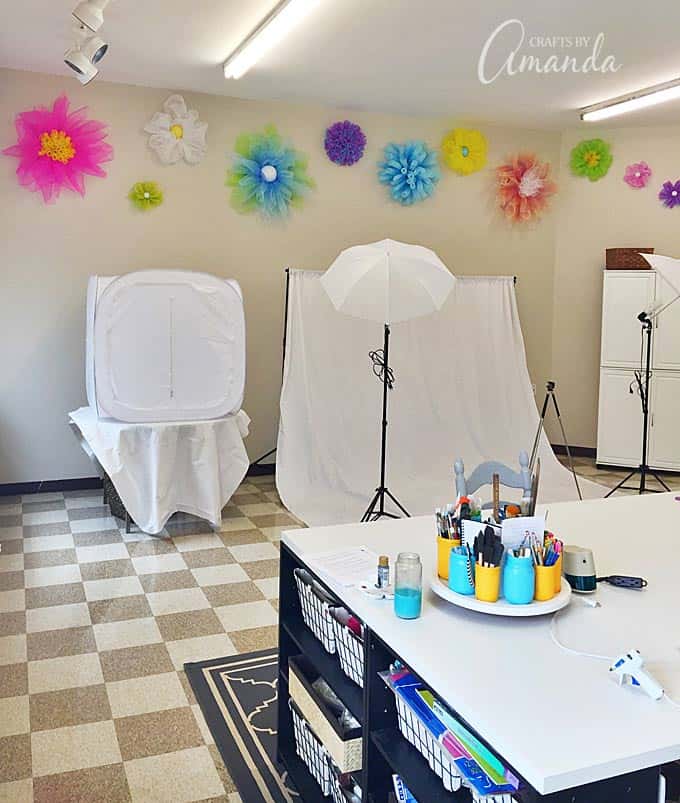
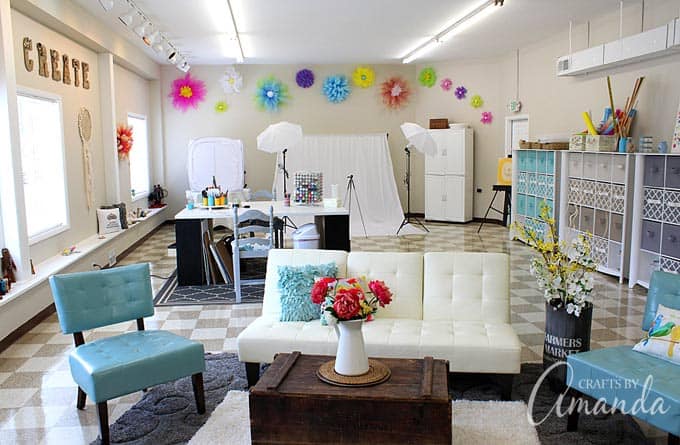
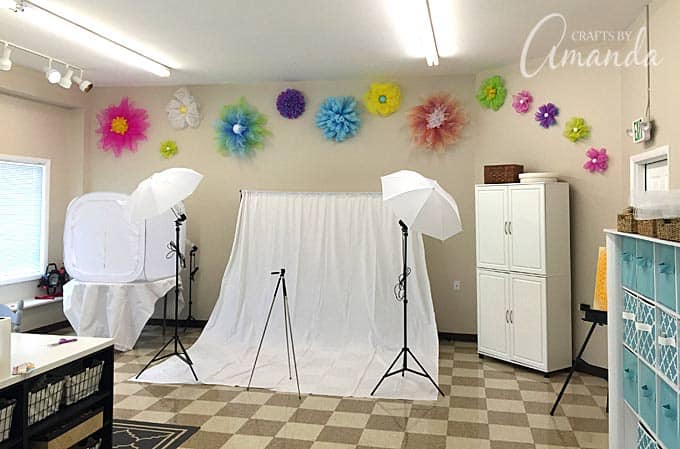
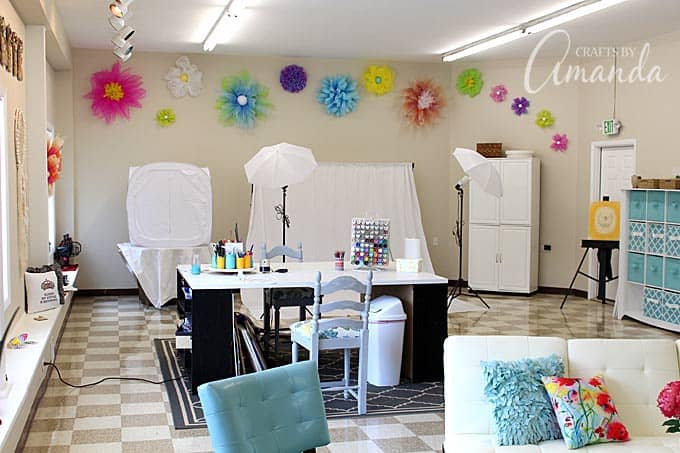
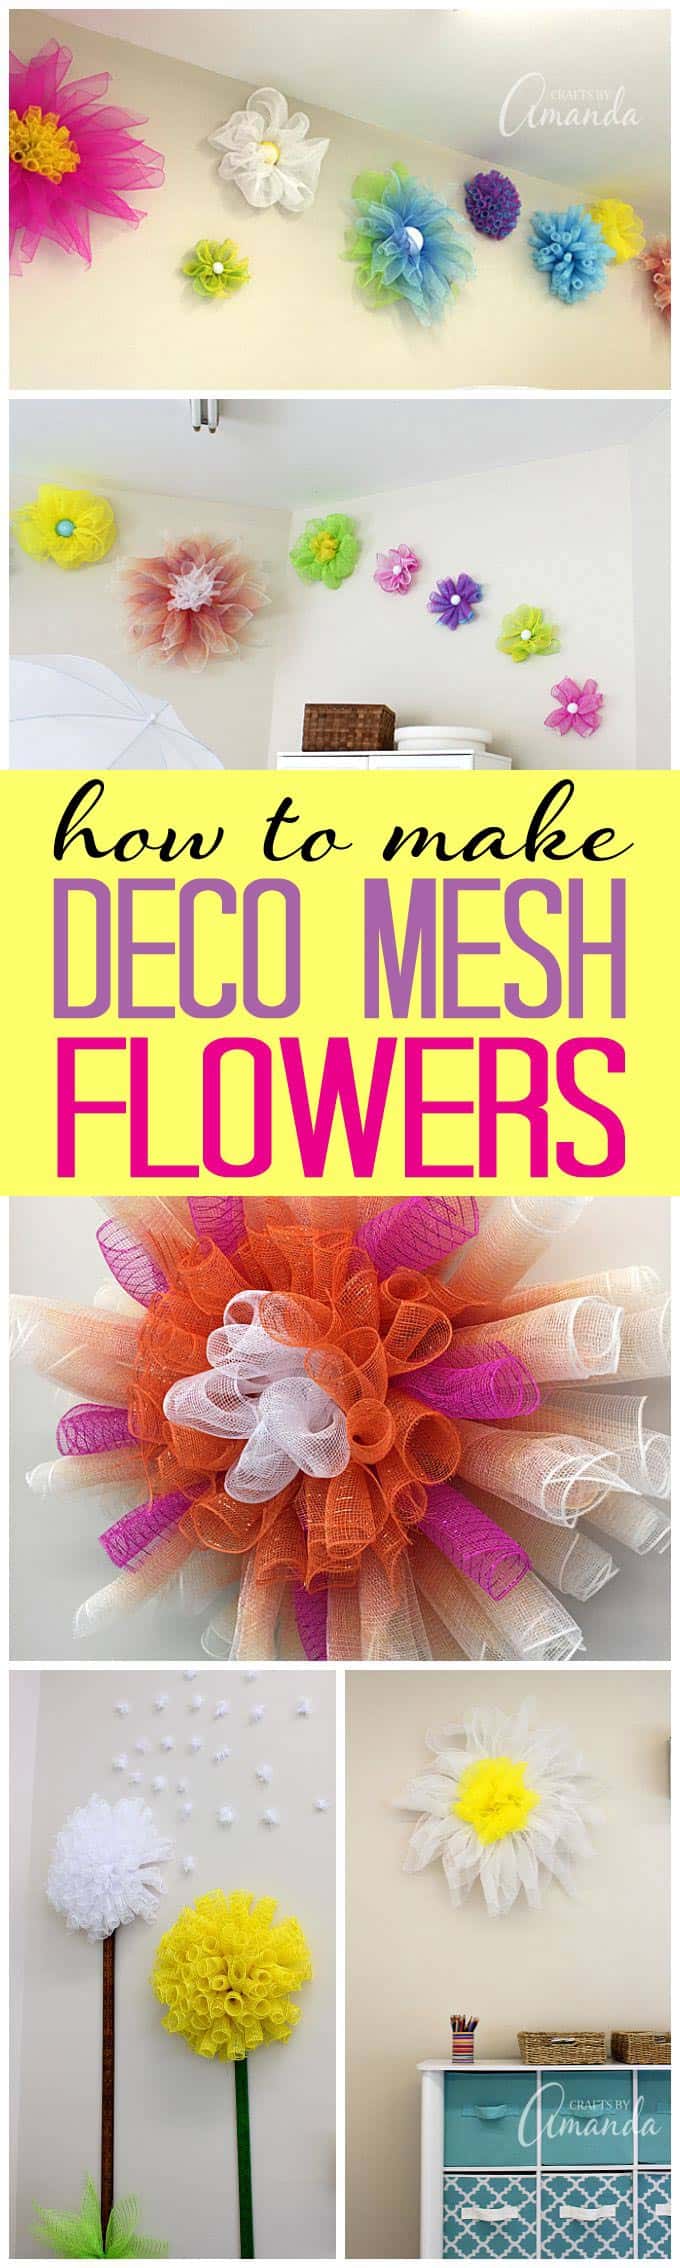
I created a bunch of deco mesh flowers for the back wall of my studio. I’ve actually never used deco mesh before, haven’t even made a deco mesh wreath, which seem to be all the rage these days. But I had seen some deco mesh flowers this past January that I just couldn’t get out of my mind.
How to Make Deco Mesh Flowers
Decorative mesh is similar in nature to window screen, only it’s not sharp and won’t cut you. It comes in a variety of colors, but other than wreaths and using it as fill for a flower arrangement, I hadn’t heard of any other deco mesh ideas.
NOTE: If you prefer to buy some pretty deco mesh flowers, be sure to check out the vast selection on Etsy!
A quick search on Google or Pinterest will yield an array of deco mesh wreath ideas, but that’s not what I was looking for. No, I wanted flowers, like these…

I took this photo In January of this year at the Craft & Hobby Association (CHA) trade show. This gorgeous display was put together by the creative folks at FloraCraft, the makers of all things Styrofoam. In fact, I visited their offices a few months ago in Michigan. When I came back home I emailed the marketing director and told her that I really wanted to create some similar deco mesh flowers.
She was not only kind enough to type up some quick directions for me, she also sent me a great big box of decorative mesh to create with! I’m going to show you how I made a few of these flowers, but it’s important to note that there are some pretty basic instructions then you just create and adapt from there! So these are really fun to just wing it with.
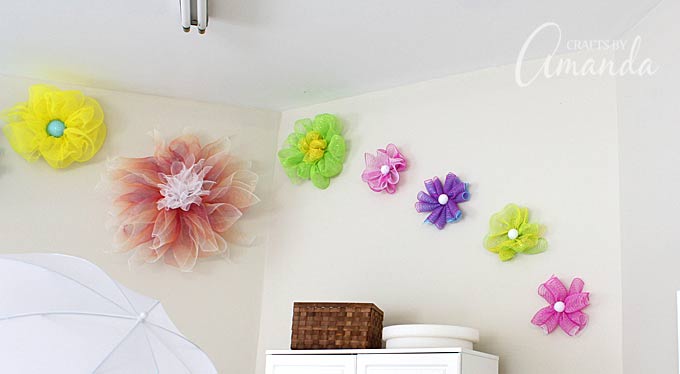
I hung all the flowers with Command Strips. In fact everything (EVERY. THING.) in my studio is hung by Command Strips. When I rented this space the landlord was concerned about nail holes, so I just eliminated that worry.
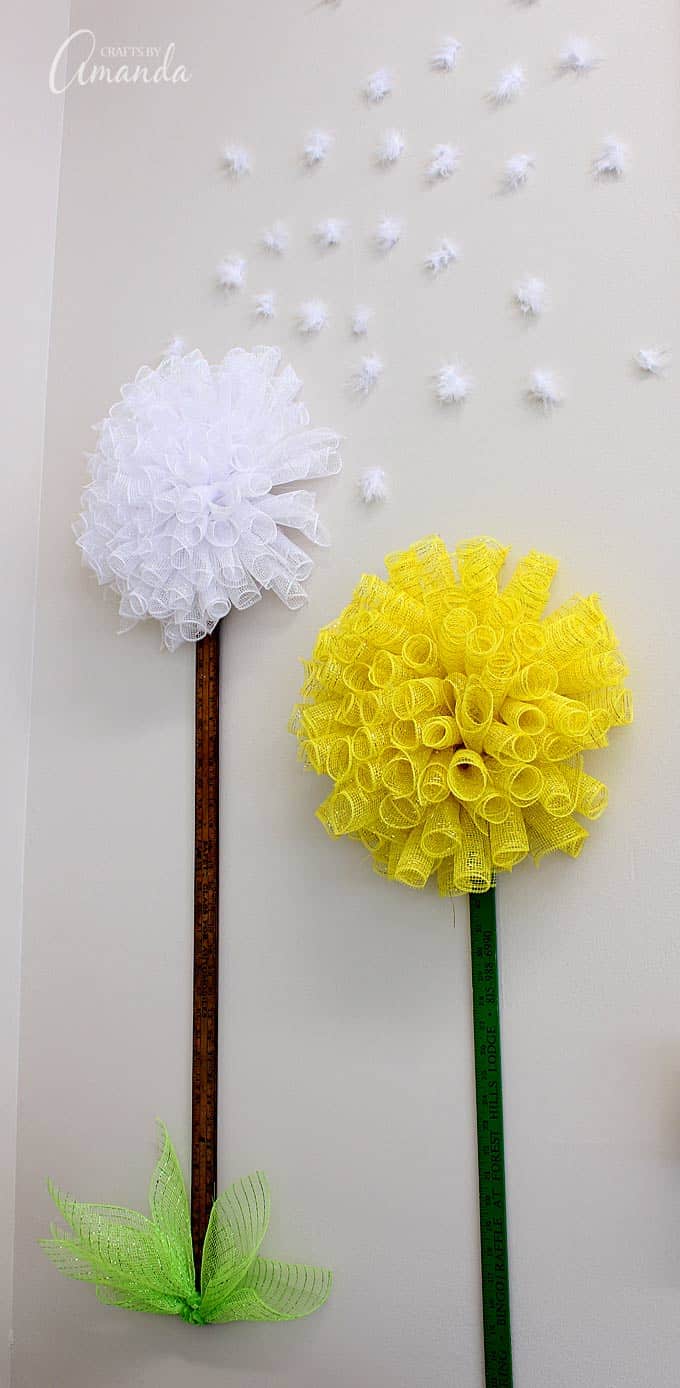
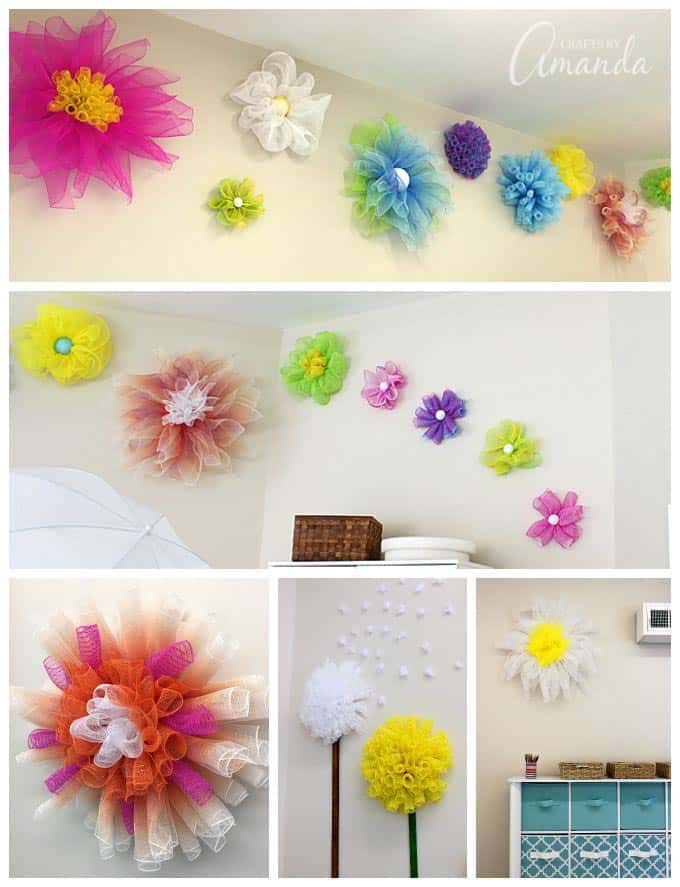
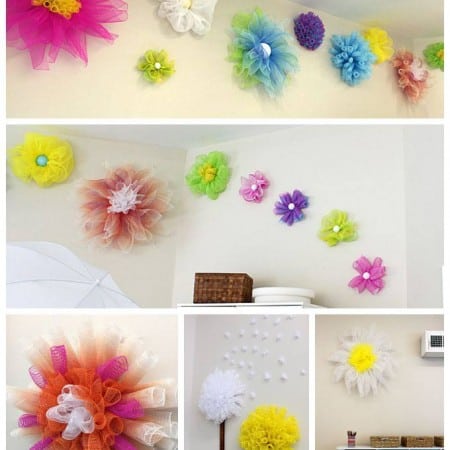
In addition to the deco mesh flowers hanging above my photo equipment, I wanted to make some dandelions to go with my dandelion painting.

Down below I’ll explain what I did and there’s even a video showing how to make these deco mesh tube flowers! You can even use this method to create a deco mesh Pumpkin Wreath pictured above!
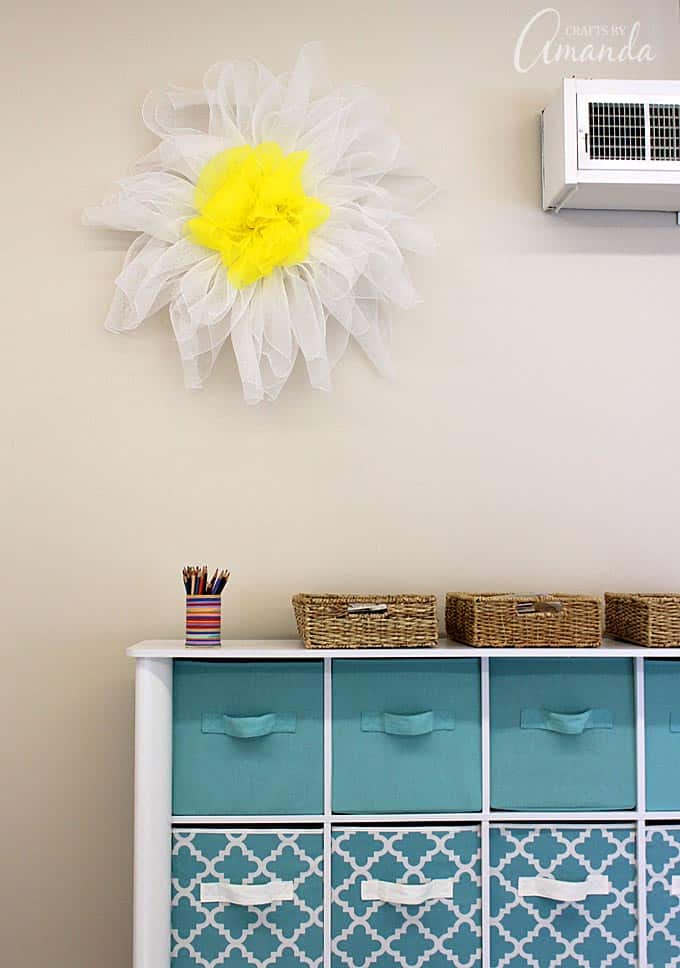
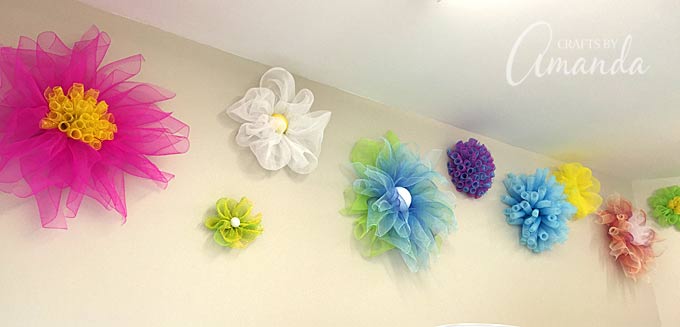
After hanging all the big flowers there was one spot that felt like it needed something. So I created a big white and yellow daisy for that spot.
This particular flower hangs next to my fourth window and uses several different techniques in one. I’ll show you how I made that deco mesh flower below as well.
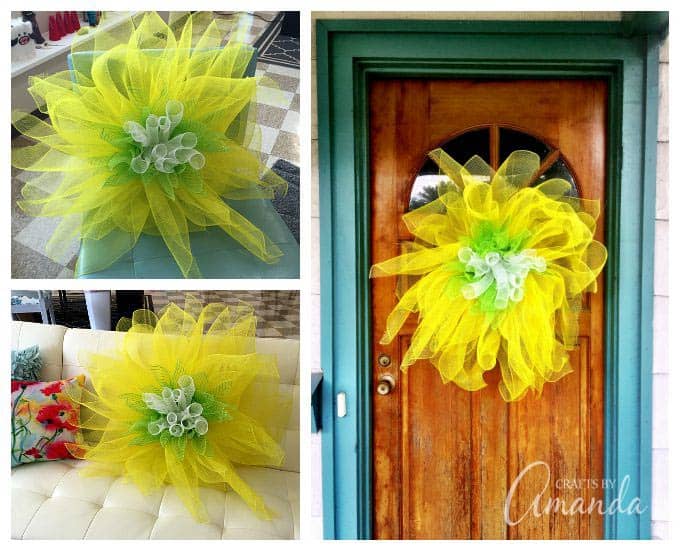
In addition to all of these flowers, I also made a bright yellow one for my friend Amanda of Aunt Peaches. She hung it on her door, I love the way it looks there! Amanda makes the most gorgeous paper flowers you have ever seen, so make sure you check those out!
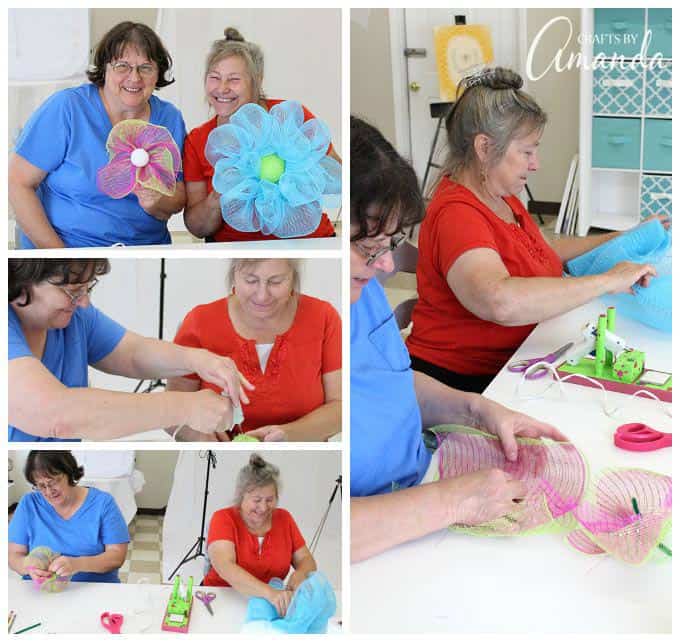
And finally I wanted to share these adorable pictures of my friend and neighbors, Debra and Lori. They stopped by my studio last week and I taught them how to make their own deco mesh flowers to take home with them. So fun!
There are several different kinds of flowers here, so I’’ go through each one. The ones I didn’t snap pictures of while I made them I’ll share links to instructions for wherever I can.
There are affiliate links within this post. That means if you click and buy something I may earn a small commission. Thank you!
Supplies for making deco mesh flowers
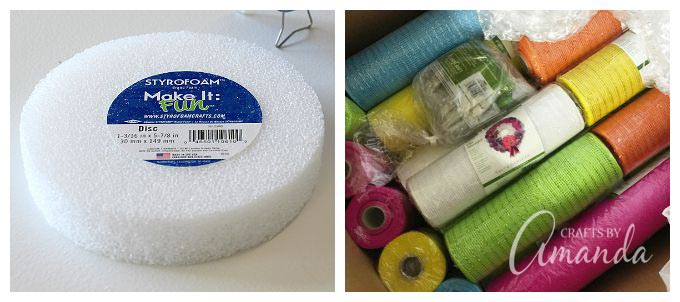
- 6-inch (5 7/8) Styrofoam disc
- U-shaped floral pins
- Decorative mesh (I used 10-yard rolls in 10-inch and 21-inch widths)*
- Low-temp glue gun
- Scissors
- Command Strips for hanging
*If you are wondering how many rolls of decorative mesh you will need for each flower, it will vary depending on the type you make and the size. For one large flower you will need a full 10yd x 21in roll.
Daisy or Sunflower
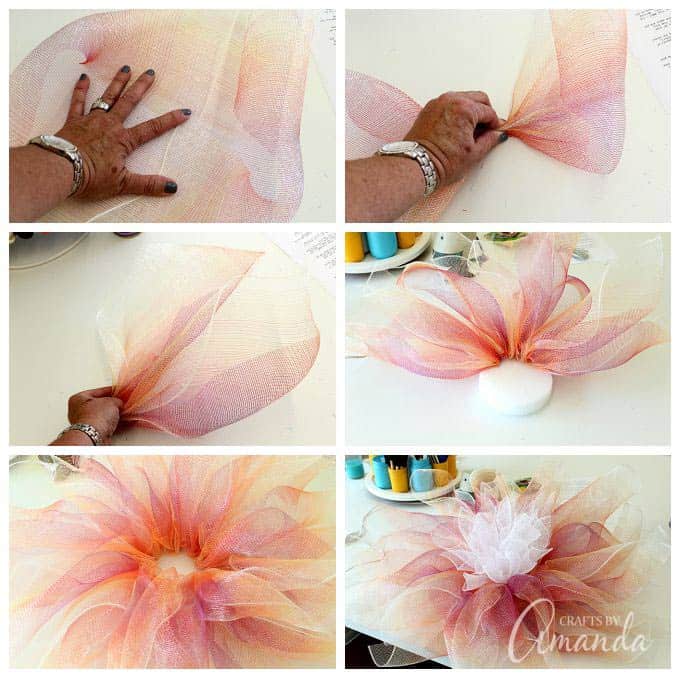
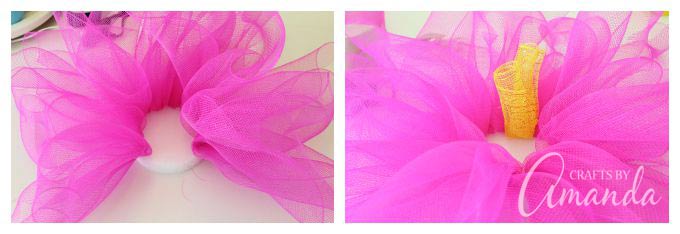
- Cut mesh into squares, they don’t have to be perfect.
- Lay mesh on table and fold opposite corners into the center.
- Gather the center with your fingers.
- Fold the gathered mesh in half and pin the center to the edge of foam disc, adding glue to the pin before inserting.
- Continue all the way around the disc, placing pins close to each other.
- When you’ve gone completely around the disc, use smaller mesh in a different color and repeat these steps, filling in the center of the flower.
Variation: The white flower with the yellow center was made using this exact method. The only difference is that after pinning in the yellow center I decided to tuck and pin in the long ends of the yellow mesh, created a puffed center.
Daisy with Tube center
- Follow instructions about for the flower petals.
- Cut squares of 10-inch decorative mesh and roll into a tube.
- Poke a pin through the center of the tube and fold the tube in half, then push pin into the center of the flower (see dandelion video below if you need a visual).
The video above shows you how to create a tube flower, like my dandelions. NOTE: After making the video and creating the flower I discovered that I could apply the glue, push the pin into the foam then push the head of the pin in (from the center of the tube), which in turn pushed the pin in farther and into the glue. Therefore there was no longer a need to use the “hot glue finger thing” ;) to press into the glue. Hope that made sense.
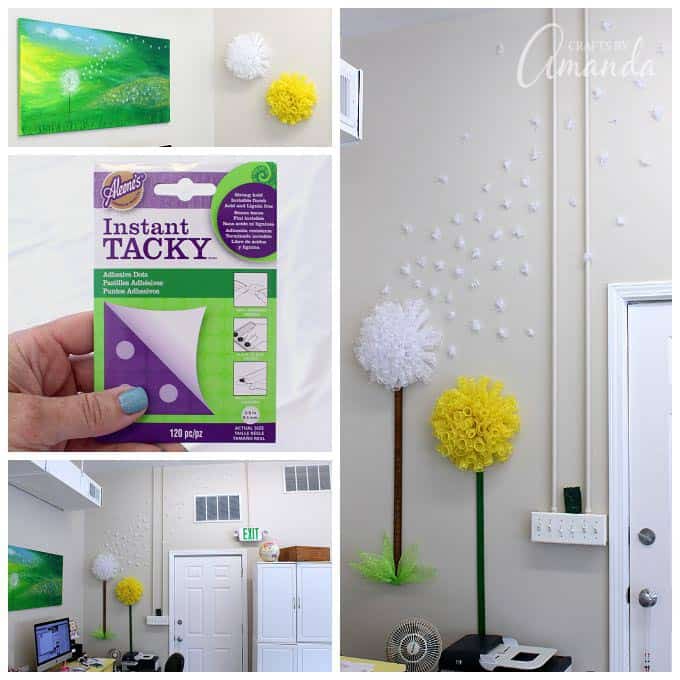
When I finished the yellow and white tube flowers I hung them on the wall by my desk to go with my dandelion painting. However, I didn’t like the way they were just hovering there, so my friend Debra suggested using some yard sticks I had here as stems. Then when trying to figure out what to make the seed heads out of, another friend suggested using a feather boa. Brilliance. So I used glue dots to attach one-inch pieces of feather boa to the wall so they appear to be blowing away.
Large tube flowers
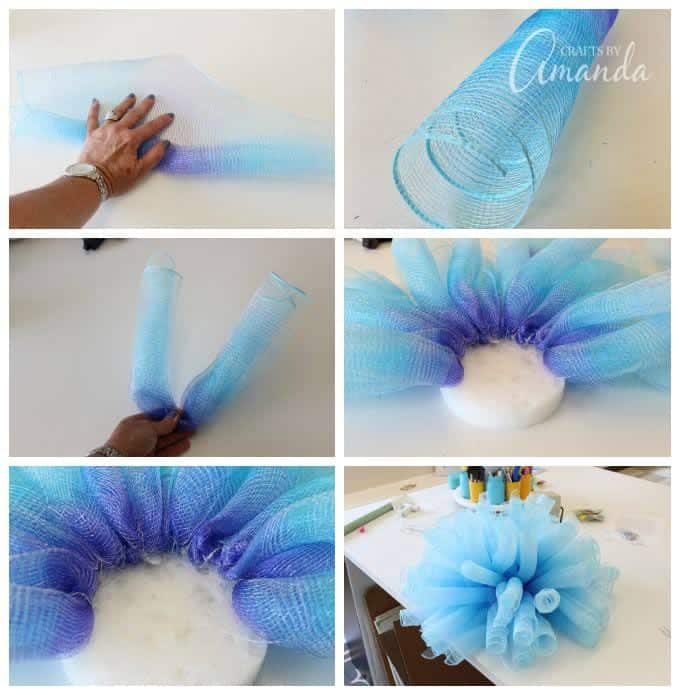
The large blue tube flower is made from 21-inch ombre blue deco mesh. The process is exactly the same as the one in the video, just larger.
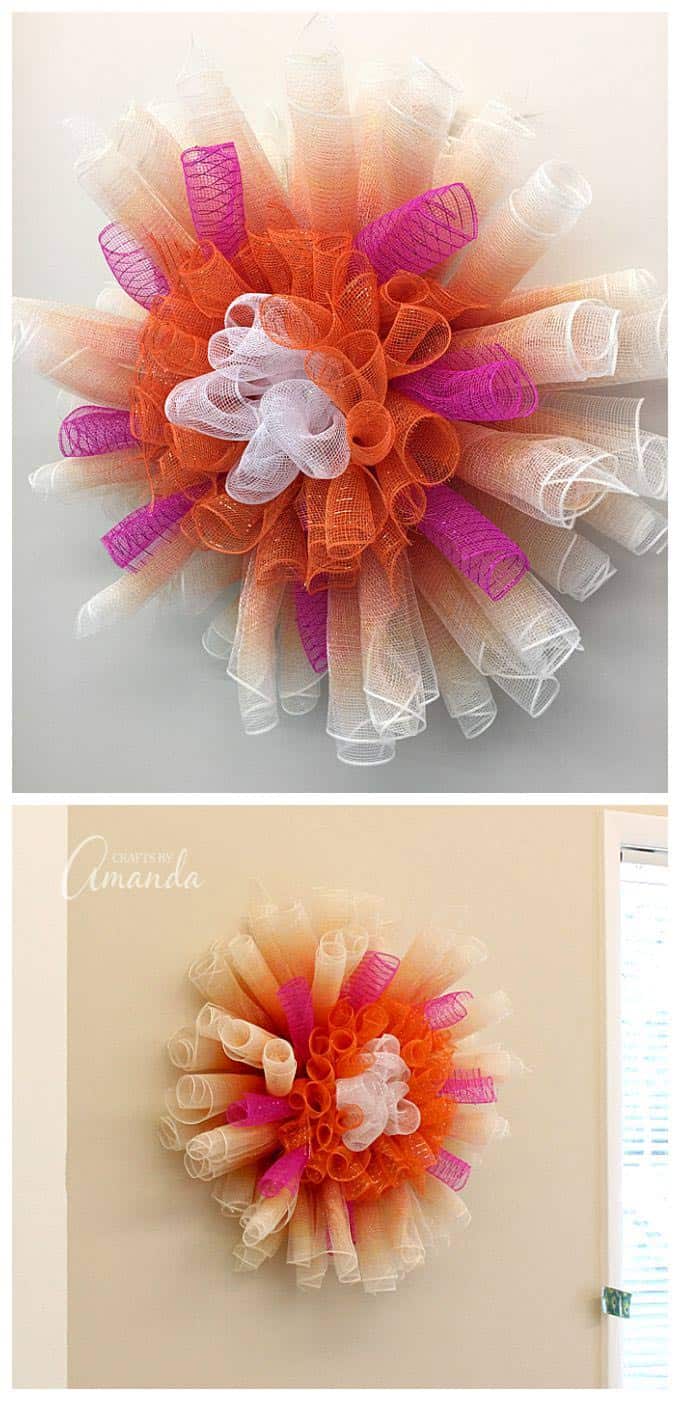
The combo flower
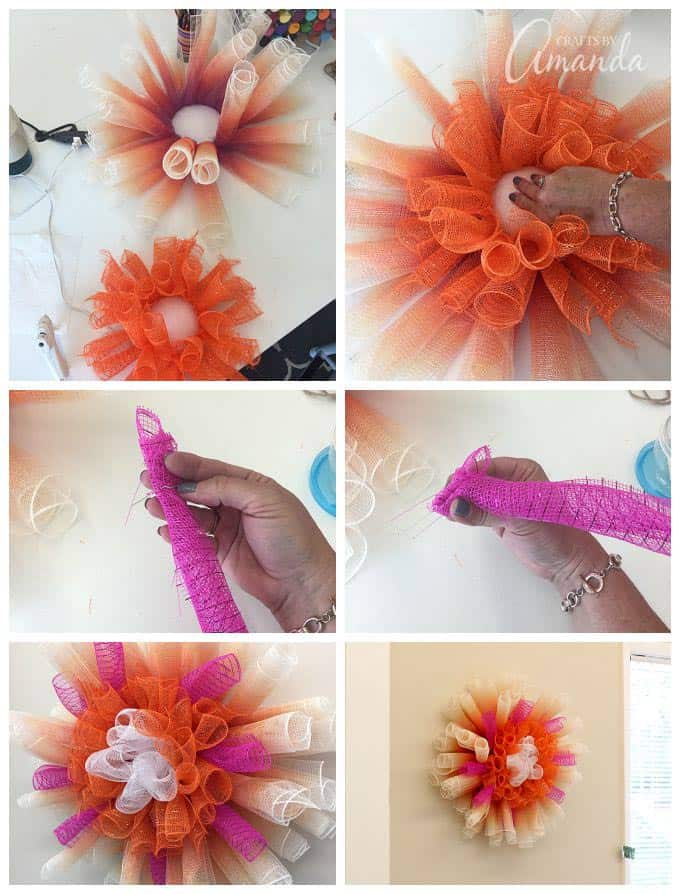
- For this flower I used a few different techniques. I used the tube method for the outside of the flower first.
- Then I cut a Styrofoam ball in half and pinned orange tubes (10-inch) around the outer edge.
- I glued and pinned that ball into the middle of the tube flower on the visible piece of the foam disc.
- I inserted some pink tubes, only instead of folding them in half, I only folded the tube down at the bottom because I wanted them to be longer.
- Finally I added white deco mesh to the center using the loop method which is described in this video.
Other flowers
You will see some small flowers on the wall. I used the method in this video to make those.
- I also used the loop method for the medium sized yellow, white and green flowers.
- I wrapped halved Styrofoam balls with deco mesh to create a pretty center for some of my flowers like the large green and blue one and the medium white one.
I hope you enjoyed these tutorials and I hope it inspires you to create your own deco mesh flowers. They would be great for a girl’s room, a wedding or your craft room. Have fun!
Deco Mesh Flowers
Supplies
- 6- inch 5 7/8 Styrofoam disc
- U-shaped floral pins
- Decorative mesh I used 10-yard rolls in 10-inch and 21-inch widths*
- Low-temp glue gun
- Scissors
- Command Strips for hanging
Instructions
Daisy or Sunflower
- Cut mesh into squares, they don’t have to be perfect.
- Lay mesh on table and fold opposite corners into the center.
- Gather the center with your fingers.
- Fold the gathered mesh in half and pin the center to the edge of foam disc, adding glue to the pin before inserting.
- Continue all the way around the disc, placing pins close to each other.
- When you’ve gone completely around the disc, use smaller mesh in a different color and repeat these steps, filling in the center of the flower.
- Variation: The white flower with the yellow center was made using this exact method. The only difference is that after pinning in the yellow center I decided to tuck and pin in the long ends of the yellow mesh, created a puffed center.
Daisy with Tube center
- Follow instructions about for the flower petals.
- Cut squares of 10-inch decorative mesh and roll into a tube.
- Poke a pin through the center of the tube and fold the tube in half, then push pin into the center of the flower (see dandelion video below if you need a visual).
- The video above shows you how to create a tube flower, like my dandelions. NOTE: After making the video and creating the flower I discovered that I could apply the glue, push the pin into the foam then push the head of the pin in (from the center of the tube), which in turn pushed the pin in farther and into the glue. Therefore there was no longer a need to use the "hot glue finger thing" ;) to press into the glue. Hope that made sense.
The combo flower
- For this flower I used a few different techniques. I used the tube method for the outside of the flower first.
- Then I cut a Styrofoam ball in half and pinned orange tubes (10-inch) around the outer edge.
- I glued and pinned that ball into the middle of the tube flower on the visible piece of the foam disc.
- I inserted some pink tubes, only instead of folding them in half, I only folded the tube down at the bottom because I wanted them to be longer.
- Finally I added white deco mesh to the center using the loop method which is described in this video.
Video
Expert Tips & FAQs
- Swirling Twirling Ladybugs - July 21, 2026
- Drip Tie Dye Backpack - July 17, 2026
- Mini Coastal Clay Houses - July 14, 2026


gayl tomaszewski says
Thank you for sharing step by step instructions. I am going to be making small flowers out of ribbon or felt to go in small vase’s. Am looking for how to make leaves out of mesh to go with them. Can you help me? Thank you so much
Lori says
Do you think it would be ok to not use the glue gun? My girls are 7. Do you think we could use craft glue? Or too messy? Thank you.
Amanda Formaro says
it’s a lot easier with a hot glue gun. You can get a low-temp glue gun and those fingertip protectors too. I’d be afraid that since regular glue is not instant, the flowers would stay together well.
Janie Rinta says
Fabulous!!! I love these!! Looks like I have some videos to watch now…hee hee hee Thanks for sharing this :) Hugs…Janie
Maureen says
Thank you for putting all this together. It’s so useful & so kind of you. I adore the hollyhocks – probably will be first I do.
Amanda Formaro says
Awesome, Maureen! I hope it goes well for you :)
Kathy says
I love you studio especially your storage units Where can I find those for my studio?
Amanda Formaro says
Thanks so much, Kathy! If you go here https://craftsbyamanda.com/amandas-creative-studio-tour/ and scroll a little more than halfway down the page, you will find a link to the storage units :)
Judy says
Just found this post….Love, love, love these flowrs but clicked on the tutorial page and they’ve been deleted. Anyway to view those videos again? I want to make these for my front door for spring.
Amanda Formaro says
Hi Judy. I am not sure what you are referring to – but the tutorials are here https://craftsbyamanda.com/deco-mesh-flowers/
sakshi sharma says
hi
i really liked your video and would love to try these out! could you please tell me that from where can i buy the decorative mesh.
i am from India
Amanda Formaro says
Hi, Sakshi! You can purchase decorative mesh here >> http://amzn.to/2ns9lEp . Best of luck!
sakshi sharma says
hi
i really liked your video and would love to try these out! cold you please tell me that from where can i buy the decorative mesh.
i am from India
Dianne Maker says
How do I get instruction for the flower art
Amanda Formaro says
Hi, Dianne. Under each different type of flower design there is a how-to on making that particular design. It’s all through out the post. :)
Tracie says
Can I ask where you got your ombre mesh? I can’t seem to find it anywhere.
Amanda Formaro says
Walmart.com has it, so they may have it in their stores as well :)
Marie says
I found mine in Walmart by the fake flowers they were at this bottom shelf by the wire wreaths
Paula Jean Arnold says
I bought mine at Walmart. But, they don’t’ always have it because they don’t get many in at one time.
Meuble sous pente says
Amanda, thank you so much for these instructions. These flowers are just what I am looking for.
Amanda Formaro says
Awesome, hope you have fun!
MaryAnn Leshick says
Amanda, thank you so much for these instructions. These flowers are just what I am looking for. Just a question, how do you keep the floral pin in the styrofoam. I have used the glue as per instructions so the pin is secured to mesh but, the whole pin
pulls out of the foam disc. Any tips on how yours are staying in?
Amanda Formaro says
I pushed mine in at an angle and they stayed in. Did you use a white Styrofoam disc and was it from Floracraft? The package would have said “Make It Fun” on it. Just not sure about other brands as I haven’t tried those so I don’t know if they would stay.
MaryAnn says
Thank you for your reply. I did put pins in at angle. I too used Floracraft styrofoam disc. I ended up using needle nose pliers to bend the pin ends that came through to the other side. Then I covered back with a piece of felt. Again thank you. The flowers are beautiful!
Amanda Formaro says
I’m glad you worked it out! :)
Laura says
Amanda,
My friend messaged me and sent me the link to your flower tutorial. I absolutely love your flowers!!! You did an amazing job and I just started making my own deco mesh wreaths this past summer! I even made a wreath for my 1st grade classroom and I’m going to try to make some of these flowers for my classroom walls! Thank you for sharing and inspiring! : )
Amanda Formaro says
That sounds so fun to do them for your classroom Laura! Oh the beautiful display you could make!
Barbara says
Yes! I was looking for something to help add color to a tiny new bathroom. White lower walls, I painted the upper walls a granny smith green ..and I’m gonna flower it up! I’m not super-crafty, but I can definitely manage this!
And yes…we should all have things around us that make us smile just by seeing them. Those dandelions….genius!
Thanks for the inspiration!
Amanda Formaro says
Barbara that’s an awesome idea! I love the idea of adding these to a bathroom! :)
Sharon says
Oh my gosh, Amanda, these are gorgeous! The flowers look beautiful on your studio walls. I love the yardstick stems, and the dandelion is so clever. I hope these make you smile every time you walk in the door.
Amanda Formaro says
Thank you so much Sharon and YES they make me smile everyday :)