• Home
  • About
    • About Crafts by Amanda
    • Visit Our Recipe Site
  • Work With Us
  • Join
    • Free Newsletters
    • Join our Facebook craft group
↑
  • Tutorials
    • Tutorial Index
    • Adult Crafts
    • Crafts for Kids
    • Crafts for Seniors
    • Recycled Crafts
    • Seasonal Crafts
    • Holiday Crafts
    • Free Printables
    • Craft Collections
  • Adult Crafts
    • Bath & Body
    • Beach Crafts
    • Clay Pot Crafts
    • Crafts for Seniors
    • Decoupage Crafts for Adults
    • DIY Gift ideas
    • Garden Crafts
    • Home Decor Projects
    • Kitchen Crafts
    • Light Bulb Crafts
    • Luminary Crafts
    • Mason Jar Crafts
    • Needlework
    • Photo Display Ideas
    • Recycled Crafts for Adults
    • Wearable Crafts for Adults
  • Crafts for Kids
    • Animal Crafts for Kids
    • Back to School Crafts
    • Beach Crafts for Kids
    • Camp Crafts
    • Cardboard Tube Crafts for Kids
    • Decoupage Crafts for Kids
    • Easy Crafts for Kids
    • Nature Crafts for Kids
    • Other Kid’s Crafts
    • Paper Plate Crafts for Kids
    • Recycled Crafts for Kids
    • Slimes, Doughs, & Clay
    • Wearable Crafts for Kids
  • Holiday Crafts
    • 4th of July Crafts
    • Christmas Crafts
    • DIY Gift ideas
    • Earth Day Crafts
    • Easter Crafts
    • Father’s Day Crafts
    • Halloween Crafts
    • Memorial Day Crafts
    • Mother’s Day Crafts
    • New Year’s
    • Other Holidays
    • Patriot Day Crafts
    • St. Patrick’s Day Crafts
    • Thanksgiving Crafts
    • Valentine’s Day Crafts
  • Seasonal Crafts
    • Winter Crafts
    • Spring Crafts
    • Summer Crafts
    • Fall Crafts
  • Skip to primary navigation
  • Skip to main content
  • Skip to primary sidebar
  • Skip to footer

Crafts by Amanda

crafts for adults and kid's crafts

  • Tutorials
    • Tutorial Index
    • Adult Crafts
    • Crafts for Kids
    • Crafts for Seniors
    • Recycled Crafts
    • Seasonal Crafts
    • Holiday Crafts
    • Free Printables
    • Craft Collections
  • Adult Crafts
    • Bath & Body
    • Beach Crafts
    • Clay Pot Crafts
    • Crafts for Seniors
    • Decoupage Crafts for Adults
    • DIY Gift ideas
    • Garden Crafts
    • Home Decor Projects
    • Kitchen Crafts
    • Light Bulb Crafts
    • Luminary Crafts
    • Mason Jar Crafts
    • Needlework
    • Photo Display Ideas
    • Recycled Crafts for Adults
    • Wearable Crafts for Adults
  • Crafts for Kids
    • Animal Crafts for Kids
    • Back to School Crafts
    • Beach Crafts for Kids
    • Camp Crafts
    • Cardboard Tube Crafts for Kids
    • Decoupage Crafts for Kids
    • Easy Crafts for Kids
    • Nature Crafts for Kids
    • Other Kid’s Crafts
    • Paper Plate Crafts for Kids
    • Recycled Crafts for Kids
    • Slimes, Doughs, & Clay
    • Wearable Crafts for Kids
  • Holiday Crafts
    • 4th of July Crafts
    • Christmas Crafts
    • DIY Gift ideas
    • Earth Day Crafts
    • Easter Crafts
    • Father’s Day Crafts
    • Halloween Crafts
    • Memorial Day Crafts
    • Mother’s Day Crafts
    • New Year’s
    • Other Holidays
    • Patriot Day Crafts
    • St. Patrick’s Day Crafts
    • Thanksgiving Crafts
    • Valentine’s Day Crafts
  • Seasonal Crafts
    • Winter Crafts
    • Spring Crafts
    • Summer Crafts
    • Fall Crafts
Craft Tutorials | Crafts for Kids | Easy Crafts for Kids | Styrofoam Cup Mini Spring Flower Pots

Styrofoam Cup Mini Spring Flower Pots

Author by Amanda Davis on March 25, 2012 Updated on January 15, 2019

5 from 4 votes
Jump to Project
Styrofoam Cup Mini Spring Flower Pots
1475 shares
  • Share
  • Tweet
  • Flipboard
  • Email

Styrofoam Cup Mini Spring Flower Pots


Spring is here! To celebrate I wanted to share with you this cute little spring flower craft you can make with your kids. You just need some pipe cleaners, foam cups and a little imagination. I’m so excited to see all of the bright green grass in my yard and can’t wait to start planting some real flowers!

Styrofoam Cup Mini Spring Flower PotsChances are you have seen my Styrofoam Cup Spring Bonnets and my Styrofoam Cup Leprechaun Hats. I also have some Uncle Sam Hats too that I haven’t posted yet! Well because shrinking the cups to look like hats is not an exact science, there are always some cups that curl up the wrong way or just don’t shape properly to be used for hats. I don’t throw them away, they make adorable little flower pots!

Chances are you probably don’t have any laying around like I do, so in the printable instructions below I’ll tell you how to shrink the cups as well as all the steps that go with it.

Styrofoam Cup Mini Spring Flower Pots
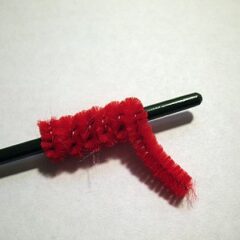
You can get creative with making the flowers. I used a few different methods. One was to make snapdragons, one of my favorite flowers, by wrapping a [amazon_link id=”B00290LKWQ” target=”_blank” container=”” container_class=”” ]chenille stem[/amazon_link] (pipe cleaner) around the end of a paintbrush. Then just insert a green pipe cleaner into the coiled pipe cleaner.

Styrofoam Cup Mini Spring Flower PotsSimple flowers can be made by wrapping a piece of pipe cleaner around the end of a paintbrush again, only this time wrap it more like a ball. Then insert the green pipe cleaner for the stem.

Styrofoam Cup Mini Spring Flower PotsAfter painting your little pots, glue a penny inside the bottom, this will help hold them upright so the weight of your flowers doesn’t make them fall over.

Styrofoam Cup Mini Spring Flower PotsThen wad up some green [amazon_link id=”B000TDZH10″ target=”_blank” container=”” container_class=”” ]tissue paper[/amazon_link] to put inside the pot, then add your flowers and glue everything for good measure.

Have fun and happy spring!

Note: I have been making crafts from shrunken foam cups for ten years. In that time I have spoken with a few different experts on the matter of what is emitted from the foam cups when heated. I’ve been told the levels are low enough that it shouldn’t be cause for concern, but that running your kitchen vent or if weather permits, keeping a window open during the baking process is an acceptable solution.

Styrofoam Cup Mini Spring Flower Pots

Styrofoam Cup Mini Spring Flower Pots
Print Project
5 from 4 votes

Styrofoam Cup Mini Spring Flower Pots

Author: Amanda Formaro

Supplies

  • Foam cups 8.5 oz size
  • acrylic craft paint I used several brown tones
  • pipe cleaners in various colors
  • green tissue paper
  • 4 pennies
  • white craft glue
  • scissors

Instructions

  • Preheat oven to 250 degrees F. Place foam cups upside down on a dark coated cookie sheet. Place cookie sheet in preheated oven and watch carefully. Cups should have begun shrinking at the 2 minute mark and should be done at the 3 minute mark. You may need to adjust the temperature up or down depending on your oven, so only try 1-2 cups at a time until you are successful. If you have some brims that are flat, make hats like these miniature spring bonnets!
  • The cups will cool quickly and can be painted within minutes of coming out of the oven. paint each pot, inside and out with acrylic craft paint and let dry.
  • Make flowers using different lengths of chenille stems. Use green for the flower stems and a variety of colors to make the flowers. Wrap chenille around the handle of a paintbrush to create flower buds, and twist longer coils to make snapdragons. Form flower shapes by bending a chenille stem into petals and secure it with the end of the chenille stem. Add a dab of white glue and insert the green stem into the colorful flowers.
  • Squeeze a generous amount of white craft glue into the bottom of each flower pot. Press a penny into the glue to give the pot some weight. Add more glue to the sides of the inside of the pot.
  • Cut a piece of green tissue paper about 5″ square and crumple it in your hand. Place crumpled tissue paper into the pot.
  • Add a dab of glue to the bottom of each flower stem and insert into the flower pot.

Expert Tips & FAQs

I have been making crafts from shrunken foam cups for ten years. In that time I have spoken with a few different experts on the matter of what is emitted from the foam cups when heated. I’ve been told the levels are low enough that it shouldn’t be cause for concern, but that running your kitchen vent or if weather permits, keeping a window open during the baking process is an acceptable solution.


  • Author
  • Recent Posts
Amanda Davis
Amanda Davis is the crafty, entrepreneurial mother of four children. She loves to bake, cook, make kid's crafts and create decorative items for her home. She is a crafting expert and guru in the kitchen and has appeared online and in print publications many times over the years.
Latest posts by Amanda Davis (see all)
  • Spring Scavenger Hunt - May 9, 2025
  • How to Make Lip Scrub - May 2, 2025
  • How to Make Lavender Soap - April 22, 2025
1475 shares
  • Share
  • Tweet
  • Flipboard
  • Email

Filed Under: Easy Crafts for Kids, Mother's Day Crafts, Other Kid's Crafts, Spring Crafts Tagged With: cups, flowers, holidays, kid's crafts, spring, styrofoam

Reader Interactions

Free CraftsBy email every week

Latest crafts straight to your inbox!

Comments

  1. Mirjam says

    August 15, 2016 at 9:56 am

    Oh, so adorable!

    Reply
  2. neti says

    May 4, 2014 at 6:31 am

    hi, what thickness of pipecleaner did you use? 3mm,4mm,6mm or 12mm? :)

    Reply
    • Amanda Formaro says

      May 4, 2014 at 7:55 am

      Hi neti! i have to admit, I’ve never been asked that question before and never even thought about it! So I did a little searching, and I THINK they would be the 6mm type. They are standard sized pipe cleaners. :)

      Reply
  3. cida santos says

    June 21, 2012 at 4:18 pm

    amei,gosto de cores vou fazer.

    Reply
  4. Plant Stands says

    May 7, 2012 at 6:49 pm

    What an idea! Just curious, though…do you have to be concerned about fumes from the heated styrofoam? Need to open a window, maybe? Thanks for this.

    Reply
    • Amanda says

      May 8, 2012 at 4:11 pm

      I have double checked with experts and they all say that the fumes aren’t enough to worry about, but to yes, have a window open and keep the kitchen ventilated :)

      Reply
  5. Jen says

    March 25, 2012 at 8:29 pm

    These are too cute. I’m just going to have to make these a part of my centerpiece for my Passove table!

    Reply
    • Amanda says

      March 26, 2012 at 12:54 am

      Thanks Jen!

      Reply
  6. jet says

    March 25, 2012 at 5:59 pm

    aaw i love them sooo lovely and full of spring.
    thank you for sharing this great tute and the inspiration.
    l

    Reply
    • Amanda says

      March 26, 2012 at 12:54 am

      Thanks Jet!

      Reply
  7. Mod Podge Amy says

    March 25, 2012 at 5:04 pm

    Super cute Amanda! I love these – a lot.

    Reply
    • Amanda says

      March 25, 2012 at 5:09 pm

      Thanks Amy! A great way to use up those extra cups that go astray! :)

      Reply
5 from 4 votes (2 ratings without comment)

Leave a Reply Cancel reply

Your email address will not be published. Required fields are marked *

Rate This Project


The maximum upload file size: 640 MB. You can upload: image, video. Links to YouTube, Facebook, Twitter and other services inserted in the comment text will be automatically embedded. Drop files here

Primary Sidebar

Hi! I’m Amanda and I’m the founder and head designer of Crafts by Amanda. I have spent over 25 years creating projects to share, but it’s not just me anymore! It’s turned into a complete family affair. Come and meet the Creative Team!

Free CraftsBy email every week

Latest crafts straight to your inbox!

All Time Favorites

snowy pinecone candle jar luminaries

Winter Luminaries: Snowy Pinecone…

Make pretty winter luminaries that appear to be covered ... Go To project

Make this wonderful deco mesh pumpkin wreath to hang on your door this fall!

Deco Mesh Pumpkin Wreath…

Adorn your door this fall with a pretty deco mesh ... Go To project

Learn to make these adorable ladybug painted rocks. use special outdoor paint for this adorable garden craft so you can keep garden ladybugs all summer!

Ladybug Painted Rocks…

I'm going to show you how to make these adorable ... Go To project

Reuse those empty prescription pill bottles in all sorts of ways. From organizing to making cookies. Yes, cookies! See how to use your empty pill bottles!

20 Uses for Prescription Pill…

You've been collecting prescription pill bottles for ... Go To project

Meet the Family

Amanda

Founder and Designer

Kristen

Editorial Manager

Lindsay

Social Media Manager

As seen on:

Footer

Favorites

  • Jar Photo Frames
  • No-Sew Roman Shade
  • Paper Flowers
  • How to Make a Scrunchie
  • Mermaid Slime

About

  • Home
  • Meet the Creative Team
  • Work with Us
  • Privacy Policy
  • Accessibility
  • Contact Us

Images/text copyright Amanda Formaro 2020. To feature a post from Crafts by Amanda, you may use one photo credited and linked back directly to the project post.

Free CraftsBy email every week

Latest crafts straight to your inbox!

Copyright ©2025, Crafts by Amanda. All Rights Reserved.
Design by Pixel Me Designs

Rate This Tutorial

Your vote:


To share a photo with your comment click here!

A rating is required
A name is required
An email is required

Recipe Ratings without Comment

Something went wrong. Please try again.