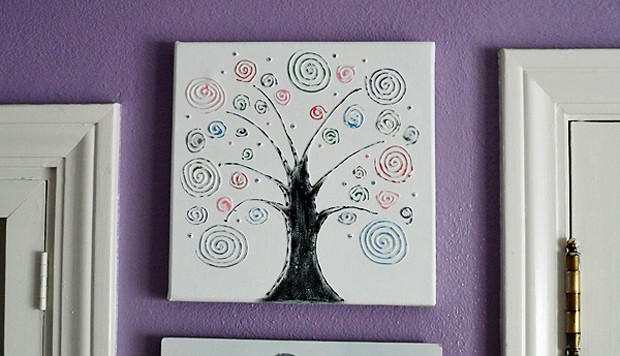
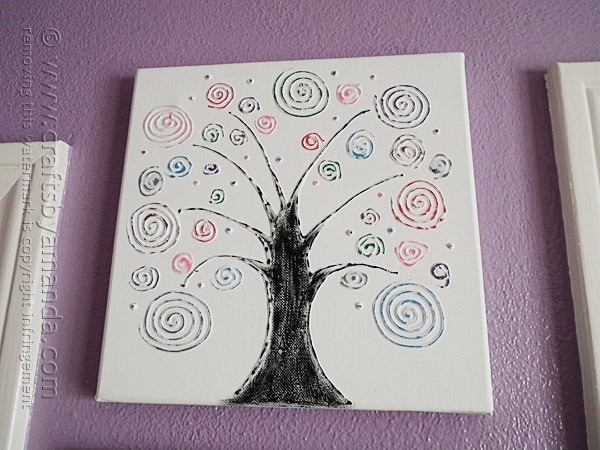
Tree art is big and canvas is pretty affordable, especially when you use an in-store coupon! I love making my own wall art. In fact, I don’t think I’ve actually bought anything for my walls in years! For this project I decided to try creating a resist-look on canvas using three dimensional paint paints and a bit of sandpaper.
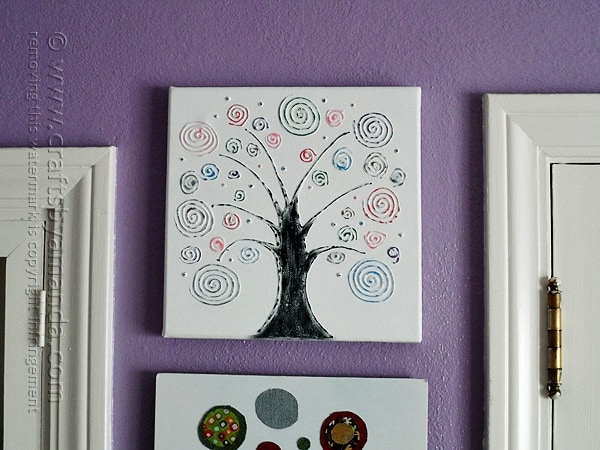
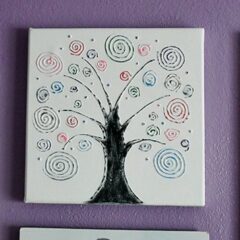
The result was a pretty cool looking piece of art that’s different than anything I’ve done before.
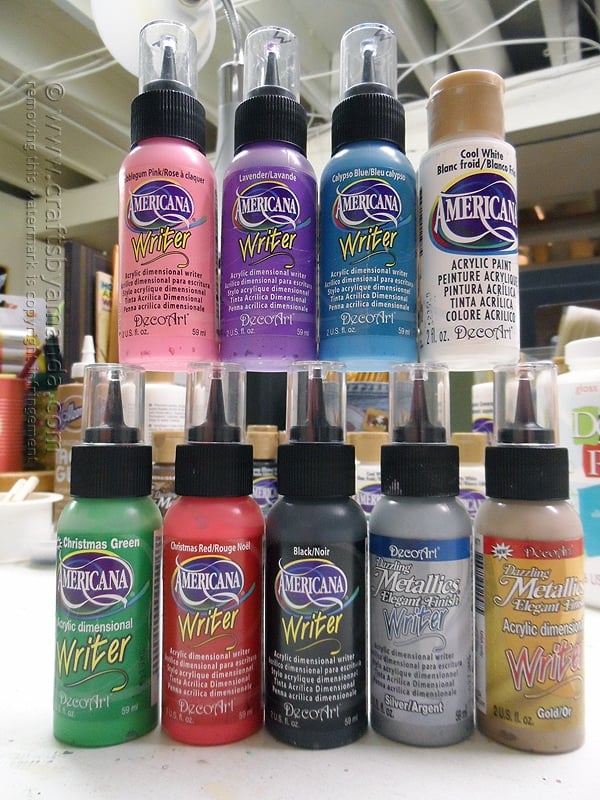
I used Americana Writers for this project. The full supply list is in the printable version below. I used a 10 x 10 stretched canvas as well.
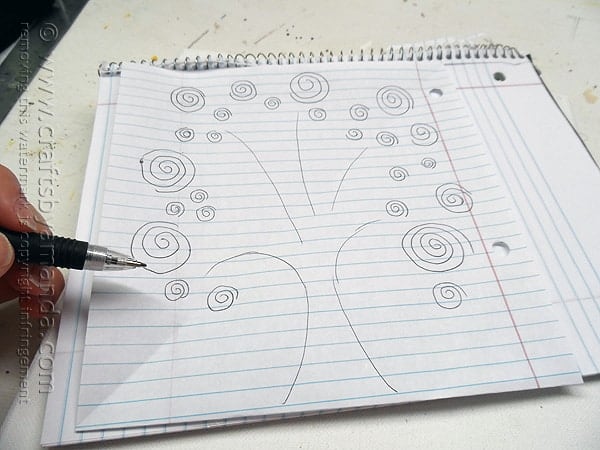
I started off by sketching out an idea for the tree. I drew the swirls first, then added in a few lines for the basics of the trunk and branches.
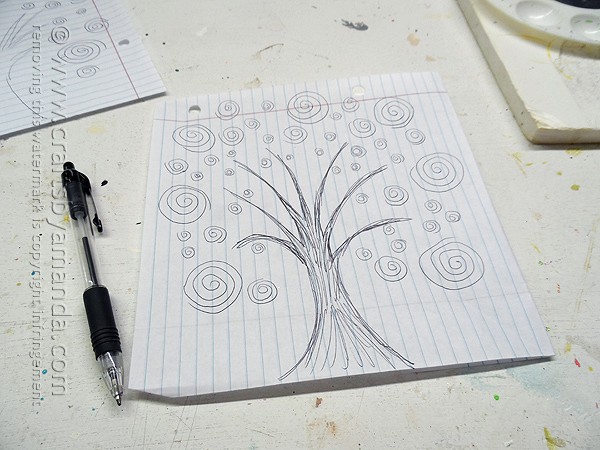
Then I used that basic idea to fill in more swirls, the branches and the trunk.
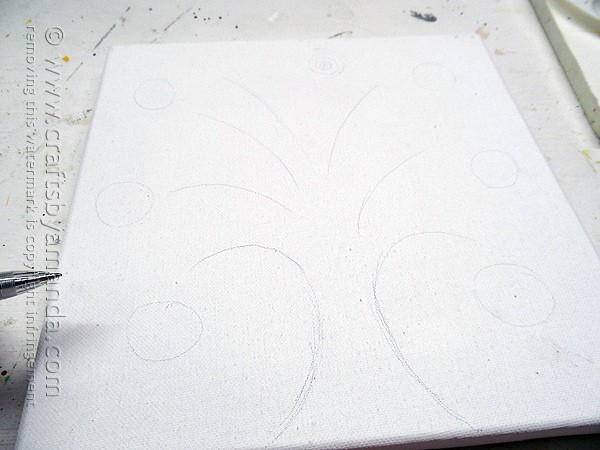
I then took pencil to canvas, just doing some very light sketching, and only of the large swirls and the basic shape of the trunk. I just wanted to give myself a starting point. Be careful though, it’s hard to cover pencil marks with white paint, so sketch lightly and only very basic shapes that you will be able to cover with the 3D Writers.
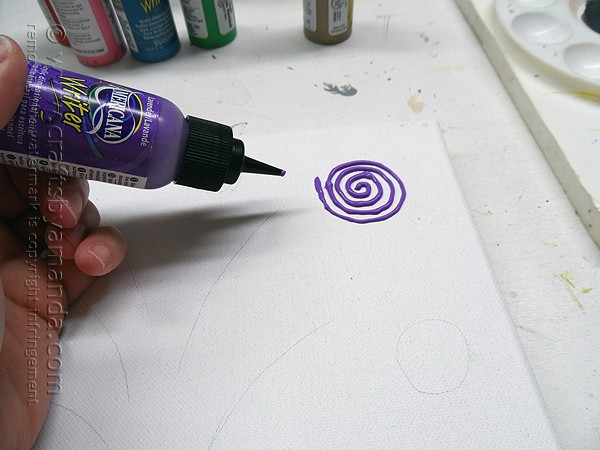
I started by making the large swirls first, using the Americana Writers.
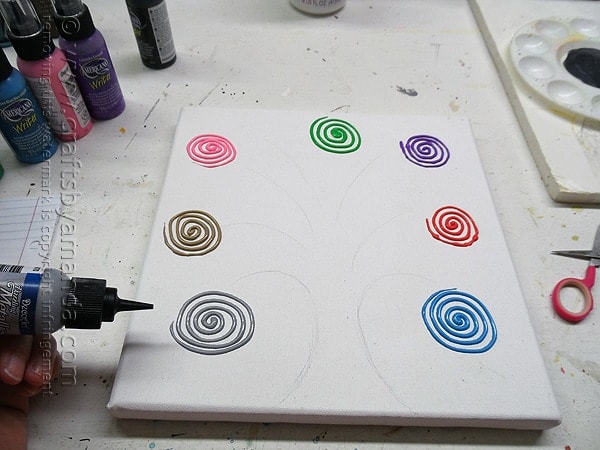
I used a different color for each swirl.
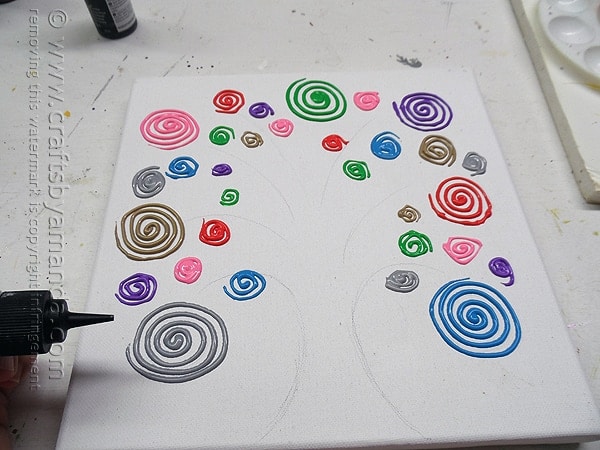
Next I added in medium and small swirls using all the different colors.
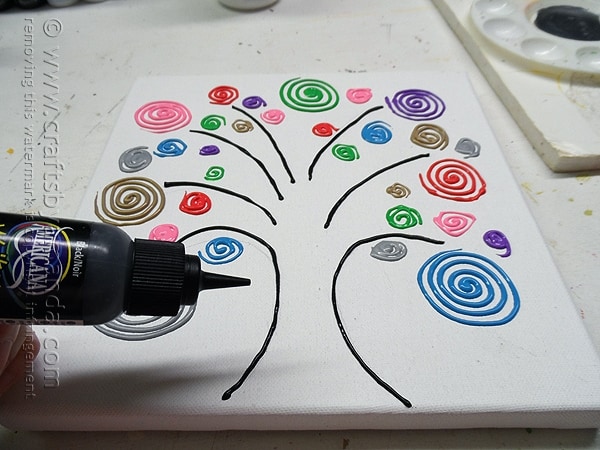

Then came the basic shape of the branches and trunk using the Black Americana Writer. Next I filled in the gaps to create the final shape of the branches and trunk.
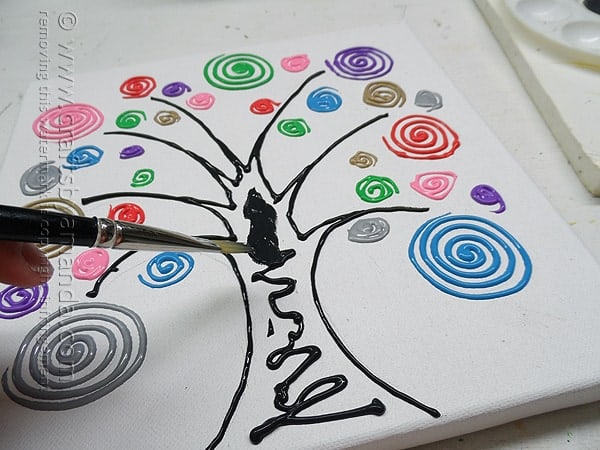
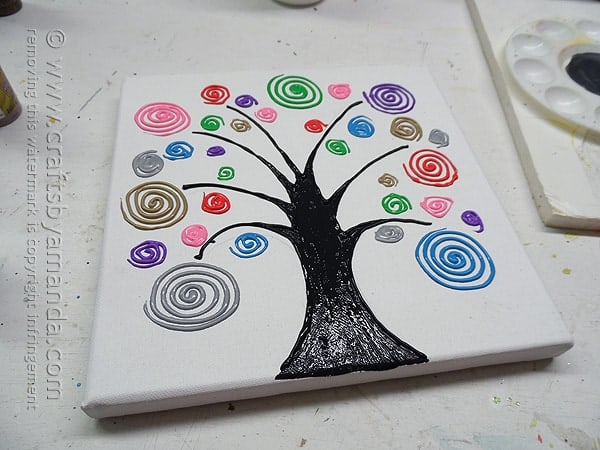
Fill in the trunk with a bit of the black Writer and spread it out with a paintbrush.
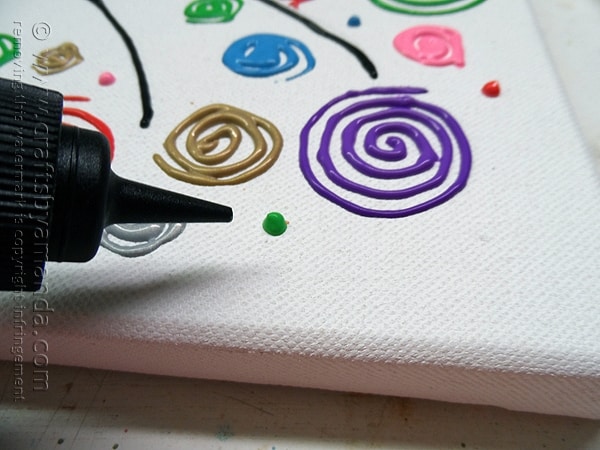
Add in a few dots using the Writers. To make dots without a tail at the top, squeeze the Writer straight down, gently inserting the tip into the dot. Release the pressure, gently lift up and as if drawing a circle, trace the tip around the top of the dot. This will allow the paint to drop onto itself, rather than creating that “top of the ice cream cone” swirl.
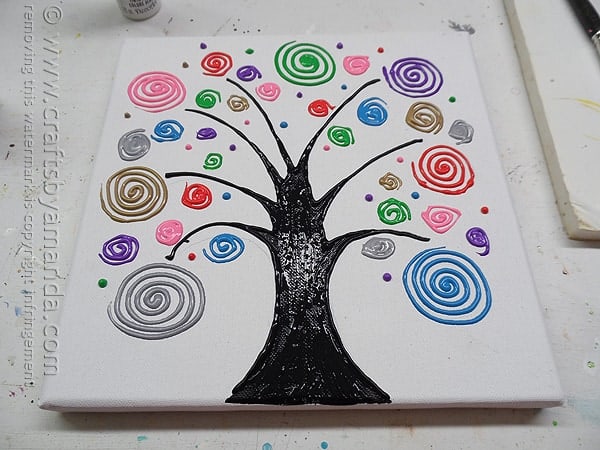
When you’re happy with your design, set it aside to dry completely. This can take several hours.
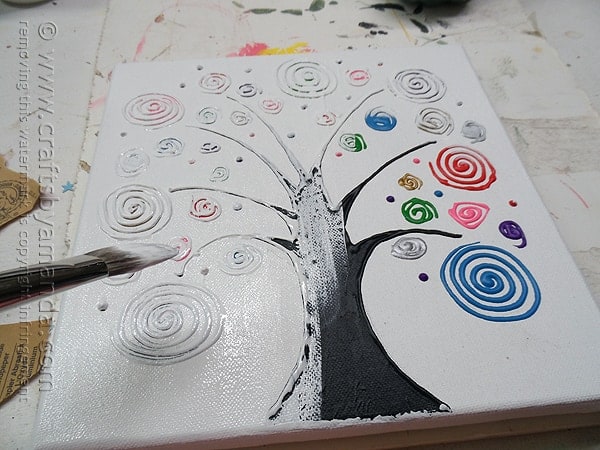
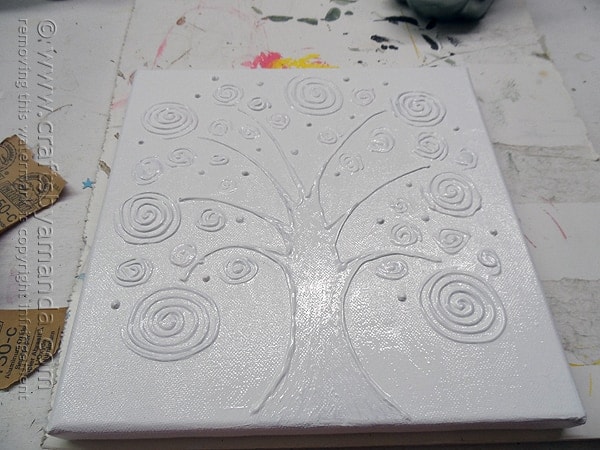
Using Americana Cool White, paint the entire surface of the canvas white; covering the entire tree design. Allow this to dry completely before moving to the final steps
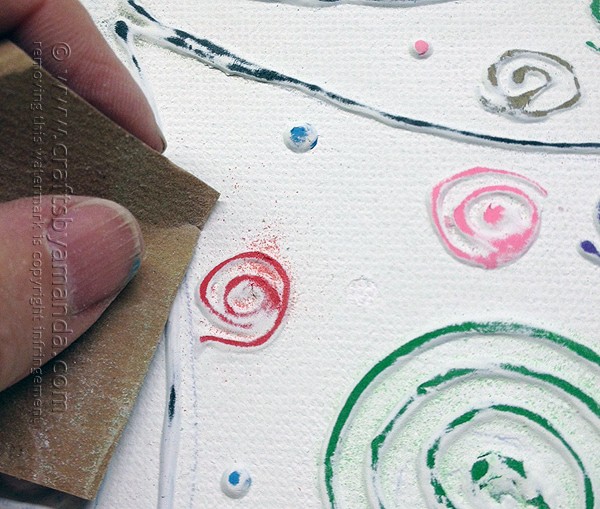
Use sandpaper to gently remove the dried white paint from the color designs underneath. If sanding the painted trunk isn’t enough, dry brush some Americana Lamp Black lightly onto the trunk until you are happy with the results.
You might also like:
Buttons on Canvas
Vintage French Bee Wreath on Honeycomb Canvas
Vibrant Button Tree on Canvas
White Cherry Blossom Tree Painting
Circle Tree Modern Art
Swirl Tree on Canvas
Supplies
Americana Writers:
- Bubblegum Pink
- Lavender
- Calypso Blue
- Christmas Green
- Christmas Red
- Black
Dazzling Metallics Elegant Finish Writers:
- Silver
- Gold
- Americana acrylic paint – Cool White
- 10 ” x 10” canvas
- Paintbrush
- Sandpaper
- Sheet of paper
- Pencil
Instructions
- Start by making the large swirls first, using the Americana Writers. I used a different color for each swirl.
- Next add in medium and small swirls using all the different colors.
- Next add the basic shape of the branches and trunk using the Black Americana Writer. Fill in the gaps to create the final shape of the branches and trunk. Fill in the trunk with a bit of the black Writer and spread it out with a paintbrush.
- Add in a few dots using the Writers. To make dots without a tail at the top, squeeze the Writer straight down, gently inserting the tip into the dot. Release the pressure, gently lift up and as if drawing a circle, trace the tip around the top of the dot. This will allow the paint to drop onto itself, rather than creating that “top of the ice cream cone” swirl.
- When you’re happy with your design, set it aside to dry completely. This can take several hours.
- Using Americana Cool White, paint the entire surface of the canvas white; covering the entire tree design. Allow this to dry completely before moving to the final steps.
- Use sandpaper to gently remove the dried white paint from the color designs underneath. If sanding the painted trunk isn’t enough, dry brush some Americana Lamp Black lightly onto the trunk until you are happy with the results.
I originally created this project for DecoArt.
- DIY Mosquito Repellent Candles - July 10, 2026
- Mason Jar Solar Lights - July 3, 2026
- Patriotic Pinwheels - June 23, 2026


Leigh Ann Rodgers says
Amanda I have gotten some really great ideas from you website. I actually think I’m going to take your advice on the paint but maybe venture out & try a different picture! Please keep those ideas coming. We love them!
Amanda Formaro says
Thanks Leigh, hope you enjoy whatever you decide to do! :)
Lana @ Never Enough Thyme says
Really pretty and different, Amanda! I think I could almost do this one myself :-)
nancy says
And can I use Tulip puffy paint?
Amanda Formaro says
Hi Nancy. I don’t know as I didn’t experiment with Puffy Paint. I would recommend trying it on a test block of some sort, like a small piece or wood.
nancy says
I’m thinking of doing this project at a kids camp, where we have limited time to finish projects. Could we use hair dryers to hurry along the drying process?
Amanda Formaro says
I wouldn’t use a hair dryer as the force of it could spread the paint. This really isn’t a project where you want to rush it. You could try fans, but I still wouldn’t recommend it.
Pam says
Hi Amanda,
I love this project; We just redid our kitchen and dining room in the last few months, and I have been searching for some ideas to decorate the walls. Love the idea and the instructions; thanks for sharing Thank you also for stopping by and visiting my blog, and for posting the clothespin airplanes on your facebook; I appreciate it very much. Also, I am delighted to have your link, as I can see that I am going to have a nice time searching through your projects.
Blessings,
Pam
Amanda Formaro says
Thanks Pam! I hope you have a good time making it, it was fun!
DesignedByBH says
What a neat idea! I love this! :)
Stumbled and pinned.
– Brooke –
Mabel Watson says
I love this idea!!!! I volunteer for a children with cancer center and this is something they can do together with siblings and parents. I am a huge fan of your work. Thanks for sharing your talent.
Amanda Formaro says
Thanks so much Mabel!