• Home
  • About
    • About Crafts by Amanda
    • Visit Our Recipe Site
  • Work With Us
  • Join
    • Free Newsletters
    • Join our Facebook craft group
↑
  • Tutorials
    • Tutorial Index
    • Adult Crafts
    • Crafts for Kids
    • Crafts for Seniors
    • Recycled Crafts
    • Seasonal Crafts
    • Holiday Crafts
    • Free Printables
    • Craft Collections
  • Adult Crafts
    • Bath & Body
    • Beach Crafts
    • Clay Pot Crafts
    • Crafts for Seniors
    • Decoupage Crafts for Adults
    • DIY Gift ideas
    • Garden Crafts
    • Home Decor Projects
    • Kitchen Crafts
    • Light Bulb Crafts
    • Luminary Crafts
    • Mason Jar Crafts
    • Needlework
    • Photo Display Ideas
    • Recycled Crafts for Adults
    • Wearable Crafts for Adults
  • Crafts for Kids
    • Animal Crafts for Kids
    • Back to School Crafts
    • Beach Crafts for Kids
    • Camp Crafts
    • Cardboard Tube Crafts for Kids
    • Decoupage Crafts for Kids
    • Easy Crafts for Kids
    • Nature Crafts for Kids
    • Other Kid’s Crafts
    • Paper Plate Crafts for Kids
    • Recycled Crafts for Kids
    • Slimes, Doughs, & Clay
    • Wearable Crafts for Kids
  • Holiday Crafts
    • 4th of July Crafts
    • Christmas Crafts
    • DIY Gift ideas
    • Earth Day Crafts
    • Easter Crafts
    • Father’s Day Crafts
    • Halloween Crafts
    • Memorial Day Crafts
    • Mother’s Day Crafts
    • New Year’s
    • Other Holidays
    • Patriot Day Crafts
    • St. Patrick’s Day Crafts
    • Thanksgiving Crafts
    • Valentine’s Day Crafts
  • Seasonal Crafts
    • Winter Crafts
    • Spring Crafts
    • Summer Crafts
    • Fall Crafts
  • Skip to primary navigation
  • Skip to main content
  • Skip to primary sidebar
  • Skip to footer

Crafts by Amanda

crafts for adults and kid's crafts

  • Tutorials
    • Tutorial Index
    • Adult Crafts
    • Crafts for Kids
    • Crafts for Seniors
    • Recycled Crafts
    • Seasonal Crafts
    • Holiday Crafts
    • Free Printables
    • Craft Collections
  • Adult Crafts
    • Bath & Body
    • Beach Crafts
    • Clay Pot Crafts
    • Crafts for Seniors
    • Decoupage Crafts for Adults
    • DIY Gift ideas
    • Garden Crafts
    • Home Decor Projects
    • Kitchen Crafts
    • Light Bulb Crafts
    • Luminary Crafts
    • Mason Jar Crafts
    • Needlework
    • Photo Display Ideas
    • Recycled Crafts for Adults
    • Wearable Crafts for Adults
  • Crafts for Kids
    • Animal Crafts for Kids
    • Back to School Crafts
    • Beach Crafts for Kids
    • Camp Crafts
    • Cardboard Tube Crafts for Kids
    • Decoupage Crafts for Kids
    • Easy Crafts for Kids
    • Nature Crafts for Kids
    • Other Kid’s Crafts
    • Paper Plate Crafts for Kids
    • Recycled Crafts for Kids
    • Slimes, Doughs, & Clay
    • Wearable Crafts for Kids
  • Holiday Crafts
    • 4th of July Crafts
    • Christmas Crafts
    • DIY Gift ideas
    • Earth Day Crafts
    • Easter Crafts
    • Father’s Day Crafts
    • Halloween Crafts
    • Memorial Day Crafts
    • Mother’s Day Crafts
    • New Year’s
    • Other Holidays
    • Patriot Day Crafts
    • St. Patrick’s Day Crafts
    • Thanksgiving Crafts
    • Valentine’s Day Crafts
  • Seasonal Crafts
    • Winter Crafts
    • Spring Crafts
    • Summer Crafts
    • Fall Crafts
Craft Tutorials | Adult Crafts | Home Decor Projects | Sun Print Wall Art
Home Decor Projects

Sun Print Wall Art

Author by Amanda Davis on June 25, 2019 Updated on December 6, 2020

5 from 2 votes
Use sun print paper to create wonderful wall art! This is an awesome project for kids to make and give as gifts to grown ups! Adults will love playing with sun print paper too!
Jump to Project
884 shares
  • Share
  • Tweet
  • Flipboard
  • Email

Ever since I was a kid I have loved using sun print paper. If you’ve never tried it you really should. There’s a chemical reaction that takes place on the paper after it’s exposed to sunlight. Running the exposed sun print paper under cool water causes another reaction that gives you a beautiful end result that’s worth framing. The best part is this is a craft project kids can make and give to adults. Wonderful wall art that looks stunning.

Pressed flower sun print frames


Sun Print Wall Art

You can use items from nature such as plants, leaves, flowers or in my case, lavender. You will definitely need a sunny day, but only a couple minutes in the sun are needed. Kids will be amazed by the sun print paper’s transformation once it hits the water. The whole process, from start to finish takes less than ten minutes, not counting drying time of course.

sun print frames on wall

The results are stunning and absolutely gift-worthy. Kids will be so proud to see their sun print creations displayed on the wall or shelf!

sun prints in frames collage

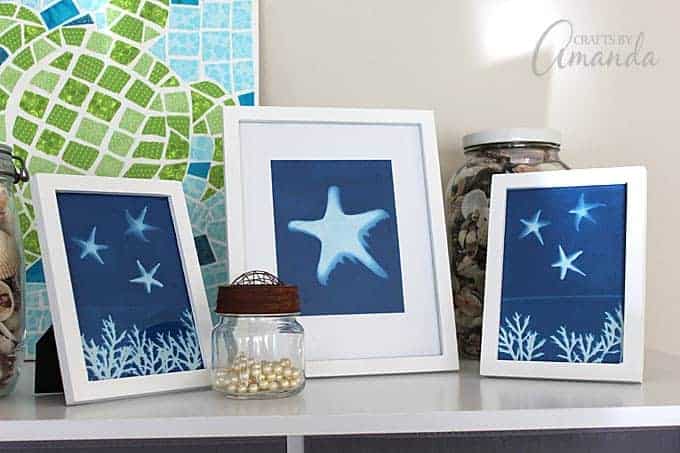
You can use any objects you like: starfish, coins, keys, cookie cutters, sticks, anything you can think of. I used different sized starfish and a few clippings from my flower box to make the coastal framed sun prints. The shadow that was cast from the starfish also shows in the final result.

pressed flowers sun prints in frames

So if you’re looking for a unique gift that the kids can make, or just a unique project to keep and display, sun print wall art is a great option! I bought the white frames from WalMart for $6.00 each and simply used a glue stick to attach the sun prints to plain white paper instead of buying expensive mattes.

If you want a quick stocking stuffer, print off these adorable little cards to use with those round lip balms.

beach themed sun print frames

Sun print paper is really easy to use. The most important thing is having a sunny day. Clouds won’t allow the same results as full sun. Windy days can make it tough too, which is why I used a piece of glass over my designs. The package will tell you to pin your paper to cardboard, but if there’s a slight breeze your lightweight objects will be easily blown off.

Supplies for Sun Print Wall Art

  • 5″x7″ sun print paper* (or on Amazon)
  • Objects of your choice (in this tutorial: lavender, starfish, plants)
  • 13″x9″ or larger pan with an inch or so of cool tap water
  • Foam core or a piece of cardboard
  • Paper towels
  • Clear plastic or glass (use one from a frame)**
  • White frames
  • White paper
  • Glue stick

sun print paper how to use

*Sun print paper comes in different sizes and contains multiple sheets. I used the 5″x7″ size for this project. The paper is stored inside a black packet to keep it from being exposed to light. Only remove it from the packet when you are ready to start.

**Check the edges of the glass to make sure they aren’t sharp. Cover edges with painter’s tape if children will be handling directly. Painter’s tape can easily be removed when project is finished.

pressing down dried flowers onto sun print paper

  • Place a piece of sun print paper, blue side up, onto your foam core or cardboard.
  • Arrange objects on top of paper.
  • Cover objects with glass and press down to hold everything in place, especially if it’s breezy out!
  • Expose to direct sunlight for two minutes.
  • Remove glass and objects from paper. You will see that the paper has lightened in color and the areas under your objects will be the original blue.

submerging sun print paper in water

  • Submerge exposed paper in pan of water.
  • Be sure it’s completely covered and leave in water for about one minute. The blue areas will turn white, and the light areas will turn light blue.
  • Remove paper from water and place on paper towels to dry. The blue areas will darken as the paper dries.

dried flowers on sun print paper

You can even add tiny elements to the paper like I did here. You can see that along with the lavender I sprinkled on some of the crushed petals and leaves.

How to use sun print paper collage

  1. With the starfish pictured at the top, the shadow cast created the look of motion. I love it!
  2. Some objects, such as my starfish, are too bulky to cover with glass. You can cover them with plastic wrap if you have smaller bulky items that may blow away. My starfish weighed enough that I did not need to worry about them. If an object does not sit flush with the paper due to variations in its shape, such as the larger, skinnier starfish, sunlight may get underneath and expose areas of the paper you didn’t want exposed. It can still create a cool effect!
  3. The line that appears above the plants with the small starfish was from me placing the glass over the plants but not the rest of the paper.

different ways to use sun print paper

If using flowers, place the flowers face down on the paper. Because flower petals are thinner that the center of the flower, the petal areas will produce a different result that the rest. Just experiment and play around with different objects and their placement.

The pack of paper that I linked above in the supplies contains 30 sheets. Plenty of paper for multiple projects! It’s on sale at S&S Worldwide, the same company that sells my Crafts by Amanda Craft Kits!

sun print wall art on wall above sink

This would also be a wonderful project for seniors going through rehabilitation, or those in a nursing home. It’s fun and relaxing and the finished product is truly a work of art. Enjoy!

Looking for more wall art ideas? Here are more than 30 canvas ideas to choose from!

Print Project
5 from 2 votes

Sun Print Wall Art

Use sun print paper to create wonderful wall art! This is an awesome project for kids to make and give as gifts to grown ups! Adults will love playing with sun print paper too!
Author: Amanda Formaro

Supplies

  • 5 "x7" sun print paper*
  • Objects of your choice this tutorial: lavender, starfish, plants
  • 13 "x9" or larger pan with an inch or so of cool tap water
  • Foam core or a piece of cardboard
  • Paper towels
  • Clear plastic or glass use one from a frame**
  • White frames
  • White paper
  • Glue stick

Instructions

  • Place a piece of sun print paper, blue side up, onto your foam core or cardboard.
  • Arrange objects on top of paper.
  • Cover objects with glass and press down to hold everything in place, especially if it's breezy out!
  • Expose to direct sunlight for two minutes.
  • Remove glass and objects from paper. You will see that the paper has lightened in color and the areas under your objects will be the original blue.
  • Submerge exposed paper in pan of water.
  • Be sure it's completely covered and leave in water for about one minute. The blue areas will turn white, and the light areas will turn light blue.
  • Remove paper from water and place on paper towels to dry. The blue areas will darken as the paper dries.

Expert Tips & FAQs

*Sun print paper comes in different sizes. I used 5"x7" for this project. Sun print paper comes in packs for multiple projects. The paper is stored inside a black packet to keep it from being exposed to light. Only remove it from the packet when you are ready to start.
**Check the edges of the glass to make sure they aren't sharp. Cover edges with painter's tape if children will be handling directly. Painter's tape can easily be removed when project is finished.

This post originally appeared here on Nov 12, 2015.

  • Author
  • Recent Posts
Amanda Davis
Amanda Davis is the crafty, entrepreneurial mother of four children. She loves to bake, cook, make kid's crafts and create decorative items for her home. She is a crafting expert and guru in the kitchen and has appeared online and in print publications many times over the years.
Latest posts by Amanda Davis (see all)
  • Patriotic Pinwheels - June 20, 2025
  • Paper Plate Aquarium Craft - June 17, 2025
  • Patriotic Bandana Wreath - June 13, 2025
884 shares
  • Share
  • Tweet
  • Flipboard
  • Email

Filed Under: Beach Crafts, Beach Crafts for Kids, Crafts for Seniors, DIY Gift ideas, Easy Crafts for Kids, Fall Crafts, Garden Crafts, Home Decor Projects, Kitchen Crafts, Nature Crafts for Kids, Summer Crafts Tagged With: beach, frame, ocean, starfish, sun print

Reader Interactions

Free CraftsBy email every week

Latest crafts straight to your inbox!

5 from 2 votes (2 ratings without comment)

Leave a Reply Cancel reply

Your email address will not be published. Required fields are marked *

Rate This Project


The maximum upload file size: 640 MB. You can upload: image, video. Links to YouTube, Facebook, Twitter and other services inserted in the comment text will be automatically embedded. Drop files here

Primary Sidebar

Hi! I’m Amanda and I’m the founder and head designer of Crafts by Amanda. I have spent over 25 years creating projects to share, but it’s not just me anymore! It’s turned into a complete family affair. Come and meet the Creative Team!

Free CraftsBy email every week

Latest crafts straight to your inbox!

All Time Favorites

Learn to make these adorable ladybug painted rocks. use special outdoor paint for this adorable garden craft so you can keep garden ladybugs all summer!

Ladybug Painted Rocks…

These colorful little ladybug painted rocks are the ... Go To project

snowy pinecone candle jar luminaries

Winter Luminaries: Snowy Pinecone…

Make pretty winter luminaries that appear to be covered ... Go To project

Make this wonderful deco mesh pumpkin wreath to hang on your door this fall!

Deco Mesh Pumpkin Wreath…

Adorn your door this fall with a pretty deco mesh ... Go To project

Reuse those empty prescription pill bottles in all sorts of ways. From organizing to making cookies. Yes, cookies! See how to use your empty pill bottles!

20 Uses for Prescription Pill…

You've been collecting prescription pill bottles for ... Go To project

Meet the Family

Amanda

Founder and Designer

Kristen

Editorial Manager

Lindsay

Social Media Manager

As seen on:

Footer

Favorites

  • Jar Photo Frames
  • No-Sew Roman Shade
  • Paper Flowers
  • How to Make a Scrunchie
  • Mermaid Slime

About

  • Home
  • Meet the Creative Team
  • Work with Us
  • Privacy Policy
  • Accessibility
  • Contact Us

Images/text copyright Amanda Formaro 2020. To feature a post from Crafts by Amanda, you may use one photo credited and linked back directly to the project post.

Free CraftsBy email every week

Latest crafts straight to your inbox!

Copyright ©2025, Crafts by Amanda. All Rights Reserved.
Design by Pixel Me Designs

Rate This Tutorial

Your vote:


To share a photo with your comment click here!

A rating is required
A name is required
An email is required

Recipe Ratings without Comment

Something went wrong. Please try again.