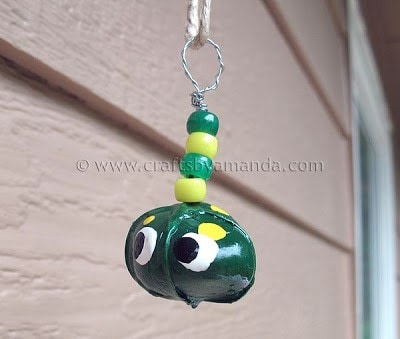
Summer leaves a lot of parents wondering what to do to keep their kids busy. Kid’s crafts are almost always at the top of the list. Camp directors are also on the look out for fun projects, this pet rock necklace delivers to both. The best part about these necklaces is each child’s will have its own special personality!
To make this cute necklace, you are going to need a smooth, round rock, some craft wire and a few other supplies. Yarn can also be used for your necklace instead of the wire. However, depending on the weight of your rock, you may want to braid three strands of yarn together.
Related – don’t miss our collection of painted rock ideas!
1 small, smooth round rock
8-12” craft or floral wire
Acrylic craft paint
4 pony beads
Cord or jute
Scissors
Instant grab fast dry glue
Sealer spray
Before starting this project, be sure to have somewhere you can hang your rock from to dry. Wrapping the wire around a twig in a tree will work great!
Place rock in the middle of the wire and wrap the wire around the rock twisting once. Wrap the wire around crosswise, twisting to secure.
Twist the remaining craft wire strands around each other.
Secure the wire to the rock using instant grab glue and hang somewhere safe to dry.
When dry, paint the rock, painting right over the wire. Let dry. Add decorations to your rock, such as polka dots or stripes, let dry.
Use the handle end of a paintbrush dipped in white paint to dot on two eyes, let dry. Use a smaller paintbrush handle to dot black onto the whites of the eyes. Let dry. Give your rock a coat of sealer spray and let dry.
Add 4 pony beads to the craft wire above the rock.
Twist the remaining wire into a loop. Thread a heavy piece of jute or jewelry cord through the loop and tie together.
Camp Crafts: Pet Rock Necklace
Supplies
- 1 small smooth round rock
- 8-12 ” craft or floral wire
- Acrylic craft paint
- 4 pony beads
- Cord or jute
- Scissors
- Instant grab fast dry glue
- Sealer spray
Instructions
- Before starting this project, be sure to have somewhere you can hang your rock from to dry. Wrapping the wire around a twig in a tree will work great!
- Place rock in the middle of the wire and wrap the wire around the rock twisting once. Wrap the wire around crosswise, twisting to secure. Twist the remaining craft wire strands around each other. Secure the wire to the rock using instant grab glue and hang somewhere safe to dry.
- When dry, paint the rock, painting right over the wire. Let dry. Add decorations to your rock, such as polka dots or stripes, let dry.
- Use the handle end of a paintbrush dipped in white paint to dot on two eyes, let dry. Use a smaller paintbrush handle to dot black onto the whites of the eyes. Let dry. Give your rock a coat of sealer spray and let dry.
- Add 4 pony beads to the craft wire above the rock. Twist the remaining wire into a loop. Thread a heavy piece of jute or jewelry cord through the loop and tie together.
Did you enjoy this post? Why not subscribe to my feed, or better yet, to my free newsletter – Foodie in the Craftroom, which provides not only crafts but recipes from my other blog, Amanda’s Cookin’ as well!
- Free Valentine Printables: Cards, toppers, and tags - February 4, 2025
- Valentine Hugs - January 31, 2025
- Scratch Off Valentine Gift Certificates - January 28, 2025


nadornia says
Muchas gracias por la linda idea, voy a hacer muchos con mis niños.
Un gran abrazo desde Lima-Peru
Pixel Berry Pie Designs says
This necklace is TOO CUTE!
creativejewishmom/sara says
hi Amanda, was missing you! love that pet rock necklace, thanks so much for sharing on Craft Schooling Sunday!
KAT says
so cute..great for the kids to do
Thanks for sharing your creativity
KAT Griffin