• Home
  • About
    • About Crafts by Amanda
    • Visit Our Recipe Site
  • Work With Us
  • Join
    • Free Newsletters
    • Join our Facebook craft group
↑
  • Tutorials
    • Tutorial Index
    • Adult Crafts
    • Crafts for Kids
    • Crafts for Seniors
    • Recycled Crafts
    • Seasonal Crafts
    • Holiday Crafts
    • Free Printables
    • Craft Collections
  • Adult Crafts
    • Bath & Body
    • Beach Crafts
    • Clay Pot Crafts
    • Crafts for Seniors
    • Decoupage Crafts for Adults
    • DIY Gift ideas
    • Garden Crafts
    • Home Decor Projects
    • Kitchen Crafts
    • Light Bulb Crafts
    • Luminary Crafts
    • Mason Jar Crafts
    • Needlework
    • Photo Display Ideas
    • Recycled Crafts for Adults
    • Wearable Crafts for Adults
  • Crafts for Kids
    • Animal Crafts for Kids
    • Back to School Crafts
    • Beach Crafts for Kids
    • Camp Crafts
    • Cardboard Tube Crafts for Kids
    • Decoupage Crafts for Kids
    • Easy Crafts for Kids
    • Nature Crafts for Kids
    • Other Kid’s Crafts
    • Paper Plate Crafts for Kids
    • Recycled Crafts for Kids
    • Slimes, Doughs, & Clay
    • Wearable Crafts for Kids
  • Holiday Crafts
    • 4th of July Crafts
    • Christmas Crafts
    • DIY Gift ideas
    • Earth Day Crafts
    • Easter Crafts
    • Father’s Day Crafts
    • Halloween Crafts
    • Memorial Day Crafts
    • Mother’s Day Crafts
    • New Year’s
    • Other Holidays
    • Patriot Day Crafts
    • St. Patrick’s Day Crafts
    • Thanksgiving Crafts
    • Valentine’s Day Crafts
  • Seasonal Crafts
    • Winter Crafts
    • Spring Crafts
    • Summer Crafts
    • Fall Crafts
  • Skip to primary navigation
  • Skip to main content
  • Skip to primary sidebar
  • Skip to footer

Crafts by Amanda

crafts for adults and kid's crafts

  • Tutorials
    • Tutorial Index
    • Adult Crafts
    • Crafts for Kids
    • Crafts for Seniors
    • Recycled Crafts
    • Seasonal Crafts
    • Holiday Crafts
    • Free Printables
    • Craft Collections
  • Adult Crafts
    • Bath & Body
    • Beach Crafts
    • Clay Pot Crafts
    • Crafts for Seniors
    • Decoupage Crafts for Adults
    • DIY Gift ideas
    • Garden Crafts
    • Home Decor Projects
    • Kitchen Crafts
    • Light Bulb Crafts
    • Luminary Crafts
    • Mason Jar Crafts
    • Needlework
    • Photo Display Ideas
    • Recycled Crafts for Adults
    • Wearable Crafts for Adults
  • Crafts for Kids
    • Animal Crafts for Kids
    • Back to School Crafts
    • Beach Crafts for Kids
    • Camp Crafts
    • Cardboard Tube Crafts for Kids
    • Decoupage Crafts for Kids
    • Easy Crafts for Kids
    • Nature Crafts for Kids
    • Other Kid’s Crafts
    • Paper Plate Crafts for Kids
    • Recycled Crafts for Kids
    • Slimes, Doughs, & Clay
    • Wearable Crafts for Kids
  • Holiday Crafts
    • 4th of July Crafts
    • Christmas Crafts
    • DIY Gift ideas
    • Earth Day Crafts
    • Easter Crafts
    • Father’s Day Crafts
    • Halloween Crafts
    • Memorial Day Crafts
    • Mother’s Day Crafts
    • New Year’s
    • Other Holidays
    • Patriot Day Crafts
    • St. Patrick’s Day Crafts
    • Thanksgiving Crafts
    • Valentine’s Day Crafts
  • Seasonal Crafts
    • Winter Crafts
    • Spring Crafts
    • Summer Crafts
    • Fall Crafts
Craft Tutorials | Crafts for Kids | Animal Crafts for Kids | Cotton Ball Container Bunny

Cotton Ball Container Bunny

Author by Amanda Davis on March 18, 2010 Updated on July 18, 2019

5 from 2 votes
Jump to Project
164 shares
  • Share
  • Tweet
  • Flipboard
  • Email
Turn a recycled cylinder container into this cute bunny craft with your kids this Easter. Whether it’s a Pringle’s can, an oatmeal container, creamer package, or any other cylindrical container. Cover it with cotton balls and decorate! I made this several years ago with my kids and I think he came out pretty darn cute!


Cotton Ball Container Bunny

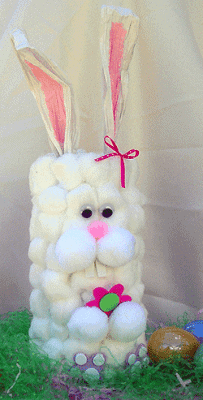
Make a fun and festive cotton ball container bunny. He’s super cute and makes the perfect Easter decor and fun kids craft! You can decorate and use whatever colors your heart desires to make this craft. Use him as a centerpiece, or put him on a side table or bookshelf.

The best part about this cotton ball container bunny? He’s super easy to make! That makes this craft easy and enjoyable for everyone! Plus, this constitutes as a recycled craft, and you can never go wrong with that!

Find more fun Easter crafts here!

You can find the printable list of things you’ll need at the end of this post!

What you’ll need

  • Potato chip canister or any cylinder type canister you have
  • White acrylic paint
  • Bag of cotton balls
  • Chenille stem
  • 4 White pom poms (cheeks and hands) and 1 pink pom pom
  • Wiggle eyes
  • Foam circles- for toes (white)
  • Lilac colored foam flower shapes (feet)
  • 1 large white foam circle
  • 1 pink foam flower shape
  • 1 green medium foam circle
  • 2 rectangular foam shapes (teeth)
  • Pink acrylic paint
  • 6-8″ colorful ribbon of your choice
  • White craft glue
  • Scissors

You can find tons of different foam shapes here!

I hope you have a blast creating this easter craft!

Print Project
5 from 2 votes

Cotton Ball Container Bunny

Author: Amanda Formaro

Supplies

  • potato chip canister or any other can you have
  • Liquitex Basics Gesso OR white acrylic paint
  • bag of cotton balls
  • 3 feet of white twisted paper ears
  • 1 chenille stem any color
  • 4 large white pom poms cheeks and hands
  • 1 small pink pom pom nose
  • 2 medium wiggle eyes
  • 2 lilac colored foam flower shapes feet
  • 6 small white foam circles toes
  • 1 large white foam circle
  • 1 pink foam flower shape
  • 1 green medium foam circle
  • 2 rectangular foam shapes teeth
  • pink acrylic paint
  • 6-8 " colorful ribbon
  • White craft glue
  • scissors

Instructions

  • Completely wash and dry potato chip canister. Paint outside of canister with one coat or Gesso. This does not have to look nice, it's just a thin coat of medium to help the glue stick better. Let dry completely.
  • Glue cotton balls onto canister, completely covering the surface. Start at the bottom, glueing cotton balls next to each other until your finish the row, ending at the one you started with. Repeat this pattern all the way up the can until the canister is completely covered in cotton balls.
  • Cut the twisted paper in half so that you have two equal lengths of 18" each. Open the twisted paper and stretch it out to make a wide ribbon. Fold in half, end to end to create the an ear. Cut chenille stem in half. Holding the ends of the ear together, start about 1 inch above the bottom of the end and secure them together by twisting the chenille stem around them. Repeat this for the other ear as well. Glue the ears to the inside of the top of the canister.
  • About 1/3 of the way down the can, glue 2 white pom poms on for the cheeks. Glue the pink pom pom just above and in between the two white ones. Glue wiggle eyes on above the nose.
  • Using the lilac colored flower foam shapes, cut all but three of the petals off. Glue small white foam circles onto each remaining petal for the toes. Repeat for other flower. Next, cut two small ovals from the large white foam circle. Glue onto lilac flower below the toes for the footpads. Glue the feet at the bottom of the canister as pictured.
  • Glue the small green foam circle into the center of the pink foam flower. Glue the remaining two white pom poms onto the bottom of the flower. Glue this whole thing onto the front of the rabbit above the feet. Flower should be sticking out above the hands.
  • Lay the bunny on its "back" and glue the teeth in place, underneath the cheeks. Tie a colorful ribbon into a bow and glue at the base of one ear.
  • Paint the center of the twisted paper with pink acrylic paint for the center of the ears.
  • Leave bunny in the lying down position, check for items that may have slid around. Put any wandering pieces back where they belong and let dry completely.


  • Author
  • Recent Posts
Amanda Davis
Amanda Davis is the crafty, entrepreneurial mother of four children. She loves to bake, cook, make kid's crafts and create decorative items for her home. She is a crafting expert and guru in the kitchen and has appeared online and in print publications many times over the years.
Latest posts by Amanda Davis (see all)
  • Birdcage Flower Planter - July 15, 2025
  • Recycled Plastic Lid Windchime - July 11, 2025
  • Rainbow Tie Dye Shirts - July 4, 2025
164 shares
  • Share
  • Tweet
  • Flipboard
  • Email

Filed Under: Animal Crafts for Kids, Earth Day Crafts, Easter Crafts, Easy Crafts for Kids, Other Kid's Crafts Tagged With: bunny, bunny craft, earth day, easter, easter craft, fun crafts, holiday craft, holidays, kid's crafts

Reader Interactions

Free CraftsBy email every week

Latest crafts straight to your inbox!

Comments

  1. Sharon says

    March 25, 2013 at 7:59 am

    I did this project years ago only I used a regular kleenex box and added a styrofoam ball for the head. Milk cartons on the side also make gret bunny baskets. I still have and use mine!

    Reply
  2. Jenn @ Delicious Ambiguity says

    March 29, 2010 at 10:21 pm

    Just wanted to let you know I've FEATURED you on TOT Tuesdays this week. Feel free to stop by & grab my FEATURED BUTTON on the top left hand side of my blog. Happy Easter! :)

    Reply
  3. jenjen says

    March 27, 2010 at 4:45 am

    What a cute little bunny! Thanks for linking up to my party!

    XOXO
    Jen

    Reply
  4. Carolyn @ My Backyard Eden says

    March 26, 2010 at 12:04 am

    Cute!!!

    Thanks for linking up to Make it Yours day at My Backyard Eden!

    Reply
  5. Lanie Ree says

    March 25, 2010 at 5:06 pm

    This had me laughing- it is SO cute! I am filing this one away under "future projects for when I have kids"

    And your linky, with all the parties? SUCH a good idea.

    Thank you for linking this to A Little Craft Therapy with Life in the Pitts!

    Reply
  6. Jenn @ Delicious Ambiguity says

    March 25, 2010 at 9:15 am

    Aww..I love it. What a cute & inexpensive craft/ Easter decoration. Thanks for linking up. I hope you'll join me next week for Tot Tuesday!

    Reply
  7. Andy Porter says

    March 23, 2010 at 9:07 pm

    Too too cute!!

    Reply
  8. Angie @ The Country Chic Cottage says

    March 23, 2010 at 8:42 pm

    My kids will love this — thanks!!

    Reply
  9. Jessa Irene (Holiday-Haven) says

    March 22, 2010 at 4:21 pm

    Very fun, my kids would love this!!!

    Reply
  10. Deeba PAB says

    March 21, 2010 at 3:48 pm

    AWWWWWWWWW I LOVE HIM! What a darling!! Well done Amanda!

    Reply
  11. Megan says

    March 21, 2010 at 3:16 pm

    Too cute!

    Reply
  12. fawnda says

    March 21, 2010 at 11:45 am

    This guy is ADORABLE! I Love him! :)

    Reply
  13. Kelly says

    March 20, 2010 at 8:18 pm

    Love the bunny! What a great Easter craft idea for kiddies! Love this blog! It was recommended to me at POM's Connect MEme Monday by Mommy Moment! Hope you can participate this Monday!

    http://thepursuitofmommyness.com

    Reply
  14. The Thriftress says

    March 20, 2010 at 3:46 pm

    Such a fun craft for kids!

    Thanks for stopping by my blog & commenting!
    Sarah

    Reply
  15. Lori says

    March 20, 2010 at 12:08 am

    Oh I totally love this!

    Thanks for joining Get Your Craft on Thursday at Life As Lori! Please join me next week for another great party!

    Reply
  16. Amy @ Positively Splendid says

    March 19, 2010 at 3:17 pm

    Awww, my son would love this! Thanks for sharing!

    Reply
  17. Sonja @ Craft-Werk says

    March 19, 2010 at 10:56 am

    Hi Amanda – thanks so much for leaving a comment on my blog. That made me find YOUR blog, which I IMMEDIATELY signed up for. You have got great craft ideas here. Love it all.

    Reply
  18. Jessica Hills says

    March 18, 2010 at 9:51 pm

    That is so creative! Come stop by my Favorite Things Friday Party if you would like to join in!

    Reply
  19. One Cheap B*tch says

    March 18, 2010 at 8:50 pm

    That is just the cutest thing I've ever seen!

    Reply
  20. Megan says

    March 18, 2010 at 5:13 pm

    Oh, yep! I can see my kids loving this. We'll probably be doing a variation of it soon. Thanks for sharing!

    Reply
  21. Kelly @ Make It Sparkly Mama says

    March 18, 2010 at 4:44 pm

    Oh I love this! I can't wait to make it with my son!

    Reply
5 from 2 votes (2 ratings without comment)

Leave a Reply Cancel reply

Your email address will not be published. Required fields are marked *

Rate This Project


The maximum upload file size: 640 MB. You can upload: image, video. Links to YouTube, Facebook, Twitter and other services inserted in the comment text will be automatically embedded. Drop files here

Primary Sidebar

Hi! I’m Amanda and I’m the founder and head designer of Crafts by Amanda. I have spent over 25 years creating projects to share, but it’s not just me anymore! It’s turned into a complete family affair. Come and meet the Creative Team!

Free CraftsBy email every week

Latest crafts straight to your inbox!

All Time Favorites

Learn to make these adorable ladybug painted rocks. use special outdoor paint for this adorable garden craft so you can keep garden ladybugs all summer!

Ladybug Painted Rocks…

These colorful little ladybug painted rocks are the ... Go To project

snowy pinecone candle jar luminaries

Winter Luminaries: Snowy Pinecone…

Make pretty winter luminaries that appear to be covered ... Go To project

Make this wonderful deco mesh pumpkin wreath to hang on your door this fall!

Deco Mesh Pumpkin Wreath…

Adorn your door this fall with a pretty deco mesh ... Go To project

Reuse those empty prescription pill bottles in all sorts of ways. From organizing to making cookies. Yes, cookies! See how to use your empty pill bottles!

20 Uses for Prescription Pill…

You've been collecting prescription pill bottles for ... Go To project

Meet the Family

Amanda

Founder and Designer

Kristen

Editorial Manager

Lindsay

Social Media Manager

As seen on:

Footer

Favorites

  • Jar Photo Frames
  • No-Sew Roman Shade
  • Paper Flowers
  • How to Make a Scrunchie
  • Mermaid Slime

About

  • Home
  • Meet the Creative Team
  • Work with Us
  • Privacy Policy
  • Accessibility
  • Contact Us

Images/text copyright Amanda Formaro 2020. To feature a post from Crafts by Amanda, you may use one photo credited and linked back directly to the project post.

Free CraftsBy email every week

Latest crafts straight to your inbox!

Copyright ©2025, Crafts by Amanda. All Rights Reserved.
Design by Pixel Me Designs

Rate This Tutorial

Your vote:


To share a photo with your comment click here!

A rating is required
A name is required
An email is required

Recipe Ratings without Comment

Something went wrong. Please try again.