• Home
  • About
    • About Crafts by Amanda
    • Visit Our Recipe Site
  • Work With Us
  • Join
    • Free Newsletters
    • Join our Facebook craft group
↑
  • Tutorials
    • Tutorial Index
    • Adult Crafts
    • Crafts for Kids
    • Crafts for Seniors
    • Recycled Crafts
    • Seasonal Crafts
    • Holiday Crafts
    • Free Printables
    • Craft Collections
  • Adult Crafts
    • Bath & Body
    • Beach Crafts
    • Clay Pot Crafts
    • Crafts for Seniors
    • Decoupage Crafts for Adults
    • DIY Gift ideas
    • Garden Crafts
    • Home Decor Projects
    • Kitchen Crafts
    • Light Bulb Crafts
    • Luminary Crafts
    • Mason Jar Crafts
    • Needlework
    • Photo Display Ideas
    • Recycled Crafts for Adults
    • Wearable Crafts for Adults
  • Crafts for Kids
    • Animal Crafts for Kids
    • Back to School Crafts
    • Beach Crafts for Kids
    • Camp Crafts
    • Cardboard Tube Crafts for Kids
    • Decoupage Crafts for Kids
    • Easy Crafts for Kids
    • Nature Crafts for Kids
    • Other Kid’s Crafts
    • Paper Plate Crafts for Kids
    • Recycled Crafts for Kids
    • Slimes, Doughs, & Clay
    • Wearable Crafts for Kids
  • Holiday Crafts
    • 4th of July Crafts
    • Christmas Crafts
    • DIY Gift ideas
    • Earth Day Crafts
    • Easter Crafts
    • Father’s Day Crafts
    • Halloween Crafts
    • Memorial Day Crafts
    • Mother’s Day Crafts
    • New Year’s
    • Other Holidays
    • Patriot Day Crafts
    • St. Patrick’s Day Crafts
    • Thanksgiving Crafts
    • Valentine’s Day Crafts
  • Seasonal Crafts
    • Winter Crafts
    • Spring Crafts
    • Summer Crafts
    • Fall Crafts
  • Skip to primary navigation
  • Skip to main content
  • Skip to primary sidebar
  • Skip to footer

Crafts by Amanda

crafts for adults and kid's crafts

  • Tutorials
    • Tutorial Index
    • Adult Crafts
    • Crafts for Kids
    • Crafts for Seniors
    • Recycled Crafts
    • Seasonal Crafts
    • Holiday Crafts
    • Free Printables
    • Craft Collections
  • Adult Crafts
    • Bath & Body
    • Beach Crafts
    • Clay Pot Crafts
    • Crafts for Seniors
    • Decoupage Crafts for Adults
    • DIY Gift ideas
    • Garden Crafts
    • Home Decor Projects
    • Kitchen Crafts
    • Light Bulb Crafts
    • Luminary Crafts
    • Mason Jar Crafts
    • Needlework
    • Photo Display Ideas
    • Recycled Crafts for Adults
    • Wearable Crafts for Adults
  • Crafts for Kids
    • Animal Crafts for Kids
    • Back to School Crafts
    • Beach Crafts for Kids
    • Camp Crafts
    • Cardboard Tube Crafts for Kids
    • Decoupage Crafts for Kids
    • Easy Crafts for Kids
    • Nature Crafts for Kids
    • Other Kid’s Crafts
    • Paper Plate Crafts for Kids
    • Recycled Crafts for Kids
    • Slimes, Doughs, & Clay
    • Wearable Crafts for Kids
  • Holiday Crafts
    • 4th of July Crafts
    • Christmas Crafts
    • DIY Gift ideas
    • Earth Day Crafts
    • Easter Crafts
    • Father’s Day Crafts
    • Halloween Crafts
    • Memorial Day Crafts
    • Mother’s Day Crafts
    • New Year’s
    • Other Holidays
    • Patriot Day Crafts
    • St. Patrick’s Day Crafts
    • Thanksgiving Crafts
    • Valentine’s Day Crafts
  • Seasonal Crafts
    • Winter Crafts
    • Spring Crafts
    • Summer Crafts
    • Fall Crafts
Craft Tutorials | Adult Crafts | Garden Crafts | Distressed Garden Sign
Garden Crafts

Distressed Garden Sign

Author by Aimee Page on April 5, 2019 Updated on July 11, 2019

5 from 2 votes
Jump to Project
650 shares
  • Share
  • Tweet
  • Flipboard
  • Email

Get your garden crafts started with this distressed garden sign. Easily distress wood with stain and paint to make a unique yard sign.

Spring craft, distressed garden sign


Distressed Garden Sign

Spring has arrived, and that means people are out in their yards and gardens preparing for the growing season. Add a little whimsy to your garden this year with a cute hand-painted and distressed garden sign.

If you’re in the DIY mood, get inspired with easy outdoor projects for your porch or garden – like these Plastic Spoon Garden Markers, DIY wooden spoon plant markers and a galvanized pail planter.

Garden craft- Please Grow Distressed Garden Sign

Supplies Needed:

  • Unfinished wood sign – You can easily make some with pallet wood, or find a variety of unfinished wood options at your local craft store.
  • Dark wood stain – I used Jacobean, but anything will work
  • Sandpaper
  • White acrylic craft paint
  • Paintbrush
  • Teal outdoor acrylic paint
  • Foam pouncer
  • Cutting machine (Cricut or Silhouette) and this Please Grow template


Tutorial: Distressed Garden Sign

In a well-ventilated area, use a foam brush or old rag to stain the entire sign. Wipe away any excess stain and let dry. Once completely dry, lightly sand the sign to smooth out the wood grain. It’s OK if the stain is not even.

How to make a distressed garden sign step 1

Using a dry brush (lightly dip the brush in paint and dab off excess) begin painting the sign.

How to make a distressed garden sign step 2

You don’t want complete coverage. Instead, use as dry of a brush as possible, and paint back and forth multiple times, to create partial coverage, or a “distressed” look.

How to make a distressed garden sign step 3

Let the white paint dry, and then lightly sand the sign, especially around the edges.

Using your cutting machine cut out the “please grow” words on regular vinyl. You can use this template here. This is your stencil.

How to make a distressed garden sign step 4

Place the vinyl stencil over the painted wood sign. Smooth the vinyl thoroughly over the ridges of the wood.

Load the foam pouncer with outdoor acrylic paint. Using a straight up-and-down motion, paint over the stencil. This will minimize paint bleed.

How to make a distressed garden sign step 5

While the paint is still a bit tacky, peel the vinyl stencil at a 45-degree angle.

How to make a distressed garden sign step 6

Let the paint dry completely before displaying your new distressed garden sign outside.

Distressed Garden Sign

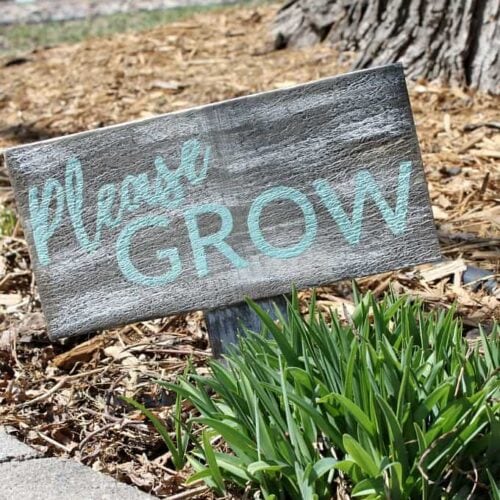
In this tutorial, I painted the words “please grow” on the little wooden sign, but you can get creative and choose any words you like – names of vegetables or fun sayings.

Distressed Garden Sign

More garden crafts you’ll love…

  • Watering Can That Pours Crystals
  • Recycled Key Garden Markers
  • Beaded Decorative Garden Stakes
  • Painted Rock Garden Markers
  • Ladybug Painted Rocks
  • Bottle Cap Flower
Print Project
5 from 2 votes

Distressed Garden Sign

Author: Amanda Formaro

Supplies

  • Unfinished wood sign – You can easily make some with pallet wood or find a variety of unfinished wood options at your local craft store.
  • Dark wood stain – I used Jacobean but anything will work
  • Sandpaper
  • White acrylic craft paint
  • Paintbrush
  • Teal outdoor acrylic paint
  • Foam pouncer
  • Cutting machine Cricut or Silhouette and this Please Grow template

Instructions

  • In a well-ventilated area, use a foam brush or old rag to stain the entire sign. Wipe away any excess stain and let dry. Once completely dry, lightly sand the sign to smooth out the wood grain. It’s OK if the stain is not even.
  • Using a dry brush (lightly dip the brush in paint and dab off excess) begin painting the sign. You don’t want complete coverage. Instead, use as dry of a brush as possible, and paint back and forth multiple times, to create partial coverage, or a “distressed” look.
  • Let the white paint dry, and then lightly sand the sign, especially around the edges.
  • Using your cutting machine cut out the “please grow” words on regular vinyl. You can use this template here. This is your stencil.
  • Place the vinyl stencil over the painted wood sign. Smooth the vinyl thoroughly over the ridges of the wood.
  • Load the foam pouncer with outdoor acrylic paint. Using a straight up-and-down motion, paint over the stencil. This will minimize paint bleed.
  • While the paint is still a bit tacky, peel the vinyl stencil at a 45-degree angle.
  • Let the paint dry completely before displaying your new distressed garden sign outside.

This post was originally published on this blog on May 8, 2018.

distressed garden sign

  • Author
  • Recent Posts
Aimee Page
Aimee Page
Blogger at The Crazy Craft Lady
Aimee is a twin mom, lawyer, and creativity junkie.She is dedicated to helping busy women and their families live more creative and inspired lives by sharing simple crafts, decor, recipes, and organizing solutions on her blog, The Crazy Craft Lady.
Aimee Page
Latest posts by Aimee Page (see all)
  • Black Cat Pumpkins - October 15, 2024
  • Lavender Sugar Scrub - April 23, 2024
  • Decoupage Wood Slice Ornaments - November 11, 2022
650 shares
  • Share
  • Tweet
  • Flipboard
  • Email

Filed Under: Garden Crafts, Spring Crafts Tagged With: diy sign, garden, gardening, outdoor, sign

Reader Interactions

Free CraftsBy email every week

Latest crafts straight to your inbox!

Comments

  1. daniel says

    October 14, 2019 at 1:56 pm

    Great post and it has given me the idea to make some distressed signs for my garden with a halloween theme :)

    Reply
  2. Garden Dad says

    May 25, 2018 at 8:17 pm

    Great diy idea plus looks doable too. Thanks a lot for sharing, Amanda! :)

    Reply
  3. Gladys says

    May 8, 2018 at 12:06 pm

    BONITO

    Reply
    • Amanda Formaro says

      May 10, 2018 at 7:01 am

      Thank you Gladys!

      Reply
5 from 2 votes (1 rating without comment)

Leave a Reply Cancel reply

Your email address will not be published. Required fields are marked *

Rate This Project


The maximum upload file size: 640 MB. You can upload: image, video. Links to YouTube, Facebook, Twitter and other services inserted in the comment text will be automatically embedded. Drop files here

Primary Sidebar

Hi! I’m Amanda and I’m the founder and head designer of Crafts by Amanda. I have spent over 25 years creating projects to share, but it’s not just me anymore! It’s turned into a complete family affair. Come and meet the Creative Team!

Free CraftsBy email every week

Latest crafts straight to your inbox!

All Time Favorites

snowy pinecone candle jar luminaries

Winter Luminaries: Snowy Pinecone…

Make pretty winter luminaries that appear to be covered ... Go To project

Make this wonderful deco mesh pumpkin wreath to hang on your door this fall!

Deco Mesh Pumpkin Wreath…

Adorn your door this fall with a pretty deco mesh ... Go To project

Learn to make these adorable ladybug painted rocks. use special outdoor paint for this adorable garden craft so you can keep garden ladybugs all summer!

Ladybug Painted Rocks…

I'm going to show you how to make these adorable ... Go To project

Reuse those empty prescription pill bottles in all sorts of ways. From organizing to making cookies. Yes, cookies! See how to use your empty pill bottles!

20 Uses for Prescription Pill…

You've been collecting prescription pill bottles for ... Go To project

Meet the Family

Amanda

Founder and Designer

Kristen

Editorial Manager

Lindsay

Social Media Manager

As seen on:

Footer

Favorites

  • Jar Photo Frames
  • No-Sew Roman Shade
  • Paper Flowers
  • How to Make a Scrunchie
  • Mermaid Slime

About

  • Home
  • Meet the Creative Team
  • Work with Us
  • Privacy Policy
  • Accessibility
  • Contact Us

Images/text copyright Amanda Formaro 2020. To feature a post from Crafts by Amanda, you may use one photo credited and linked back directly to the project post.

Free CraftsBy email every week

Latest crafts straight to your inbox!

Copyright ©2025, Crafts by Amanda. All Rights Reserved.
Design by Pixel Me Designs

Rate This Tutorial

Your vote:


To share a photo with your comment click here!

A rating is required
A name is required
An email is required

Recipe Ratings without Comment

Something went wrong. Please try again.