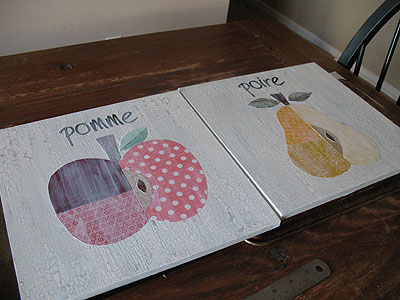
There’s a little story behind this wall art. I was selected as a contestant, along with 11 incredibly talented ladies in the super fun competition, Crafting with the Stars. I was paired up with Amy Anderson of Mod Podge Rocks fame, and together we were to come up with a brand inspired decoupage knock off project. We both had a few different ideas, but I decided that the apple and pear wall art from Land of Nod that Amy found could be transformed into some fabulous kitchen wall art. I had originally planned to just put “apple” and “pear” above the fruit, but the amazing Amy suggested writing the words in French. Tres bon!! The French are all about food, so it only made sense to put the words of my kitchen foodie wall art in the language of love. :)
UPDATE: These two French Fruit Wall Art pieces are available in my Etsy shop here.
As for my inspiration… (thank you Amy!)
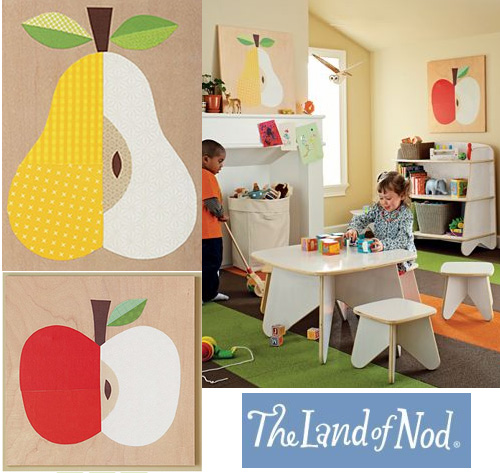
These two pieces of art from Land of Nod are adorable, but they are
1) huge, 26″ x 26″
2) really more geared toward a child’s playroom or bedroom
3) a whopping $119 each!
Umm.. no.
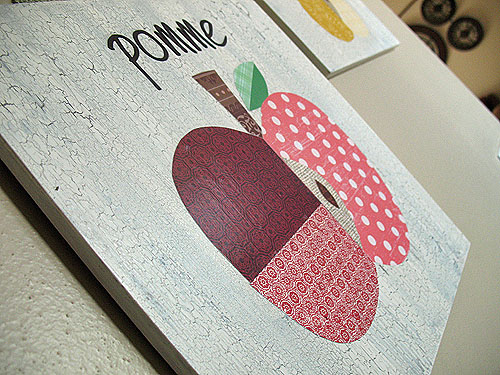
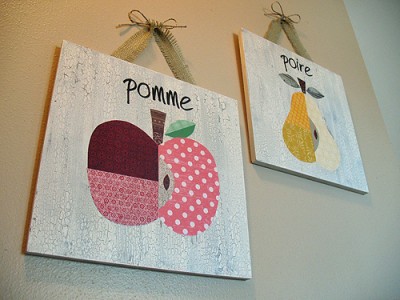
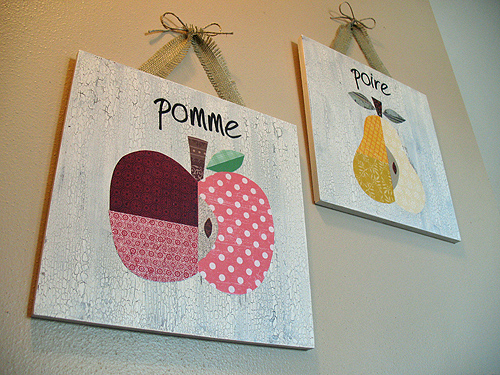
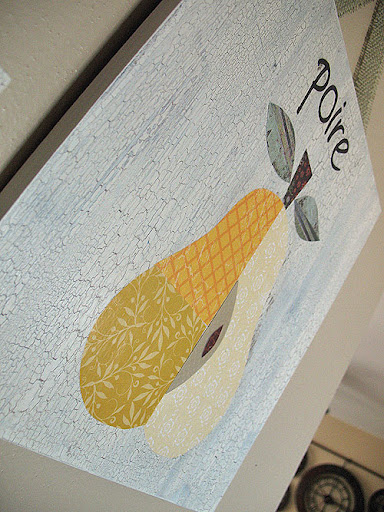
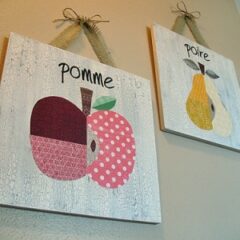
Instead, I decided to use the fruit alone as my inspiration, sticking with the wooden canvas, but adding in a bit of French country primitive charm. I used crackle medium, several different types of scrapbook papers in vintage hues, and I cut the sweet French words out of brown card stock using my Silhouette cutting machine. Everything was attached with Mod Podge and I finished it off with a burlap and twine hanger.
I just want to say a huge thank you to Amy of Mod Podge Rocks for being my partner in this venture, for being a great sounding board, and for several of her marvelous ideas that made this project a success. I am happy to say that we have advanced to Round 2 and are excited about coming up with the next project!
Here’s the full tutorial, including fruit patterns, if you would like to make your own!
French Fruit Wall Art
What you need
2 pieces of 12″ x 12″ x 3/4″ plywood, available at Michael’s
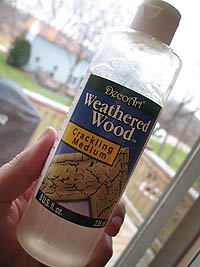
Crackle medium (I used DecoArt Weathered Wood)
Acrylic paint: dark brown and antique white
Various scrapbook papers in shades of red, yellow, green and brown
Scissors
Mod Podge matte finish
Brown cardstock
Burlap
Twine
Hot glue
2 thumbtacks
Scrap cardboard
Apple pattern
Pear pattern
Silhouette pattern (or use the font “harrison” in Word)
What you do
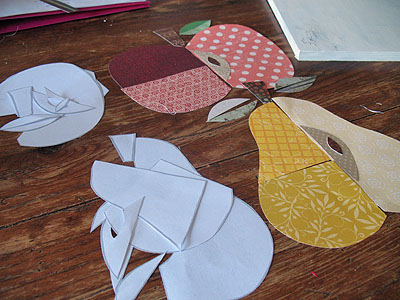
Print the fruit patterns. Use the patterns to cut pieces out of scrapbook paper.
Paint the plywood brown, paint the sides as well. Allow to dry. When the brown paint is dry, brush on a coat of crackle medium. This will need to dry for a good 30-40 minutes. You don’t want it to dry completely, but almost. ;)
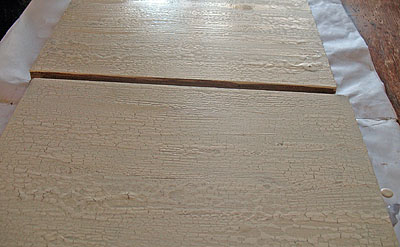
Load up your brush with antique white paint. You want a good amount of paint on your brush, but it shouldn’t be dripping. Brush on top of crackle medium using single strokes, try not to paint over areas you have already painted. You can quickly touch something up right away, but don’t wait too long.
If you have a cutting machine, use that and the “harrison” font to cut the words “pomme” and “poire” from brown cardstock. If you don’t have a cutting machine, you could use a sharp craft knife or maybe paint the words on to the board.
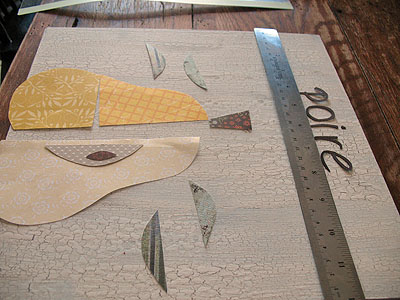
Position the fruit pieces and the words on the board to make sure you have them where you want them. I found the center of the board with a rule and started there, placing the middle of the word in the center and positioning the rest of the word afterward.
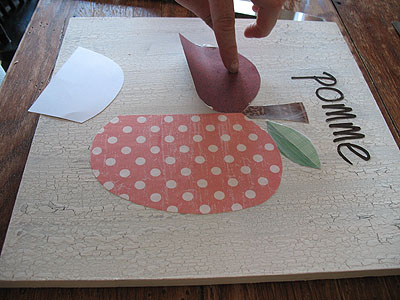
Add the letter first using a little Mod Podge. After the letters are in place, start adding the fruit pieces with Mod Podge.
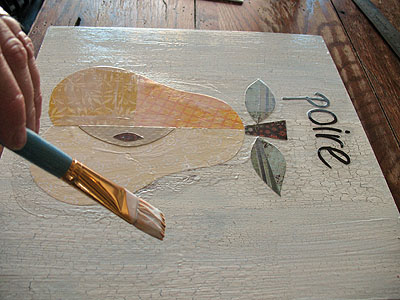
Once all the pieces are in place, add a good coat of Mod Podge over the entire project.
Let them dry completely.

To add hangers, cut a piece of burlap into a 12-14″ strip, fray the edges by pulling off a couple side strands. Position the fruit art on your work surface facing up, then position your hanger under it, just to figure out how you want it. When you have it the way you want it, tie a piece of twine at the top of the hanger into a bow, trim ends. Use your glue gun to tack the burlap to some pieces of cardboard, and tack the cardboard to the wooden board. Now you can lift the art and turn it over without losing the hanger’s position. Add more hot glue where needed and push thumbtacks into the burlap and cardboard for a little added strength. I’m sure there’s a much better way to do this, but hey, this worked! ;)

There you have it!
French Fruit Wall Art
Supplies
- 2 pieces of 12″ x 12″ x 3/4″ plywood available at Michael’s
- Crackle medium I used DecoArt Weathered Wood
- Acrylic paint: dark brown and antique white
- Various scrapbook papers in shades of red yellow, green and brown
- Scissors
- Mod Podge matte finish
- Brown cardstock
- Burlap
- Twine
- Hot glue
- 2 thumbtacks
- Scrap cardboard
- Apple pattern
- Pear pattern
- Silhouette pattern or use the font “harrison” in Word
Instructions
- Print the fruit patterns. Use the patterns to cut pieces out of scrapbook paper.
- Paint the plywood brown, paint the sides as well. Allow to dry. When the brown paint is dry, brush on a coat of crackle medium. This will need to dry for a good 30-40 minutes. You don’t want it to dry completely, but almost. ;)
- Load up your brush with antique white paint. You want a good amount of paint on your brush, but it shouldn’t be dripping. Brush on top of crackle medium using single strokes, try not to paint over areas you have already painted. You can quickly touch something up right away, but don’t wait too long.
- If you have a cutting machine, use that and the “harrison” font to cut the words “pomme” and “poire” from brown cardstock. If you don’t have a cutting machine, you could use a sharp craft knife or maybe paint the words on to the board.
- Position the fruit pieces and the words on the board to make sure you have them where you want them. I found the center of the board with a rule and started there, placing the middle of the word in the center and positioning the rest of the word afterward.
- Add the letter first using a little Mod Podge. After the letters are in place, start adding the fruit pieces with Mod Podge.
- Once all the pieces are in place, add a good coat of Mod Podge over the entire project.
- Let them dry completely.
- To add hangers, cut a piece of burlap into a 12-14″ strip, fray the edges by pulling off a couple side strands. Position the fruit art on your work surface facing up, then position your hanger under it, just to figure out how you want it. When you have it the way you want it, tie a piece of twine at the top of the hanger into a bow, trim ends. Use your glue gun to tack the burlap to some pieces of cardboard, and tack the cardboard to the wooden board. Now you can lift the art and turn it over without losing the hanger’s position. Add more hot glue where needed and push thumbtacks into the burlap and cardboard for a little added strength.


- Patriotic Pinwheels - June 23, 2026
- Fingerprint Daddy & Me Coffee Mug - June 12, 2026
- Patriotic Bandana Wreath - June 9, 2026


Melanie says
Hello!! I love this so much! I’m in the process of making these for personal use. I’m changing the French to Italian for my heritage. The Apple = La Mela, The Pear= La Pera. I just have a question, being fairly new to crafting especially decoupage, how do I cut the shapes for the fruits correctly? I printed them out mirror image on the front of contact paper an stuck the shapes on the back of the paper, but they never line up properly. I keep cutting little pieces off until I end up completely ruining them and have to start again! I’m on round 3 as I write this! Any suggestions?
Amanda Formaro says
That’s basically what I had to do as well, just trim until they fit. When cutting out your pieces, try cutting out the entire piece of fruit from each paper, then stack all of them together and then cut the sections. That might work better!
Melanie says
Ahhh! I will try that thanks soooo much!
Angie @ Big Bear's Wife says
love them! I need to make an orange for my kitchen! So cute!
Amanda Formaro says
Thank you Angie! And yes, an orange would be fabulous!
Irina says
Absolutely lovely, thanks for the great idea!
Amanda says
Thank you for letting me know! I have sent a complaint to google as well as asked the blog owner to remove it.
sewfearless.com says
Just a heads up, makethingsforkids.blogspot.com has copied your blog post on their site.
geraldine says
Hi Amanda thanks for sharing this great project :) I just finished making them. I don't have a blog but maybe I can post the pic on facebook.
Amanda says
I love it Jen, thanks so much for showing me! I have linked to your project on my Facebook page :) http://www.facebook.com/CraftsbyAmanda
Jen says
I hope you don't mind, I followed your tutorial and credited your site on my blog. It was a fun easy project, and turned out great!
http://jenjames11.blogspot.com/
Thank you for the work you did on this!
Amanda says
Karli – Shared that on my FB page, they look great!
@ Staci – thank you so much, really appreciate the feature! :)
Staci says
These are so adorable! I'm including them in my Friday Favorites feature this week!
Karli says
I did this tutorial.. and yours turned out better! haha! But I'm still totally in love with mine!!!
-Karli
http://www.dancingaroundwithkarli.blogspot.com/2011/03/pomme-et-poire.html
Amanda says
Those came out great Amy!! Thanks for sharing those with me, they look awesome!
AmyOfSweden says
I tried to make something similar: http://amyofsweden.blogspot.com/
Thank you for a very good tutorial. I really like the outcome
Amanda says
Thank you so much for all of your wonderful comments!!
Yeda Sant'Anna says
Uauuuu!!!
Ameiii muitoo legal a idéiaa!!
Parabénss..
DarcyinVA says
Those would work well for reusable grocery bags, too. Very nice.
Sparkling says
Tres chic. This was posted on my birthday and I am a French teacher and I just stumbled this. Excellent!
Katie P says
I love it! Though I am a sucker for all things pear…
Katie P
Food, Wine, & Mod Podge — Vinyl Giveaway!!
Its So Very Cheri says
Amanda,
Thanks for sharing your project with the DIY Club. You know we think you are awesome.
Have a knock out week.
Cheri
Amanda says
Thanks Roeshel!
The DIY Show Off says
So pretty! I love the pattern and weathered wood together. Clever! :)
Roeshel
Amanda says
Thank you ladies!!
Judy@cutest-little-things says
How adorable and simple! Thank you for sharing!
Judy@cutest-little-things
creativejewishmom/sara says
Love, love love these Amanda! thanks so much for sharing on Craft Schooling Sunday, you've definately earned a place in the features….all the best!
C.R.A.F.T. says
that is so cute! come on over and link up to MMM :)
Young and Crafty says
I would LOVE for you to link this up in Scraptastic Saturday! It is adorable!
Hannah @ http://youngancrafty.blogspot.com/
Morgane @ Bear,Dolly and Moi says
cool and smart, and I do not just say that because it is in French!! great pieces of art, the fuits have such nice texture.
Amanda says
Thanks so much you guys! :) :)
marla {family fresh cooking} says
Amanda, this wall art is awesome! Thanks for sharing your creativity and this technique with us! xo
Jenny says
so cute!
Samantha says
So cute! I had admired Amy's, but the french writing makes them even better!!
Megan says
These are just too cute and I knew you would advance to round two!!!
Toyin O. says
Looks really nice.
Chris says
These turned out great. The finish is a wonderful touch.
Life with the Lebedas says
You were featured on my blog!! Swing by and grab the 'feature' button- I have a link up as well if you'd like to join. :) Have a great Thursday!
Jennifer @ Life with the Lebedas
http://www.lebedafamily.blogspot.com
Staci says
These turned out amazing! Crazy enough I just saw these in the catalog last night and have been thinking about how to make them all day, then waalaa there is a link to you on my FB page through Dollar Store Crafts! Thanks so much for sharing your talent :)
Amanda says
Thank you so much everyone!
Suzie says
So cute! Great idea! Thanks for sharing.
Suzie @
staycalmandsewsomething.blogspot.com
Julie says
Very cute!
Mod Podge Amy says
No, YOU! Seriously, you did such an amazing job. I'm so excited for Round 2!
Ashleigh says
These are so great. I love that you were "brand-inspired," then put your own twist on it, making it uniquely beautiful! Great work!
Angie @ The Country Chic Cottage says
This was my fave project!! Gorgeous!!
Becky says
Thanks so much for sharing the tutorial. I can't wait to make this!
Jennifer says
That is so stinkin' cute. I like it better than the original. No wonder you advanced. Great job.
Alicia says
Those are fantastic. Can't wait to see round 2.
Maria Gridley says
Love this, this was a tie for my fav on crafting with the stars!! :) LOVE it!
Its So Very Cheri says
Congrats on advancing on CRAFTING with the STARS.
If you used our DecoArt crackle medium you could enter this in theDIYClub.com monthly contest starting Nov 4th.
Cheri
Cheri from ItsSoVeryCheri.com and TheDIYClub.com
Denise * KKL Primitives says
These turned out beautiful Amanda! Love them!! Congrats on advancing to the next round! :)
Michele {The Scrap Shoppe} says
Loved this, Amanda!! Especially with the patterned papers and French wording. Just too cute! Congratulations!
Deeba PAB says
Well done Amanda, you deserve to advance to the next round! These are brilliant!
Kristen Duke says
This is great! I want to make this for my kitchen:)