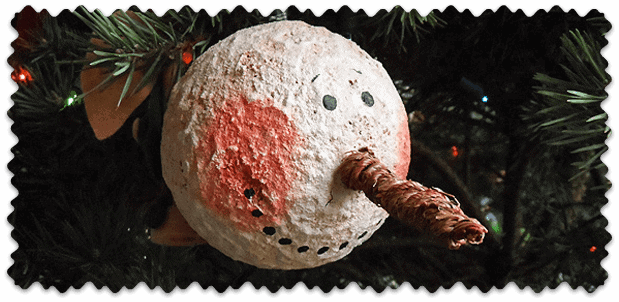

Make a big statement this Christmas with this jumbo ornament. A big vintage snowman that is as big as the palm of your hand to grace your Christmas tree this year!

I was actually inspired to make this because of an ornament I bought a couple of years ago. Problem was I made this ornament back in September, which of course meant I hadn’t unpacked my Christmas ornaments yet. Therefore I would have to make it from memory.
 Now that Christmas is here and the ornaments have been taken down from the attic, I think I did a pretty good job of replicating that big vintage snowman. You can get a feel for the size from these pictures.
 When I made this in September I took some pictures of him hanging in the tree outside and was glad to get him hung up in the Christmas tree finally.
 - CraftsbyAmanda.com") To make this ornament I used a 4-inch Styrofoam ball, Magikote, snow texture paint, white glitter paint, antiquing gel and a few other supplies.
To make this ornament I used a 4-inch Styrofoam ball, Magikote, snow texture paint, white glitter paint, antiquing gel and a few other supplies.
[There are full printable instructions below.]
 - CraftsbyAmanda.com") I used a chunk of floral foam as a stand to work with. After adding a coat of Magikote, I then added Snotex paint and texturized it with my fingers. It takes a while to dry. I used vine wrapped wire to make the nose by wrapping it around a pencil, then created a hole in the ball where the nose would be to create my starting point.
I used a chunk of floral foam as a stand to work with. After adding a coat of Magikote, I then added Snotex paint and texturized it with my fingers. It takes a while to dry. I used vine wrapped wire to make the nose by wrapping it around a pencil, then created a hole in the ball where the nose would be to create my starting point.
 - CraftsbyAmanda.com") From there I added cheeks with Coral Blush paint and used the handle end of a paintbrush to add the eyes and mouth with black paint. After that dried I mixed glazing medium with Light Cinnamon paint and brushed it on then wiped it back. I wasn’t really achieving the tint I wanted, so I switch to antiquing gel instead.
From there I added cheeks with Coral Blush paint and used the handle end of a paintbrush to add the eyes and mouth with black paint. After that dried I mixed glazing medium with Light Cinnamon paint and brushed it on then wiped it back. I wasn’t really achieving the tint I wanted, so I switch to antiquing gel instead.

He’s a big guy, but I’m really happy with how he came out. You could absolutely make one a little smaller using a different sized Styrofoam ball. I just wanted to mimic that cool snowman I bought for my tree 2 years ago. :)
Jumbo Vintage Snowman Ornament
Supplies
- 4- inch Styrofoam ball
- White paint or Magikote
- Snow texture paint
- White glitter paint
- 12- inch dowel
- Floral foam
- Glazing medium or antiquing gel
- Paint: pink black, light brown
- Vine wrapped wire available in floral department
Instructions
- Insert dowel into Styrofoam ball. Insert the other end of the dowel into the floral foam. This will hold the ball for you while you work.
- Coat the ball in white paint or Magikote and let it dry completely.
- Thin snow texture paint with white glitter paint. Simply squeeze some of the glitter paint into the texture paint and stir. Texture paint is usually quite thick and you will want it to have a more paintable texture.
- Apply the texture paint mixture all over the Styrofoam ball until completely covered. Use your fingers to add more texture by touching and lifting your fingers out of the paint. Allow to dry completely, overnight is best.
- To make the nose, coil some vine wrapped wire around a pencil. The nose will be about 3-inches long. Peel back some of the vine from the end of the nose and insert the wire into the ball. Remove the nose and set aside. The hole will mark where your nose will go.
- Dip a scruffy paintbrush in pink paint and dab off the excess onto a cloth or paper towel. Using a pouncing motion, apply pink to the cheek areas.
- Dip the handle end of a paintbrush into black paint to add eyes and mouth. Let the paint dry completely.
- Mix the light brown paint with the glazing medium according to bottle directions. Apply all over the ball and wipe back excess with a clean cloth. Repeat until you are happy with the results.
- Create a hanger from a scrap of gingham fabric. Insert into the hole from the dowel and glue in place.
- Add a dab of glue to the nose hole and insert the nose.
- Paper Plate Tropical Fish Craft - July 19, 2024
- Tropical Paper Flowers - July 16, 2024
- DIY Mosquito Repellent Candles - July 9, 2024


Jenny Brown says
I make these as well however I use brown shoe polish wax to give it that aged look when paint is all dry. I use the kind that is in a small tin container not the bottled liquid kind. Just wanted to share that with ya. It gives them a real nice look also. I love the vine covered wire for the nose. Beats the custom orange felt nose….
Maureen says
LOVE, LOVE, LOVE IT! I am a big snowman collector so this will be added to my collection as soon as I get it made. THANKS for sharing..
Amanda Formaro says
Thanks Maureen! He’s definitely one of my faves :)
Suzetta says
Thank you…Thank you…Snowmen are my FAV. I just made one and followed your instructions…Yours looks much smoother than mine. Did you sand yours a bit? And did you apply a clear glaze over yours after you were done? Not sure how I would post a pic of mine to show you what I am talking about…..?
Thanks again.
Amanda Formaro says
Hi Suzette! I’ve sent you an email so you can reply and send me a photo if you like. I didn’t use a clear glaze, just the antiquing gel as mentioned in the tutorial. I didn’t do any sanding either, just used my fingers to manipulate the Magikote as shown in the picture on the post. I’m sure it still looks awesome! If you wanted to sand it though, you certainly can. Magikote is totally sandable, you would just have to do your antiquing gel again.
Rosa Marie says
THANK YOU, THANK YOU, THANK YOU….I LOVE HIM! Adorable much better than the original one. I bought some balls, had a couple of the GREEN ONES and I have a LARGE one too like 8 inches. Going to try it too. What is the difference in the green ones and the white ones??
Hugs and Smiles,
Rosa Marie
Amanda Formaro says
Hi Rosa! I’m sure you could use the green ones just as well as the white. So glad you love the project and hope you get a chance to try it!
Debbie Buff says
I just LOVED this! Thanks so much for sharing.
Amanda Formaro says
Thanks Debbie, so glad you like him! :)
Sandi Allen says
Thanks for sharing!
Love this!
Amanda Formaro says
Thanks Sandi, he’s one of my favorites :)
jan says
These are adorable!! Thank u for the tutorial…gonna make these!!
Amanda Formaro says
Thanks jan glad you like it!
Melody Priest says
Very cool. I love snowmen, and I am going to try this. Thanks for Sharing.
Amanda Formaro says
Thanks Melody!
DebBlee says
I think the reproduction is even cuter! think I finally found a use for the 6 inch foam ball I have lying around =D
Theresa says
This ornament is adorable! Visiting from DearCreatives.com
nest of posies says
he looks so cute!!!
jet says
aaaw such a great cute idea, thank you for the great tute and the sharing;-D
Linda says
Sooooo Cute! I will be making these with my young nieces and nephews but in a smaller version for them,but I like the big one!! Great idea!
Kelly Rowe says
How cute is this? LOVE the vintage look and am anxious to use the snow textured paint (I’ve never used that before). Thanks for sharing. Stumbling and Pinning ;)
Rena says
That’s really cool! I need to find some of that Magikote!