• Home
  • About
    • About Crafts by Amanda
    • Visit Our Recipe Site
  • Work With Us
  • Join
    • Free Newsletters
    • Join our Facebook craft group
↑
  • Tutorials
    • Tutorial Index
    • Adult Crafts
    • Crafts for Kids
    • Crafts for Seniors
    • Recycled Crafts
    • Seasonal Crafts
    • Holiday Crafts
    • Free Printables
    • Craft Collections
  • Adult Crafts
    • Bath & Body
    • Beach Crafts
    • Clay Pot Crafts
    • Crafts for Seniors
    • Decoupage Crafts for Adults
    • DIY Gift ideas
    • Garden Crafts
    • Home Decor Projects
    • Kitchen Crafts
    • Light Bulb Crafts
    • Luminary Crafts
    • Mason Jar Crafts
    • Needlework
    • Photo Display Ideas
    • Recycled Crafts for Adults
    • Wearable Crafts for Adults
  • Crafts for Kids
    • Animal Crafts for Kids
    • Back to School Crafts
    • Beach Crafts for Kids
    • Camp Crafts
    • Cardboard Tube Crafts for Kids
    • Decoupage Crafts for Kids
    • Easy Crafts for Kids
    • Nature Crafts for Kids
    • Other Kid’s Crafts
    • Paper Plate Crafts for Kids
    • Recycled Crafts for Kids
    • Slimes, Doughs, & Clay
    • Wearable Crafts for Kids
  • Holiday Crafts
    • 4th of July Crafts
    • Christmas Crafts
    • DIY Gift ideas
    • Earth Day Crafts
    • Easter Crafts
    • Father’s Day Crafts
    • Halloween Crafts
    • Memorial Day Crafts
    • Mother’s Day Crafts
    • New Year’s
    • Other Holidays
    • Patriot Day Crafts
    • St. Patrick’s Day Crafts
    • Thanksgiving Crafts
    • Valentine’s Day Crafts
  • Seasonal Crafts
    • Winter Crafts
    • Spring Crafts
    • Summer Crafts
    • Fall Crafts
  • Skip to primary navigation
  • Skip to main content
  • Skip to primary sidebar
  • Skip to footer

Crafts by Amanda

crafts for adults and kid's crafts

  • Tutorials
    • Tutorial Index
    • Adult Crafts
    • Crafts for Kids
    • Crafts for Seniors
    • Recycled Crafts
    • Seasonal Crafts
    • Holiday Crafts
    • Free Printables
    • Craft Collections
  • Adult Crafts
    • Bath & Body
    • Beach Crafts
    • Clay Pot Crafts
    • Crafts for Seniors
    • Decoupage Crafts for Adults
    • DIY Gift ideas
    • Garden Crafts
    • Home Decor Projects
    • Kitchen Crafts
    • Light Bulb Crafts
    • Luminary Crafts
    • Mason Jar Crafts
    • Needlework
    • Photo Display Ideas
    • Recycled Crafts for Adults
    • Wearable Crafts for Adults
  • Crafts for Kids
    • Animal Crafts for Kids
    • Back to School Crafts
    • Beach Crafts for Kids
    • Camp Crafts
    • Cardboard Tube Crafts for Kids
    • Decoupage Crafts for Kids
    • Easy Crafts for Kids
    • Nature Crafts for Kids
    • Other Kid’s Crafts
    • Paper Plate Crafts for Kids
    • Recycled Crafts for Kids
    • Slimes, Doughs, & Clay
    • Wearable Crafts for Kids
  • Holiday Crafts
    • 4th of July Crafts
    • Christmas Crafts
    • DIY Gift ideas
    • Earth Day Crafts
    • Easter Crafts
    • Father’s Day Crafts
    • Halloween Crafts
    • Memorial Day Crafts
    • Mother’s Day Crafts
    • New Year’s
    • Other Holidays
    • Patriot Day Crafts
    • St. Patrick’s Day Crafts
    • Thanksgiving Crafts
    • Valentine’s Day Crafts
  • Seasonal Crafts
    • Winter Crafts
    • Spring Crafts
    • Summer Crafts
    • Fall Crafts
Craft Tutorials | Adult Crafts | Home Decor Projects | How to Make a Burlap Wreath
Home Decor Projects

How to Make a Burlap Wreath

Author by Amanda Davis on August 26, 2022 Updated on August 26, 2022

990 shares
  • Share
  • Tweet
  • Flipboard
  • Email

I love wreaths but admittedly with all the adult crafts I have, I didn’t have one on how to make a burlap wreath. So I am going to show you how to make a burlap wreath using a wire coat hanger and a roll of burlap or burlap ribbon.

burlap wreath hanging on door


Why we love this project

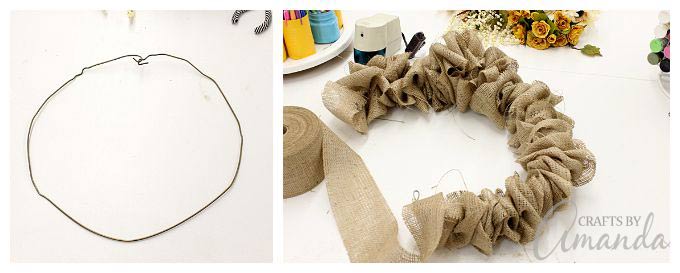
There are several ways to make a burlap wreath. I’m using a coat hanger for the form, but there are instructions out there for using wired and Styrofoam wreath forms too. Some of them weave the burlap ribbon in and out of the wreath form while others tie strips of burlap to it.

Some are neat as a pin and others, like mine, have a more rustic and natural look. No matter what your style, make a burlap wreath that makes you happy! When you’re done, you can embellish it with pretty silk flowers, little pumpkins, and scarecrows, or berries and twigs. It would look perfect next to this reversible scarecrow snowman sign or these mason jar lid pumpkins!

Tips from experience

When I saw this video on Facebook (via Just Call Me Homegirl) showing how to make a burlap wreath I knew I wanted to make one right away! In fact, instead of giving you the complete step by step here, I’m including the video below since it shows just how easy it is.. I made this wreath in September 2015. A few weeks after I noticed that the weight of the burlap started giving in to gravity and shifting down the hanger.

I would recommend using something as a spacer in between every other fold of burlap. Maybe add small wads of modeling clay to the hanger or even just hot glue the burlap to the hanger as you go.

RELATED: See how to make an adorable wreath made from doilies OR an adorable Burlap Pumpkin Wreath!

hanging burlap wreath

Here’s what you will need

  • 10 yard roll of burlap
  • Wire coat hanger
  • Silk flowers
  • Lace ribbon
  • Small pliers
  • Hot glue gun

How To Make a Burlap Wreath

coat hanger formed into circl

First I suggest watching the video because I’m not going to show you any of the assembly steps. It’s one motion repeated over and over. So please watch then come back. :)

Basically, you need to use some small pliers to help you unwrap the wire hanger. Stretch it out and form a circle, creating hooks at each end so you can join it together when you’re done.

Then thread the burlap on per the video instructions (see my “experience tip” above). When you’re done adding burlap, join the hooked ends and tighten them with the pliers so they don’t come unhooked.

adding lace to burlap wreath

Use a hot glue gun to embellish the wreath with your silk flowers. Tie the lace ribbon into a bow and glue to the top of the wreath.

Other Embellishment Ideas

  • Use silk flowers in colors of the season. If you build the embellishment separately, you can attach a large pin or even a pipe cleaner that will allow you to attach it to the wreath. Then when the season changes, you can easily remove that embellishment and add the next season!
  • Using lace to add romance to rustic. You can buy lace in ribbon form, which makes it really easy to tie into a bow like I did on mine. You can also use it to add your embellishment flower arrangement.
  • Dress it up with personalization. A painted letter makes the perfect monogrammed touch to the center of your wreath. This is a great way to personalize your wreath to your family name.
  • Light it up! You can purchase battery operated mini LED string lights to thread throughout your wreath. This is great for the holidays, but it works any time of the year as well. I did this with my deco mesh poinsettia flower.
burlap wreath with a coat hanger on door

Now that you know how to make a burlap wreath you have an easy and awesome idea for holiday gifts AND no excuse not to have a wreath on your door. It’s the perfect way to decorate the outside before people come inside!

Now that I’ve discovered how fun and easy making wreaths really is I’ve been collecting quite a few ideas. I really like this Indian Corn Wreath idea and think I’ll try making one of those next.

burlap wreath

More of my burlap crafts

And if it’s burlap crafts that you love, you might like my vintage jewel burlap wall letters and my burlap & doily luminaries. And it’s kind of funny actually, but these bleached burlap vintage jewelry luminaries are kind of a cross between the other two projects I mentioned!

More burlap crafts

  1. I love some of the burlap crafts I’ve found around, including this coastal burlap wall art from Sand & Sisal.
  2. And this burlap and ribbon pillow from Country Chic Cottage.
  3. Home Stories A to Z shows you how to make burlap light shades.
  4. Just Paint It uses spray paint to create a fun leaf themed burlap pillow.
  5. This beautiful sunflower wreath is made with brown, yellow, and green burlap. A statement piece like this on your front door can easily transition from summer to fall!

Hope you enjoyed learning how to make a burlap wreath! If you would rather buy a burlap style wreath, this one on Etsy is lovely and has a monogram letter in the center. You can obviously personalize it with your order! Have fun!

This post was originally published on this blog on Oct 4, 2016.

  • Author
  • Recent Posts
Amanda Davis
Amanda Davis is the crafty, entrepreneurial mother of four children. She loves to bake, cook, make kid's crafts and create decorative items for her home. She is a crafting expert and guru in the kitchen and has appeared online and in print publications many times over the years.
Latest posts by Amanda Davis (see all)
  • Spring Scavenger Hunt - May 9, 2025
  • How to Make Lip Scrub - May 2, 2025
  • How to Make Lavender Soap - April 22, 2025
990 shares
  • Share
  • Tweet
  • Flipboard
  • Email

Filed Under: Crafts for Seniors, Fall Crafts, Home Decor Projects Tagged With: burlap, coat hanger, home decor, lace, wreath

Reader Interactions

Free CraftsBy email every week

Latest crafts straight to your inbox!

Comments

  1. Wendy Saxton says

    September 28, 2017 at 12:27 am

    Does the burlap have to have finished edges? I have a huge roll and thought of cutting it in strips myself. Thank you in advance for the great video.

    Reply
    • Amanda Formaro says

      September 28, 2017 at 10:12 pm

      Hi Wendy! Burlap frays really bad. If you cut the strips yourself I fear that you’ll end up with a lot of strings and you won’t be happy with the results :(

      Reply
  2. Jeanine Okio B Designs says

    October 4, 2016 at 10:22 am

    Beautifully done! Every year I say I’m going to make one and another year passes and I don’t. You’ve given me the nudge I needed.

    Jeanine

    Reply
  3. Brandeebratcher says

    November 7, 2015 at 8:45 pm

    Hi. Did you use entire ten yard role for this one wreath and also wondrring if your burlap had finished or unfinished edges. Thank yiy

    Reply
    • Amanda Formaro says

      November 16, 2015 at 10:00 am

      Mine had finished edges. I did not use the whole roll. :)

      Reply
  4. JO says

    October 1, 2015 at 3:19 pm

    This is very expensive, Walmart cost for a roll of burlap, $51.00 Very cute, but….

    Reply
    • Amanda Formaro says

      October 1, 2015 at 6:49 pm

      Wow really? If you click the link within the post where the supplies are listed, you can get the roll of burlap for $10.99.

      Reply
    • Ms Judi says

      October 26, 2015 at 8:56 am

      I got my burlap at Walmart 15 yds. for only $3.97 Great price. Free coat hanger

      Reply
  5. Carol says

    September 20, 2015 at 3:59 pm

    I love this! How wide is the roll of burlap?

    Reply
    • Amanda Formaro says

      September 21, 2015 at 3:40 pm

      Hi Carol! Mine is 4-inches wide :)

      Reply
  6. Tiffiny Felix says

    September 10, 2015 at 12:04 pm

    I love that you don’t need a special wire form for this. Super cute!

    Reply
    • Amanda Formaro says

      September 11, 2015 at 1:59 pm

      Thank you Tiffiny, and so easy!

      Reply
  7. Tara Boettger says

    September 9, 2015 at 8:40 pm

    Thanks for sharing my video! Your wreath looks great!

    Reply
    • Amanda Formaro says

      September 11, 2015 at 1:59 pm

      Thanks Tara! Thanks for the great video tutorial :)

      Reply

Leave a Reply Cancel reply

Your email address will not be published. Required fields are marked *

Rate This Project


The maximum upload file size: 640 MB. You can upload: image, video. Links to YouTube, Facebook, Twitter and other services inserted in the comment text will be automatically embedded. Drop files here

Primary Sidebar

Hi! I’m Amanda and I’m the founder and head designer of Crafts by Amanda. I have spent over 25 years creating projects to share, but it’s not just me anymore! It’s turned into a complete family affair. Come and meet the Creative Team!

Free CraftsBy email every week

Latest crafts straight to your inbox!

All Time Favorites

snowy pinecone candle jar luminaries

Winter Luminaries: Snowy Pinecone…

Make pretty winter luminaries that appear to be covered ... Go To project

Make this wonderful deco mesh pumpkin wreath to hang on your door this fall!

Deco Mesh Pumpkin Wreath…

Adorn your door this fall with a pretty deco mesh ... Go To project

Learn to make these adorable ladybug painted rocks. use special outdoor paint for this adorable garden craft so you can keep garden ladybugs all summer!

Ladybug Painted Rocks…

I'm going to show you how to make these adorable ... Go To project

Reuse those empty prescription pill bottles in all sorts of ways. From organizing to making cookies. Yes, cookies! See how to use your empty pill bottles!

20 Uses for Prescription Pill…

You've been collecting prescription pill bottles for ... Go To project

Meet the Family

Amanda

Founder and Designer

Kristen

Editorial Manager

Lindsay

Social Media Manager

As seen on:

Footer

Favorites

  • Jar Photo Frames
  • No-Sew Roman Shade
  • Paper Flowers
  • How to Make a Scrunchie
  • Mermaid Slime

About

  • Home
  • Meet the Creative Team
  • Work with Us
  • Privacy Policy
  • Accessibility
  • Contact Us

Images/text copyright Amanda Formaro 2020. To feature a post from Crafts by Amanda, you may use one photo credited and linked back directly to the project post.

Free CraftsBy email every week

Latest crafts straight to your inbox!

Copyright ©2025, Crafts by Amanda. All Rights Reserved.
Design by Pixel Me Designs