• Home
  • About
    • About Crafts by Amanda
    • Visit Our Recipe Site
  • Work With Us
  • Join
    • Free Newsletters
    • Join our Facebook craft group
↑
  • Tutorials
    • Tutorial Index
    • Adult Crafts
    • Crafts for Kids
    • Crafts for Seniors
    • Recycled Crafts
    • Seasonal Crafts
    • Holiday Crafts
    • Free Printables
    • Craft Collections
  • Adult Crafts
    • Bath & Body
    • Beach Crafts
    • Clay Pot Crafts
    • Crafts for Seniors
    • Decoupage Crafts for Adults
    • DIY Gift ideas
    • Garden Crafts
    • Home Decor Projects
    • Kitchen Crafts
    • Light Bulb Crafts
    • Luminary Crafts
    • Mason Jar Crafts
    • Needlework
    • Photo Display Ideas
    • Recycled Crafts for Adults
    • Wearable Crafts for Adults
  • Crafts for Kids
    • Animal Crafts for Kids
    • Back to School Crafts
    • Beach Crafts for Kids
    • Camp Crafts
    • Cardboard Tube Crafts for Kids
    • Decoupage Crafts for Kids
    • Easy Crafts for Kids
    • Nature Crafts for Kids
    • Other Kid’s Crafts
    • Paper Plate Crafts for Kids
    • Recycled Crafts for Kids
    • Slimes, Doughs, & Clay
    • Wearable Crafts for Kids
  • Holiday Crafts
    • 4th of July Crafts
    • Christmas Crafts
    • DIY Gift ideas
    • Earth Day Crafts
    • Easter Crafts
    • Father’s Day Crafts
    • Halloween Crafts
    • Memorial Day Crafts
    • Mother’s Day Crafts
    • New Year’s
    • Other Holidays
    • Patriot Day Crafts
    • St. Patrick’s Day Crafts
    • Thanksgiving Crafts
    • Valentine’s Day Crafts
  • Seasonal Crafts
    • Winter Crafts
    • Spring Crafts
    • Summer Crafts
    • Fall Crafts
  • Skip to primary navigation
  • Skip to main content
  • Skip to primary sidebar
  • Skip to footer

Crafts by Amanda

crafts for adults and kid's crafts

  • Tutorials
    • Tutorial Index
    • Adult Crafts
    • Crafts for Kids
    • Crafts for Seniors
    • Recycled Crafts
    • Seasonal Crafts
    • Holiday Crafts
    • Free Printables
    • Craft Collections
  • Adult Crafts
    • Bath & Body
    • Beach Crafts
    • Clay Pot Crafts
    • Crafts for Seniors
    • Decoupage Crafts for Adults
    • DIY Gift ideas
    • Garden Crafts
    • Home Decor Projects
    • Kitchen Crafts
    • Light Bulb Crafts
    • Luminary Crafts
    • Mason Jar Crafts
    • Needlework
    • Photo Display Ideas
    • Recycled Crafts for Adults
    • Wearable Crafts for Adults
  • Crafts for Kids
    • Animal Crafts for Kids
    • Back to School Crafts
    • Beach Crafts for Kids
    • Camp Crafts
    • Cardboard Tube Crafts for Kids
    • Decoupage Crafts for Kids
    • Easy Crafts for Kids
    • Nature Crafts for Kids
    • Other Kid’s Crafts
    • Paper Plate Crafts for Kids
    • Recycled Crafts for Kids
    • Slimes, Doughs, & Clay
    • Wearable Crafts for Kids
  • Holiday Crafts
    • 4th of July Crafts
    • Christmas Crafts
    • DIY Gift ideas
    • Earth Day Crafts
    • Easter Crafts
    • Father’s Day Crafts
    • Halloween Crafts
    • Memorial Day Crafts
    • Mother’s Day Crafts
    • New Year’s
    • Other Holidays
    • Patriot Day Crafts
    • St. Patrick’s Day Crafts
    • Thanksgiving Crafts
    • Valentine’s Day Crafts
  • Seasonal Crafts
    • Winter Crafts
    • Spring Crafts
    • Summer Crafts
    • Fall Crafts
Craft Tutorials | Adult Crafts | Clay Pot Crafts | Wooden Planter Box
Clay Pot Crafts

Wooden Planter Box

Author by Aimee Page on March 10, 2019 Updated on December 6, 2020

5 from 1 vote
You won’t believe how easy it is to make this wood shim planter box, no power tools required! Leave this project bare wood or paint it any color you like.
Jump to Project
You won’t believe how easy it is to make this wood shim planter box, no power tools required! You can leave this project as bare wood, or paint it whatever color you like. There's always room for creativity!
748 shares
  • Share
  • Tweet
  • Flipboard
  • Email

You won’t believe how easy it is to make this wooden planter box from wood shims. No power tools required! You can leave this project as bare wood, or paint it whatever color you like. Here’s how to make an easy wooden planter box for your garden, porch or stoop!

There are so many fun projects to make with wood shims, try this beautiful Wood Shim Sunburst Mirror!

Wood Shim Planter Box


Wooden Planter Box

Have you ever crafted with wood shims before? They are a versatile and inexpensive craft supply. Using wood shims is a great way to add wood to your craft projects, without needing to use power tools. They can easily be cut using an x-acto knife.

Need more creative spring planter ideas? Give upcycling a try with these easy map paper planter cans or make a unique newspaper planter bag for spring greenery.

Cute Wood Shim Planter Box

Supplies Needed

  • Wood shims – they come in two sizes at your local home improvement store. Buy the long ones.
  • X-Acto knife
  • Glue – use both hot glue and E6000
  • 4 small terracotta pots
  • Faux greenery or potting soil and small plants


Tutorial: How to Make a Wood Shim Planter Box

How to make a wood shim planter box step 1

Start by measuring your small terracotta pots. Keep in mind the width of the tops and the height of the pots, so your planter box has the right dimensions.

How to make a wood shim planter box step 2

Build the base and the walls of your box. Important: This base was three wood shims wide, but I used six wood shims. Each wall was two wood shims tall, but I used four wood shims. This means that you will have to double up your wood shims.

Since each wood shim has a thick and a thin end, stack two wood shims at a time. Secure two wood shims together at a time using both a dab of hot glue at each end as well as E6000. The hot glue provides instant adhesion while you work, but the E6000 will give you better, long-lasting results.

How to make a wood shim planter box step 3

Cut down the thick end of four wood shims to serve at the short walls of the planter.

How to make a wood shim planter box step 4

Secure all of the walls using both types of glue. Add a dab of hot glue on each end, and then fill in the middle of each wood shim with E6000.

Wait 24 hours for the E6000 to fully dry.

How to make a wood shim planter box step 4

You can easily stain or paint your wood shim planter box, but it also looks nice unfinished.

Wood shim planter box with terra cotta plants

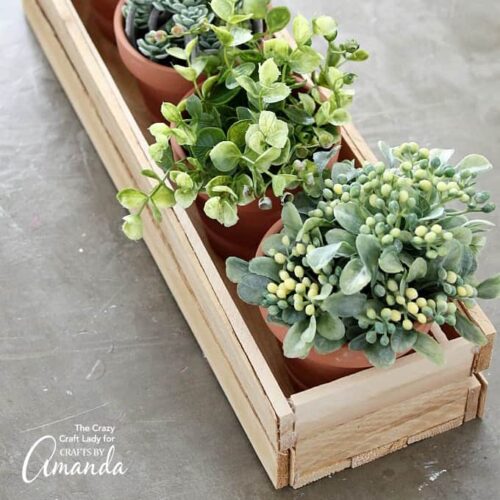
Fill the terracotta pots with faux greenery or small plants like succulents or herbs.

Wood Shim Planter Box

This wood shim planter box is a great addition to your spring decor, but also looks great year round!

Have leftover wood shims? Check out more wood shim projects like this Rustic Starfish Craft, which was made with rulers, but can very easily be made with wood shims! Or this Weathered Paint Stick Beach Flag that can also be made from wood shims.

You won’t believe how easy it is to make this wood shim planter box, no power tools required! You can leave this project as bare wood, or paint it whatever color you like. There's always room for creativity!
Print Project
5 from 1 vote

DIY Wood Shim Planter Box

You won’t believe how easy it is to make this wood shim planter box, no power tools required! Leave this project bare wood or paint it any color you like.
Author: Amanda Formaro

Supplies

  • Wood shims – they come in two sizes at your local home improvement store. Buy the long ones.
  • X-Acto knife
  • Glue – use both hot glue and E6000
  • 4 small terracotta pots
  • Faux greenery or potting soil and small plants

Instructions

  • Start by measuring your small terracotta pots. Keep in mind the width of the tops and the height of the pots, so your planter box has the right dimensions.
  • Build the base and the walls of your box. Important: This base was three wood shims wide, but I used six wood shims. Each wall was two wood shims tall, but I used four wood shims. This means that you will have to double up your wood shims.
  • Since each wood shim has a thick and a thin end, stack two wood shims at a time. Secure two wood shims together at a time using both a dab of hot glue at each end as well as E6000. The hot glue provides instant adhesion while you work, but the E6000 will give you better, long-lasting results.
  • Cut down the thick end of four wood shims to serve at the short walls of the planter.
  • Secure all of the walls using both types of glue. Add a dab of hot glue on each end, and then fill in the middle of each wood shim with E6000.
  • Wait 24 hours for the E6000 to fully dry.

Wood Shim Planter Box

This post was originally published here on Feb 26, 2018. 

  • Author
  • Recent Posts
Aimee Page
Aimee Page
Blogger at The Crazy Craft Lady
Aimee is a twin mom, lawyer, and creativity junkie.She is dedicated to helping busy women and their families live more creative and inspired lives by sharing simple crafts, decor, recipes, and organizing solutions on her blog, The Crazy Craft Lady.
Aimee Page
Latest posts by Aimee Page (see all)
  • Black Cat Pumpkins - October 15, 2024
  • Lavender Sugar Scrub - April 23, 2024
  • Decoupage Wood Slice Ornaments - November 11, 2022
748 shares
  • Share
  • Tweet
  • Flipboard
  • Email

Filed Under: Clay Pot Crafts, DIY Gift ideas, Garden Crafts Tagged With: diy, garden, plant, planter box, spring, wood shim

Reader Interactions

Free CraftsBy email every week

Latest crafts straight to your inbox!

5 from 1 vote (1 rating without comment)

Leave a Reply Cancel reply

Your email address will not be published. Required fields are marked *

Rate This Project


The maximum upload file size: 640 MB. You can upload: image, video. Links to YouTube, Facebook, Twitter and other services inserted in the comment text will be automatically embedded. Drop files here

Primary Sidebar

Hi! I’m Amanda and I’m the founder and head designer of Crafts by Amanda. I have spent over 25 years creating projects to share, but it’s not just me anymore! It’s turned into a complete family affair. Come and meet the Creative Team!

Free CraftsBy email every week

Latest crafts straight to your inbox!

All Time Favorites

snowy pinecone candle jar luminaries

Winter Luminaries: Snowy Pinecone…

Make pretty winter luminaries that appear to be covered ... Go To project

Make this wonderful deco mesh pumpkin wreath to hang on your door this fall!

Deco Mesh Pumpkin Wreath…

Adorn your door this fall with a pretty deco mesh ... Go To project

Learn to make these adorable ladybug painted rocks. use special outdoor paint for this adorable garden craft so you can keep garden ladybugs all summer!

Ladybug Painted Rocks…

I'm going to show you how to make these adorable ... Go To project

Reuse those empty prescription pill bottles in all sorts of ways. From organizing to making cookies. Yes, cookies! See how to use your empty pill bottles!

20 Uses for Prescription Pill…

You've been collecting prescription pill bottles for ... Go To project

Meet the Family

Amanda

Founder and Designer

Kristen

Editorial Manager

Lindsay

Social Media Manager

As seen on:

Footer

Favorites

  • Jar Photo Frames
  • No-Sew Roman Shade
  • Paper Flowers
  • How to Make a Scrunchie
  • Mermaid Slime

About

  • Home
  • Meet the Creative Team
  • Work with Us
  • Privacy Policy
  • Accessibility
  • Contact Us

Images/text copyright Amanda Formaro 2020. To feature a post from Crafts by Amanda, you may use one photo credited and linked back directly to the project post.

Free CraftsBy email every week

Latest crafts straight to your inbox!

Copyright ©2025, Crafts by Amanda. All Rights Reserved.
Design by Pixel Me Designs

Rate This Tutorial

Your vote:


To share a photo with your comment click here!

A rating is required
A name is required
An email is required

Recipe Ratings without Comment

Something went wrong. Please try again.