• Home
  • About
    • About Crafts by Amanda
    • Visit Our Recipe Site
  • Work With Us
  • Join
    • Free Newsletters
    • Join our Facebook craft group
↑
  • Tutorials
    • Tutorial Index
    • Adult Crafts
    • Crafts for Kids
    • Crafts for Seniors
    • Recycled Crafts
    • Seasonal Crafts
    • Holiday Crafts
    • Free Printables
    • Craft Collections
  • Adult Crafts
    • Bath & Body
    • Beach Crafts
    • Clay Pot Crafts
    • Crafts for Seniors
    • Decoupage Crafts for Adults
    • DIY Gift ideas
    • Garden Crafts
    • Home Decor Projects
    • Kitchen Crafts
    • Light Bulb Crafts
    • Luminary Crafts
    • Mason Jar Crafts
    • Needlework
    • Photo Display Ideas
    • Recycled Crafts for Adults
    • Wearable Crafts for Adults
  • Crafts for Kids
    • Animal Crafts for Kids
    • Back to School Crafts
    • Beach Crafts for Kids
    • Camp Crafts
    • Cardboard Tube Crafts for Kids
    • Decoupage Crafts for Kids
    • Easy Crafts for Kids
    • Nature Crafts for Kids
    • Other Kid’s Crafts
    • Paper Plate Crafts for Kids
    • Recycled Crafts for Kids
    • Slimes, Doughs, & Clay
    • Wearable Crafts for Kids
  • Holiday Crafts
    • 4th of July Crafts
    • Christmas Crafts
    • DIY Gift ideas
    • Earth Day Crafts
    • Easter Crafts
    • Father’s Day Crafts
    • Halloween Crafts
    • Memorial Day Crafts
    • Mother’s Day Crafts
    • New Year’s
    • Other Holidays
    • Patriot Day Crafts
    • St. Patrick’s Day Crafts
    • Thanksgiving Crafts
    • Valentine’s Day Crafts
  • Seasonal Crafts
    • Winter Crafts
    • Spring Crafts
    • Summer Crafts
    • Fall Crafts
  • Skip to primary navigation
  • Skip to main content
  • Skip to primary sidebar
  • Skip to footer

Crafts by Amanda

crafts for adults and kid's crafts

  • Tutorials
    • Tutorial Index
    • Adult Crafts
    • Crafts for Kids
    • Crafts for Seniors
    • Recycled Crafts
    • Seasonal Crafts
    • Holiday Crafts
    • Free Printables
    • Craft Collections
  • Adult Crafts
    • Bath & Body
    • Beach Crafts
    • Clay Pot Crafts
    • Crafts for Seniors
    • Decoupage Crafts for Adults
    • DIY Gift ideas
    • Garden Crafts
    • Home Decor Projects
    • Kitchen Crafts
    • Light Bulb Crafts
    • Luminary Crafts
    • Mason Jar Crafts
    • Needlework
    • Photo Display Ideas
    • Recycled Crafts for Adults
    • Wearable Crafts for Adults
  • Crafts for Kids
    • Animal Crafts for Kids
    • Back to School Crafts
    • Beach Crafts for Kids
    • Camp Crafts
    • Cardboard Tube Crafts for Kids
    • Decoupage Crafts for Kids
    • Easy Crafts for Kids
    • Nature Crafts for Kids
    • Other Kid’s Crafts
    • Paper Plate Crafts for Kids
    • Recycled Crafts for Kids
    • Slimes, Doughs, & Clay
    • Wearable Crafts for Kids
  • Holiday Crafts
    • 4th of July Crafts
    • Christmas Crafts
    • DIY Gift ideas
    • Earth Day Crafts
    • Easter Crafts
    • Father’s Day Crafts
    • Halloween Crafts
    • Memorial Day Crafts
    • Mother’s Day Crafts
    • New Year’s
    • Other Holidays
    • Patriot Day Crafts
    • St. Patrick’s Day Crafts
    • Thanksgiving Crafts
    • Valentine’s Day Crafts
  • Seasonal Crafts
    • Winter Crafts
    • Spring Crafts
    • Summer Crafts
    • Fall Crafts
Craft Tutorials | Adult Crafts | Garden Crafts | Rainbow Button Wind Chime
Garden Crafts

Rainbow Button Wind Chime

Author by Amanda Davis on March 5, 2019 Updated on June 11, 2019

4.86 from 7 votes
Jump to Project
3413 shares
  • Share
  • Tweet
  • Flipboard
  • Email

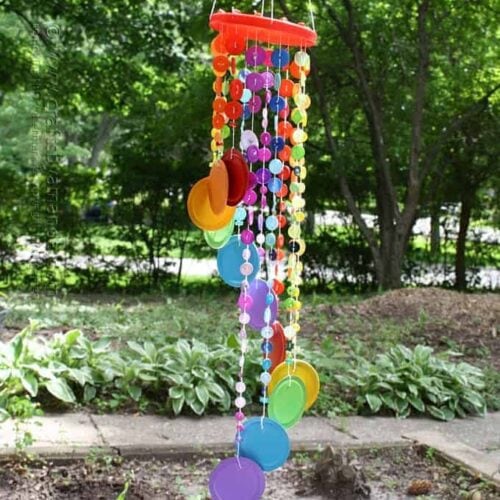
This button wind chime in rainbow colors is one of my favorite projects in my book Button Mania. Since it’s still summer and we have plenty of months left of warm weather, I thought this would be a fun tutorial to share.

Rainbow Button Wind Chime by Amanda Formaro of Crafts by Amanda, an excerpt from her latest book, Button Mania


Button Wind Chime

Here’s a short video that will show the button wind chime in action in a light breeze:

In case you are wondering where I got all the buttons, you can buys bags or containers of them at craft stores and discount department stores. I bought mine mostly from WalMart, but I did pick some up at Michaels and JoAnn’s. You can also shop for them at Amazon.

What to buy a rainbow wind chime? It’s not made with buttons, but it IS gorgeous!


It took me almost an hour, but I got all of my buttons sorted by color. I seem to have an awful lot of antique white… Hmm… Guess it’s time for a project!

A photo posted by Amanda Formaro (@amandaformaro) on May 31, 2014 at 8:55am PDT

I like to keep the container in my studio full, so I’m always stocking up! Don’t you just love all the colors of the button wind chime?? And because it’s a rainbow, it’s also part of my collection of St. Patrick’s Day crafts.

Rainbow Button Wind Chime

You’ll need some canning lids too. I thought about using recycled laundry soap lids in different colors, but I wanted some uniformity in the look, so I went with the canning lids. It’s still recycling, you can’t can with those a second time!


Bottle cap flower in my herb garden that I made for my book “Button Mania: Buttons, Bottlecaps and Beyond!” -releases next month! Link in profile #buttonmania #craftsbyamanda A photo posted by Amanda Formaro (@amandaformaro) on Jul 12, 2015 at 6:04am PDT

Button Mania: Buttons, Bottlecaps and Beyond! is appropriately named. There are button crafts, projects using bottle caps and even plastic lids that can’t be recycled. Don’t you just love this bottlecap flower I posted on Instagram? You can get the tutorial in the book!


My desk lamp is one of my favorite things in my studio. It was a project from my #rubberbandmania book and I smile every morning when I turn it on. ☺#amandasstudio

A photo posted by Amanda Formaro (@amandaformaro) on Jun 18, 2015 at 6:31am PDT

There are also instructions for my Button Lamp Shade. This lamp is right next to me every day on my desk. I love it because it’s so cheerful and bursting with color!


My bottlecap rag doll horse sits on a shelf and greets me every morning. From my new book Button Mania: Buttons, Bottlecaps and Beyond! #buttonmania A photo posted by Amanda Formaro (@amandaformaro) on Jul 15, 2015 at 12:54pm PDT

Another of my favorites is this rag doll bottlecap horse. here he’s sitting on a shelf right inside the door of my studio. He’s so cute! So as you can see, there are plenty of fun projects in the book, so hopefully, you’ll order a copy! My other two books are coming out at the same time: Paper Fun Mania and Star Wars Mania. So now let’s get back to making this wind chime, shall we?

What you need to make a Button Wind Chime

  • 1 large, sturdy plastic lid
  • Lots of buttons
  • String
  • 16 pony beads
  • 12 tri-beads
  • 12 metal canning lids
  • Hot glue gun
  • White craft glue
  • Scissors
  • Hammer and a nail
  • Thumbtack
  • Outdoor craft paint (optional)


Attaching strings to wind chime

  1. Use hammer and nail to poke a hole in the top of each canning lid.
  2. If you’d like, paint each of the lids, front and back and let them dry.
  3. Use a thumbtack to poke four evenly spaced holes into the inside rim of the plastic lid. This will be for your hanger.
  4. Use a thumbtack to poke twelve evenly spaced holes in the top of the plastic lid.
  5. Measure and cut sixteen pieces of string, about 24-inches long. Tie a pony bead to the end of each string.
  6. Set four strings aside and thread remaining twelve strings through the top of the lid so that the pony bead holds them in place.
  7. Tack a bead in place with a little hot glue.

Threading buttons to windchime

  1. Thread the first string through four large buttons and add a tri-bead. Add some white glue to each button and the bead.
  2. Repeat step 6, eleven more times, adding a few more buttons each time to create a tiered effect.
  3. Tie the end of each string to a canning lid.

Steps for making rainbow button windchime

  1. Use the four remaining strings to create the hanger.
  2. Thread each one through the holes in the sides of the lid.
  3. Gather all four strings together and tie in a knot.

Rainbow Button Wind Chime hanging

Now hang it up outside and enjoy! I hope you have fun with this project!

Reprinted with permission from Button Mania: Buttons, Bottlecaps and Beyond! by Amanda Formaro, published by Studio Fun International

More you might like:

  1. Dangling Button Earrings
  2. 4-Seasons Button Tree
  3. Batman vs. Superman Button Checkers
  4. Plastic Lid Wind Chime


Print Project
4.86 from 7 votes

Rainbow Button Wind Chime

Supplies

  • 1 large sturdy plastic lid
  • Lots of buttons
  • String
  • 16 pony beads
  • 12 tri-beads
  • 12 metal canning lids
  • Hot glue gun
  • White craft glue
  • Scissors
  • Hammer and a nail
  • Thumbtack
  • Outdoor craft paint optional

Instructions

  • Use hammer and nail to poke a hole in the top of each canning lid.
  • If you like paint each of the lids, front and back and let them dry.
  • Use a thumbtack to poke four evenly spaced holes into the inside rim of the plastic lid. This will be for your hanger.
  • Use thumbtack to poke twelve evenly spaced holes in the top of the plastic lid.
  • Measure and cut sixteen pieces of string, about 24-inches long. Tie a pony bead to the end of each string. Set four strings aside and thread remaining twelve strings through the top of the lid so that the pony bead holds them in place. Tack bead in place with a little hot glue.
  • Thread the first string through four large buttons and add a tri-bead. Add some white glue to each button and the bead.
  • Repeat step 6, eleven more times, adding a few more buttons each time to create a tiered effect.
  • Tie the end of each string to a canning lid.
  • Use the four remaining strings to create the hanger. Thread each one through the holes in the sides of the lid. Gather all four strings together and tie in a knot.

Rainbow Button Wind Chime

This post was originally published on Jul 15, 2015.

  • Author
  • Recent Posts
Amanda Davis
Amanda Davis is the crafty, entrepreneurial mother of four children. She loves to bake, cook, make kid's crafts and create decorative items for her home. She is a crafting expert and guru in the kitchen and has appeared online and in print publications many times over the years.
Latest posts by Amanda Davis (see all)
  • Paper Plate Aquarium Craft - June 17, 2025
  • Patriotic Bandana Wreath - June 13, 2025
  • Ladybug Painted Rocks - June 10, 2025
3413 shares
  • Share
  • Tweet
  • Flipboard
  • Email

Filed Under: Garden Crafts, Recycled Crafts for Kids, St. Patrick's Day Crafts, Summer Crafts Tagged With: adult, adult crafts, adults, button, button mania, buttons, crafts for adults, garden, holidays, kid's craft, kid's crafts, outdoor, recycle, recycled, st pat, st patrick day, st patricks, st patricks day, st pattys day, wind chime

Reader Interactions

Free CraftsBy email every week

Latest crafts straight to your inbox!

Comments

  1. Susan Kraut says

    August 4, 2020 at 12:09 pm

    Love the button embellished lampshade. Can’t wait to share your button crafting ideas with my grand kids.

    Reply
    • Amanda Formaro says

      August 7, 2020 at 6:39 am

      Thanks Susan, hope you have fun!

      Reply
  2. Amanda Lawson says

    March 6, 2017 at 10:03 pm

    How did you paint your canning lids? When I spray painted them the rubber seal disintigrated and they wouldn’t dry. I also tried hand painting them and had to paint them so many times to get the right coverage that it was very time consuming, plus the gloss paint stuck together and peeled off. Any tips?

    Reply
    • Amanda Formaro says

      March 13, 2017 at 1:31 pm

      Hi Amanda. I used a brush-on multi-surface acrylic paint with a matte finish. I believe I did have to do a couple of coats. However, I left my windchime outside and the weather took its tole on the canning lids. So the paint did end up flaking off by the end of autumn.

      Reply
  3. Cucicucicoo: Eco Sewing and Crafting says

    February 3, 2016 at 5:29 am

    That’s a great idea! I love how you’ve created a rainbow look with the different colors! I have a gazillion totally random buttons, so I doubt I’d be able to get enough of each color, but I just might try anyway! :) Lisa

    Reply
    • Amanda Formaro says

      February 7, 2016 at 6:40 am

      You can get colored buttons in multicolor packs or single colors at JoAnns and Michaels :)

      Reply
  4. Barbara says

    July 26, 2015 at 2:14 pm

    This is really pretty and so colorful! I think you could also use different colors of string or clear fishing line would be nice
    also. I will be making one of these soon, thanks for sharing!

    Reply
    • Amanda Formaro says

      July 27, 2015 at 8:26 am

      Thanks Barbara! :)

      Reply
  5. Anne-Marie Roode says

    July 20, 2015 at 2:52 pm

    Thanks Amanda,I realy enjoy the thing’s you made please send some more!! Thanks for sharing!! Xx

    Reply
    • Amanda Formaro says

      July 24, 2015 at 5:42 pm

      Thank you Anne-Marie! :)

      Reply
  6. cookie17 says

    July 16, 2015 at 3:02 pm

    This cute Amanda Hope u having fun this summer ,making the pretty thing’s you make Thank’s for sharing ..

    Reply
    • Amanda Formaro says

      July 24, 2015 at 5:44 pm

      Thanks Cookie!

      Reply
      • sarina says

        August 9, 2015 at 12:11 pm

        If canning lids are not available what would be another suggestion?

        Reply
        • Amanda Formaro says

          August 11, 2015 at 9:11 am

          Hi Sarina. You could use washers as they have some nice weight to them. Anything that has a little weight will work!

          Reply
        • Sharon says

          April 17, 2016 at 1:53 pm

          Cake icing container lids or any other plastic lid, You could glue a metal lid on so it would make a sound when it taps against the buttons. You could also add jingle bells for added sound when it is windy.

          Reply
4.86 from 7 votes (5 ratings without comment)

Leave a Reply Cancel reply

Your email address will not be published. Required fields are marked *

Rate This Project


The maximum upload file size: 640 MB. You can upload: image, video. Links to YouTube, Facebook, Twitter and other services inserted in the comment text will be automatically embedded. Drop files here

Primary Sidebar

Hi! I’m Amanda and I’m the founder and head designer of Crafts by Amanda. I have spent over 25 years creating projects to share, but it’s not just me anymore! It’s turned into a complete family affair. Come and meet the Creative Team!

Free CraftsBy email every week

Latest crafts straight to your inbox!

All Time Favorites

Learn to make these adorable ladybug painted rocks. use special outdoor paint for this adorable garden craft so you can keep garden ladybugs all summer!

Ladybug Painted Rocks…

These colorful little ladybug painted rocks are the ... Go To project

snowy pinecone candle jar luminaries

Winter Luminaries: Snowy Pinecone…

Make pretty winter luminaries that appear to be covered ... Go To project

Make this wonderful deco mesh pumpkin wreath to hang on your door this fall!

Deco Mesh Pumpkin Wreath…

Adorn your door this fall with a pretty deco mesh ... Go To project

Reuse those empty prescription pill bottles in all sorts of ways. From organizing to making cookies. Yes, cookies! See how to use your empty pill bottles!

20 Uses for Prescription Pill…

You've been collecting prescription pill bottles for ... Go To project

Meet the Family

Amanda

Founder and Designer

Kristen

Editorial Manager

Lindsay

Social Media Manager

As seen on:

Footer

Favorites

  • Jar Photo Frames
  • No-Sew Roman Shade
  • Paper Flowers
  • How to Make a Scrunchie
  • Mermaid Slime

About

  • Home
  • Meet the Creative Team
  • Work with Us
  • Privacy Policy
  • Accessibility
  • Contact Us

Images/text copyright Amanda Formaro 2020. To feature a post from Crafts by Amanda, you may use one photo credited and linked back directly to the project post.

Free CraftsBy email every week

Latest crafts straight to your inbox!

Copyright ©2025, Crafts by Amanda. All Rights Reserved.
Design by Pixel Me Designs

Rate This Tutorial

Your vote:


To share a photo with your comment click here!

A rating is required
A name is required
An email is required

Recipe Ratings without Comment

Something went wrong. Please try again.