
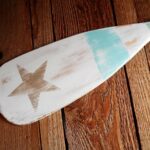
Switching over to rustic coastal decor has been an ongoing process. I wanted to create a starfish craft for the living room, but not one that looked like all the others out there. I love weathered signs and plaques, and had a bunch of wooden rulers and yardsticks lying around, and that’s how this project was born.
Rustic Starfish Craft: Wooden Ruler Plaque
Every time I hit a garage sale, flea market or thrift store, I have a list inside my brain of things to watch for. I’m always grabbing wooden yardsticks and rulers to use in projects. I had amassed quite a solid collection, and they weren’t vintage or antique, so I decided to use them in a way I hadn’t before.
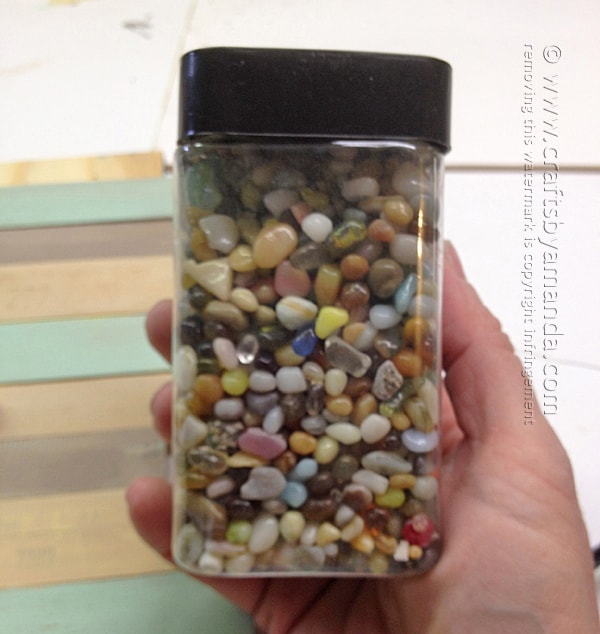
Also, last fall I was at Menards and they had a shelf full of vase filler and other dried botanicals on sale. I picked up a bunch of driftwood, some white sticks (not entirely sure what they are), and several jars of colored pebbles. Had no idea what I was going to make with them, but figured some day I’ll come up with something!
Related: Love beach crafts? Try this Driftwood Art nestled in a shadowbox with starfish!
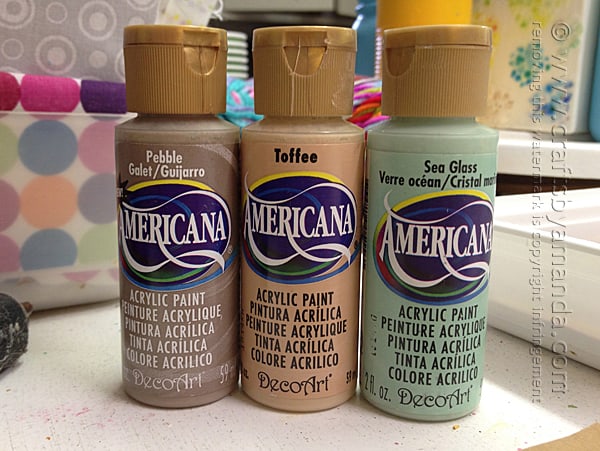
I used Americana paint for the background colors. The colors I used were Pebble, Toffee and Sea Glass. Some of my favorite coastal shades!
Note: some links below are affiliate links. That means if you happen to buy something, a small percentage of that sale goes back into this site, which enables me to continue to bring you free tutorials such as this one. So, thanks!
As always, a full printable supply list and instructions are at the end of this post.
For this project you will need the following supplies:
- 9 wooden rulers, flat – no ridges, no metal or metal removed
- 2 paint stir sticks

- 5 white vase filler twigs
- 1 pebble
- Americana paint: Pebble, Toffee, Sea Glass
- Tools: Wood glue, heavy duty scissors, Turbo Tacky Glue, paintbrush, sandpaper (240 grit)
Note: Since you weren’t with me at Menards to pick up the white sticks, you can use small branches from your yard, strip off the bark and paint them white.
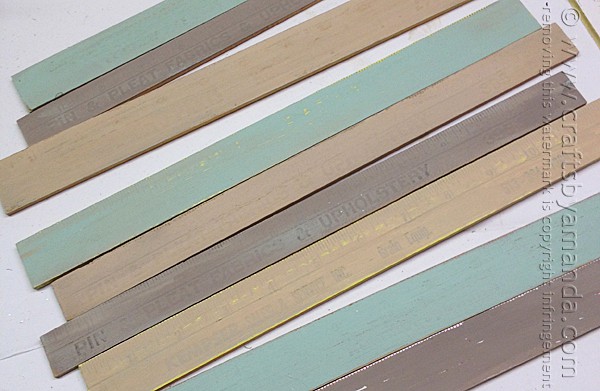
Paint three of the rulers (note: most of my rulers are from upholstery and fabric shops) Toffee, three of them Pebble, and the last three Sea Glass. To get a more rustic look, do not clean your paintbrush between colors. A little mixing gives it character.
When dry, use sandpaper to rough up the edge a little and sand off some of the excess paint. This will allow a bit of the writing to show through from the rulers.

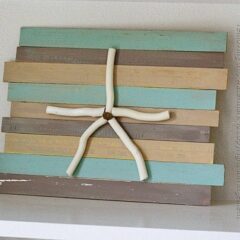
When all nine rulers are lined up together to make the plaque, they will measure approximately 9 1/2-inches. Measure your paint stir sticks to about 9-inches and trim off the excess.
NOTE: This paint stick was already white from stirring ages ago. You do not have to paint your stir sticks, they will be in the back and won’t be seen.
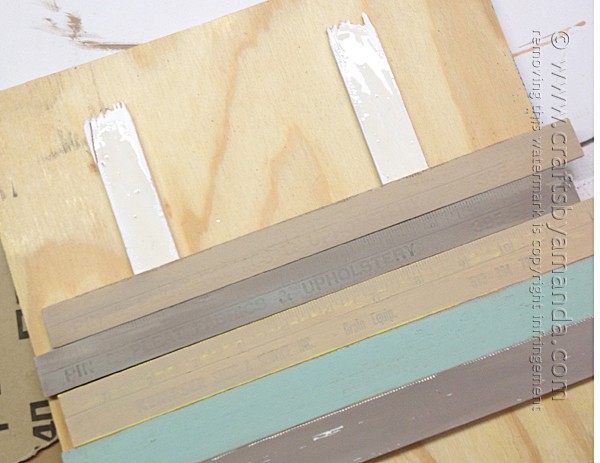
Apply wood glue to the paint sticks and lay them on a flat surface next to each other with about 7-inches in between them.
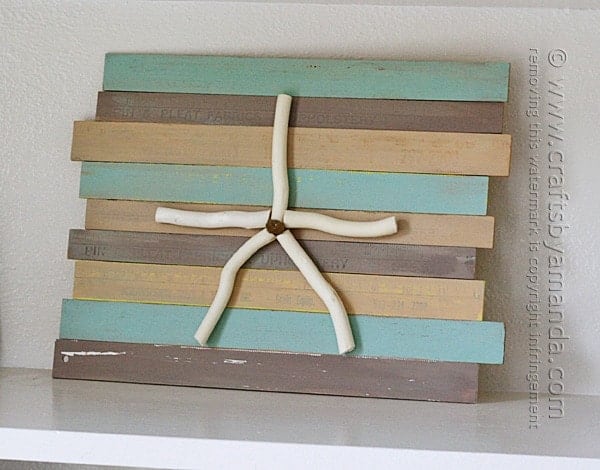
Starting at the bottom, lay a painted ruler onto the paint stir sticks and keep stacking them upward until all rulers are in place. You can see that I did not line mine up exactly, I purposely placed them all offset.
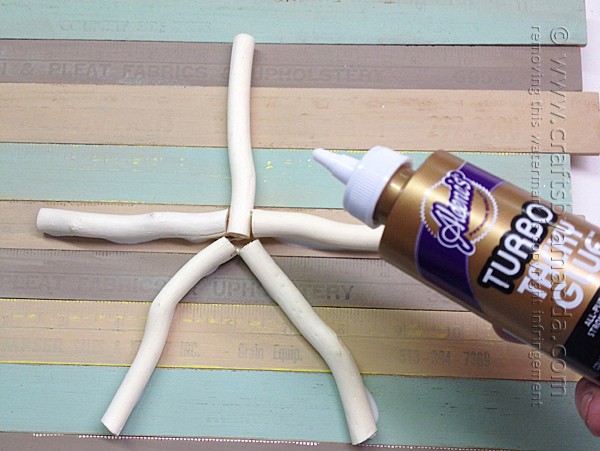
Use Turbo Tacky Glue to glue the white sticks in the shape of a starfish to the center of the plaque.
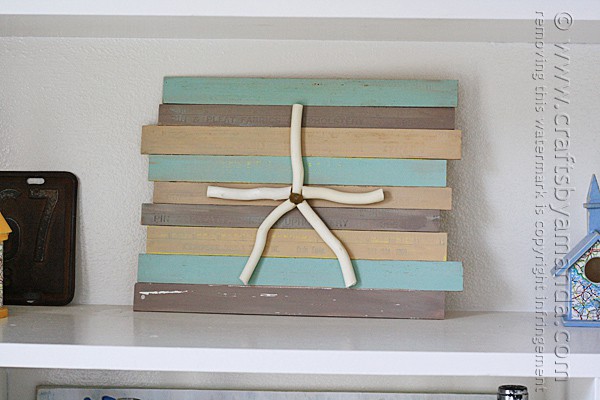
Glue a pebble to the center of the star. Allow everything to dry before displaying.
More beach crafts
 |
 |
 |
 |
Rustic Starfish Craft: Wooden Ruler Plaque
Supplies
- 9 wooden rulers flat - no ridges
- 2 paint stir sticks
- 5 white vase filler twigs
- 1 pebble
- Americana paint: Pebble Toffee, Sea Glass
- Tools: Wood glue heavy duty scissors, Turbo Tacky Glue, paintbrush, sandpaper (240 grit)
Instructions
- Paint three of the rulers Toffee, three of them Pebble, and the last three Sea Glass. To get a more rustic look, do not clean your paintbrush between colors. A little mixing gives it character.
- When dry, use sandpaper to rough up the edge a little and sand off some of the excess paint. This will allow a bit of the writing to show through from the rulers.
- When all nine rules are lined up together to make the plaque, they will measure approximately 9 1/2-inches. Measure your paint stir sticks to about 9-inches and trim off the excess.
- Apply wood glue to the paint sticks and lay them on a flat surface next to each other with about 7-inches in between them.
- Starting at the bottom, lay a painted ruler onto the paint stir sticks and keep stacking them upward until all rulers are in place.
- Use Turbo Tacky Glue to glue the white sticks in the shape of a starfish to the center of the plaque. Glue a pebble to the center of the star. Allow everything to dry before displaying.
Expert Tips & FAQs
- Tie Dye Beach Towels - July 24, 2026
- Swirling Twirling Ladybugs - July 21, 2026
- Drip Tie Dye Backpack - July 17, 2026


Nan McDonald says
I’m really loving this. Especially the sticks from the yard painted white idea. Thank you for your inspiration!! *<]:0)
Amanda Formaro says
Thanks Nan! I hope you get a chance to try it :)