Headed to the beach this summer? Be sure to collect some driftwood to make this driftwood art for your home. I love a few beach or nautical touches in my home for summer and this driftwood art beach craft is easy to make and will look great as your new piece of home decor.

Add it to your summer mantel for a nod to the beach that will leave you dreaming of waves splashing on the sand! This driftwood art would pair beautifully with these Striped Beach Luminaries or this Cement Driftwood Sailboat!
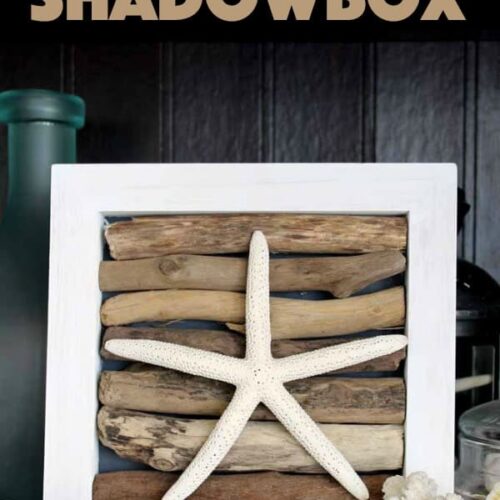
Driftwood Art with a Starfish
Not headed to the beach this summer? You can look for driftwood on lakes and streams as well. If all else fails, order some and have it delivered right to your door. There is no reason you can’t enjoy a beautiful piece of driftwood art in your own home.
Related: Need more ideas for adding beach decor to your home? Try this sea glass mason jar or this sea glass monogram.

Supplies to make your own driftwood art:
- Driftwood
- Starfish
- Wood panel with recessed back
- Hot glue and glue gun
- Saw
- White craft paint
- Gray craft paint

Crafting tips for this driftwood art project:
- Choose a shadow box or other wood frame with a recess for your driftwood.
- Choose driftwood pieces that are slightly longer than your wood panel.
- The gray craft paint in the back of your box will make areas between the driftwood dark.
- Use a very dry brush and very little paint when adding the white to give a slightly rustic appearance.
- Always be careful when using power tools and follow all manufacturer’s instructions and safety precautions.
How to make driftwood art:
- Start by painting your wood panel or shadowbox. The outer edge should be white while the very back should be gray. Allow it to dry completely before continuing.

- Use a saw to cut your driftwood pieces to size. (Remember to follow all safety precautions and use your safety gear when using power tools.) This is like a puzzle. Try different combinations until something fits well and works for your piece. No two pieces of driftwood are the same but that is the beauty of it.

- Use hot glue to secure everything into place. First, add the driftwood to the back of the box then the starfish on top.

Your driftwood art is ready to be added to your home decor! I especially love adding nautical touches like this one to a bathroom. It would also work in a lake or beach home, however. Remember that special beach vacation forever when you frame the driftwood picked up along that fabulous stretch of beach.

Speaking of beach crafts, how cute is this DIY Pebble Art? It’s great for using any smooth, round rocks you may have found on the beach. Or you can simply purchase some from the craft store.
If you love this beautiful driftwood art home decor you may also like this Weathered Painted Oar, our Driftwood Crab Wall Art, or these Cottage Style Beach Frames. Or you may want to check out this roundup of 29 Beach Crafts: Coastal DIY Wall Art where there are tons of awesome DIY wall art ideas!

Driftwood Art with a Starfish
Supplies
- Driftwood
- Starfish
- Wood panel with recessed back
- Hot glue and glue gun
- Saw
- White craft paint
- Gray craft paint
Instructions
- Start by painting your wood panel or shadowbox. The outer edge should be white while the very back should be grey. Allow to dry completely before continuing.
- Use a saw to cut your driftwood pieces to size. (Remember to follow all safety precautions and use your safety gear when using power tools.) This is like a puzzle. Try different combinations until something fits well and works for your piece. No two pieces of driftwood are the same but that is the beauty of it.
- Use hot glue to secure everything into place. First add the driftwood to the back of the box then the starfish on top.
Expert Tips & FAQs
Choose driftwood pieces that are slightly longer than your wood panel.
The gray craft paint in the back of your box will make areas between the driftwood dark.
Use a very dry brush and very little paint when adding the white to give a slightly rustic appearance.
Always be careful when using power tools and follow all manufacturer’s instructions and safety precautions.

This post was originally published on this blog on Mar 10, 2017.
- Mason Jar Bird Feeder - January 9, 2026
- Fall Mason Jars - September 16, 2025
- Burlap Stenciled Pillow Covers - May 16, 2025


STEPHANIE ABBOTT says
Such a cute piece. Adding to my Pinterest queue. I’d love for you to join our link up To Grandmas House We Go. It opens Tuesday nights around 11pm ET.
Lisa Silfwerbrand says
Oh I just love this! It makes me long for the cottage and the lake or the ocean…. *sigh*. Thanks so much for linking this up to the Inspiration Galore Project Party last week. You are one of my features today over at http://www.recreateddesigns.com. Pinned and shared. Hugs, Lisa
Sharon@BlueWillowHouse says
So cute. I love the beachy look and this driftwood art is perfect. Thank you for sharing at the Snickerdoodle Create~Bake~Make link party!
Linda says
You are a busy gal. Great project for a beachy look. Thanks for sharing at DI&DI.
Sheree Thomas says
Thank you for sharing this post over at the Simply Sweet Home Linky Party. You are my choice for this week. Your post will be featured on the Friday Favorites Linky Party. Feel free to go over and Grab the Feature Button.
Teri @ The Freshman Cook says
Absolutely love the beach look around my house, and this driftwood art is a fantastic piece! I am looking forward to creating this! Thank you for sharing at Celebrate It!
Ginger M Cochran says
I just love this. I would be so honored if you would share in my new link up called Support Your Fellow Crafter Linky Party :) Thank you so much! http://superstinkyboys.blogspot.com/2017/03/support-your-fellow-crafter-linky-party_20.html
Ashley @ Forgetful Momma says
I love this! I painted my half bath over the weekend and this would look amazing in it. Someday I will get back to the ocean to have to make this. I pinned it to remember. ;-)
Sara says
Great project! I love how it turned out! Thanks for linking up at the Home Matters Link Party! We hope to see you again next week:) #HomeMattersParty
Barbara says
Great project. I’m Pinning it.
Ginger M Cochran says
Lovely :)
Michelle Mink says
This would be so perfect in my beach themed bathroom! I love the how the starfish pops on the driftwood.
Laurie says
Great Project! Pinned.
Pamela Smith says
Anything with driftwood and starfish is perfect! Great idea!
Debrashoppeno5 says
This is such a sweet project. It is a great way to use the beach finds from vacation.
Amanda Formaro says
Absolutely! :)
Stephanie Dolph says
This is beautiful! I am looking to redo our house with coastal decor> I am going to try this and pinning to share too! Beautiful blog!
Amanda Formaro says
Thanks so much, Stephanie! The driftwood art sure is a pretty piece :) Hope you have fun creating it!
Linda Nelson says
So pretty!
Victoria @DazzleWhileFrazzled says
Super pretty! I love anything beach-y and this is a great combination. Visiting from Totally Terrific Tuesday party.
Courtney Sanchez says
I LOVE THIS!! Totally my kind of project!