• Home
  • About
    • About Crafts by Amanda
    • Visit Our Recipe Site
  • Work With Us
  • Join
    • Free Newsletters
    • Join our Facebook craft group
↑
  • Tutorials
    • Tutorial Index
    • Adult Crafts
    • Crafts for Kids
    • Crafts for Seniors
    • Recycled Crafts
    • Seasonal Crafts
    • Holiday Crafts
    • Free Printables
    • Craft Collections
  • Adult Crafts
    • Bath & Body
    • Beach Crafts
    • Clay Pot Crafts
    • Crafts for Seniors
    • Decoupage Crafts for Adults
    • DIY Gift ideas
    • Garden Crafts
    • Home Decor Projects
    • Kitchen Crafts
    • Light Bulb Crafts
    • Luminary Crafts
    • Mason Jar Crafts
    • Needlework
    • Photo Display Ideas
    • Recycled Crafts for Adults
    • Wearable Crafts for Adults
  • Crafts for Kids
    • Animal Crafts for Kids
    • Back to School Crafts
    • Beach Crafts for Kids
    • Camp Crafts
    • Cardboard Tube Crafts for Kids
    • Decoupage Crafts for Kids
    • Easy Crafts for Kids
    • Nature Crafts for Kids
    • Other Kid’s Crafts
    • Paper Plate Crafts for Kids
    • Recycled Crafts for Kids
    • Slimes, Doughs, & Clay
    • Wearable Crafts for Kids
  • Holiday Crafts
    • 4th of July Crafts
    • Christmas Crafts
    • DIY Gift ideas
    • Earth Day Crafts
    • Easter Crafts
    • Father’s Day Crafts
    • Halloween Crafts
    • Memorial Day Crafts
    • Mother’s Day Crafts
    • New Year’s
    • Other Holidays
    • Patriot Day Crafts
    • St. Patrick’s Day Crafts
    • Thanksgiving Crafts
    • Valentine’s Day Crafts
  • Seasonal Crafts
    • Winter Crafts
    • Spring Crafts
    • Summer Crafts
    • Fall Crafts
  • Skip to primary navigation
  • Skip to main content
  • Skip to primary sidebar
  • Skip to footer

Crafts by Amanda

crafts for adults and kid's crafts

  • Tutorials
    • Tutorial Index
    • Adult Crafts
    • Crafts for Kids
    • Crafts for Seniors
    • Recycled Crafts
    • Seasonal Crafts
    • Holiday Crafts
    • Free Printables
    • Craft Collections
  • Adult Crafts
    • Bath & Body
    • Beach Crafts
    • Clay Pot Crafts
    • Crafts for Seniors
    • Decoupage Crafts for Adults
    • DIY Gift ideas
    • Garden Crafts
    • Home Decor Projects
    • Kitchen Crafts
    • Light Bulb Crafts
    • Luminary Crafts
    • Mason Jar Crafts
    • Needlework
    • Photo Display Ideas
    • Recycled Crafts for Adults
    • Wearable Crafts for Adults
  • Crafts for Kids
    • Animal Crafts for Kids
    • Back to School Crafts
    • Beach Crafts for Kids
    • Camp Crafts
    • Cardboard Tube Crafts for Kids
    • Decoupage Crafts for Kids
    • Easy Crafts for Kids
    • Nature Crafts for Kids
    • Other Kid’s Crafts
    • Paper Plate Crafts for Kids
    • Recycled Crafts for Kids
    • Slimes, Doughs, & Clay
    • Wearable Crafts for Kids
  • Holiday Crafts
    • 4th of July Crafts
    • Christmas Crafts
    • DIY Gift ideas
    • Earth Day Crafts
    • Easter Crafts
    • Father’s Day Crafts
    • Halloween Crafts
    • Memorial Day Crafts
    • Mother’s Day Crafts
    • New Year’s
    • Other Holidays
    • Patriot Day Crafts
    • St. Patrick’s Day Crafts
    • Thanksgiving Crafts
    • Valentine’s Day Crafts
  • Seasonal Crafts
    • Winter Crafts
    • Spring Crafts
    • Summer Crafts
    • Fall Crafts
Craft Tutorials | Crafts for Kids | Back to School Crafts | Sports Ball Ornaments

Sports Ball Ornaments

Author by Amanda Davis on September 23, 2011 Updated on January 15, 2019

4.80 from 5 votes
Jump to Project
192 shares
  • Share
  • Tweet
  • Flipboard
  • Email


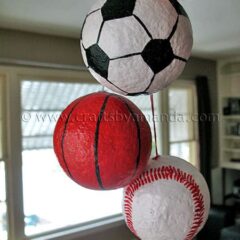
My daughter has been playing high school soccer since she was a Freshman. Now that she’s a senior, driving her own car and getting ready to head off to college, even she can appreciate some of the crafts I do. ;-) These sports ball ornaments are a great example. She loved the soccer ball and immediately wanted it for her rear view mirror.

I made these for DecoArt when they asked me to try out their new MagiKote product. MagiKote is a fairly thick white liquid that, when applied to Styrofoam, creates a sandable, paintable surface. You might remember the Giant Sand Dollar I made using MagiKote as well.

You’ll want to use an empty egg carton to hold your Styrofoam balls while you work. You’ll apply a coat of MagiKote to the balls then let them dry for 2-3 hours.I actually applied 2 coats to mine and you do need that dry time in between each coat. So make sure you plan this project accordingly.

This is what it looks like when it’s dry. At this point you can use a piece of sand paper to smooth the surface a bit.

These are the Americana colors that I used.

As you can see, the surface is paintable and there aren’t little pieces of Styrofoam going everywhere and getting caught in your paintbrush. Nice! So here’s the full printable tute if you are so inclined. These make a great gift for any sport’s fan.

Have fun!

Print Project
4.80 from 5 votes

Sports Ball Ornaments

Author: Amanda Formaro

Supplies

Supplies:

  • MagiKote
  • Americana Starlight Topcoat
  • Americana Cadmium Orange
  • Americana White Wash
  • Americana Ebony Black
  • Americana Berry Red
  • 3 3 "-Styrofoam balls
  • Stick pins
  • String

Tools:

  • Flat paintbrush
  • Liner brush
  • Pencil
  • Sand paper
  • Hot glue gun
  • Scissors

Instructions

  • Using 3/4" Flat paintbrush, apply 3 coats of MagiKote to each ball, ensuring that you coat inside the indentations as well. Allow 2-3 hours dry time between each coat.
  • Sand the entire surface to remove any rough edges.
  • Using 3/4" Flat paintbrush, paint entire ball Americana White Wash for the baseball and/or soccer ball, and Americana Cadmium Orange for the basketball. Paint a second coat when first has dried.
  • Use a pencil to lightly draw the lines where the baseball stitches will go. Also draw on the soccer ball sections. After the painting step and the paint has dried, excess pencil marks can be easily erased.
  • Use liner paintbrush to paint the lines of the basketball and the soccer ball using Americana Lamp (Ebony) Black. Using the same brush, paint the baseball stitches using Americana Berry Red.
  • Use a flat paintbrush to fill in the black sections of the soccer ball.
  • Erase any excess pencil marks.
  • Use 3/4" flat paintbrush to add two coats of Starlight Topcoat.
  • Cut a piece of sturdy string to 12" in length. Holding the two open ends together, tie ends in a knots, inserting the head end of a tick pin just before tightening. Insert pointed end of stick pin into the top of the ball. Before pushing the pin all the way in, add a dot of hot glue around the pin, then push the pin all the way in.

Expert Tips & FAQs

If you find that using a marker is easier for you than paint and a liner brush, you can certainly substitute using this method. Consider drying time when planning this project. You will need 2-3 hours between coats of MagiKote and at least 2 coats for good coverage.


‘); // ]]>

  • Author
  • Recent Posts
Amanda Davis
Amanda Davis is the crafty, entrepreneurial mother of four children. She loves to bake, cook, make kid's crafts and create decorative items for her home. She is a crafting expert and guru in the kitchen and has appeared online and in print publications many times over the years.
Latest posts by Amanda Davis (see all)
  • Family Handprint Turkey - October 25, 2024
  • Cereal Box Turkey - October 22, 2024
  • Pumpkin Painting Party - October 11, 2024
192 shares
  • Share
  • Tweet
  • Flipboard
  • Email

Filed Under: Back to School Crafts, Fall Crafts, Father's Day Crafts, Other Kid's Crafts, Spring Crafts Tagged With: baseball, basketball, father's day, holidays, kid's crafts, Ornament Crafts, soccer, sports, spring, styrofoam

Reader Interactions

Free Tutorials+ Free Craft Book!

Get your copy of of "5 Christmas Ornaments to Make" when you subscribe!

Comments

  1. Jeri says

    December 21, 2011 at 3:27 am

    Your crafts are amazing. And they look very easy. I may be a hairstylist, but crafty is not my thing, but I want to get into it so that I have prjects to do. I get bored so easy.

    Reply
    • Amanda Formaro says

      December 21, 2011 at 1:43 pm

      Thanks Jeri, so nice of you to say :)

      Reply
  2. Trish says

    September 30, 2011 at 6:19 pm

    I love these.. thinking of making a version for my daughter’s volleyball team!

    Reply
    • Amanda Formaro says

      October 2, 2011 at 4:45 pm

      How fun!

      Reply
  3. maggy, red ted art says

    September 28, 2011 at 1:15 pm

    Wow! They turned out so effective all look really great! Clever lady once again!

    Thank you for sharing on Kids Get Crafty!

    Maggy

    Reply
    • Amanda Formaro says

      September 29, 2011 at 2:46 pm

      Thanks so much Maggy!

      Reply
  4. Kadie says

    September 28, 2011 at 12:58 pm

    These are great!! I am going to make some for my sons birthday to use as decoration!

    Reply
    • Amanda Formaro says

      September 28, 2011 at 1:46 pm

      Thanks Kadle!

      Reply
  5. Crafty Mischief says

    September 25, 2011 at 5:40 am

    This is awesome! Maybe I’ll make some for Christmas.

    Reply
  6. Christina says

    September 24, 2011 at 1:42 pm

    These are really cute! My son would have loved them when he was little.

    Reply
    • Amanda Formaro says

      September 25, 2011 at 12:48 am

      Thanks Christina! They are great for older kids too :)

      Reply
  7. Barbara(Cookie" says

    September 23, 2011 at 9:01 pm

    Love this Amanda have 2 gransons into sports& I think even I can do this,.Could you tell me where you got the DS105MagiKote? Don’t think I’ve seen this.Thanks You are great Crafter keep up good work ,Cookie”Va.

    Reply
    • Amanda Formaro says

      September 23, 2011 at 9:09 pm

      Hi Barbara! MagiKote should be available at Michael’s Craft store, and I know you can buy it directly from DecoArt’s website. I’m not positive if it’s available at Hobby Lobby or Jo-Ann’s, so you may want to call them first :)

      Reply
  8. Angie @ Bigbearswife says

    September 23, 2011 at 1:00 pm

    aww I love these! Don’t have any big sports fans in the family! But I’ll be sure to pass this on to people I know

    Reply
    • Amanda Formaro says

      September 23, 2011 at 9:09 pm

      Thanks Angela!

      Reply
4.80 from 5 votes (2 ratings without comment)

Leave a Reply Cancel reply

Your email address will not be published. Required fields are marked *

Rate This Project


Primary Sidebar

Hi! I’m Amanda and I’m the founder and head designer of Crafts by Amanda. I have spent over 25 years creating projects to share, but it’s not just me anymore! It’s turned into a complete family affair. Come and meet the Creative Team!

Senior Crafts

Coffee Filter Christmas Tree

You ever have those days where an idea just ... Go To project

halloween painted jar luminaries

Halloween Luminaries

These colorful Halloween luminaries are made ... Go To project

Make this simple starfish wall art with buttons and a canvas. This coastal craft is a great way to upcycle and reuse old buttons.

Button Starfish Wall Art

Make beautifully simple starfish wall ... Go To project

Glitter Christmas Tree Luminaries by Amanda Formaro, Crafts by Amanda

Glitter Christmas Luminaries

One of my favorite things to make are ... Go To project

-> More Senior Crafts

Popular Crafts

Learn how to make this vibrant button tree - by Amanda Formaro of Crafts by Amanda

Vibrant Button Tree on Canvas

I'll show you how to make this beautiful ... Go To project

EPSOM SALT LUMINARIES

Epsom Salt Luminaries

I originally made these epsom salt luminaries ... Go To project

burlap doily luminaries

Doily Luminaries

Doilies are dainty, burlap and twine are ... Go To project

halloween painted jar luminaries

Halloween Luminaries

These colorful Halloween luminaries are made ... Go To project

Free Tutorials+ Free Craft Book!

Get your copy of of "5 Christmas Ornaments to Make" when you subscribe!

All Time Favorites

Make this wonderful deco mesh pumpkin wreath to hang on your door this fall!

Deco Mesh Pumpkin Wreath…

Adorn your door this fall with a pretty deco mesh ... Go To project

snowy pinecone candle jar luminaries

Winter Luminaries: Snowy Pinecone…

Make pretty winter luminaries that appear to be covered ... Go To project

Learn to make these adorable ladybug painted rocks. use special outdoor paint for this adorable garden craft so you can keep garden ladybugs all summer!

Ladybug Painted Rocks…

I'm going to show you how to make these adorable ... Go To project

Reuse those empty prescription pill bottles in all sorts of ways. From organizing to making cookies. Yes, cookies! See how to use your empty pill bottles!

20 Uses for Prescription Pill…

You've been collecting prescription pill bottles for ... Go To project

Meet the Family

Amanda

Founder and Designer

Kristen

Editorial Manager

Lindsay

Social Media Manager

As seen on:

Footer

Favorites

  • Jar Photo Frames
  • No-Sew Roman Shade
  • Paper Flowers
  • How to Make a Scrunchie
  • Mermaid Slime

About

  • Home
  • Meet the Creative Team
  • Work with Us
  • Privacy Policy
  • Accessibility
  • Contact Us

Images/text copyright Amanda Formaro 2020. To feature a post from Crafts by Amanda, you may use one photo credited and linked back directly to the project post.

Free Tutorials+ FREE CRAFT BOOK!

GET YOUR COPY OF OF "5 CHRISTMAS ORNAMENTS TO MAKE" WHEN YOU SUBSCRIBE!

Sign Me Up!
Copyright ©2024, Crafts by Amanda. All Rights Reserved.
Design by Pixel Me Designs

Rate This Tutorial

Your vote:


A rating is required
A name is required
An email is required

Recipe Ratings without Comment

Something went wrong. Please try again.