

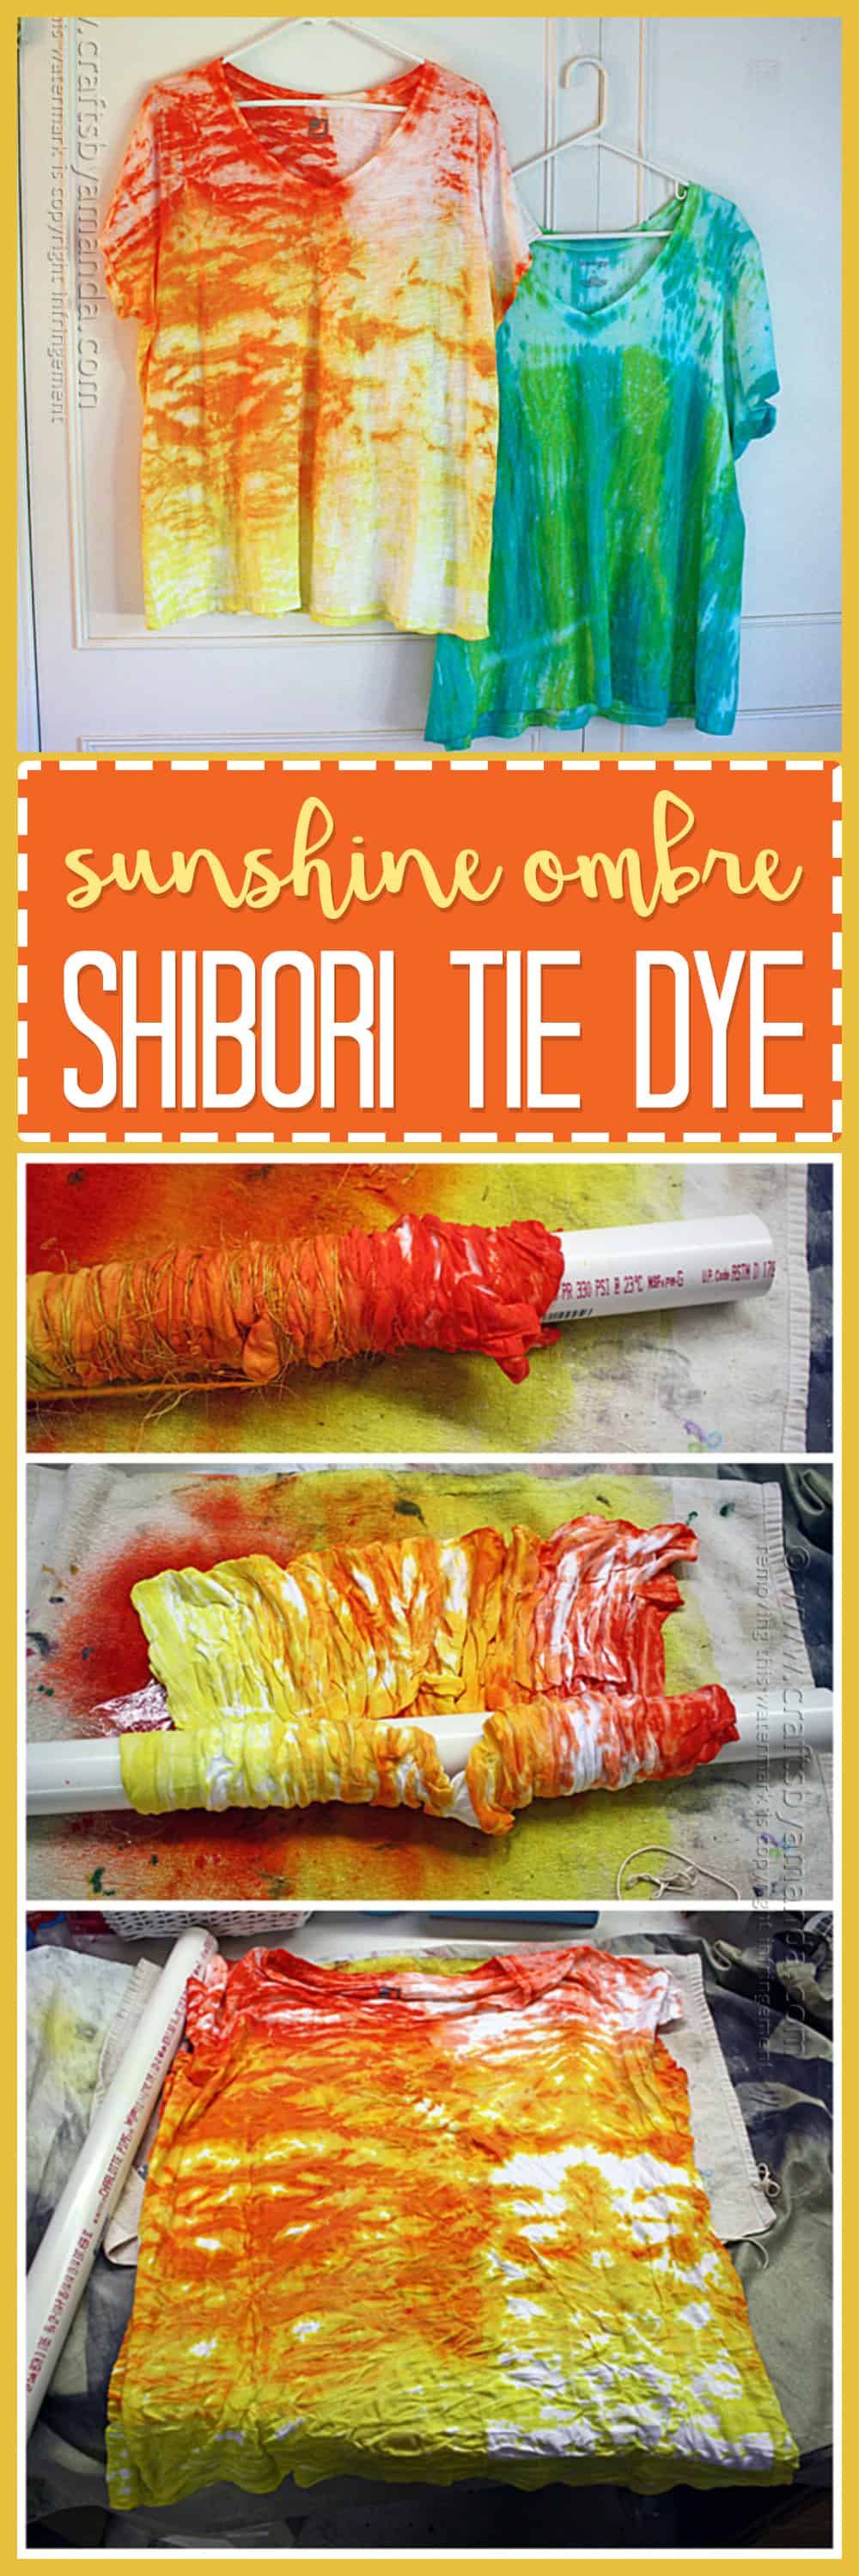
Have you heard of shibori? I hadn’t until just a couple weeks ago. It’s a resist method used for dying that has been used in Japan for many, many years. There are several different ways to shibori; folding, wrapping, twisting and more. I chose the method that involves wrapping fabric around a cylindrical object.
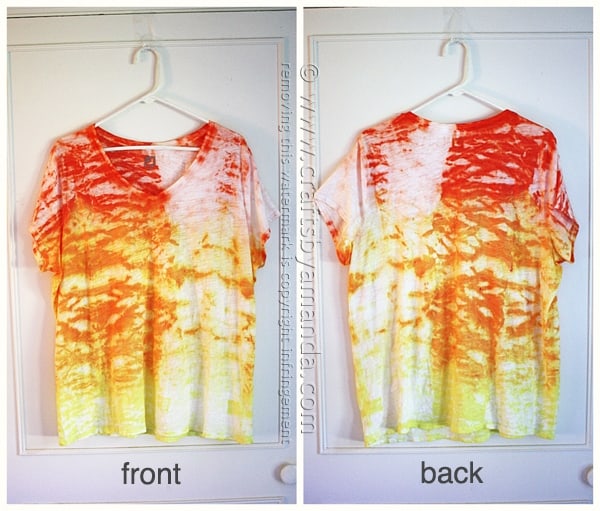
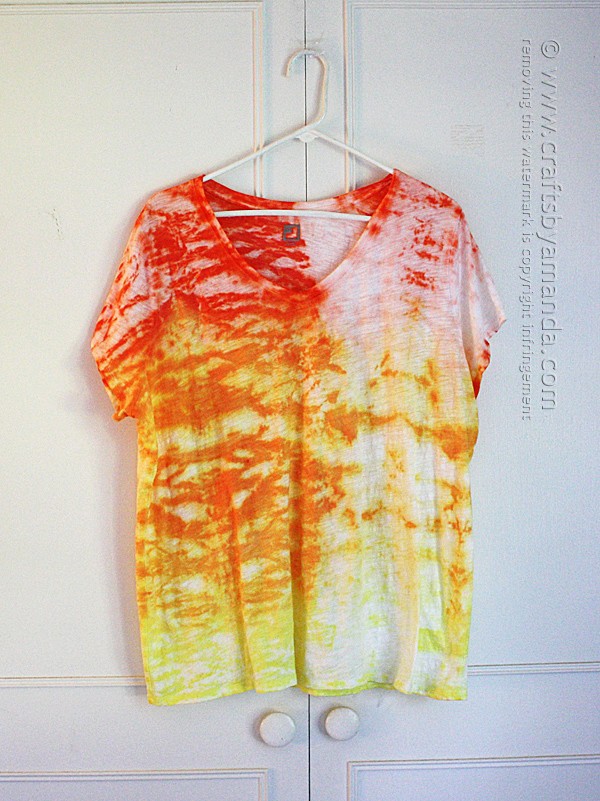
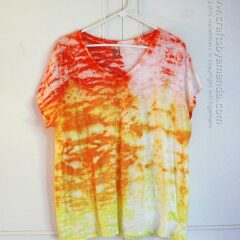
I don’t do a lot of projects using the ombre look, but this one almost begged it. I love the gradual transition of colors that are going on with this top. Believe it or not, that top color is not red, it’s orange. The center is a mixture of orange and yellow and the bottom, of course, is yellow on its own.

A couple weeks ago I was browsing JC Penney and saw these tops. Mine didn’t turn out like these, but I still love the results. And I’m still going to keep trying to achieve something similar to these. Yes, $14.99 is pretty darn reasonable, but I don’t look good in boat necks and they didn’t have any V-necks with this design. Besides, I love trying to figure stuff like this out! Gives me an excuse to spend time in the craft room. :)
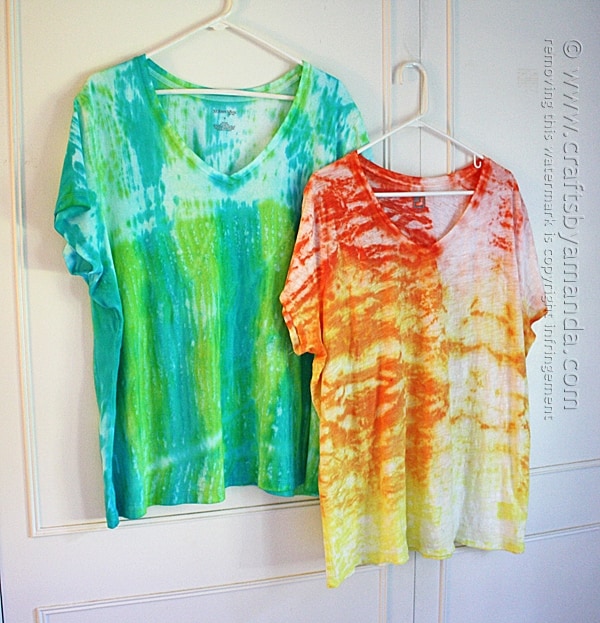
Before I show you how to make this top, I wanted to let you know that at the end of this post, there’s a link to my tutorial for making the blue/green one as well!
Note: some links below are affiliate links. That means if you happen to buy something, a small percentage of that sale goes back into this site, which enables me to continue to bring you free tutorials such as this one. So, thanks!
As always, a full printable supply list and instructions are at the end of this post.
For this project you will need the following supplies:
Tulip One-Step Dye Kits- Yellow![]()
Tulip One-Step Dye Kits- Orange![]()
White tee
PVC pipe – 1 1/2″ (diameter) x 24″ (long) (mine was around $5 at Home Depot)
Rubber bands and gloves (available in dye kit)
Spray bottle of water
Towel you don’t mind staining
Twine![]()
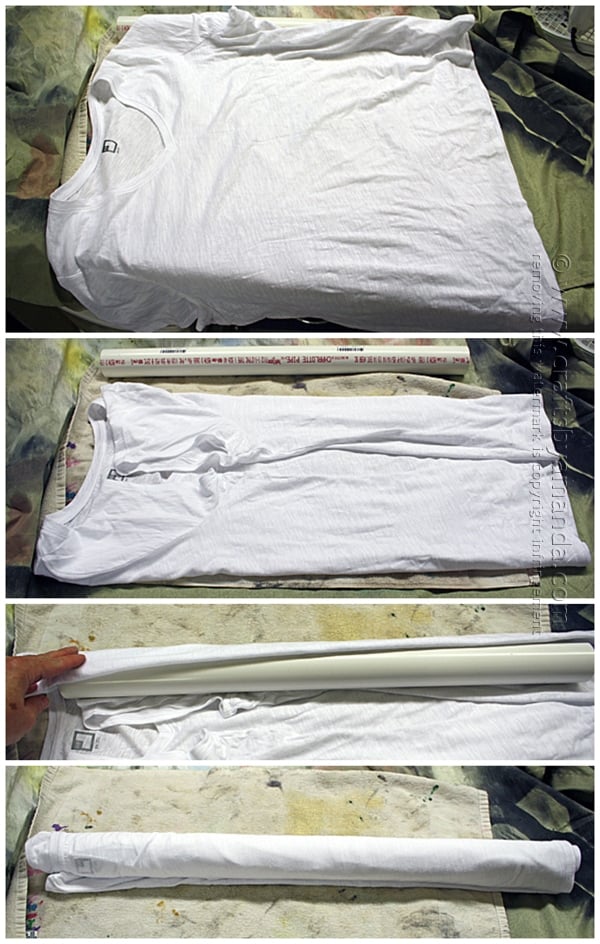
First off, protect your work surface with an old tablecloth or lots of newspaper.
Lay your tee face up on the table. Fold the sleeves and sides of tee toward the center of the shirt. Beginning at one side of the tee, roll the shirt around the PVC pipe.
NOTE: Keep track of which end of the pipe your tee’s neckline is! You can draw a little mark inside that end of the PVC pipe with a permanent marker to help you remember.
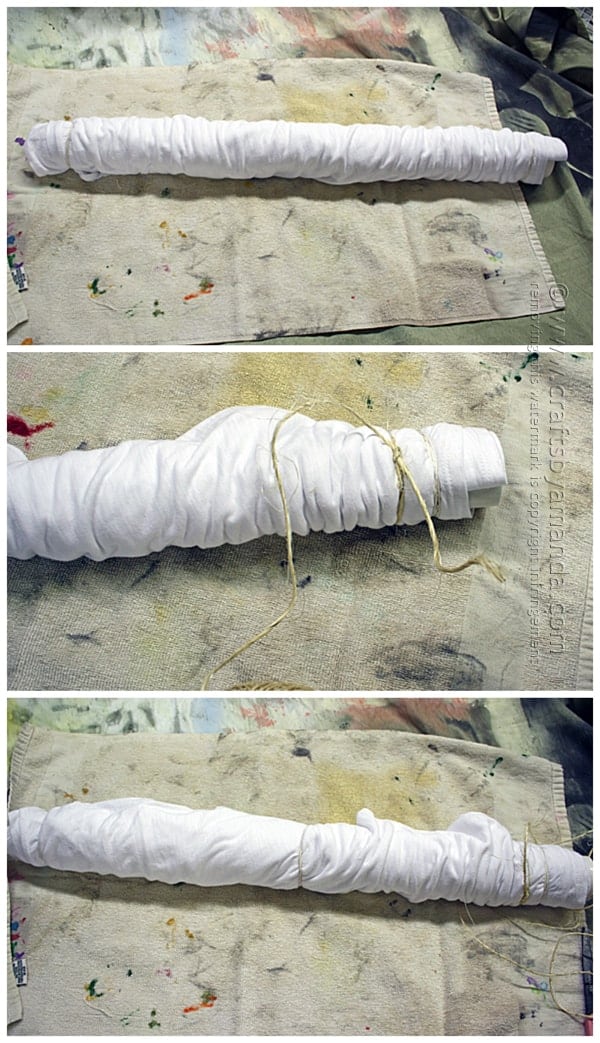
Wrap a rubber band around each end of the pipe and in the center. This is not for resist purposes, just to hold the shirt in place. Tie the twine around one end of the pipe and knot.
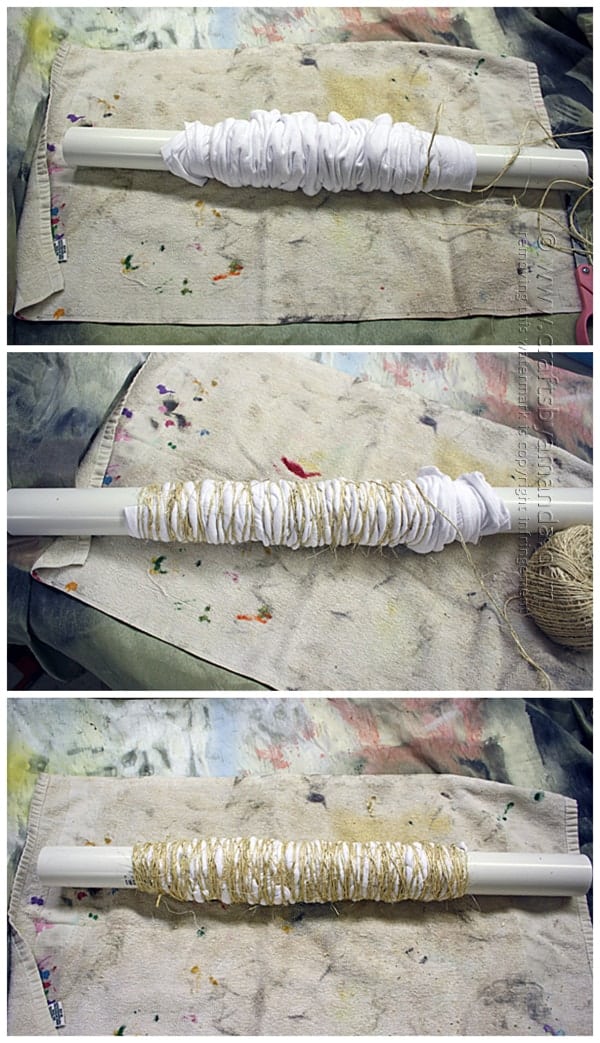
Scrunch the shirt from each end toward the center of the pipe. Wrap the twine tightly around the pipe/tee until completely covered. There should be thin areas of tee showing in between wraps of twine.
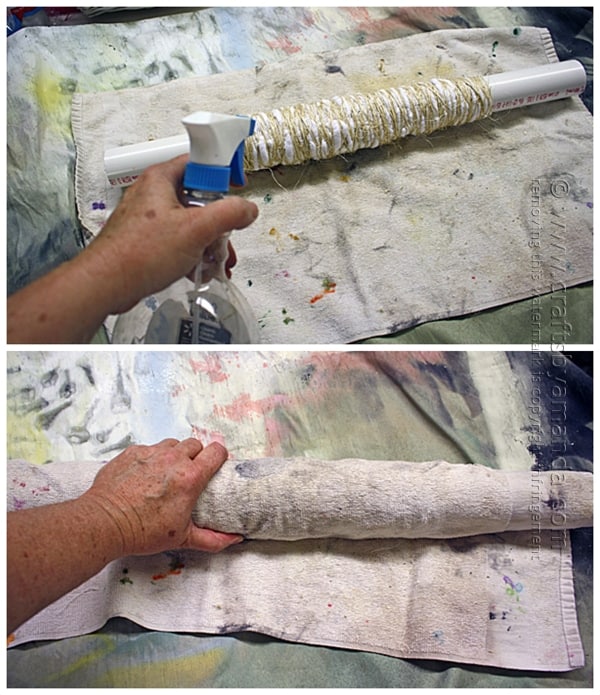
Mist the twine wrapped tee with water. Roll it in a towel to remove excess water, you want it damp, not sopping.
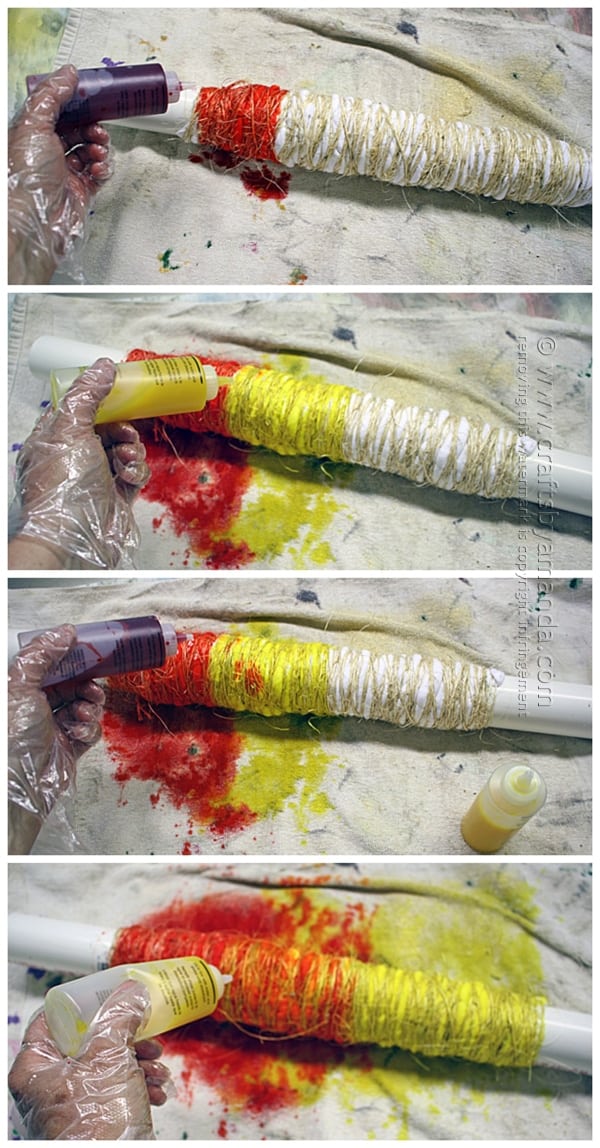
Put on your gloves and mix your dye (add water and shake). Starting at the neckline end of your tee, cover about 1/4 of the fabric with orange dye. Cover the remaining fabric with yellow dye. To get that orange-yellow color in the center, add some orange dye over the yellow dye in the center of the tee.
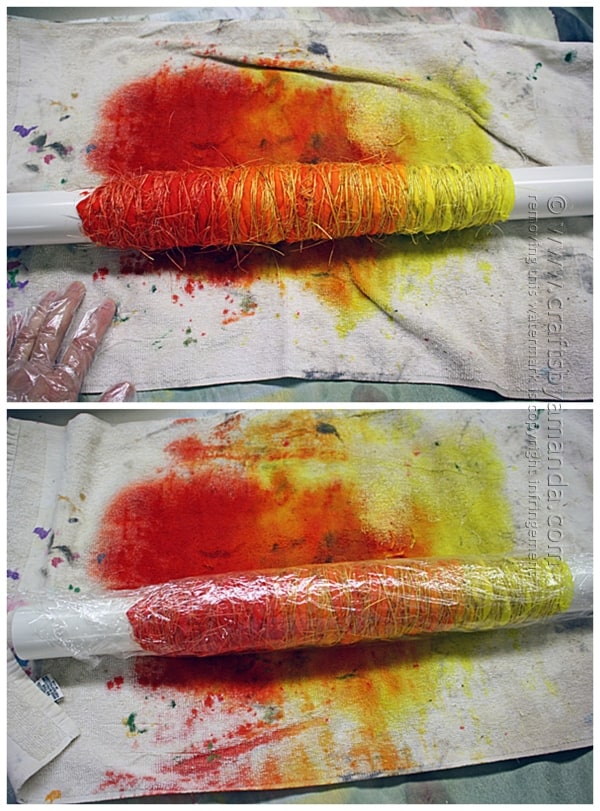
Roll the pipe back and forth across an old towel to ensure there’s no dripping dye. Wrap the pipe/tee in plastic wrap and allow it to sit for 6 hours.

Remove the plastic wrap and run the fabric covered pipe under cool water to get as much as the dye out as you can. Remove the rubber bands and the twine and unroll the tee from the pipe. Rinse out any remaining dye and follow laundering instructions on the dye packaging.

I hope you enjoyed this tutorial! If you would like to see how I made the blue hued shirt, please head over to my tutorial – Cool Hues Shibori Top
Sunshine Ombre Shibori Tie Dye Top
Supplies
- Yellow and orange dye
- White tee
- PVC pipe - 1 1/2" diameter x 24" (long)
- Rubber bands and gloves from kit
- Spray bottle of water
- Towel you don't mind staining
- Twine
Instructions
- First off, protect your work surface with an old tablecloth or lots of newspaper.
- Lay your tee face up on the table. Fold the sleeves and sides of tee toward the center of the shirt. Beginning at one side of the tee, roll the shirt around the PVC pipe.
- Wrap a rubber band around each end of the pipe and in the center. This is not for resist purposes, just to hold the shirt in place. Tie the twine around one end of the pipe and knot.
- Scrunch the shirt from each end toward the center of the pipe. Wrap the twine tightly around the pipe/tee until completely covered. There should be thin areas of tee showing in between wraps of twine.
- Mist the twine wrapped tee with water. Roll it in a towel to remove excess water, you want it damp, not sopping.
- Put on your gloves and mix your dye (add water and shake). Starting at the neckline end of you tee, cover about 1/4 of the fabric with orange dye. Cover the remaining fabric with yellow dye. To get that orange-yellow color in the center, add some orange dye over the yellow dye in the center of the tee.
- Roll the pipe back and forth across an old towel to ensure there's no dripping dye. Wrap the pipe/tee in plastic wrap and allow it to sit for 6 hours.
- Remove the plastic wrap and run the fabric covered pipe under cool water to get as much as the dye out as you can. Remove the rubber bands and the twice and unroll the tee from the pipe. Rinse out any remaining dye and follow laundering instructions on the dye packaging.
Expert Tips & FAQs
- Swirling Twirling Ladybugs - July 21, 2026
- Drip Tie Dye Backpack - July 17, 2026
- Mini Coastal Clay Houses - July 14, 2026


Tina Berrier says
This is so cool.
Linda says
I have tshirts from cj banks and am wondering if they would work as well?
Amanda Formaro says
I’m not sure, I’m not familiar with the brand. Sorry!
Clodreé says
Love ?
Obrigada!
Karen says
These are lovely, I am ordering some dyes! I don’t look so great in boatnecks either, can you tell me where you got your tshirt blank? I really like the way it’s made. Thanks so much for the lesson.
Amanda Formaro says
Hi Karen! Pretty sure this one I bought from JC Penney :)
Victoria says
Was thinking for a while about doing some onesies for a friend. Just wondering whether these dyes are safe to use on children’s clothes? Don’t want to give them to her & the dye rub off on the baby? X
Amanda Formaro says
They are safe and the dye will not rub off :)
Renee VanEpps says
This is such a great project, thank you for the tutorial and inspiration Amanda!!! I have a quick question – do you know why the one side of the shirt has more color and there’s more white space on the other? Is there a way to get it to come out more even on both sides?
Amanda Formaro says
It’s been a while since I made it, but it had to do with how far into the roll the back of the shirt ended up. Does that make sense?
Phyllis says
Try rolling the neck end in first and then the bottom will be darker. The yellow and the red/orange would be on the left or right and the lighter Orange would be in the middle.
Sherry Litchfield Newton says
Nice
Sherry Litchfield Newton says
nice tie dye shirt
Denise Stone says
We’ve got these styles coming into fashion here in Australia now and I much prefer yours. This technique would make everyone unique, which I think is awesome. Keep up the good work!
Liz says
Do you know what might happen if the dye were left on for more than six hours? I teach art and was thinking to try this with my art club. But we would have to let them sit over night – way more than six hours.
Just wondering :)
Amanda Formaro says
It should be fine. I haven’t tried it overnight, but I have left them for longer than 6 hours without a problem.
Crystal says
Okay. Here is my tie dye hint. Soak your shirt in tub or bucket with washing soda. Ring it out then do your tie dye. Makes a huge difference doing it on a wet shirt than a dry shirt. The colors penetrate so much better. We are the tie dye family here. We even tie dyed bassinet sheets and crib sheets for our baby. He also had a tie dye onesie. We were totally the grooviest family around.
Suzanne says
They’re gorgeous! I like them better than the ones in the store, too. I don’t do a lot of crafts but you’ve really made me want to do this one!
Amanda Formaro says
Awesome! Hope you have fun with it Suzanne!
VCal says
Do you think this technique would work with a queen sized sheet?
I’m making a backdrop for a black light pillow fight and I think this technique would create a cool landscape-esque atmosphere. I have UV reactive dyes in 6 colors!
Thanks
Amanda Formaro says
That sounds cool! Just keep in mind that a queen size sheet is a lot larger, which means it will wrap around the tube several times more than a shirt will. That makes it harder for the dye to penetrate. So either increase the amount of dye OR use a larger cylinder to wrap it around. Would love to hear how it turns out!
Peggy says
So clever and I love the final product. It’s really beautiful. I just asked my husband if we had any PVC pipe lying around. I think I’ll be running to Lowe’s for a pipe a Michael’s for a shirt tomorrow!
Amanda Formaro says
Hope you have fun with it Peggy!
Rosa Marie says
How do I get my picture added by my name ?
Amanda Formaro says
Hi Rosa. I’m not sure, but I think if you go to Gravatar.com you can get it there :)
Rosa Marie says
I LOVE, LOVE, LOVE these shirts!!!!! I only like V neck too. Soooooooooo I hope I can do it. I love RED.
Amanda Formaro says
You can do it!
Joni Hoult says
I like yours better than the store bought ones. They’re brilliant. And look more texured.
Amanda Formaro says
Thank you so much Joni!
Asmaa says
Hey love your project and lovely outcome , just a tip , do not use the pipe just gather the shirt lenghtwise not eavenly then twist it as much as you can may need another hand to help… then wrap as tight as you can with a yarn maybe twice on the same place if yarn is thin , keep the yarn at a distance not too covering the whole fabric . Then you can dip all the twisted element in one color to get the look of the tee your project was inspired with :)
Amanda Formaro says
Thanks Asmaa, it’s funny you should say that because “twisting” was another method I was going to try soon. I didn’t want the shirt one color though, I prefer multiple colors :)
agnes wimmer says
i wondered if using a plastic twine instead of rope twine, if you could get the effect that the store bought version has, since the rope twine absorbs the dye as well.
Amanda Formaro says
That’s a brilliant idea Agnes!