• Home
  • About
    • About Crafts by Amanda
    • Visit Our Recipe Site
  • Work With Us
  • Join
    • Free Newsletters
    • Join our Facebook craft group
↑
  • Tutorials
    • Tutorial Index
    • Adult Crafts
    • Crafts for Kids
    • Crafts for Seniors
    • Recycled Crafts
    • Seasonal Crafts
    • Holiday Crafts
    • Free Printables
    • Craft Collections
  • Adult Crafts
    • Bath & Body
    • Beach Crafts
    • Clay Pot Crafts
    • Crafts for Seniors
    • Decoupage Crafts for Adults
    • DIY Gift ideas
    • Garden Crafts
    • Home Decor Projects
    • Kitchen Crafts
    • Light Bulb Crafts
    • Luminary Crafts
    • Mason Jar Crafts
    • Needlework
    • Photo Display Ideas
    • Recycled Crafts for Adults
    • Wearable Crafts for Adults
  • Crafts for Kids
    • Animal Crafts for Kids
    • Back to School Crafts
    • Beach Crafts for Kids
    • Camp Crafts
    • Cardboard Tube Crafts for Kids
    • Decoupage Crafts for Kids
    • Easy Crafts for Kids
    • Nature Crafts for Kids
    • Other Kid’s Crafts
    • Paper Plate Crafts for Kids
    • Recycled Crafts for Kids
    • Slimes, Doughs, & Clay
    • Wearable Crafts for Kids
  • Holiday Crafts
    • 4th of July Crafts
    • Christmas Crafts
    • DIY Gift ideas
    • Earth Day Crafts
    • Easter Crafts
    • Father’s Day Crafts
    • Halloween Crafts
    • Memorial Day Crafts
    • Mother’s Day Crafts
    • New Year’s
    • Other Holidays
    • Patriot Day Crafts
    • St. Patrick’s Day Crafts
    • Thanksgiving Crafts
    • Valentine’s Day Crafts
  • Seasonal Crafts
    • Winter Crafts
    • Spring Crafts
    • Summer Crafts
    • Fall Crafts
  • Skip to primary navigation
  • Skip to main content
  • Skip to primary sidebar
  • Skip to footer

Crafts by Amanda

crafts for adults and kid's crafts

  • Tutorials
    • Tutorial Index
    • Adult Crafts
    • Crafts for Kids
    • Crafts for Seniors
    • Recycled Crafts
    • Seasonal Crafts
    • Holiday Crafts
    • Free Printables
    • Craft Collections
  • Adult Crafts
    • Bath & Body
    • Beach Crafts
    • Clay Pot Crafts
    • Crafts for Seniors
    • Decoupage Crafts for Adults
    • DIY Gift ideas
    • Garden Crafts
    • Home Decor Projects
    • Kitchen Crafts
    • Light Bulb Crafts
    • Luminary Crafts
    • Mason Jar Crafts
    • Needlework
    • Photo Display Ideas
    • Recycled Crafts for Adults
    • Wearable Crafts for Adults
  • Crafts for Kids
    • Animal Crafts for Kids
    • Back to School Crafts
    • Beach Crafts for Kids
    • Camp Crafts
    • Cardboard Tube Crafts for Kids
    • Decoupage Crafts for Kids
    • Easy Crafts for Kids
    • Nature Crafts for Kids
    • Other Kid’s Crafts
    • Paper Plate Crafts for Kids
    • Recycled Crafts for Kids
    • Slimes, Doughs, & Clay
    • Wearable Crafts for Kids
  • Holiday Crafts
    • 4th of July Crafts
    • Christmas Crafts
    • DIY Gift ideas
    • Earth Day Crafts
    • Easter Crafts
    • Father’s Day Crafts
    • Halloween Crafts
    • Memorial Day Crafts
    • Mother’s Day Crafts
    • New Year’s
    • Other Holidays
    • Patriot Day Crafts
    • St. Patrick’s Day Crafts
    • Thanksgiving Crafts
    • Valentine’s Day Crafts
  • Seasonal Crafts
    • Winter Crafts
    • Spring Crafts
    • Summer Crafts
    • Fall Crafts
Craft Tutorials | Holiday Crafts | Halloween Crafts | Halloween Door – Keep Out
Halloween Crafts

Halloween Door – Keep Out

Author by Amanda Davis on October 8, 2024 Updated on October 8, 2024

5 from 9 votes
Decorate your house with a spooky Halloween Door that says "Keep Out", warning all who approach that they don't know what lies beyond! Fun!
Jump to Project
Halloween decorated door
24485 shares
  • Share
  • Tweet
  • Flipboard
  • Email

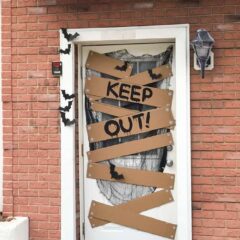
Using a bit of scrap cardboard and acrylic paint you can make a creepy Halloween door warning all who approach to keep out!

Halloween decorated door


Why We Love This Project


I’ve seen a lot of fun decorated doors for Halloween. I almost decorated my garage door to look like a sharp-toothed monster last year! The best part about this Halloween door was how easy it was to make. Very few supplies required meant it was inexpensive too.

keep out halloween door decoration

Last year I hosted a pumpkin painting party for friends at my craft studio and turned my studio door into this fun Halloween Door!

cardboard painted with words

How to Create Your Halloween Door
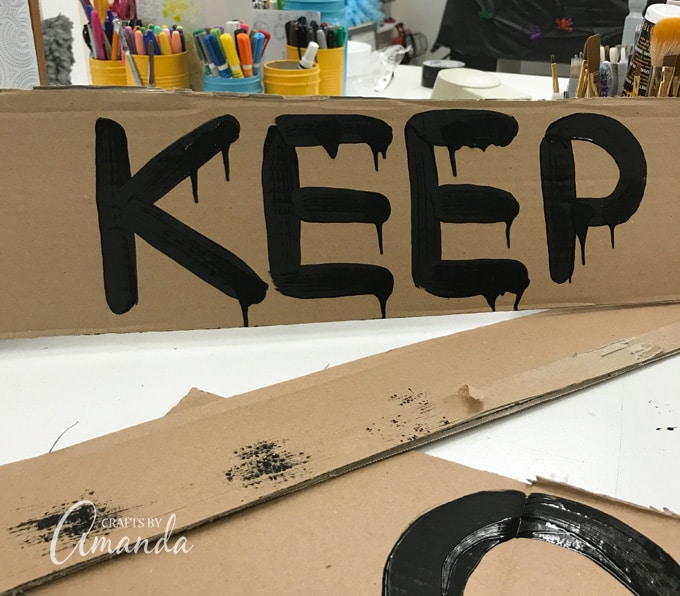

  1. Cut cardboard box open so that it lies flat. Use a box cutter to cut the cardboard into “planks of wood”.
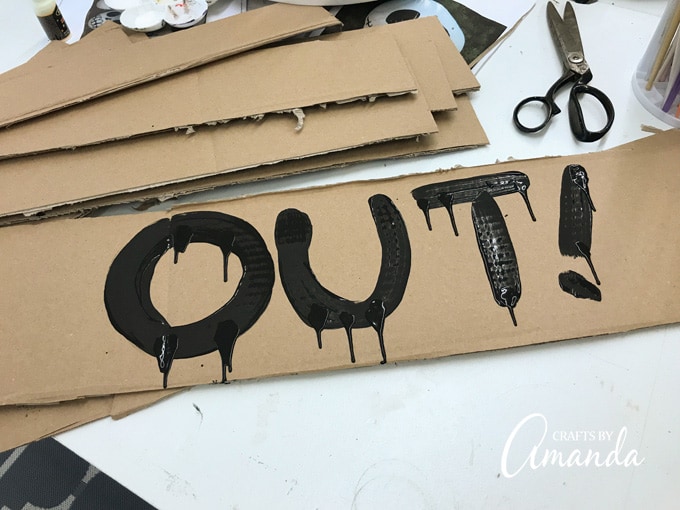
  2. Use a large paintbrush with black paint to write KEEP on one of the planks and OUT on another. Use a lot of paint, then stand the plank upright and tap it on the work surface a few times so that the excess paint drips.
  3. Use a round sponge applicator and silver paint to add “nails/bolts” to the end of each plank. Dip the applicator in the paint then press onto the plank and turn and twist to create a circle.
  4. Let everything dry completely.
  5. Meanwhile, while the paint is drying, attach the black mesh or spider web to the outside of your door using tape (try to find a color that matches your door or use clear shipping tape).
  6. When the planks are dry, attach them over the mesh, allowing it to show through.
  7. Add some fun stick-on bats to the finished project!
painting words on cardboard

*CAUTION – I left my door decoration up for quite a while (about two months) because I wasn’t visiting my studio daily then. When I removed the tape, it pulled the top layer of paint off the door. I assume because of the sun beating down on the tape. I recommend putting this on a storm door if you have one, or putting it up a week before Halloween then removing it right away, especially if your door gets a lot of sun like mine did!

halloween door decoration made from cardboard

Everyone got a big kick out of my Halloween Door! My studio was right on Main Street so there were a lot of turned heads as people went by. Lots of fun! I’ve saved the boards and will be putting this on my storm door on my house in a few weeks. Have fun and Happy Halloween!

Feel free to check out over 40 more ideas for Halloween decorations!

More Halloween decorating ideas


  • Halloween Painted Jar Luminaries
  • Salt Dough Haunted Houses
  • Barbie Zombies
  • Creepy Hand Luminaries
  • Clay Halloween Village
  • You’ve Been Booed

I love to create and share my projects with you! I know it’s hard to remember to come back and search, so I’ve made it easy for you with my weekly newsletter! You can subscribe for free and I’ll send you fun crafts every week right to your email.

Halloween decorated door
Print Project
5 from 9 votes

Halloween Door – Keep Out

Decorate your house with a spooky Halloween Door that says “Keep Out”, warning all who approach that they don’t know what lies beyond! Fun!
Age Group: Crafts
Project Type: Halloween
Author: Amanda Formaro

Supplies

  • Large cardboard box
  • Black and silver acrylic craft paint
  • Black creepy mesh or white spider web if you have a light colored door, use black, and vice versa
  • Round sponge applicator
  • Duct tape or double-sided tape *please read caution in notes!

Craft tools

  • Box cutter
  • Large paintbrush

Instructions

  • Cut cardboard box open so that it lies flat. Cut box into “planks of wood”.
  • Use a large paintbrush to write KEEP on one of the planks and OUT on another. Use a lot of paint, then stand the plank upright and tap it on the work surface a few times so that the excess paint drips.
  • Use a round sponge applicator and silver paint to add “nails/bolts” to the end of each plank. Dip the applicator in the paint then press onto the plank and turn and twist to create a circle.
  • Let everything dry completely.
  • Meanwhile, while the paint is drying, attach the black mesh or spider web to the outside of your door using tape (try to find a color that matches your door or use clear shipping tape).
  • When the planks are dry, attach them over the mesh, allowing it to show through.

Expert Tips & FAQs

CAUTION – I left my door decoration up for quite a while (about two months) because I wasn’t visiting my studio daily then. When I removed the tape, it pulled the top layer of paint off the door. I assume because of the sun beating down on the tape. I recommend putting this on a storm door if you have one, or putting it up a week before Halloween then removing right away, especially if your door gets a lot of sun like mine did!

I was inspired to create this door after seeing it on Woman’s Day. This post originally appeared here on Sep 20, 2018.

  • Author
  • Recent Posts
Amanda Davis
Amanda Davis is the crafty, entrepreneurial mother of four children. She loves to bake, cook, make kid's crafts and create decorative items for her home. She is a crafting expert and guru in the kitchen and has appeared online and in print publications many times over the years.
Latest posts by Amanda Davis (see all)
  • Birdcage Flower Planter - July 15, 2025
  • Recycled Plastic Lid Windchime - July 11, 2025
  • Rainbow Tie Dye Shirts - July 4, 2025
24485 shares
  • Share
  • Tweet
  • Flipboard
  • Email

Filed Under: Halloween Crafts Tagged With: halloween decorations, recycle crafts

Reader Interactions

Free CraftsBy email every week

Latest crafts straight to your inbox!

Comments

  1. Inês says

    October 28, 2024 at 12:07 pm

    Made this for my halloween party, it looked awesome!

    Reply
  2. Jim says

    April 2, 2020 at 9:19 am

    When you painted keep out why didn’t you use red to make it look more scary thank you

    Reply
    • Amanda Formaro says

      April 9, 2020 at 7:33 am

      Good idea!

      Reply
      • Natty potter says

        October 8, 2021 at 9:53 am

        Thanks

        Reply
  3. Beth says

    September 21, 2018 at 3:21 pm

    This is awesome! We made something similar, only used wood, to create this look in a dining room windows one year. Our party guests loved it.

    Reply
    • Amanda Formaro says

      October 4, 2018 at 8:00 am

      Oh I bet that was so cool!

      Reply
5 from 9 votes (7 ratings without comment)

Leave a Reply Cancel reply

Your email address will not be published. Required fields are marked *

Rate This Project


The maximum upload file size: 640 MB. You can upload: image, video. Links to YouTube, Facebook, Twitter and other services inserted in the comment text will be automatically embedded. Drop files here

Primary Sidebar

Hi! I’m Amanda and I’m the founder and head designer of Crafts by Amanda. I have spent over 25 years creating projects to share, but it’s not just me anymore! It’s turned into a complete family affair. Come and meet the Creative Team!

Free CraftsBy email every week

Latest crafts straight to your inbox!

All Time Favorites

Learn to make these adorable ladybug painted rocks. use special outdoor paint for this adorable garden craft so you can keep garden ladybugs all summer!

Ladybug Painted Rocks…

These colorful little ladybug painted rocks are the ... Go To project

snowy pinecone candle jar luminaries

Winter Luminaries: Snowy Pinecone…

Make pretty winter luminaries that appear to be covered ... Go To project

Make this wonderful deco mesh pumpkin wreath to hang on your door this fall!

Deco Mesh Pumpkin Wreath…

Adorn your door this fall with a pretty deco mesh ... Go To project

Reuse those empty prescription pill bottles in all sorts of ways. From organizing to making cookies. Yes, cookies! See how to use your empty pill bottles!

20 Uses for Prescription Pill…

You've been collecting prescription pill bottles for ... Go To project

Meet the Family

Amanda

Founder and Designer

Kristen

Editorial Manager

Lindsay

Social Media Manager

As seen on:

Footer

Favorites

  • Jar Photo Frames
  • No-Sew Roman Shade
  • Paper Flowers
  • How to Make a Scrunchie
  • Mermaid Slime

About

  • Home
  • Meet the Creative Team
  • Work with Us
  • Privacy Policy
  • Accessibility
  • Contact Us

Images/text copyright Amanda Formaro 2020. To feature a post from Crafts by Amanda, you may use one photo credited and linked back directly to the project post.

Free CraftsBy email every week

Latest crafts straight to your inbox!

Copyright ©2025, Crafts by Amanda. All Rights Reserved.
Design by Pixel Me Designs

Rate This Tutorial

Your vote:


To share a photo with your comment click here!

A rating is required
A name is required
An email is required

Recipe Ratings without Comment

Something went wrong. Please try again.