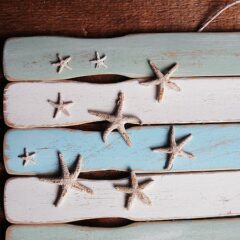
This Weathered Paint Stick Beach Flag is the perfect coastal home decor! Grab some paint, paint sticks, and mini starfish and you can easily create one for yourself.
Before we dive into the post, I wanted to share our beautiful sunburst mirror made from wood shims. This sunburst mirror will complement your coastal themed decor, and would look great paired with this beach flag!

Weathered Paint Stick Beach Flag
Beach decor is probably my all time favorite. I love making things with starfish, seashells, and sand dollars. There’s something about beach decor that brings the ocean indoors and reminds me of how relaxed I feel when I’m there. I live in the midwest, quite a ways from the ocean, so bringing it into my decor is the next best thing.
Before I show you how I made this, I should probably clear something up right away. I know that the American flag has 13 stripes. I also know that its colors are red, white and blue. This project was “inspired” by the American flag, it’s not meant to be a replica. With that said, I hope that you enjoy the project!

Recently, someone gave me a big box of paint sticks, so I tucked them away for a future project. I’ve actually been meaning to make this beach flag for quite some time and was finally able to sit down for a couple of hours and get it done.

I’m in love with beachy colors. I chose to use DecoArt’s Americana paint in Cool White, Sea Glass, Whispering Turquoise, and Oyster Beige. I’ve used DecoArt paints on many, many projects and love it!
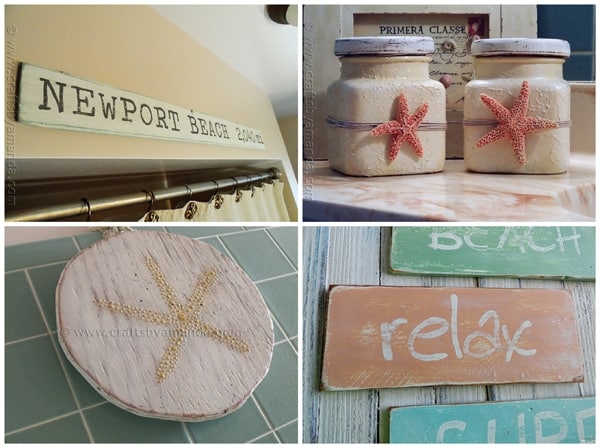
My bathroom is decorated with some other beach projects I’ve created, like this Weathered Newport Beach Sign, these Textured Glass Beach Canisters, and this Beach Starfish Plaque. The Weathered Beach Signs are among my favorites. Here are all my beach crafts if you want to have a look.

This flag measures about 12-inches wide. Eventually, I’d like to make another one that’s much larger, similar in size to my PB Inspired Rustic Colonial American Flag.

What You’ll Need
- Seven paint sticks
- Starfish in varying sizes
- Paintbrushes
- Hot glue gun
DecoArt’s Americana paint
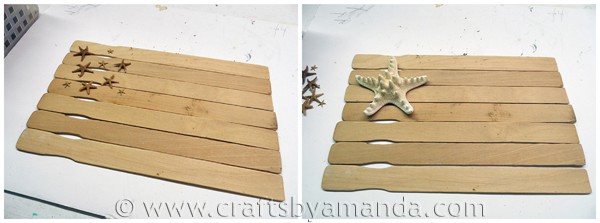
I started by lining up seven paint sticks. Some of them were a little warped, but gently bending them with my hands helped bring them back to shape. I laid out the starfish to help me decide which ones to use.
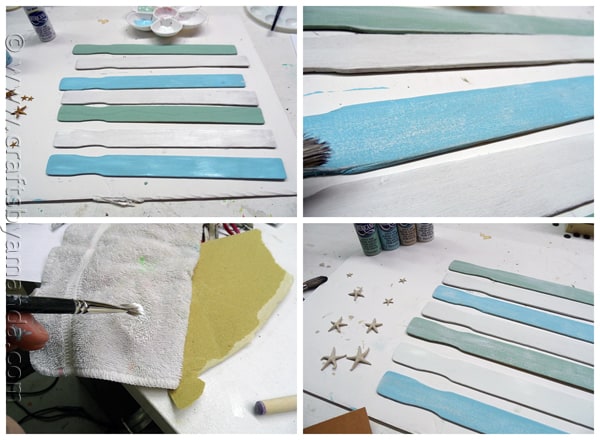
I painted the sticks, alternating colors as I went. The end result was 2 green, 2 blue and 3 white. After they had dried, I dry brushed white over the blue and green sticks. I used a sponge applicator to paint the starfish white, and once they were dry I added a layer of Oyster Beige.
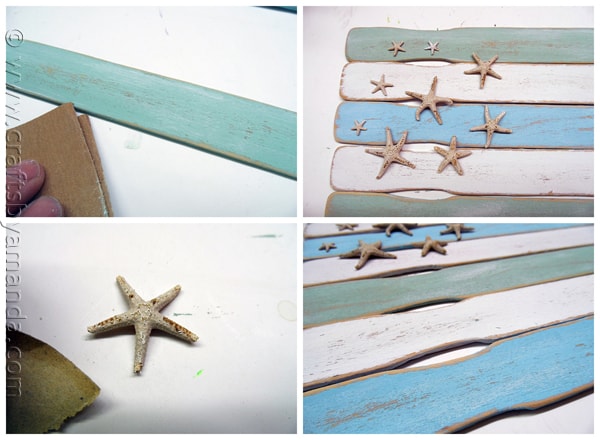
Sanding all the edges and corners came next. I also sanded the face of the sticks and the starfish.
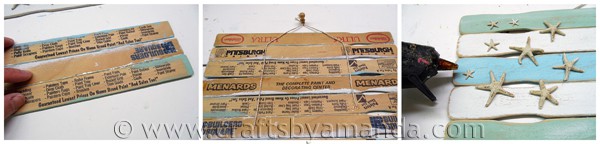
I hot glued the sticks together, one by one, gluing from the backside so that the glue wouldn’t show. Next, I tied a hanger out of twine and glued that to the back, then turned the whole thing over and glued the starfish in place.

All done and ready to hang!

Weathered Paint Stick Beach Flag
Supplies
- 7 Paint sticks
- Starfish in varying sizes
- Paintbrushes
- Hot glue gun
DecoArt Americana Acrylic Paint
- Cool white
- Sea glass
- Whispering turquoise
- Oyster beige
Instructions
- I started by lining up seven paint sticks. Some of them were a little warped, but gently bending them with my hands helped bring them back to shape. I laid out the starfish to help me decide which ones to use.
- I painted the sticks, alternating colors as I went. The end result was 2 green, 2 blue and 3 white. After they had dried, I dry brushed white over the blue and green sticks. I used a sponge applicator to paint the starfish white, and once they were dry I added a layer of Oyster Beige.
- Sanding all the edges and corners came next. I also sanded the face of the sticks and the starfish.
- I hot glued the sticks together, one by one, gluing from the backside so that the glue wouldn't show.
- Next, I tied a hanger out of twine and glued that to the back, then turned the whole thing over and glued the starfish in place.
I am a DecoArt Core Blogger. I was compensated for this post, but have always loved DecoArt products! Therefore, all opinions expressed here are 100% my own.
This post originally appeared here on May 28, 2013.
- Swirling Twirling Ladybugs - July 21, 2026
- Drip Tie Dye Backpack - July 17, 2026
- Mini Coastal Clay Houses - July 14, 2026


Maureen Steele says
My friend and I are making these for a school bazaar but we are having trouble getting the sticks to stayed glued together. The hot glue works but looks gappy and tried gorilla wood glue (not hot) and they didn’t seem to be staying glued. any suggestions?
Amanda Formaro says
Try Beacons 3-in-1 http://amzn.to/2gFGdop or E6000 http://amzn.to/2gGfmsk – Tacky Glue will work too, but you may want clamp the pieces together with something while they dry. :)
Vicky says
I glued a couple of cut paint stirrers on each side
MELA says
Seeing this in 2019- pinterestnproject on s different site used E6000 or gorilla glue combined with hot glue. So get the permanent weather-tolerable e6000 and the immediate hold of hot glue.
Amanda Formaro says
great tip, thanks!
Shena says
I am just now seeing this so when I make it I will use thin wire and loop around the sticks individually. I think it may look too rustic but will try that first before I try gluing.
Barbara Henderson Bishop says
I just got most of my stuff together for my beachie flags except I didn’t get my star fish yet do u think I be able to get them at Hobby Lobby?
Amanda Formaro says
Hi, Barbara! I believe Hobby Lobby should have the starfish :) If not, try Michaels as well. Best of luck!
Donna Muscara says
Where did u get the sticks? Also I couldnt get oyster beige,
.
Amanda Formaro says
Hi, Donna. You can find sticks on Amazon here http://amzn.to/2qQWPAV and Oyster Beige can be found here > http://amzn.to/2s721Ri or possibly at Michaels. Good luck!
Page says
Cute! Can I ask what wood glue you recommend? I’m having a hard time with glues being very messy when I put wood or items onto wood. Any brand you like using? Thanks.
Amanda Formaro says
I have had good results with Gorilla brand wood glue :)
Debie Woodbeck says
I love this but we are “mountain lake people” not beachy. What would you use instead of starfish?
Amanda Formaro says
Fun! I think little pine trees would be cute, or if you want a more nature inspired look, I would try wood chips, tiny pinecones or stones.
Kaitlyn says
This is so cute and beachy! Thanks for sharing this DIY! I can’t wait to recreate it.
Lindsey says
Can you explain the dry-brush of white over the blue and green sticks? I’ve never done that. I LOVE this project and can’t wait to do it.
Amanda Formaro says
Hi Lindsey :) Dry brush basically is what it sounds like. You dip your paintbrush into the paint, then use painting strokes on a paper towel or cloth to remove the excess paint. The paintbrush should be pretty dry but still hold paint. When you apply the dry brush to your surface, it should leave kind of a “scratchy” look.
Deb says
Love this flag. Started making one. My question where did you get the small starfish?
Amanda Formaro says
I found those at Michaels! They have an aisle with vase filler etc and a bunch of beach themed stuff :)
Deb says
Thank you! Now to make a trip to Michael’s.
Meg Mayo says
I’d like to have my Girl Scouts make this. But, we don’t use hot glue. What would be your suggestion for a glue to glue the sticks together, and add the starfish? We’d let it dry till our next meeting (2 weeks!)
Amanda Formaro says
Hi Meg. White craft glue will work fine as will wood glue or an instant grab glue like Beacons 3 in 1 advanced
afc350 says
I fell for this project the minute I saw it. Have all the supplies and going to make it this weekend. My question is, did you give the paint sticks a heavy coat of paint, or a thin coat where the grain of the paint sticks showed? I so love your creativity. Thanks for sharing.
Amanda Formaro says
Just a regular coat of paint, not too thin, not too thick :)
sue allen says
I am soooo going to make this–I wish I was as creative as you!
Amanda Formaro says
Aww thank you Sue! Hope you have fun with it :)
amy @ one artsy mama says
I love this! I’m all about anything beachy, and this is an awesome way to upcycle paint stirrers!
Amanda Formaro says
Thank you Amy!
Liz says
Amanda, I just wanted to tell you how much I like this project. I am redoing a bedroom in a coastal theme. This is the first project for my room. I am just finishing it and I love it. Thank for posting it. Liz.
Amanda Formaro says
That’s awesome Liz! I would love to see a picture if you can!
Kristeen says
I may have overlooked this but where did you get your starfish from?
Amanda Formaro says
Hi Kristeen! I got them from Michaels over by the floral and all the vases and marbles. They had bags of various sized starfish. I had used the bigger ones on another project, and these little ones were what was left in the bag. :)
Henri says
this is so neat and easy to do with grandkids as is. I took it a step farther and painted a sail boat &small waves and a lighthouse. I finished it and a visiting neighbor took it for a church sale. BOO HOO, never got a pic. But thatnks for the inspiration. YOU are a gem.
Marcy @ day2day SuperMom says
Oh my I just love this project! I found your feature on Someday Crafts and pin’d ya before I even read the post! The tutorial is fantastic, love all the pics!
Amanda Formaro says
Thank you Marcy! I really appreciate that!
Miranda @ Someday Crafts says
These are beautiful! I love the pastel, beachy theme. Thanks for linking up at Whatever Goes Wednesday last week. This was the most viewed link, so we’ll be highlighting this at tomorrow’s party. We hope you’ll come take a look and join in the party fun again!
Amanda Formaro says
Thank you so much Miranda! i really appreciate that!
DesignedByBH says
Love this! If we are ever able to get our condo at the beach, this is a decoration I must make! :)
Amanda Formaro says
I would love to have a ondo on the beach! ;)
Victoria says
Love this idea and thank you for inspiring me.
Amanda Formaro says
Thanks Victoria, so glad you liked it!
Atta Girl Amy says
I love this, Amanda. So cute. I’ve just called my dad who was on the way to Lowe’s for a project he’s working on at my house and asked him to grab me 7 paint sticks. (They tend to hid them at my local store, so I hope he is successful.)
Amanda Formaro says
Thanks Amy! I hope you have fun making it, and I hope he was able to get the paint sticks for you :)
Laura / The Shed blog by Pet Scribbles says
Wow – this is so creative and perfectly beachy! Love it and pinned it! :)
Amanda Formaro says
Thank you Laura, so nice of you!
Brenda @ a farmgirl's dabbles says
What a great project, I love flags!
Melissa says
I love this idea! Will have to make for our bathroom wall.
Amanda Formaro says
Thank you Melissa!
patty says
Do you think it could be hung on the outside of the house?
Amanda Formaro says
Hi Patty! If you want to do that I would make sure you use an outdoor sealer. I didn’t use any sealer on this since it’s for indoor use.
Lana @ Never Enough Thyme says
How do you come up with these thing!?! You talent just amazes me, Amanda.
Amanda Formaro says
Aww thanks Lana! I was inspired by another project when I made this, but couldn’t find it when I posted. I saw it last year :) Theirs was different and only blue and white, but it inspired me just the same!
Sarah Forhan says
Great idea and so inexpensive to make! Impressive!
Amanda Formaro says
Thank you Sarah, really appreciate that!
Terri Betz says
Wowed! Beauty! Amanda you’ve done it again! Can’t wait to make this sign! Thanks so much! I just love your stuff! :)
Amanda Formaro says
Thank you so much Terri, that’s so nice of you!
Deborah says
Love this! I’m not even crafty, but I could totally do this!
Amanda Formaro says
Thanks Deborah! It’s not hard at all, and the supplies are so easy to get!
Patricia Krank says
This is adorable. I love the colors. Another PIN to my projects board! Blessings,
Patti@OldThingsNew
Amanda Formaro says
Thank you so much Patti!
Elise says
This is awesome! I love the beach so this is perfect :)
Amanda Formaro says
Thank you Elise!
Elle says
I must make this! I adore it.
Amanda Formaro says
Thank you Elle! If you do make one, I’d love to see it!
Kammy's Korner says
Super cute!!! Love it and pinning.
Amanda Formaro says
Thanks Kammy, and thanks so much for the pin!
Suzanne says
This is such a sweet idea! Love the coastal look and you have captured it beautifully on this Flag.
Thanks for sharing,
Suzanne
Amanda Formaro says
Thank you Suzanne, I appreciate that!
Kim @ Sand & Sisal says
I love this Amanda! So creative! Pinned it ;)
Amanda Formaro says
Thank you Kim, and thanks so much for sharing it on Facebook too!