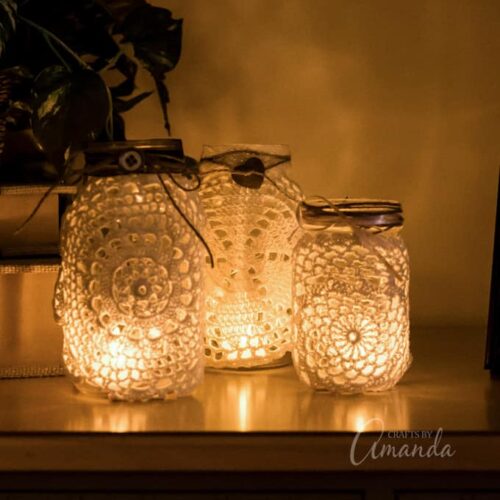
Doilies are dainty, burlap and twine are rustic, and together they make a beautiful combination. Here I’ve put them all together to make these romantic doily luminaries. These luminaries would be perfect on your porch, mantle, or entryway, and they are gorgeous as wedding centerpieces.

Why this project works
Play around with different ribbons, buttons, twine, and burlap to make your doily luminaries. This is one of my favorite adult crafts on the blog! I found my doilies at the thrift store for about $0.35 each. I tried paper doilies![]() but they aren’t as pretty and they are solid in the center, missing the lovely designs that real doilies possess. Because I only had a few doilies on hand, I only put them on one side of the jar, however, you could place them on both sides if you like. They look lovely on their own or with a lit tea light glowing inside.
but they aren’t as pretty and they are solid in the center, missing the lovely designs that real doilies possess. Because I only had a few doilies on hand, I only put them on one side of the jar, however, you could place them on both sides if you like. They look lovely on their own or with a lit tea light glowing inside.
LOVE BURLAP PROJECTS? Be sure to try our easy to make burlap wreath for your home!

What you’ll need to make doily luminaries

To make these beautiful doily luminaries you will need the following supplies. If you have ribbon on hand there’s no need to buy extra, unless of course you are making these for a wedding centerpiece!
I originally used burlap around the rim of one of my luminaries but when remaking these went with some pretty lace and sheer ribbon. You can also see how vintage doilies look compared to crocheted doilies (see photo below).
- Glass jars – you can purchase mason jars, or use recycled jars from jelly and mayonnaise.
- Adhesive spray (like Elmer’s Craft Bond)
- Crocheted doilies – I prefer the way that vintage doilies look, but any type of crocheted doily will work!
- Burlap (or lace, sheer ribbon, etc)
- Twine
- buttons, and/or ribbon
How To Make Doily Luminaries
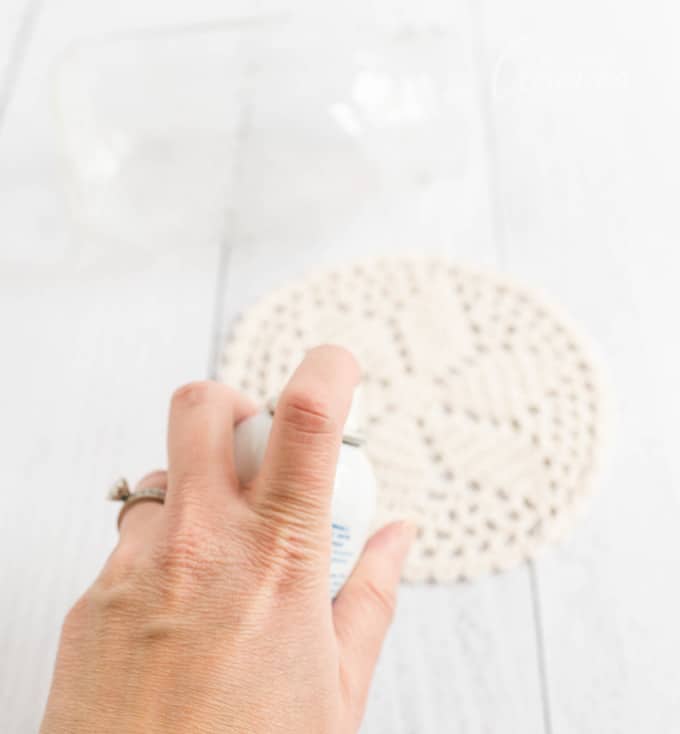
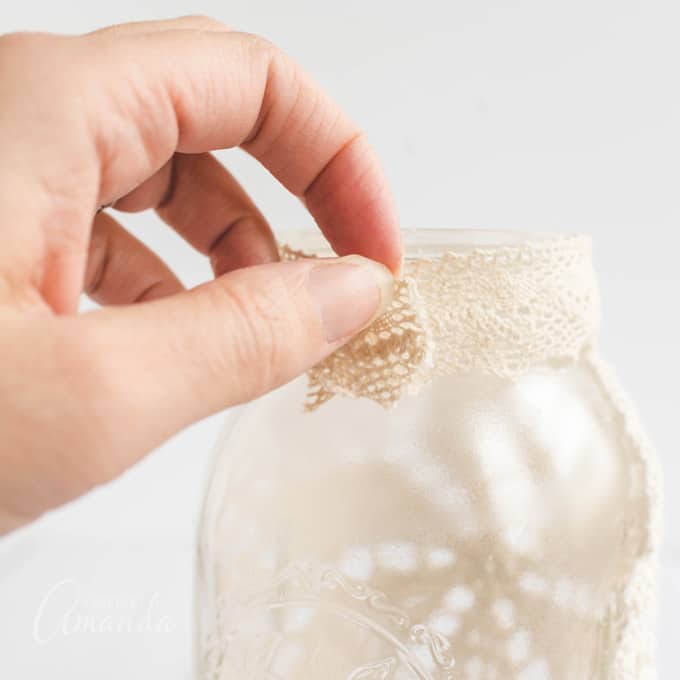
- Make sure your jars are clean and dry, wash them with warm soapy water and dry with a clean cloth. Spray the doily with adhesive spray
 .
.
TIP: Instead of holding the doily up, leave it on the table and spray the doily, then lay the jar onto the doily.
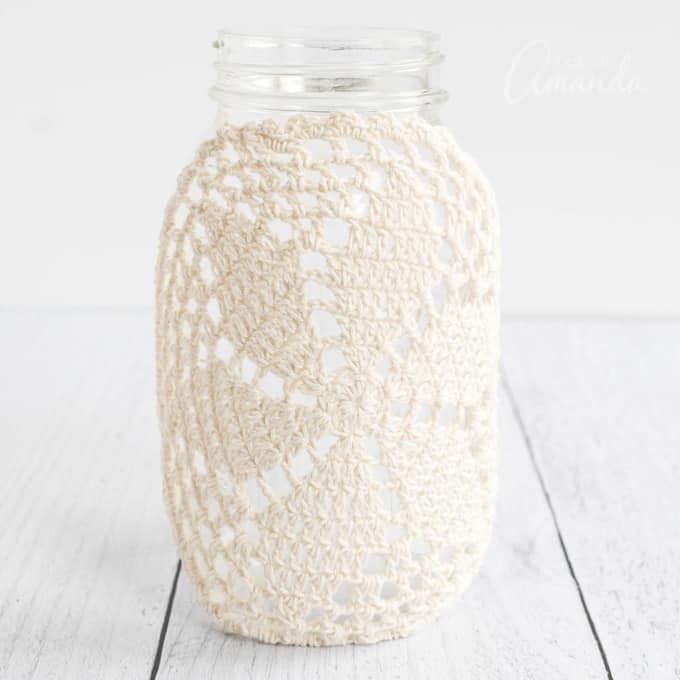
- Place the doily onto the jar and position it, making sure it’s not bunched up anywhere. Press in place.

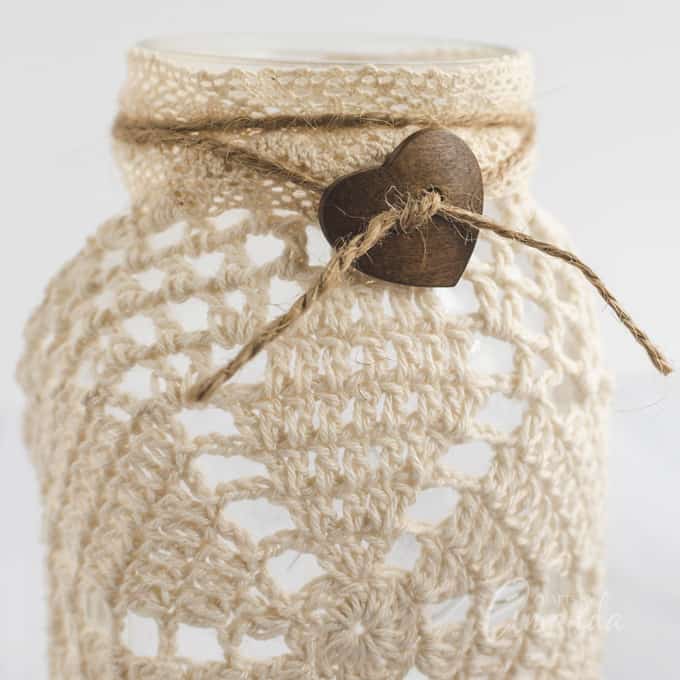
- Spray the rim with adhesive, then wrap the jar rim with burlap, ribbon or twine. You can also wrap the rim with pretty ribbon then tie a piece of twine around the rim as well. Use any combination that pleases you. Tie them both in a bow.
- Another option is to use the canning jar lid, then wrap that with twine or loose threads from your burlap. Thread two of the ends through a button and tie in a knot.
Tips for making doily luminaries
- Look for doilies at thrift stores and garage sales.
- If you prefer, you can brush one side of the doily with white glue or Mod Podge instead of using spray adhesive.
- Battery-operated tea lights can be used in place of real candles.
- If using real candles, use a long handled lighter for easy lighting inside the jar.
- If you like, use empty jelly and mayonnaise jars for this project.

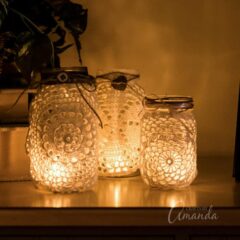
We absolutely love this project and think the results are just beautiful. Many readers over the years have made these rustic doily luminaries as wedding centerpieces or decorations for a bridal shower. They also make gorgeous home decor for your fireplace mantle or sitting on a table or shelf.

More Luminary Crafts
Burlap & Doily Luminaries
Supplies
- Glass jars
- Adhesive spray like Elmer’s Craft Bond
- Doilies
- Burlap, ribbon, lace, etc
- Twine and buttons
Instructions
- Make sure your jars are clean and dry.
- Lay doily on table and spray one side with adhesive spray.
- Place the jar onto the doily and press in place.
- Spray the rim with adhesive, then wrap the jar rim with burlap or ribbon.
- Tie a piece of twine around the rim if desired.
- Another option is to use the canning jar lid, then wrap that with twine or loose threads from your burlap. Thread two of the ends through a button and tie in a knot.
Video
This post was originally published on this blog on Jan 4, 2011. Pictured below is one of the original images.

- Tie Dye Beach Towels - July 24, 2026
- Swirling Twirling Ladybugs - July 21, 2026
- Drip Tie Dye Backpack - July 17, 2026


Vanessa Fasanella says
Love this idea. One question: Where do you get your doilies? I would love to host a girls’ craft night, but my concern is supplying the doilies. Your doilies look vintage. I’m thinking you already had them or you found them at a thrift store?
Amanda Davis says
Yep thrift stores and garage sales! You can find some on Etsy too, and I think Amazon may even have them.
Cindy says
I am glad I found you Amanda! I will try this soon. Thank you!
Habiba says
Ananda, these are so pretty. I gave everything at home to make them. Up on my to do list they go :-)
Amanda Formaro says
Thanks Habiba, be sure to share a photo in the FB group when you do! :)
Carrie says
I hope you can help me. I am going to make Bottle lights as Christmas Gifts
and I have bought Pebeo Glass paints as I am doing the stained glass look.
However I am finding that I can see the brush strokes and it looks horrible
as it looks patchy as well : (
Someone suggested natural paint brushes which I now use and it does look
a bit better but still the colour looks patchy.I do not put too much on and don’t
overload the brush and I make sure all the bottles are clean with soap and warm water
and then wipe them over with Rubbing Alcohol so what am I doing wrong?
Amanda Formaro says
I have actually never used their paint, but here’s their website, i am sure they’ll be able to help you! http://en.pebeo.com/Creative-leisure/Painting-on-Glass/Vitrea-160
Tina says
Hi I have found brushing the paint on bottom to top or vice versa, works better than painting side to side or around. Hope this makes sense. Tina
Jene nikora says
Wooow very impressive art.i love it.thanks for sharing now i have gifts for xmas.
Question:do u do n e art with feathers.they’ve become a fascination of mine.i always find them at different times especially wen im sad or im in deep thort. I find them very comforting n serene.i have collected quite afew.
Amanda Formaro says
I haven’t done any adult crafts with feathers, only crafts for little ones.
Laurir says
Hi I was wondering what size doily you used. My daughter is getting married she really like burlap & doily luminaries
Amanda Formaro says
Hi Laurie, no specific size. I just fit them to the jars. It really depends on what size jars you use. If I would have to guess I think I might have used 6 inch doilies. Good luck! :)
bridget says
These jars are cute and make a home feel comfortable. But Im worried if I use real candles that they can flame up easily, maybe the battery candle lights are better?
Amanda Formaro says
Whatever makes you more comfortable!
Sonja Gjokas says
Hi, I’m wondering what u use to make the doily stick? And how do u reach the candle to light it at the bottom? Do u keep remove the old one somehow before u put another ?
Amanda Formaro says
I use adhesive spray to attach the doilies. You can use tongs to add and remove the candles. A long handled barbecue lighter works great for lighting them
Vicky Turner says
Another comment on the adhesive. I would use the re-positionable adhesive. Easier to adjust and can be removed to clean the jar and doily. I love these jars and plan to make some for gifts (add battery operated candles for safety so even kids could use them). Love all of your beautiful ideas.
Amanda Formaro says
Great tip!
Sharon Assisi says
I would like to know where to get the instructions for these Burlap & Doily luminaries?
Amanda Formaro says
You are in the right place! Just scroll down. if you don’t see them AND are using a mobile device like your phone, scroll just past the first photo and you should see a red button that says Read More. Click that to open the rest of the post.
Gayatri Mantra says
These Looks amazing!
Kim says
Did the paper doilies not look very good? We are looking to do a shabby/chic decor theme for my daughter’s grad party and I was going to make these, but considering paper….
Amanda Formaro says
I didn’t try paper doilies so I’m not sure how they would turn out!
Mini says
I was thinking of using paper dailies to.
Pet says
Mini, I was thinking the same,,,or one can cut out paper snowflakes in various coloured paper and do this.
Usha says
Great job Amanda. Will share this on our blog too, and fb page. Will send you the link :) Great idea for people to try out
Amanda Formaro says
Thanks for the shares, very much appreciated! :)
ydelle says
I still haven’t seen my question here about what to use as a sealer to keep the doilies clean if I were using it as a soap dispenser.
Amanda Formaro says
Hmm, you could try Scotch Guard spray. But could also remove the doilies and wash them if you needed to, then reapply them.
Dee says
Hello Amanda,
Thank you, these are beautiful! How did you light them? Is it just candles inside?
Amanda Formaro says
Yes just candles, thanks Dee!
Nita Solley says
Just a thought…you might also be able to use liquid starch mixed with a little water, saturate the doily and then place over the jar and leave to dry. Easy to remove by soaking in water.
Nancy says
You may be able to put a wet doily on the glass instead of using an adhesive. When I wash doilies or hankies, I put them on my kitchen counter while still well so I don’t have to iron them. They will pretty well to the counters, so I’m thinking they might stick to the jars too. That would be less flamable than adhesive.
PAT WHITE says
The doily jars are very nice. Where do u find the doilies? Tks Pat
Amanda Formaro says
Thrift stores, garage sales, etc :)
Kim says
Gorgeous!!!!! Do you thinking running the doily through a Xyron would work just as well as the adhesive spray?
Amanda Formaro says
I’m not sure, I’ve never used one, sorry!
Dorecia says
I am going to make hanging pendant lights out of mason jars could I do this too?
Amanda Formaro says
I don’t see why not
Laurel says
These are lovely and I’d like to make some for my front gallery. My problem is that everything gets coated with salt spray and have to be washed regularly. Do you have any suggestions on how I can coat them and make than washable in the sink? Thanks very much :)
Amanda Formaro says
Not without the doilies coming off. You would have to reapply them each time.
linda says
Use battery-powered candles. The ones with timers are great. These make wonderful night lights and are safe around grandkids
Peggy Linder says
I was wondering if you could use Mod Podge? I have a parrot and don’t like to use sprays.
Love this project, it is very pretty. Will have to try with Mod Podge as I make altered bottles and have always used Mod Podge on them.
Amanda Formaro says
I have not tried it with MP but I’m sure it would work :)
Shelly Van Camp says
I have a bird too and I do it outside….I never spray anything around him.
Rhonda says
I love the Doily and Jar idea, but for me instead of using a Tea light I might use a small string of lights, either a small plug in set or the LED lights with the battery pack, I have created something similar to these and what I did was put a layer of lights then a layer of potpourri another layer of lights, then a layer of potpourri and so on, I covered the top with a decorative fabric that I cut in a larger circle than the jar lid, sewed elastic to it and put lace around the edge which made a beautiful cover to the lid and hid the cord at least from the front. I have 3 on the shelf above my kitchen cabinets and is a great evening lighted area. I am going to try the doilies and do a little experimenting with them. Thanks so much for the great idea! <3
Karen says
I luv luv this idea ! I don’t have Elmer’s craft bond. Could you use Modge Podge ? Maybe thin it down?
Amanda Formaro says
You probably could, though I wouldn’t thin it down. Just use it as is and brush it onto the doily.
DebEtt says
You could also use lace, instead of dollies. For a wedding you can find lace in the theme colors – this too makes a gorgeous luminaire.
Janice Tedford says
going to ask a stupid question. The lace doilly luminaries have what inside? A tealight????
Amanda Formaro says
Hi Janice. Yes, I used tea lights :)
Cyndee says
Amanda, these are beautiful!!! Can’t wait to get some jars and make some!!!! I shared this project on my blog!!
Thanks for sharing.
Amanda Formaro says
Thank you Cyndee, and thank you so much for sharing!
Patti says
I didn’t read all the comments so not sure if someone suggested this… but I was thinking to use either cotton, paper or plastic and holding it on long enough (tape?) to lightly spray over the it with paint. I think spaying the jar first with a base color and then adding the doily on top with a contrasting color. That would put a cool design on the jar. Anyone try this? :)
Joy says
I love this idea, so pretty!
Amanda Formaro says
Thank you Joy, glad you like them!
ann moore says
Love your jars with the doilys on them.What kind of lights?
Amanda Formaro says
I used tea light candles, but you can use LED tea lights or even the LED Christmas lights if you want
Jooselyn @ The DIY Spot says
Amanda, these are so beautiful! I first discovered them on Pinterest but none of the pins linked back to the place of origin. So I found you via Google. Yeah!! Now I can pin directly back to you:) I have so many doilies and definitely have to give this a try.
Amanda Formaro says
Thanks for being so diligent and finding me! it’s frustrating with Pinterest sometimes, isn’t it?
Chrissie says
Thank you kindly! These are beautiful and not at all expensive to make. And if one crochets, they could make them to fit the occasion in color of choice as well. Blessings and Happy New Year. I think I will make one for my birthday dinner. :)
Amanda Formaro says
Thanks Chrissie!
MaryAnn Leshick says
I am new to your site. Im thrilled to have found it. Thank you. Also, thank you for the mason jar project.
Amanda Formaro says
Glad you found me MaryAnn! :)
Marcia says
Thanks for sharing. I will have to try these someday soon!!
Amanda Formaro says
Thanks Marcia!
Regina Partain says
These are delightful. As you say, dainty and rustic at the same time. I know our brides would love them. Only problem might be coming up with the fabric doilies. Thanks so much for sharing.
Amanda Formaro says
Glad you like them Regina!
Linda toon says
I’d like to try dying the doilies for special occasions, like red or green for Christmas or a brides colors or baby girl pink, yellow or baby boy shower. Possibilities are endless. You’ve got my createtivity going!!
Amanda Formaro says
Sounds like fun Linda!
Paula Eick says
I’m going to be making these this weekend. Currently, Michael’s Craft store has small doilies in various colors in their $1 bins. Just in case someone wanted a different color other than a white doily. At our local Michaels store there were yellow, green, blue, red and white to choose from.
Amanda Formaro says
Hope you have fun Paula!
Jane Carey says
I’m going to try this with black lacy spider web fabric that I saw at Joann.
Amanda Formaro says
Sounds spooky :)
suzanne vachon says
they are very lovly good gift giving one ? do you put the dolly on the out side of the jar. thank you for shareing with us all.
Amanda Formaro says
As the instructions show, the doily goes on the outside of the jar :)
janet widerski says
thanks for sharing. gives me an idea to start making christmas dollies.an make holiday ones..
Amanda Formaro says
Would be very pretty janet!
Martha Brooks says
You can crochet the pieces to fit the jar, then just slide them over the jar and tie them with a ribbon. That way you can take them off and wash them. A fillet pattern would be nice. That way you could crochet literally any scene you wanted.
Amanda Formaro says
Great tip for those who crochet! :)
Betty from Hamburg NY says
I just finished making my jars for my golf banquet. I only have to add ribbon and they are done. I sprayed the dollies first, then put them on the jar. If you spray the jar first, you will have a hard time getting the excess glue off. Once the spray is on, the doilies stretched so easily. They look great!!
Amanda Formaro says
Yes, it’s definitely easier (and less messy) to spray the doilies instead of the jars! Glad you enjoyed the project!
Kathy says
These would be a good craft for the ladies get togethers at church. Thanks for sharing. :)
Amanda Formaro says
Yes, that would be fun Kathy!
Sue Kopp says
These are waaaaayyyyyyyyyy cool! I have tons of heavy lace and also old doilies that are not in perfect shape, let’s say shabby. Will definitely do these. Thanks for the ideas!
Amanda Formaro says
Thanks Sue, so glad you like them, hope you try them out!
ella liddle says
These are adorable. Thanks for sharing. :)
Amanda Formaro says
Thanks for saying so Ella!
Brandy Young says
I just have a ? actually. I’ve recently begun saving all my glass jars for projects just like these and I think this is absolutely beautiful, however I’m having a problem removing all of the glue from the jars. I tried soaking them in vinegar and did so for a few days with no result. Will the doily still stick if I have some of the glue left on the jar, cause if so it would be a fantastic way to cover it up!!
Amanda Formaro says
Hi Brandy. Try Goo Gone. It removes all that label residue :) As for leaving the labels on and putting the doilies over them, I probably wouldn’t recommend that as you will probably be able to see it through the holes in the doily.
Karla Fosse says
You could also use WD40 to remove adhesive.
Amanda Formaro says
Yes you could, thanks Carla!
Judy I. Culham-Morris says
Hi Amanda
I have large vases that held the flowers from the funerals of my family members. They are lovely almost hour-glass shaped vases, and I would like to try this on them. I have vintage doiles made by my maternal Grandma and her Mother that I would like to use. I will of course try all this on an old bottle with a cheap doily! I love your idea and definitely want to try it! Thanks!
Amanda Formaro says
I hope you enjoy the project Judy! The vases sound lovely!
Renee says
*one more idea: may take things from a trip spent with my best friend & give her a special gift for her upcoming birthday. One that will bring back many happy memories.
Thanks again =)
Amanda says
Great ideas Renee! Thank you for sharing!
Renee says
I work at an Antique’s & More/Flea Market. Going to make several of these, and alter some for the different seasons & holidays. For example ; add birds & flowers-Spring; seashells and sand-Summer; fall foliage, pumkins, gourds, & indian corn-Fall; snowflakes, pine cones, mistletoe, Christmas balls, & holly-Winter; and HOLIDAYS: hearts, pearls & lace-Valentines; Mardi Gras beads & dubloons-Mardi Gras; Colored Eggs, easter grass, rabbits, & crosses-Easter; Flags, fireworks-Independence Day; jack-o-lanterns, witches, bats, & ghost-Halloween….. May even take orders for Mother’s & Father’s Day special jars, for example kids pictures on the jars…. Hmmm…. Maybe made to look like a family tree.
Thanks so much for the wonderful idea, you’ve jump started all sorts of craft projects for me. Lol =)
Evan M says
WOW, what a creative use for mason jars and doilies. Would look good at a nice country or victorian wedding, placing these all over the room…Very nice, wish I was as creative as you…Thank you for sharing.
Janet Brown says
This is aa beautiful idea and everyone of the is a little different… Instead of candles I put a small string of Christmas lights on a timer inside… Works great for a night light and looks great with my old fashion bedroom furniture.. love it
Bambi Hartman says
Amanda, to avoid the doily folding over on its self lay the doily out flat on some parchment paper spray it and lay the jar onto the doily, gently rolling it from side to side.
These are beautiful and can be used all year long. Thanks for the idea.
Laurie says
I can’t use the spray glues due to asthma. Do you thing Mod Podge would glue them on the glass without making it cloudy?
Amanda says
Yes I think it would, though I haven’t tried that. BUT I would suggest laying the doily flat on the table, applying the Mod Podge to the doily and then laying the jar onto the doily so that it grabs. Then lay the jar on its side and adjust the doily if needed. Let it dry like that, laying down, so that there are less chance of drips.
Dot says
These are lovely – found you through links on Facebook AND Pinterest. I am wondering how it would work if you sprayed the doilies, and then affixed them to the inside of the jar – would keep them from getting dusty/dirty over time/use.
Dot says
And…would have to use a battery/lcd powered candle, of course.
Amanda says
I’m not sure, but sounds interesting Dot! You are right though that you could of course only use LED tea lights that way :)
Judy Taylor says
I tried to make these. Used the same adhesive spray. The doily will not stick to the jar. Any ideas or should I try another adhesive?
Amanda says
Hi Judy. I found that exact spray to be very tacky, so if yours didn’t work I would actually take it back to the store and return it. Other factors could have been that your doilies were damp or the jars were wet.
orachel says
Thanks so much for the lovely idea! I was just looking for inexpensive gorgeous atmospheric lighting cause my guy is coming to visit from cross country, and don’t have much moola to set the mood. These are perfect! Also thinking they’d be great to burn something like sage in with a little tin holder placed in the bottom. Really clever, and gorgeous result!
Tracy Bennett says
Good Morning/Afternoon. I’m making my own doilies… and will be putting them on jars for center pieces for a wedding/wedding shower…
These are just beautiful.. Thank you for the idea and the modifications and directions, etc..
have a blessed day.
Amanda says
How wonderful, sounds perfect!
Krynne says
This is pretty cool! I’ve crocheted a few doilies and always love finding new ways to use them. Seeing as how mason jars are pretty expensive to buy here new and are rare to find (in decent shape) used I’m thinking of trying this idea out on various other glass food jars such as the ones used for pickles, mayonnaise, and kimchi. Just wash the jars out well after use, remove the labels (you can soak them of in hot water) and voila! Thanks for the idea :)
Helen says
These are beautiful!! I crochet so I was thinking of making very small doilies and putting them on baby food jars or small jelly jars. Great gift ideas!!
Brook -- Learn To Preserve says
These are adorable!
I am always on the lookout for crafts using Mason jars and I can’t wait to try these.
I am going to use them inside AND outside. I’ve lit candles inside Mason jars in the garden before, but never thought to attach anything to the jars. These are going to be the prettiest twinkling lights ever.
Makes me wish summer would hurry up and get here :)
Thanks for the inspiration.
Amanda says
Picturing them in the garden and they look so pretty! Thanks Brook!
Susan @ Oh My! Creative says
I love this project and featured it in a collection of Doily Projects!
Susan @ Oh My! Creative
DandelionPointe says
These would look great on my kitchen table lit or unlit!
Cat says
I just love these! We are getting married in July and these will be perfect for our garden party afterwards. Plenty of time to go around the charity shops/second hand shops to find everything I need and make loads as we have a very big garden! I just know the kids will love making these with us!
Amanda says
Thanks Cat and congratulations on your upcoming big day!
Samara says
I love the variety of lace/materials on your jars. I did a similar thing however used smaller jars for tea light candles and found that I didn’t actually need to glue the whole thing- just enough at the join. I also found that using smaller jars meant that you could just use lace ribbon, which was quick and cheap :-)
Samara
I’ve included the link the the blog post I wrote about it…
http://thesecretlifeofsamara.tumblr.com/post/21338907102/date-night
Amanda says
Those are very pretty Samara!
Pam says
Thanks for this awesome idea. My mom passed last July & she had a sewing room full of stuff & I used some of her lace, ribbons & buttons to make all my brothers & sisters ..yes there are 8… a jar as a memory gift of our Awesome Mom !!!!!
Peabea says
I crochet doilies and absolutely love your idea for using my extra. Could even put in little gifts when giving as a present if don’t want to do the tealight. I like the idea to use the non-burning little tealights as tealights might make the inside black and harder to wash out.
Very original…
Hayley says
This is exactly what I’ve been envisioning as my wedding centerpieces but couldn’t find anyway to make it work. Thank you so much for posting this! They are absolutely beautiful and can be used for so much!
Diba says
I absolutely love these but I’m just curious how easy it is to light the tea light candles in the bottom of the large mason jar?
admin says
Hi Diba! I use a wooden skewer. I light the skewer and point that down into the jar :)
Emme says
I love this idea. I too make jar lights and this is a new idea. Thank you for sharing.
Terry Tinker says
What a great idea. There are thousands & thousands of beautiful doilies just sitting around out there. This is a great way to show them off.
Cheri Burton says
I used a glue gun and wrapped lace and ribbons on small jars and added a led tea light. So cute!
admin says
Sounds pretty!
Kelly Madsen says
I use Modge Podge adhesive a lot and would think it would be perfect for this project. It’s easier and less messy for me to brush glue on than spray it.
REBECCA MACIJOWSKY says
These are great. I “tea soaked” the dollies and they are stunning. What a great idea. Will be using for a bridal showe centerpieces!
admin says
I bet that’s beautiful Rebecca!
Melba Cliffman says
These are beautiful. I crochet beaded doilies and I will try one of these. Thanks for the idea.
Renee says
I love the black idea…this is what is so great about sharing ideas is because someone can always add their twist and it then becomes apart of their creativeness.
Lieve says
I really enjoyed making these! And enjoying the result even more :-)
A useful hint: I ironed the doilies before sticking them onto the jars, as to make them they perfectly flat = easy to stick on the jar.
I had romantic candle lights with a slightly sexy accent in mind… Here’s the result! http://lievewoordjes.files.wordpress.com/2012/01/lichtjes.jpg
Thanks a lot for the great idea! :o)
admin says
I love the way yours came out, the black is awesome!!
Erika says
Where have you found the best deals on doilies? I was hoping to do this for wedding decorations. Let me know!
admin says
Thrift stores have been the best place!
Anna says
I have repeatedly bought pretty/crochet doilies for yrs @ “DOLLAR STORE” where dishtowels, pot holders are located*
Renee says
These are darling…..I would love to share on my blog if you don’t mind. I love re-purposing and thrift stores.
gonnabe40 says
so pretty! thanks so much for this lovely idea
:)
Amanda Formaro says
Thank you!
Shelley d says
Hi,
These are beautiful. But I would be concerned about the glue becoming toxic when the bottle got warm. Just a thought.
Shelley
Amanda Formaro says
Hi Shelley. If using the spray adhesive concerns you, you can use something like Mod Podge or even white glue. Thanks for stopping by :)
leslie says
This has my mind whirling with ideas… modpodge lace on the outside of the jars and put string of white xmas lights inside! Maybe even wrap a red ribbon on the top… I am gonna do this!
Anna says
How would Christmas lights turn on please?
Amanda Formaro says
If you want to use Chritmas lights, they sell LED string lights that are battery operated
Breena Bogikes says
The jars are beautiful! I am always looking for ideas for my students to do for a parent gift for Christmas. The doilies remind me of snowflakes. Do you have any suggestions for 3rd graders? You mentioned trying it with paper doilies, did it work ok? I was also wondering if the Mod Podge might be better for the kids? Any tips would be greatly appreciated. Thanks so much for your great, creative ideas!
Amanda Reynolds says
These are so cute and thanks for sharing with us how to make these. Years ago I use to make these jars with pinecones and christmas lights that were cozy with the Christmas tree while all other lights were turned off. I would have them sitting around at random. I love your idea with dolies. Thanks Again!
Amanda Formaro says
Oh the pine cone jars sound so pretty!
Illy says
I just love the simplicity and beauty of them. thanks for sharing..
Amanda Formaro says
Thank you very much Illy!
bronwen says
this is a PERFECT "free" craft for our Super Saturday Craft day coming up. Thank you!!
Amanda says
Good idea lisa, thanks for sharing that :) The spray adhesive actually does the same thing, it's not permanent :)
Lisa says
If you don't need it to be as permanent, you can dip the doily in liquid fabric starch and lay it on the jar. When dry, it'll be stuck to it but can be peeled off.
I've used this trick w/ cottong fabric to cover the back wall of display cases or bookshelves when I had a shop and wanted it festive for the holidays or such.
Jacee says
Very pretty! Thanks for sharing.
MakeupbyThess says
Love it! super pretty =)
two birds says
i just posted this as one of my favorite things this week on our blog. what a great idea!!
Amanda says
Hi Maria! No actually that was from the spray adhesive that I used to add the doilies, it put a film on the glass.
Craft Medley says
Love this idea! Did you spray the jars with some frosting effect first to make them more opaque?
xoxo Maria
valeriaporopat says
Hi! You've been featued here http://wp.me/p1hRux-2x
marianna says
love it!
Tricotbel says
C'est très joli, j'adore, je mets dans mes favoris pour te retrouver. Merci
Savvy Deets Bridal says
This is so charming! Love it!
Gio says
It's so beautiful!
I'm going to put a link to this wonderful tutorial on my blog with credits of course. Hope it's okay for you.
Thanks for sharing.
Kimbo West @ a girl and a glue gun says
I featured this on my blog today!!!
http://www.kimboscrafts.blogspot.com
Tabitha says
I just made some lace covered jars that are very similiar to these. I used modpodge instead of spray adhesive and I didn't add an embellishment at the rim. I really like the trim, though and I think I'll add it…it's the perfect touch. I'll be sure to link back to you! Thanks!
Eva Marie Harp says
Neat idea. Doilies are so fun. I am so in to them right now. Thank you for the post.
http://www.couturiermommy.com
FrederIque says
I have never really like these dollies, but this idea makes them gorgeous to me, really ! I will look at them with a different eye now… THank you for the idea
kayla says
Oh my, these are so pretty!! Would be perfect decor for a wedding reception!
dreamalittle says
Such a lovely idea!
Recycled Rita says
I love these doily luminaries! I can't wait to make them! thanks for the inspiration! karen…
Etcetorize says
Ooooh! I really love the look of these. They'll fit right in with my porch make-over. Thanks~
Stephanie Mosselman says
Hey, I just featured this project on my blog, Beauty From Ashes.
Check it out!
Stephanie Lynn @Under the Table and Dreaming says
Amanda – These are so precious! One of my CSI favorites! Thanks so much for linking up to The Sunday showcase party – I have featured this today. Stop by and grab a featured button if you like. Hope you have a wonderful week ~ Stephanie Lynn
Tea Jurković says
This is so lovelly :) i'm linking it to my DIY blog!!
Amy of WhisperWood Cottage and Junkologie says
Love the mix of materials! I appreciate you linking up to the 1st Project of the Year Party! Please add the party button to your post so you are eligible to win and be featured. Thanks so much, Amanda!
Erin @ Crafts and Sutch says
Hi Amanda! I love this project and gave you some link love over at Crafts & Sutch today! I hope you'll stop by to take a peek and grab a SUTCH an Inspiration button. :)
Have a wonderful week!
Erin
Tasty Eats At Home says
Amanda, I love these! So cute.
Maria Luisa Artesanatos says
I love these, Amanda!! Your button is on my blog.
Visit me!
Maria Luisa
One Cheap B*tch says
So pretty! Love this look and would love to try to make them too!
Jeanine
Jenny says
LOVE these! I am book marking these to make for Christmas gifts next year!
Amanda says
TCahal – So glad to know that spraying the doilies worked well! Thank you!
Thank you ALL for your kind comments, I appreciate every single one of them!
Charm Bracelet Diva says
I am SO loving this idea!
Get Nestled In says
I've been seeing this featured EVERYWHERE it seems! What a beautiful project, just beautiful!! :)
TCahal says
These were so beautiful I decided to make a couple of my own…I wish I would have taken my jars with me when I was picking out doilies…they don't have the fit I was looking for but all in all I think I like them and will probably end up making a few more. I sprayed the doilies with the adhesive and that seemed to work pretty good vs spraying the jars. TFS!
Nancy Dreher says
My daughter is getting married in March. Instead of using the paperbags and doiles, we have decided to try the jars instead! Can you share with me/us where we can find fabric doilies? I have looked on different websites, but thought I’d see if I have missed one! Thanks…
admin says
I’ve never looked at stores for the doilies, I just look at thrift stores. Antique stores will have them too. I’ve seen them on eBay as well, but consignment shops and thrift stores are probably going to be your best bet :)
Michele says
If you have an Ollies, a Dollar Tree (etc) they usually have them pretty cheap.
Anonymous says
These are BEAUTIFUL !! I can think of many ways that these would look lovely for. One way is to buy those LED battery operated tea candles to put in the jars. ( no worry of fire )… with the LED's it would provide a warm and cozy night-light in any room… gorgeous in a new babys room.
Another idea is use small jars with the LED's and place them along tables for Wedding Table Center pieces.
Upscale Downhome says
I really like this idea and how the fabrics juxtapose against eachother–elegant and rustic at the same time. When the light shines through it looks wonderful. I'll have to find a way to use this in my home. Thanks for posting!
Sue from Oregon says
What a beautiful idea!
IndieSpotting says
I love these – especially the one with the button! Thanks for sharing!
L says
These remind me of firefly jars…Would love for you to add it to my link party The Treasurista's Thursday Treasures. http://www.thetreasurista.blogspot.com
Melissa F says
These are so beautiful and dainty. They look like something even us non-"crafty" people could do!
Anna @ Blissful Whimsy says
These are absolutely darling :o)
Laurie says
Amanda, I just love these! I'm going to have to try them myself. Thanks so much for the creative inspiration and God bless you and yours in 2011!
Sweet Bee Cottage says
Very pretty!
the 30 girl says
These are too cute! Such a clever idea!
Linda says
These jars are beautiful! What a lovely idea. I hope I can make a few of these for my home.
Thanks so much for sharing!
FancieStrands says
You did an awesome job. I love them.
Mod Podge Amy says
AMANDA! I love these. What a gorgeous decorating idea! -MP Amy
Lianne says
Hello,
Just wanted to let you know that I have awarded you with an award because I love your blog. Please stop by and check it out.
http://familylife-lianne.blogspot.com/2011/01/blog-award.html
Thanks and God Bless
Lianne
Jenn Erickson says
What a beautiful project! I love the way the light shines through the delicate lace. Great tutorial! You and I were both featured over at Flamingo Toes, and I just had to stop by, say hi, and pay my regards! Happy Friday! Jenn
Blue Ridge Altered Art says
I love these. They would have made lovely gifts for Christmas. Will save this idea for next year. I have some heart shape doilies and I think I will make some for valentines. Thanks for sharing. ~~Sherry~~
Curtains In My Tree says
beautiful I am heading right down stairs and getting my jars out and my spray glue and my ribbons and my lace out and making a couple friends these for a gift.
Thanks for the pretty idea
Janice
Beverly @ FlamingoToes.com says
Love these Amanda! I think they are so great. ;) I featured them today on my Crush of the Week post!
http://www.flamingotoes.com/2011/01/crush-of-the-week-returns/
Sue Ann says
Super CUTE!!!! I have so much burlap this would be a great way to use some of it!!! I will have to hit some garage sales for some jars and such!!!
Amanda says
Elizabeth – that's a great idea! The spray adhesive actually isn't totally permanent (I don't think). I had placed one on a jar and didn't like the way it came out, so I was able to remove it easily. Of course that was after only 15-20 minutes of it being on there, not sure how easily they will come off after days and days of sitting. However, I would imagine you could soak them in hot or warm water and the glue would release.
Thank you all SO much for all of your wonderful comments!!
Erin Rollyson says
These are beautiful!!! But just wondering how you get the lit tea light down in the jar????
Amanda Formaro says
I just dropped them in and used one of those long lighters to light them. you can also light them then put them in with a long set of metal tongs.
C says
You can use a piece of spaghetti to light them, or use battery operated candles, (which would be a lot safer)
malen says
I was just thinking how to get the candles in the jar, thanks for asking that question & for that answer also.
taidyeoriginal says
saw these on someday crafts and I LOVE them! I am your newest follower! ~tai @ taidye original
Cammy says
These are just gorgeous! Thanks for sharing with us!
Creative Ambitions says
I love this idea! They turned out so pretty! May have to try this!
Kendra
Dixie Mom says
I found your link through someday crafts…these are so darling. What a great idea.
Elizabeth says
In doing this type of thing to glass jars or items, I like to use either a sugar water or spray starch as my "adhesive" so that I can take it all off when I don't need them anymore! I just dip the doily into the sugar water (heavy syrup) or spray a lot of spray starch on the doily. Works great for me.
Pat says
That would solve the problem of how to clean the doilies when they inevitably get dirty. They could be washed and re-applied. Otherwise I was wondering if they could be sealed with something like Minwax Fast-Drying Polyurethane so they could be washed/wiped clean in place.
Angie @ The Country Chic Cottage says
I love these Amanda!! I am a sucker for mason jars!!
Krystal says
These are amazingly beautiful. What a geat idea! I'm featuring this post on my blog tomorrow if you'd like to check it out.
sassysanctuary.blogspot.com
KJ@letsgoflyakite says
Visiting from Someday Crafts. These are beautiful and I just had to tell you!
Michelle@Somedaycrafts says
These are gorgeous! I think this is my favorite project I've seen with doilies so far. I am featuring this at somedaycrafts.blogspot.com.
Sue says
I love this, Amanda! I wish I had just even a teeny bit of your creativity!
Lori@KitchenFunk says
Amanda, I love these!! I was just admiring the Halloween votives and was planning to do them next year – I look forward to doing these right now. Cute!
Amanda says
These are amazing, what a great idea, and would look perfect on my fireplace. Your whole site is inspiring, I really want to try the french inspired word art, would look super cute in the kitchen!
I shall be following your blog to see what other amazing ideas you have!
Life's Sweeter with Chocolate says
Love this!
Amanda says
Peechee – That actually is a brilliant idea! I did have a few issues of some tiny hairs (from the twine and burlap) and some dust sticking to the excess adhesive. So yes, super smart – spray the doilies first!
Peechee says
Those are SO adorable. I'm definitely going to give it a try, but I do have a question…
You sprayed adhesive on the glass jar. Isn't it still sticky in between the empty spaces of the doily? Could you have sprayed the doily instead and then place it on the jar? I'm just worried that dust will stick to the empty spaces.
Tiffiny Felix says
These are so cute! You are the luminarie queen! I'm amazed by the ideas you come up with :)
Anonymous says
How lovely. Thank you.
Gerti
Its So Very Cheri says
It's Cheri and I am visiting from the CSI. I am enteries number 86, 87, 88 and 89.
Amanda what an interesting way to filter the light.
Cheri from http://www.itssoverycheri.com and http://www.thediyclub.com
RecycleCindy says
Such a lovely and beautiful way to decorate a mason jar. I love the project. Thanks for sharing another wonderful tutorial.
Megan says
These would be so pretty at a wedding. Luv 'em
Michael - Innkeeper says
love me some mason jars! even more with your added touch! thanks for sharing.
Balbina says
You are a very creative person. Candlestick beautiful. Regards from Polish
Michele {The Scrap Shoppe} says
Amanda! These are gorgeous! Great deal on the doilies, too. I love the one with the button!
Tara says
sooo cute!
Elizabeth says
So pretty! We are doing a fireplace makeover and these would be fun on the mantel! Would love for you to come visit me at Sew Chatty and link up to Made with Love Monday. I host every week. I am leaving the party open longer this week so that people can link up multiple projects if they wish to. Hope to see you there! http://sewchatty.blogspot.com
georgiaharrison says
Thank u for the offer and the mason jar.s looking forward to trying these
Rebecca says
You could also position your jars inside the fireplace at different levels, set on upended pieces of wood, for a beautiful glow in the summer time without the heat of the actual fire.
Dragonfly Treasure says
Very pretty! Great idea, thanks for sharing
*hugs8deb
Kim's Treasures says
I really love these! : )
Cassie @ Primitive & Proper says
these are so pretty, amanda!
Anonymous says
i love them :)
Jen @ tatertotsandjello.com says
So so pretty Amanda!!! I shared it on my TT&J FB page :)
xoxo
Jen
Jane says
These are gorgeous!! If I can find some doilies, I am making these for February. So pretty!!
alicia huff says
i found doilies on ebay.
Sally Kennedy says
you can find dolies at second hand stores I have found many If they are a bit off color sit into bleach for a few seconds and wash out with dtergent dry and your ready to go
Sally Kennedy says
I love this idea cant wait to make it absolutely lovely
thank you for sharing would even make a cute gift for someone
Amanda Formaro says
Thanks Sally! So glad you enjoyed it! :)
Kathlene says
Oh, no, never bleach – bleach destroys the fiber. Use trisodium phosphate – it cleans with no damage to fibers It’s commonly known TSP. Buy it at hardware stores or paint shops. Also available at TSC. Just a tsp. in a couple quarts of warm water. Let soak awhile an dry in sun for great whiteness.
Shelley says
Have u ever cut the doilies to fit. Mine are too big?
Amanda Formaro says
I would be too afraid that the doilies would unravel. I would get smaller doilies or bigger jars.
Valeria says
Doilies are found in craft stores, WalMart, Good Will and Salvation army stores, flea markets, yard sales, etc.
TJ says
A coloured doily would be more ”glowing” thanks for the wonderful idea……………….
jo patrick says
love this going to do the jars jo patrick
Donna~One Simple Country Girl says
Love this! Very romantic, easy, and pretty! Thanks for sharing!
Hugs,
Donna
Michelle Cummings says
pretty! thanks for sharing!
Les says
for an even more “Vintage or old look” try soaking the doilies in tea…..it stains them various shades of beige…..and looks nice…
Phyllis lamb says
I think these are beautiful! Great for birthdays,friends,no/reason day,and so on,etc……….Every one can have a use for these.If wanted to use for candles,great idea.perfect for a lot of other ideas.Going to make these.Thanks.
Amanda Formaro says
Thank you Phyllis!
symphony says
Could a pasta sauce jar be used instead of Mason jar? Trying to keep budget down
Amanda Formaro says
Of course!
Sheila Beers says
I believe I saw these being made once, but the person used liquid starch to make the doilies stick onto the jars. Whenever the doilies were soiled, the jars could be put into water to remove the doilies and launder them.
Barbie Wallace says
great idea’s in the comment section! I’ll have to try that! By the way, can only tea lights be used, or can a small candle be used also?
Amanda Formaro says
I have used a votive candle as well :)
Ginny Taurasi says
I am going to try this. They are beautiful and thank you for sharing.