• Home
  • About
    • About Crafts by Amanda
    • Visit Our Recipe Site
  • Work With Us
  • Join
    • Free Newsletters
    • Join our Facebook craft group
↑
  • Tutorials
    • Tutorial Index
    • Adult Crafts
    • Crafts for Kids
    • Crafts for Seniors
    • Recycled Crafts
    • Seasonal Crafts
    • Holiday Crafts
    • Free Printables
    • Craft Collections
  • Adult Crafts
    • Bath & Body
    • Beach Crafts
    • Clay Pot Crafts
    • Crafts for Seniors
    • Decoupage Crafts for Adults
    • DIY Gift ideas
    • Garden Crafts
    • Home Decor Projects
    • Kitchen Crafts
    • Light Bulb Crafts
    • Luminary Crafts
    • Mason Jar Crafts
    • Needlework
    • Photo Display Ideas
    • Recycled Crafts for Adults
    • Wearable Crafts for Adults
  • Crafts for Kids
    • Animal Crafts for Kids
    • Back to School Crafts
    • Beach Crafts for Kids
    • Camp Crafts
    • Cardboard Tube Crafts for Kids
    • Decoupage Crafts for Kids
    • Easy Crafts for Kids
    • Nature Crafts for Kids
    • Other Kid’s Crafts
    • Paper Plate Crafts for Kids
    • Recycled Crafts for Kids
    • Slimes, Doughs, & Clay
    • Wearable Crafts for Kids
  • Holiday Crafts
    • 4th of July Crafts
    • Christmas Crafts
    • DIY Gift ideas
    • Earth Day Crafts
    • Easter Crafts
    • Father’s Day Crafts
    • Halloween Crafts
    • Memorial Day Crafts
    • Mother’s Day Crafts
    • New Year’s
    • Other Holidays
    • Patriot Day Crafts
    • St. Patrick’s Day Crafts
    • Thanksgiving Crafts
    • Valentine’s Day Crafts
  • Seasonal Crafts
    • Winter Crafts
    • Spring Crafts
    • Summer Crafts
    • Fall Crafts
  • Skip to primary navigation
  • Skip to main content
  • Skip to primary sidebar
  • Skip to footer

Crafts by Amanda

crafts for adults and kid's crafts

  • Tutorials
    • Tutorial Index
    • Adult Crafts
    • Crafts for Kids
    • Crafts for Seniors
    • Recycled Crafts
    • Seasonal Crafts
    • Holiday Crafts
    • Free Printables
    • Craft Collections
  • Adult Crafts
    • Bath & Body
    • Beach Crafts
    • Clay Pot Crafts
    • Crafts for Seniors
    • Decoupage Crafts for Adults
    • DIY Gift ideas
    • Garden Crafts
    • Home Decor Projects
    • Kitchen Crafts
    • Light Bulb Crafts
    • Luminary Crafts
    • Mason Jar Crafts
    • Needlework
    • Photo Display Ideas
    • Recycled Crafts for Adults
    • Wearable Crafts for Adults
  • Crafts for Kids
    • Animal Crafts for Kids
    • Back to School Crafts
    • Beach Crafts for Kids
    • Camp Crafts
    • Cardboard Tube Crafts for Kids
    • Decoupage Crafts for Kids
    • Easy Crafts for Kids
    • Nature Crafts for Kids
    • Other Kid’s Crafts
    • Paper Plate Crafts for Kids
    • Recycled Crafts for Kids
    • Slimes, Doughs, & Clay
    • Wearable Crafts for Kids
  • Holiday Crafts
    • 4th of July Crafts
    • Christmas Crafts
    • DIY Gift ideas
    • Earth Day Crafts
    • Easter Crafts
    • Father’s Day Crafts
    • Halloween Crafts
    • Memorial Day Crafts
    • Mother’s Day Crafts
    • New Year’s
    • Other Holidays
    • Patriot Day Crafts
    • St. Patrick’s Day Crafts
    • Thanksgiving Crafts
    • Valentine’s Day Crafts
  • Seasonal Crafts
    • Winter Crafts
    • Spring Crafts
    • Summer Crafts
    • Fall Crafts
Craft Tutorials | Adult Crafts | Crafts for Seniors | Beaded Frost Luminaries

Beaded Frost Luminaries

Author by Amanda Davis on April 3, 2018 Updated on December 6, 2020

5 from 4 votes
These Beaded Frost Luminaries are a great Earth Day craft. These luminaries will add just the right amount of soft light to any garden or path in your yard.
Jump to Project
741 shares
  • Share
  • Tweet
  • Flipboard
  • Email
beaded frost luminaries pin image


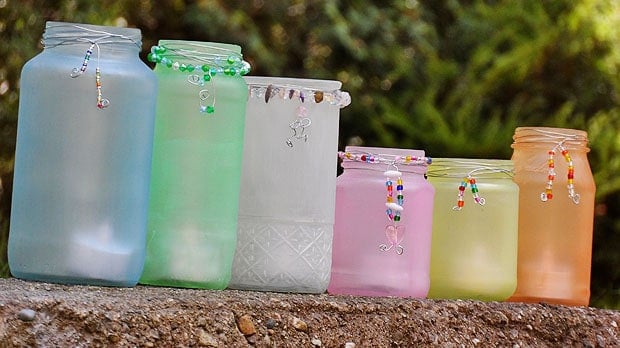
These Beaded Frost Luminaries are a great Earth Day craft. These soft colored luminaries will add just the right amount of gentle color and light to any garden or path in your yard.

Luminaries for your garden

Beaded Frost Luminaries

All of these luminaries are made from recycled jars. I keep just about every jar once the contents have been used up. Therefore, with Earth Day right around the corner, and the weather getting warmer, I thought it would be a great time to share these with you.

I really love the look of luminaries, especially in the garden. I have an herb garden that has plenty of green, but really no color to speak of. I’ve planted a few flowers in there each year to pretty it up, but it never seems to be quite enough.

Glowing Beaded Frost Luminaries

What you’ll need to make these Frost Luminaries

  • Recycled glass jars
  • Silver jewelry wire
  • Various colored beads
  • Acrylic sealer spray
  • Wire snips
  • Round nose pliers
Martha Stewart Frost Glass Paint Colors:
  • Bubble Gum
  • Yellow Jacket
  • Pea Shoot
  • Summer Linen
  • Mace
  • Blue Calico


Making the Beaded Frost Luminaries

Beaded Frost Luminaries

I used Martha Stewart Frost glass paint for this project. The colors I used are in the instructions below and it is formulated to withstand the outdoors.

How to make beaded frost luminaries step 1

After painting the jars, fold your wire in half to find the center.

How to make beaded frost luminaries step 2

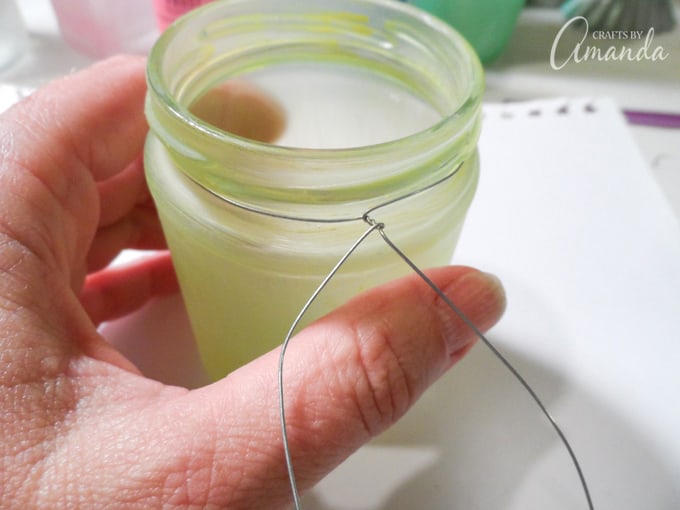
Using the center of the wire as your starting point, hold the wire against the jar rim, wrap around and twist together in front to hold it in place.

How to make beaded frost luminaries step 3

Wrap it several times around the jar rim. You should have a few inches of excess wire to add beads onto.

How to make beaded frost luminaries step 4

Bend the wire upward so that when you add the beads they won’t fall off.

How to make beaded frost luminaries step 5

Here’s where your round nose plier comes in. Use it to curl the ends of the wire. This serves as a decorative end and keeps the beads in place.

Here are the variations that I used to give you an idea. You can certainly do whatever designs you like!

Beaded Frost Luminaries variation 1Beaded Frost Luminaries variation 2Beaded Frost Luminaries variation 3Beaded Frost Luminaries variation 4Beaded Frost Luminaries variation 5Beaded Frost Luminaries variation 6

Then, simply light them up. You can use regular tea light candles or use the LED tea lights that don’t require a flame.

Making beaded frost luminaries

These are safe to stay outside, but you may want to wipe them down once a week, and if you know it’s going to rain, bring them in so they don’t fill up with water. Enjoy!

Beaded Frost Luminaries in row


More Luminary Ideas

  • Epsom Salt Luminaries
  • 4th of July Luminaries
  • Bleached Burlap Vintage Luminaries
  • Burlap & Doily Luminaries
  • Halloween Luminaries


Print Project
5 from 4 votes

Beaded Frost Luminaries

These Beaded Frost Luminaries are a great Earth Day craft. These luminaries will add just the right amount of soft light to any garden or path in your yard.
Age Group: Adult

Supplies

  • Recycled glass jars
  • Silver jewelry wire
  • Various colored beads
  • Acrylic sealer spray
  • Wire snips
  • Round nose pliers

Martha Stewart Frost Glass Paint Colors:

  • Bubble Gum
  • Yellow Jacket
  • Pea Shoot
  • Summer Linen
  • Mace
  • Blue Calico

Instructions

  • Wash and remove any labels and glue residue from jars. Be sure they are completely dry.
  • Paint the outside of the jars with the frost paint. it will appear streaky at first, but as you work your paintbrush over the glass, smoothing the surface out as you go, the paint will become more uniform. Allow it to dry for one hour.
  • Spray the painted jars with sealer and let dry.
  • Snip wire into 2-foot lengths. Find the center of your length of wire and hold it against the rim of the jar. Wrap both ends of wire around the rim and twist together to hold in place.
  • Continue wrapping the wire, leaving a few inches at each end to add beads. Twist wire together again to keep it from unraveling.
  • Bend wire upward so that when you thread your beads on they won't fall off.
  • After adding your beads, use the round nose plier to curl the end of the wire to prevent your beads from falling off, and to add a decorative touch.
  • Try variations by adding some beads to the wire that wraps around the jar rim.
  • These are very pretty lit up at night as well! Use tea light candles or LED tea lights inside the jars.


This post was originally published on this blog on April 7, 2013.

  • Author
  • Recent Posts
Amanda Davis
Amanda Davis is the crafty, entrepreneurial mother of four children. She loves to bake, cook, make kid's crafts and create decorative items for her home. She is a crafting expert and guru in the kitchen and has appeared online and in print publications many times over the years.
Latest posts by Amanda Davis (see all)
  • Spring Scavenger Hunt - May 9, 2025
  • How to Make Lip Scrub - May 2, 2025
  • How to Make Lavender Soap - April 22, 2025
741 shares
  • Share
  • Tweet
  • Flipboard
  • Email

Filed Under: Crafts for Seniors, DIY Gift ideas, Earth Day Crafts, Garden Crafts, Luminary Crafts, Mason Jar Crafts, Recycled Crafts for Adults, Recycled Crafts for Kids, Summer Crafts Tagged With: glass, glass paint, holidays, luminaries, recycle

Reader Interactions

Free CraftsBy email every week

Latest crafts straight to your inbox!

Comments

  1. Debra says

    January 26, 2017 at 1:03 pm

    These are very pretty. I have only about half an hour for the paint to dry – ever try a hair dryer on it? Thanks.

    Reply
    • Amanda Formaro says

      January 28, 2017 at 8:28 am

      I haven’t tried that myself, but you could as long as you use a low setting and keep the dryer moving back and forth so as not to concentrated heat in one area for too long.

      Reply
  2. Juli says

    November 3, 2016 at 10:00 pm

    Can you tell me what kind of sealer you used?

    Reply
    • Amanda Formaro says

      November 4, 2016 at 12:06 pm

      Hi Juli! I didn’t use a sealer on these. I used Martha Stewart Frost glass paint for this project which is formulated to withstand the outdoors. If you really wanted to use a sealer, I would recommend a matte finish so as not to take away from the frosted effect. Krylon carries a low-odor matte finish outdoor sealer that would work well – here’s an affiliate link where you can see it http://amzn.to/2fpiSEL

      Reply
  3. Laura says

    December 10, 2013 at 3:48 pm

    I love your luminaries. The beading adds a nice touch.

    Reply
    • Amanda Formaro says

      December 11, 2013 at 7:08 am

      Thank you laura!

      Reply
  4. Inspire Me Heather says

    August 12, 2013 at 9:21 am

    Your luminaries look just beautiful, I do like the beads on them too! I’ve got this linked to my DIY luminaries roundup post as well today, thanks for posting yours!

    Reply
    • Amanda Formaro says

      August 17, 2013 at 12:12 pm

      Thank you so much Heather! Really appreciate that!

      Reply
  5. Kay the Country Bumpkin says

    August 11, 2013 at 4:08 pm

    You add a wonderful creative touch to all of your creations. Thank you! I definitely want to use some of your ideas!!

    Reply
    • Amanda Formaro says

      August 12, 2013 at 6:22 am

      Thanks Kay, so nice of you to say!

      Reply
  6. abby says

    April 14, 2013 at 5:11 am

    I’m thinking of ways to fix my garden this spring and make it really nice, this is the perfect touch on it! I’m going to try and see how it fits my garden :).

    Reply
    • Amanda Formaro says

      April 14, 2013 at 9:48 am

      Thanks Abby, I hope you have fun with it!

      Reply
  7. Sue says

    April 12, 2013 at 7:38 am

    I was disappointed in the paint finish on my jar. I use the same paint, trying a sponge brush and a good quality sable brush as well but the finish is still streaky looking. Tried to improve the look with a second coat but still not a nice smooth finish as shown in photos.
    Any tips?

    Reply
    • Amanda Formaro says

      April 12, 2013 at 8:13 am

      Hi Sue, I’m sorry you had trouble! In #2 of the printable instructions I say:

      “Paint the outside of the jars with the frost paint. it will appear streaky at first, but as you work your paintbrush over the glass, smoothing the surface out as you go, the paint will become more uniform. Allow it to dry for one hour.”

      It’s true that the finish will be streaky. To fix that you have to keep smoothing out the paint with your paintbrush. If it siple won’t smooth out, you may have too much paint on the brush and jar. You can use either a dry brush or clean off the one you are using to help smooth out the finish. As with spray painting, 203 thin coats works much better than 1-2 thicker coats. Hope that helps!

      Reply
  8. Jennifer says

    April 8, 2013 at 4:47 am

    Where do you buy the Martha Stewart frost glass paint? I checked my local Joann and Michaels stores and they did not carry it. Thanks!!!

    Reply
    • Amanda Formaro says

      April 8, 2013 at 9:29 am

      I bought mine at Michaels. However, if it’s not at your store (check Hobby Lobby if there’s one near you) you should be able to buy it online without a problem. Just do a google search for the paint line. :)

      Reply
  9. Hilda says

    April 7, 2013 at 7:50 pm

    I love your choice of color paints. I would use copper wire. With time it would have a pretty patina. Just a suggestion.

    Reply
  10. Jeanine says

    April 7, 2013 at 2:52 pm

    Absolutely perfect! Going to use for our window sill. I keep wanting to get rid of our string lighting there but havent found anythin to put in their place–these are the perfect switch with a sweet Spring feel! Lovely, thank you for sharing!

    Reply
  11. Cookie 17 says

    April 7, 2013 at 12:18 pm

    I like this ,have lot jars wondering what do now I know,Thank’s Hon have great day,,,

    Reply
  12. Suzanne B says

    April 7, 2013 at 12:15 pm

    Love these!

    Reply
  13. Casse-bonbec says

    April 7, 2013 at 11:56 am

    how lovely !

    Reply
5 from 4 votes (4 ratings without comment)

Leave a Reply Cancel reply

Your email address will not be published. Required fields are marked *

Rate This Project


The maximum upload file size: 640 MB. You can upload: image, video. Links to YouTube, Facebook, Twitter and other services inserted in the comment text will be automatically embedded. Drop files here

Primary Sidebar

Hi! I’m Amanda and I’m the founder and head designer of Crafts by Amanda. I have spent over 25 years creating projects to share, but it’s not just me anymore! It’s turned into a complete family affair. Come and meet the Creative Team!

Free CraftsBy email every week

Latest crafts straight to your inbox!

All Time Favorites

snowy pinecone candle jar luminaries

Winter Luminaries: Snowy Pinecone…

Make pretty winter luminaries that appear to be covered ... Go To project

Make this wonderful deco mesh pumpkin wreath to hang on your door this fall!

Deco Mesh Pumpkin Wreath…

Adorn your door this fall with a pretty deco mesh ... Go To project

Learn to make these adorable ladybug painted rocks. use special outdoor paint for this adorable garden craft so you can keep garden ladybugs all summer!

Ladybug Painted Rocks…

I'm going to show you how to make these adorable ... Go To project

Reuse those empty prescription pill bottles in all sorts of ways. From organizing to making cookies. Yes, cookies! See how to use your empty pill bottles!

20 Uses for Prescription Pill…

You've been collecting prescription pill bottles for ... Go To project

Meet the Family

Amanda

Founder and Designer

Kristen

Editorial Manager

Lindsay

Social Media Manager

As seen on:

Footer

Favorites

  • Jar Photo Frames
  • No-Sew Roman Shade
  • Paper Flowers
  • How to Make a Scrunchie
  • Mermaid Slime

About

  • Home
  • Meet the Creative Team
  • Work with Us
  • Privacy Policy
  • Accessibility
  • Contact Us

Images/text copyright Amanda Formaro 2020. To feature a post from Crafts by Amanda, you may use one photo credited and linked back directly to the project post.

Free CraftsBy email every week

Latest crafts straight to your inbox!

Copyright ©2025, Crafts by Amanda. All Rights Reserved.
Design by Pixel Me Designs

Rate This Tutorial

Your vote:


To share a photo with your comment click here!

A rating is required
A name is required
An email is required

Recipe Ratings without Comment

Something went wrong. Please try again.