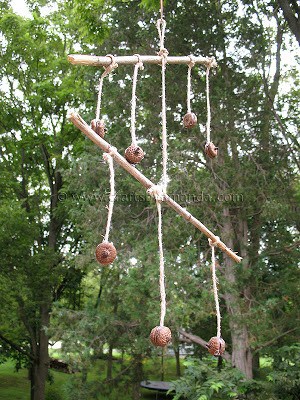
Nature crafts are great fun for kids. It gives families an opportunity to get outside and collect discarded pieces of the earth and use them to make fun and pretty things. So get out there and collect some acorns and fallen twigs so we can make this twirling acorn mobile you can hang on your deck or in your child’s room!
I like to collect acorns and save them for future projects. I always have a baggie of them handy in my craft supplies!
2 sturdy twigs
14 acorn tops
7 pennies or washers (for weight)
Twine
Hot glue gun or instant grab glue
Scissors
NOTE: You can use instant grab glue for this project, however it will take longer for the glue to adhere. A hot glue gun should be used with adult supervision.
Without cutting the twine, tie a loop around the center of one of the twigs. With the long piece remaining, tie to the center of the second twig then trim off the excess.
Tie twine around the end of the top twig. Once tied, then cut to the desired length. Doing it this way will reduce any waste that might occur from cutting pieces too short accidentally and finding out after you’ve tied them on. Continue this process until you have four pieces on the top twig and three on the bottom.
Add a layer of glue to a penny and press an acorn top to the glue. Grab the acorn top and turn it upside down, exposing the penny on the other side.
Add glue to the exposed penny, then lay one of the pieces of twine into the glue and press a second acorn top onto the exposed penny and twine. This will sandwich them together.
When finished, trim any excess twine and dot some glue around all the knots of twine.
Hang!
Be sure to try our strawberry acorn magnets too!
Summer Camp Crafts
Camp Crafts: Acorn Mobile
Supplies
- 2 sturdy twigs
- 14 acorn tops
- 7 pennies or washers
- Twine
- Hot glue gun or instant grab glue
- Scissors
Instructions
- Without cutting the twine, tie a loop around the center of one of the twigs. With the long piece remaining, tie to the center of the second twig then trim off the excess.
- Tie twine around the end of the top twig. Once tied, then cut to the desired length. Doing it this way will reduce any waste that might occur from cutting pieces too short accidentally and finding out after you’ve tied them on. Continue this process until you have four pieces on the top twig and three on the bottom.
- Add a layer of glue to a penny and press an acorn top to the glue. Grab the acorn top and turn it upside down, exposing the penny on the other side.
- Add glue to the exposed penny, then lay one of the pieces of twine into the glue and press a second acorn top onto the exposed penny and twine. This will sandwich them together.
- When finished, trim any excess twine and dot some glue around all the knots of twine.
Did you enjoy this post? Why not subscribe to my feed, or better yet, to my free newsletter – Foodie in the Craftroom, which provides not only crafts but recipes from my other blog, Amanda’s Cookin’ as well!
- 30+ Organization Ideas and Tips - January 14, 2025
- Makeover: Plastic Storage Drawers - January 3, 2025
- Paint Stick Snowmen - December 31, 2024


Make handmade says
Creative ideas. thanks for sharing
Jen says
Great idea- love it. :)
Amanda says
Testing comments, a problem with commenting was reported.