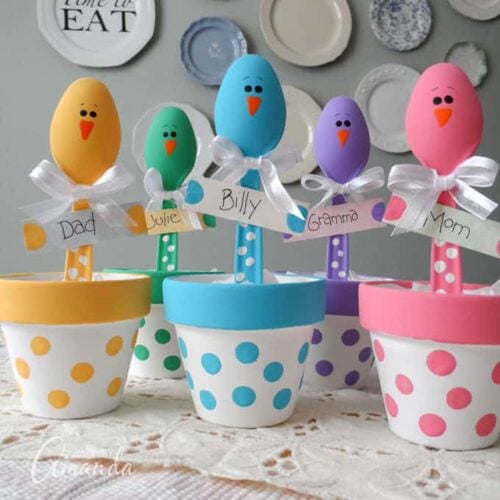
When we think about cute crafts for Easter, bunnies, and chicks spring to mind. These plastic spoon chicks are full of color and can and should be personalized!

Plastic Spoon Chicks for Easter
Easter is a holiday where people get together to celebrate family, religious beliefs, and togetherness. The holiday almost always is celebrated with a feast with many people around the table. So I’ve put together these cute easter placeholders that the kids will love and the adults will smile over.

I originally made these plastic spoon chicks for Craft Stores via DecoArt. They asked me to create a fun Easter project using Craftsmart paint. I actually am a big fan of Craftsmart paint and highly recommend it for kid’s crafts. It’s also great for adult projects too. It goes on nicely and there are quite a few colors to choose from.
To make this Easter chick craft, you can print off the full instructions below. If you like chick crafts, these jellybean chicks are also great as placeholders!

What You’ll Need To Make Plastic Spoon Chicks
- 5 plastic spoons
- 5 terracotta pots
- Fine grit sandpaper
- Pencil with new eraser
- Floral foam
- Cardstock
- White ribbon
- White tissue paper
- Hot glue gun
- White craft glue
- Butter Cream- similar to DecoArt’s Buttercream
- Pink- similar to this Pink Chiffon
- Grape Taffy
- Pool Blue- slightly lighter in color is this Pale Blue
- Spearmint- similar is this DecoArt Leprechaun
- Orange
- Black
- White
Making the Plastic Spoon Chicks:

Gently sand the shine off the spoons, dust them off and paint them.

I used a block of floral foam to hold them while they dried.

Add white polka dots up the handles.

Paint terra cotta pots white and paint the rims with the colored paint. Add matching polka dots.

Cut floral foam into small squares and glue them inside the pots. Add the beaks and the eyes.

Cut pieces of card stock for the name tags. Write names on and add the “hands” using your finger dipped in paint.

Insert the spoon chicks into the floral foam. Tie ribbon into bows and glue to the neck.

Fill with tissue paper and glue on the name tags!

More fun Easter crafts
- Easter Bunny Mason Jars– these jars make adorable gifts filled with candy!
- Yarn Pom Pom Chicks– a cute and easy chick craft everyone will love. (You can even make a garland out of them!)
- Paper Plate Rabbit– the perfect kid-friendly paper plate craft for Easter!
- These Foam Cup Chicks, Foam Cup Bunnies, and Foam Cup Sheep are fun and easy Easter crafts!

Plastic Spoon Chicks for Easter
Supplies
- 5 plastic spoons
- 5 terracotta pots
- Fine grit sandpaper
- Pencil with new eraser
- Floral foam
- Cardstock
- White ribbon
- White tissue paper
- Hot glue gun
- White craft glue
Craftsmart paint:
- Butter Cream
- Pink
- Grape Taffy
- Pool Blue
- Spearmint
- Orange
- Black
- White
Instructions
- Lightly sand the front and back surfaces of the plastic spoons.
- Paint the front and back of each spoon with Butter Cream, Pink, Grape Taffy, Pool Blue, and Spearmint. When dry apply a second coat.
- Use the handle end of the paintbrush to add polka dots with White paint to the handles of the spoons.
- Paint the terra cotta pots white. When dry apply a second coat.
- Paint the rim of each pot with Butter Cream, Pink, Grape Taffy, Pool Blue, and Spearmint.
- Use the eraser end of a pencil to add polka dots to each pot to correspond with the color of the rim.
- Paint beaks onto spoons with Orange.
- Use the handle end of a paintbrush to add Black dots for eyes.
- Cut floral foam into 1-inch cubes and use white craft glue to attach to the inside the bottom of each terra cotta pot.
- Cut cardstock into strips about 3” x ¾” and write the names of each guest. To add the “hands” dip your finger into the paint and gently press to the left and right sides of each name card using the corresponding color for each spoon and pot.
- Tie ribbon into bows and hot glue the bows to the “necks” of the spoons. Insert the end of each spoon into the floral foam.
- Tuck tissue paper into the pots to cover the floral foam and the base of each spoon.
- Hot glue the name tags to the spoons under the bows.
This post was originally published on this blog on March 8, 2013.
- Tie Dye Beach Towels - July 24, 2026
- Swirling Twirling Ladybugs - July 21, 2026
- Drip Tie Dye Backpack - July 17, 2026


Jennifer says
Oh my goodness. I am an up and coming crafts fanatic lol. I absolutely LOVE crafts & I am always looking for new ideas to do for me and the kiddos. Very happy to have stumbled across your page! I will definitely have to do this next Easter! Love love love !! Ty so much.
Amanda Formaro says
Thanks Jennifer! I hope you guys have fun making these, they are one of my favorites :)
cas says
Amanda, these are the cutest EVER! I love Easter! I love the idea of family and friends gathering without all the gift giving etc. It is more a time of loving, sharing and making memories! ‘A reminder of “Things Beautiful”. Fresh grass and leaves, flowers, little birds and bunnies, and a time to begin anew! The Spoon Chick Placeholders are awesome and the colors are so Spring! They would make a wonderful gift for everyone to take home at the end of the day. Thank you for all the joy you share!
Amanda Formaro says
Thank you so much and Happy Easter!
Diane says
Oh my gosh, this is so cute!!! And the colors are perfect, it is as if my day is complete looking at them. Will definitely try this one out. Thank you for the idea!
Amanda Formaro says
Thanks Diane, I love the colors too! :)
Terry says
Cover the Foam with plastic wrap and then add jelly beans, chocolate eggs, or mints around the spoon for a sweet treat.
Lydianne says
This is one of the cutest ideas for Easter decor I have ever seen. I don’t do many, if any, of the projects I see but I will most definitely give this one a try! I also hardly ever if at all comment on ideas or post but this one is just so darn cute. Thanks Amanda for all your great ideas.
Amanda Formaro says
That is so sweet, Lydianne! Thank you so much :) I hope you have fun crafting these!
Nina Lewis says
I just stumbled across this post of yours. (I’m a little slow ! :-) ) This is such a cute idea! You are so clever!
Janet Fazio says
What a cute idea to brighten up a table. Love these.
Crystal @HelloCreativeFamily says
This project is TOO CUTE!!! I adore the colors that you picked!
I shared this project in a roundup I did of 27 Family Friendly Easter Projects on Hello Creative Family. I’d love for you to take a peek and share if you think your fans would like it. :)
http://hellocreativefamily.com/27-family-friendly-spring-and-easter-craft-ideas/
Best Wishes,
Crystal
Amanda Formaro says
Thanks so much for including me!
Sarah says
These are adorable! I also love your wall behind the placeholders with the plate collage. Do you know the color of the wall? :). Thanks!
Amanda Formaro says
Hi Sarah! The color is Comfort Gray, I believe it’s Benjamin Moore if memory serves! :)
Sarah says
Thanks! God Bless :)
Liz says
These are so cute! Where did you buy the paint at? It looks like its so smooth and has a nice texture!
Amanda Formaro says
Thanks Liz! The paint is called Craft Smart and it’s only available at Michaels :) The colors I used are listed in the printable instructions.
Linda says
These are darling Amanda :)
Amanda Formaro says
Thank you Lunda, appreciate that!
Sandra says
What size of pots did you use?
Amanda Formaro says
Hi Sandra. It’s been a while since I made these, but I want to say they were 4″ pots.
wallenachaney says
Why couldn’t you use small styrofoam cups put enough flower foam in the bottom to hold the spoon put in s amall amout of grass and top them off with easter candies for a treat to have after dinner?
Amanda Formaro says
No one said you couldn’t wallenachaney! ;-)
alka says
great idea. it looks beautiful
Sophia says
I love them!! Super cute! Thanks for the tutorial!
KATHY MURPHY says
Beautiful. Thanks for sharing. :)
cathy c says
These are so adorable. Very creative!
Lisa @hooplapalooza says
oh i am SO loving this!!! :>D
Caroline @ Creative Party Themes says
These are great! They would add such an amazing burst of color to any Easter party table. We shared your pin. Thanks!
Kim says
Adorable going to do this with my Grand Daughter
Teresa R. says
love your Easter chicks. they’re so colorful. going to have to make some. thanks for the idea.
Cookie 17 says
Here we go ladies we have another winner from Mss Amanda,she is good..Thank’s Amanda,,Cookie17 !
KC @ The Real Thing with the Coake Family says
What an adorable idea! Love it and pinning it.
KC
Rosamaria says
Muito bonito.
Rosamaria says
Achei lindissimo.
Alessandra says
São lindo os seus trabalhos,parabéns….
Alessandra says
Gostaria muito de algumas ideias em flores e arranjos de e.v.a,vc tem alguma coisa ou ideia pra me ajudar??? Obrigada
JILL S. says
I love this project! The colors are so pretty and you could use other colors for different holidays, and make Santas or Leprechauns!!
Thanks so much for the idea!!