• Home
  • About
    • About Crafts by Amanda
    • Visit Our Recipe Site
  • Work With Us
  • Join
    • Free Newsletters
    • Join our Facebook craft group
↑
  • Tutorials
    • Tutorial Index
    • Adult Crafts
    • Crafts for Kids
    • Crafts for Seniors
    • Recycled Crafts
    • Seasonal Crafts
    • Holiday Crafts
    • Free Printables
    • Craft Collections
  • Adult Crafts
    • Bath & Body
    • Beach Crafts
    • Clay Pot Crafts
    • Crafts for Seniors
    • Decoupage Crafts for Adults
    • DIY Gift ideas
    • Garden Crafts
    • Home Decor Projects
    • Kitchen Crafts
    • Light Bulb Crafts
    • Luminary Crafts
    • Mason Jar Crafts
    • Needlework
    • Photo Display Ideas
    • Recycled Crafts for Adults
    • Wearable Crafts for Adults
  • Crafts for Kids
    • Animal Crafts for Kids
    • Back to School Crafts
    • Beach Crafts for Kids
    • Camp Crafts
    • Cardboard Tube Crafts for Kids
    • Decoupage Crafts for Kids
    • Easy Crafts for Kids
    • Nature Crafts for Kids
    • Other Kid’s Crafts
    • Paper Plate Crafts for Kids
    • Recycled Crafts for Kids
    • Slimes, Doughs, & Clay
    • Wearable Crafts for Kids
  • Holiday Crafts
    • 4th of July Crafts
    • Christmas Crafts
    • DIY Gift ideas
    • Earth Day Crafts
    • Easter Crafts
    • Father’s Day Crafts
    • Halloween Crafts
    • Memorial Day Crafts
    • Mother’s Day Crafts
    • New Year’s
    • Other Holidays
    • Patriot Day Crafts
    • St. Patrick’s Day Crafts
    • Thanksgiving Crafts
    • Valentine’s Day Crafts
  • Seasonal Crafts
    • Winter Crafts
    • Spring Crafts
    • Summer Crafts
    • Fall Crafts
  • Skip to primary navigation
  • Skip to main content
  • Skip to primary sidebar
  • Skip to footer

Crafts by Amanda

crafts for adults and kid's crafts

  • Tutorials
    • Tutorial Index
    • Adult Crafts
    • Crafts for Kids
    • Crafts for Seniors
    • Recycled Crafts
    • Seasonal Crafts
    • Holiday Crafts
    • Free Printables
    • Craft Collections
  • Adult Crafts
    • Bath & Body
    • Beach Crafts
    • Clay Pot Crafts
    • Crafts for Seniors
    • Decoupage Crafts for Adults
    • DIY Gift ideas
    • Garden Crafts
    • Home Decor Projects
    • Kitchen Crafts
    • Light Bulb Crafts
    • Luminary Crafts
    • Mason Jar Crafts
    • Needlework
    • Photo Display Ideas
    • Recycled Crafts for Adults
    • Wearable Crafts for Adults
  • Crafts for Kids
    • Animal Crafts for Kids
    • Back to School Crafts
    • Beach Crafts for Kids
    • Camp Crafts
    • Cardboard Tube Crafts for Kids
    • Decoupage Crafts for Kids
    • Easy Crafts for Kids
    • Nature Crafts for Kids
    • Other Kid’s Crafts
    • Paper Plate Crafts for Kids
    • Recycled Crafts for Kids
    • Slimes, Doughs, & Clay
    • Wearable Crafts for Kids
  • Holiday Crafts
    • 4th of July Crafts
    • Christmas Crafts
    • DIY Gift ideas
    • Earth Day Crafts
    • Easter Crafts
    • Father’s Day Crafts
    • Halloween Crafts
    • Memorial Day Crafts
    • Mother’s Day Crafts
    • New Year’s
    • Other Holidays
    • Patriot Day Crafts
    • St. Patrick’s Day Crafts
    • Thanksgiving Crafts
    • Valentine’s Day Crafts
  • Seasonal Crafts
    • Winter Crafts
    • Spring Crafts
    • Summer Crafts
    • Fall Crafts
Craft Tutorials | Recycled Crafts | Cardboard Tube Crafts for Kids | Cardboard Tube Pilgrims & Indians craft

Cardboard Tube Pilgrims & Indians craft

Author by Amanda Davis on November 12, 2009 Updated on November 19, 2022

4.75 from 4 votes
Jump to Project
101 shares
  • Share
  • Tweet
  • Flipboard
  • Email


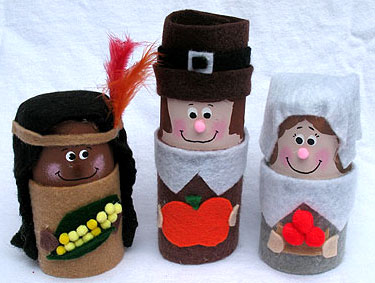
I made these little cuties several years ago for a website I used to own. Aren’t they cute?? They are one of my faves for Thanksgiving, and the bonus is that it’s a recycling project. While I was making these, my son made an indian right along side me. We love making cardboard tube crafts!

Click here to open pattern in a new window to print

These are a kid friendly friend and you can adjust the details to make them more age appropriate if needed. The tutorials for each one are below:

Cardboard Tube Pilgrims and Indians

Print Project
4.75 from 4 votes

Cardboard Tube Pilgrims & Indians craft

Author: Amanda Formaro

Supplies

  • 1 paper towel roll cardboard tube
  • 2 small feathers
  • 2 pink miniature pom poms
  • 1 brown miniature pom poms
  • 13-15 yellow miniature pom poms
  • 3 red small pom poms
  • acrylic paint: brown flesh, light brown, white, black and pink
  • black fine tip marker
  • felt: tan brown, gray, white, black, orange, peach, & green
  • scissors
  • hot glue gun
  • white craft glue
  • paintbrush
  • patterns

Instructions

  • First, cut the paper towel roll into three sections, one for each character.

Pilgrim Man

  • Paint the top 1/3 of the cardboard tube with flesh colored paint. Use brown paint to add on hair around the back and sides of face. Leave enough room to add facial features later. Let dry before continuing.
  • Roll up tube in a piece of brown felt. Trim felt to the height of the roll and be sure you have enough to wrap all the way around it as well, overlapping slightly.
  • Cut the felt strip about 2/3 of the way up for the pilgrim’s clothes, leaving the remainder for his hat. Glue the larger brown piece of felt around the tube for his clothes and the smaller section around the top for his hat. Glue seams in the back.
  • Cut out hat brim from brown felt and hat band from black felt using the patterns. Cut out the buckles from black and white felt according to the pattern. Glue the hand brim around the bottom of the hat and the black band above the brim. Glue the buckle (white first, then black) onto the front of the hat on the band.
  • Cut out the pilgrim’s collar from the white felt using the pattern. Glue around the neckline on top of the brown felt.
  • Cut out pumpkin and stem from orange and green felt, glue to the front of the pilgrim’s body. Cut out 2 hands from peach felt and glue to the front, overlapping the sides of the pumpkin.
  • Use the handle end of a paint brush dipped in white paint to dot on eyes. Do not add black until white is dry. Use a scruffy paint brush or a roughed up cotton swab to add cheeks using pink paint. Be sure to dab off excess pink paint before applying cheeks (dry application). Glue a miniature pink pom pom on for the nose and use fine tip black marker to add the mouth and eyebrows. Dot on blacks of the eyes.

Pilgrim Woman

  • Paint the top 1/3 of the cardboard tube with flesh colored paint. Use light brown paint to add on hair around the back and sides of face. Leave enough room to add facial features later. Let dry before continuing.
  • Roll up tube in a piece of gray felt. Trim felt to 2/3 the height of the roll and be sure you have enough to wrap all the way around it as well, overlapping slightly.
  • Glue the gray felt around the tube for her clothes, seam should be in the back.
  • Cut out the pilgrim woman’s collar from the white felt using the pattern. Glue around the neckline on top of the gray felt.
  • Cut a piece of white felt wide enough to cover the top of the tube and hang down about 1″ in the back. The shape will resemble a semi-circle, adjust and trim as needed to make her bonnet.
  • Cut out basket from tan felt and 2 hands from peach felt using pattern. Glue basket to the front of the pilgrim woman and glue hands on, overlapping the sides of the basket. Glue 3 small red pom poms to the top of basket for apples.
  • Use the handle end of a paint brush dipped in white paint to dot on eyes. Do not add black until white is dry. Use a scruffy paint brush or a roughed up cotton swab to add cheeks using pink paint. Be sure to dab off excess pink paint before applying cheeks (dry application). Glue a miniature pink pom pom on for the nose and use fine tip black marker to add the mouth, eyebrows and eyelashes. Dot on blacks of the eyes.

Indian

  • Paint the top 1/3 of the cardboard tube with brown paint.
  • Roll up tube in a piece of tan felt. Trim felt to 2/3 the height of the roll and be sure you have enough to wrap all the way around it as well, overlapping slightly. From the remainder of the felt, cut out a thin strip of tan to use as the headband, set aside for a later step.
  • Glue the tan felt around the tube for his clothes, seam should be in the back.
  • Cut a piece of black felt wide enough to cover the top of the tube and long enough to reach the bottom of both sides of the tube. Use hot glue to attach the hair to the top of the tube. Dot a bit of glue at the tops of the sides as well, but not all the way down, just to hold it in place. Cut the hair on both sides into three pieces and braid together. Hot glue the braided ends and glue to the side of the tube.
  • Glue two feathers to the side of the head, then wrap headband around the head, seam in the back and glue in place.
  • Cut out the corn husk and leaf from green felt and 2 hands from brown felt using the pattern. Glue the large green husk to the front of the Indian. Glue on two rows of miniature yellow pom poms for the corn kernels, then glue the green leaf at the bottom of the kernels, overlapping them slightly. Glue the hands on, overlapping the corn.
  • Use the handle end of a paint brush dipped in white paint to dot on eyes. Do not add black until white is dry. Use a scruffy paint brush or a roughed up cotton swab to add cheeks using pink paint. Be sure to dab off excess pink paint before applying cheeks (dry application). Glue a miniature brown pom pom on for the nose and use fine tip black marker to add the mouth and eyebrows. Dot on blacks of the eyes.
  • Author
  • Recent Posts
Amanda Davis
Amanda Davis is the crafty, entrepreneurial mother of four children. She loves to bake, cook, make kid's crafts and create decorative items for her home. She is a crafting expert and guru in the kitchen and has appeared online and in print publications many times over the years.
Latest posts by Amanda Davis (see all)
  • Paper Plate Aquarium Craft - June 17, 2025
  • Patriotic Bandana Wreath - June 13, 2025
  • Ladybug Painted Rocks - June 10, 2025
101 shares
  • Share
  • Tweet
  • Flipboard
  • Email

Filed Under: Cardboard Tube Crafts for Kids, Easy Crafts for Kids, Other Kid's Crafts, Thanksgiving Crafts Tagged With: cardboard tubes, earth day, holidays, kid's crafts, recycle crafts

Reader Interactions

Free CraftsBy email every week

Latest crafts straight to your inbox!

Comments

  1. Julia Hagstrom says

    November 18, 2022 at 12:29 am

    I like this project, look forward to making it, but where is the pattern you refer to, in the instructions???
    I can’t seem to find it

    Reply
    • Amanda Formaro says

      November 19, 2022 at 1:10 pm

      thanks for pointing that out. I have added the pattern to the post!

      Reply
  2. mary says

    October 30, 2011 at 5:47 pm

    love your thanksgiving projects. It’s one holiday that seems to get skipped over. Everyone jumps from halloween to christmas. Thank you for sharing all your great great crafts I really really appreciate them. You are so very talented.

    Reply
    • Amanda Formaro says

      November 3, 2011 at 9:09 pm

      Thanks Mary!

      Reply
  3. Amanda says

    November 21, 2010 at 1:05 am

    Thanks ladies!

    Reply
  4. DANA says

    November 20, 2010 at 6:33 pm

    That's great! I would love for you to come link this up at my Strut Your Stuff Party, and enter the giveaway as well!
    http://danajeanward.blogspot.com/2010/11/strut-your-stuff-link-party-and.html

    Reply
  5. Michelle says

    November 19, 2010 at 7:43 pm

    So adorable! I am your newest follower :-)

    Reply
  6. Laura Ingalls Gunn says

    November 19, 2010 at 3:34 pm

    What a cute project! Keep up the lovely work! Happy Thanksgiving!

    I hope you'll stop by and enter my giveaway.

    Reply
  7. Amanda says

    November 18, 2010 at 1:46 am

    Thank you so much Maggy!

    Reply
  8. RedTedArt says

    November 17, 2010 at 12:56 pm

    Oh my! These are BRILLIANT! I love things made out of paper rolls! These look amazing.

    Thank you for stopping by and sharing it with us on Kids Get Crafty! I will definitely be having a go at "People" with Red Ted next!

    Maggy

    Reply
  9. Amanda says

    November 15, 2010 at 10:37 pm

    Thanks so much Rexanne!

    Reply
  10. Rexanne Mancini says

    November 13, 2010 at 8:04 pm

    Darling! Linked to it on my Thanksgiving page :-)

    Reply
  11. Amanda says

    November 13, 2010 at 1:56 am

    Thank you!

    Reply
  12. Anonymous says

    November 12, 2010 at 3:02 pm

    very cute thanks for sharing.

    Reply
  13. Amanda says

    May 2, 2010 at 12:27 am

    Thank you Michelle!

    Reply
  14. michelle@somedaycrafts says

    April 30, 2010 at 5:46 pm

    Those are so cute!! Thanks for linking up!!

    Reply
  15. Anonymous says

    December 25, 2009 at 9:51 am

    I want to quote your post in my blog. It can?
    And you et an account on Twitter?

    Reply
  16. Its So Very Cheri says

    November 21, 2009 at 4:52 pm

    Cute crafts. My kids would love these.

    Thanks for coming by. I always enjoy meeting new people.

    I signed up to follow you.

    cheri

    Reply
  17. Mama King says

    November 16, 2009 at 2:05 am

    I just became a follower! Great craft ideas :-)

    Reply
  18. Mama King says

    November 16, 2009 at 2:02 am

    Adorable!!

    Reply
  19. ~Sara says

    November 15, 2009 at 8:17 pm

    Those are so cute!

    Reply
  20. jennwa says

    November 14, 2009 at 2:04 am

    I love those. They would be so much fun to play with.

    Reply
  21. Kara@ Creations by Kara says

    November 14, 2009 at 2:02 am

    Those are just darling! Such cute little faces!

    Reply
  22. Sherry says

    November 13, 2009 at 1:48 am

    Those are fantastic!

    Reply
  23. Jamie says

    November 12, 2009 at 11:28 pm

    Oh my goodness! Those are so cute!

    Reply
4.75 from 4 votes (3 ratings without comment)

Leave a Reply Cancel reply

Your email address will not be published. Required fields are marked *

Rate This Project


The maximum upload file size: 640 MB. You can upload: image, video. Links to YouTube, Facebook, Twitter and other services inserted in the comment text will be automatically embedded. Drop files here

Primary Sidebar

Hi! I’m Amanda and I’m the founder and head designer of Crafts by Amanda. I have spent over 25 years creating projects to share, but it’s not just me anymore! It’s turned into a complete family affair. Come and meet the Creative Team!

Free CraftsBy email every week

Latest crafts straight to your inbox!

All Time Favorites

Learn to make these adorable ladybug painted rocks. use special outdoor paint for this adorable garden craft so you can keep garden ladybugs all summer!

Ladybug Painted Rocks…

These colorful little ladybug painted rocks are the ... Go To project

snowy pinecone candle jar luminaries

Winter Luminaries: Snowy Pinecone…

Make pretty winter luminaries that appear to be covered ... Go To project

Make this wonderful deco mesh pumpkin wreath to hang on your door this fall!

Deco Mesh Pumpkin Wreath…

Adorn your door this fall with a pretty deco mesh ... Go To project

Reuse those empty prescription pill bottles in all sorts of ways. From organizing to making cookies. Yes, cookies! See how to use your empty pill bottles!

20 Uses for Prescription Pill…

You've been collecting prescription pill bottles for ... Go To project

Meet the Family

Amanda

Founder and Designer

Kristen

Editorial Manager

Lindsay

Social Media Manager

As seen on:

Footer

Favorites

  • Jar Photo Frames
  • No-Sew Roman Shade
  • Paper Flowers
  • How to Make a Scrunchie
  • Mermaid Slime

About

  • Home
  • Meet the Creative Team
  • Work with Us
  • Privacy Policy
  • Accessibility
  • Contact Us

Images/text copyright Amanda Formaro 2020. To feature a post from Crafts by Amanda, you may use one photo credited and linked back directly to the project post.

Free CraftsBy email every week

Latest crafts straight to your inbox!

Copyright ©2025, Crafts by Amanda. All Rights Reserved.
Design by Pixel Me Designs

Rate This Tutorial

Your vote:


To share a photo with your comment click here!

A rating is required
A name is required
An email is required

Recipe Ratings without Comment

Something went wrong. Please try again.