• Home
  • About
    • About Crafts by Amanda
    • Visit Our Recipe Site
  • Work With Us
  • Join
    • Free Newsletters
    • Join our Facebook craft group
↑
  • Tutorials
    • Tutorial Index
    • Adult Crafts
    • Crafts for Kids
    • Crafts for Seniors
    • Recycled Crafts
    • Seasonal Crafts
    • Holiday Crafts
    • Free Printables
    • Craft Collections
  • Adult Crafts
    • Bath & Body
    • Beach Crafts
    • Clay Pot Crafts
    • Crafts for Seniors
    • Decoupage Crafts for Adults
    • DIY Gift ideas
    • Garden Crafts
    • Home Decor Projects
    • Kitchen Crafts
    • Light Bulb Crafts
    • Luminary Crafts
    • Mason Jar Crafts
    • Needlework
    • Photo Display Ideas
    • Recycled Crafts for Adults
    • Wearable Crafts for Adults
  • Crafts for Kids
    • Animal Crafts for Kids
    • Back to School Crafts
    • Beach Crafts for Kids
    • Camp Crafts
    • Cardboard Tube Crafts for Kids
    • Decoupage Crafts for Kids
    • Easy Crafts for Kids
    • Nature Crafts for Kids
    • Other Kid’s Crafts
    • Paper Plate Crafts for Kids
    • Recycled Crafts for Kids
    • Slimes, Doughs, & Clay
    • Wearable Crafts for Kids
  • Holiday Crafts
    • 4th of July Crafts
    • Christmas Crafts
    • DIY Gift ideas
    • Earth Day Crafts
    • Easter Crafts
    • Father’s Day Crafts
    • Halloween Crafts
    • Memorial Day Crafts
    • Mother’s Day Crafts
    • New Year’s
    • Other Holidays
    • Patriot Day Crafts
    • St. Patrick’s Day Crafts
    • Thanksgiving Crafts
    • Valentine’s Day Crafts
  • Seasonal Crafts
    • Winter Crafts
    • Spring Crafts
    • Summer Crafts
    • Fall Crafts
  • Home
  • About
    • About Crafts by Amanda
    • Visit Our Recipe Site
  • Work With Us
  • Join
    • Free Newsletters
    • Join our Facebook craft group
  • Skip to primary navigation
  • Skip to main content
  • Skip to primary sidebar
  • Skip to footer

Crafts by Amanda

crafts for adults and kid's crafts

  • Tutorials
    • Tutorial Index
    • Adult Crafts
    • Crafts for Kids
    • Crafts for Seniors
    • Recycled Crafts
    • Seasonal Crafts
    • Holiday Crafts
    • Free Printables
    • Craft Collections
  • Adult Crafts
    • Bath & Body
    • Beach Crafts
    • Clay Pot Crafts
    • Crafts for Seniors
    • Decoupage Crafts for Adults
    • DIY Gift ideas
    • Garden Crafts
    • Home Decor Projects
    • Kitchen Crafts
    • Light Bulb Crafts
    • Luminary Crafts
    • Mason Jar Crafts
    • Needlework
    • Photo Display Ideas
    • Recycled Crafts for Adults
    • Wearable Crafts for Adults
  • Crafts for Kids
    • Animal Crafts for Kids
    • Back to School Crafts
    • Beach Crafts for Kids
    • Camp Crafts
    • Cardboard Tube Crafts for Kids
    • Decoupage Crafts for Kids
    • Easy Crafts for Kids
    • Nature Crafts for Kids
    • Other Kid’s Crafts
    • Paper Plate Crafts for Kids
    • Recycled Crafts for Kids
    • Slimes, Doughs, & Clay
    • Wearable Crafts for Kids
  • Holiday Crafts
    • 4th of July Crafts
    • Christmas Crafts
    • DIY Gift ideas
    • Earth Day Crafts
    • Easter Crafts
    • Father’s Day Crafts
    • Halloween Crafts
    • Memorial Day Crafts
    • Mother’s Day Crafts
    • New Year’s
    • Other Holidays
    • Patriot Day Crafts
    • St. Patrick’s Day Crafts
    • Thanksgiving Crafts
    • Valentine’s Day Crafts
  • Seasonal Crafts
    • Winter Crafts
    • Spring Crafts
    • Summer Crafts
    • Fall Crafts
Craft Tutorials | Adult Crafts | Home Decor Projects | Bandana Wreath
Home Decor Projects

Bandana Wreath

Author by Amanda Davis on June 27, 2018 Updated on May 8, 2022

5 from 9 votes
Use whatever colors you choose (red, white, and blue would be awesome for the 4th of July!) to make this super fun wreath from bandanas.
Jump to Project
How to make a bandana wreath
5265 shares
  • Share
  • Tweet
  • Flipboard
  • Email
bandana wreath pin image

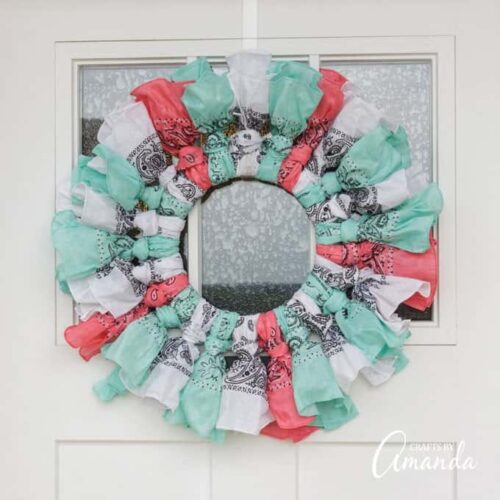
I haven’t made a ton of wreaths in my time, but when I do sit down at the craft table I want that wreath project to be easy and fast. My burlap wreath is like that, easy to do, only a few supplies and takes very little time to put together. This bandana wreath is similar and only took about 20 minutes.

How to keep a bandana wreath from drooping


Making a bandana wreath

I recently shared a bunch of pretty spring wreaths and that motivated me to make something myself. However, procrastination is a real problem and I didn’t get around to it until after the 4th of July!

In fact, I was inspired by my friend Angie, who is also a contributor on this blog, when she made this patriotic wreath from bandanas.

Buying a bandana wreath

NOTE: if you prefer to buy a bandana wreath, while I don’t sell my projects, there are lots of bandana wreaths available on Etsy here!


Bandana Wreath Tutorial

How to keep a bandana wreath from drooping

I’ve had my bandana wreath hanging on my door for about a month now. But I decided not to post it right away until I could solve one problem and tell you how to fix it too…

Droopiness.

I hung my wreath and it looked great the first day. By the second day, all the bandanas were beginning to droop. Gravity was taking over. Then it rained, and well! Let me tell you that wasn’t pretty at all. I had to take it down, lay it out on a flat surface and let it dry.

Light blue, pink, and white bandanas

However after a little brainstorming and digging through my craft room stash I found the solution to my drooping bandana wreath… water resistant fabric stiffener. Adding this step does, however, remove this wreath from the 30-minute craft category.

You can make the wreath in 30 minutes for sure, but if you add the stiffener you will need to not only account for the time it takes to apply it, but also for the drying time. But it’s worth it, I promise!

Colorful bandanas made into a wreath

Now my bandana wreath is permanently perky and the rain doesn’t bother it. Pretty excited about that! I think you could make a fabric wreath with this method too.

Supplies to make a bandana wreath:

  • 12-15 bandanas (I used 5 teal, 5 white and 3 coral)
  • 12-inch wire wreath form
  • Scissors
  • Hot glue gun
  • 2 large trash bags or dollar store plastic tablecloth
  • Water-resistant fabric stiffener*
  • Large paintbrush
  • 15 sheets of paper

*I used Martha Stewart fabric stiffener because I had it in my craft room. But I looked and apparently they don’t sell it anymore, I can’t find it online anywhere. However, even though I haven’t tested it, Aleene’s is a good, solid brand and I’m sure it’s a solid substitute.

It’s called Aleene’s Fabric Stiffener & Draping Liquid which is also water resistant. You can use any fabric stiffener, but the water resistance is what sold me.

FOR THE INSTRUCTIONS, please see the printable version below or watch the video above.

You could use any color bandanas you like and you can decorate your wreath too. Originally I was going to add starfish to mine but I ended up liking it all on its own. You do what makes you happy with your bandana wreath and be sure to send me a picture!

How to make a bandana wreath

If you liked this bandana wreath, you may also like my denim wreath made from scraps of colorful blue jeans! Or for a different type of patio DIY try these fun and easy Stenciled Burlap Pillows! Customize them to say whatever you want, and enjoy these adorable outdoor pillows for your patio set.

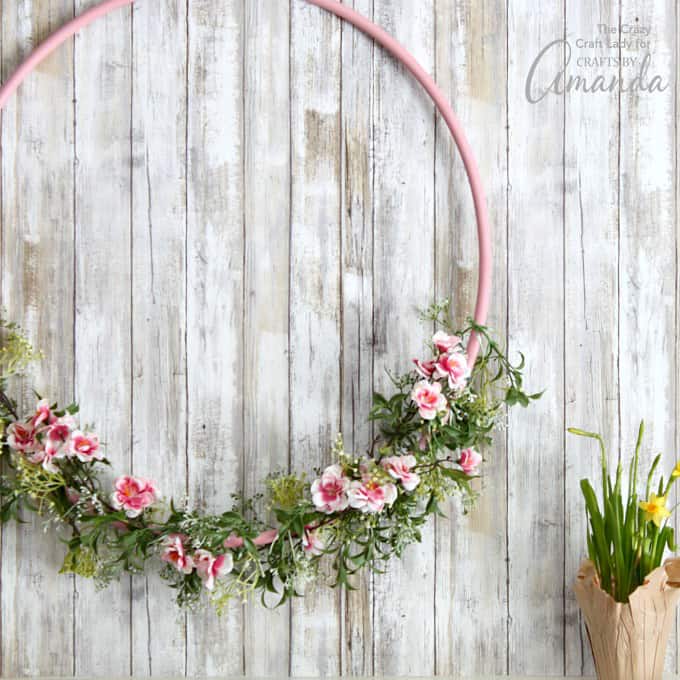
Don’t miss this beautiful hula hoop wreath that you can make from a handful of supplies and an old hula hoop!

Want more? Check out these summer wreaths! 

More Wreath Projects

  • Tulip Wreath
  • Burlap Wreath
  • Burlap Pumpkin Wreath
  • Halloween Ribbon Wreath
  • Deco Mesh Pumpkin Wreath
  • How to Make A Forsythia Wreath
How to make a bandana wreath
Print Project
5 from 9 votes

Bandana Wreath

Use whatever colors you choose (red, white, and blue would be awesome for the 4th of July!) to make this super fun wreath from bandanas.
Author: Amanda Formaro

Supplies

  • 12-15 bandanas I used 5 teal, 5 white and 3 coral
  • 12- inch wire wreath form
  • Scissors
  • Hot glue gun
  • 2 large trash bags or dollar store plastic tablecloth
  • Water-resistant fabric stiffener
  • Large paintbrush
  • 15 sheets of paper

Instructions

  • Cut each bandana in half.
  • Take one of the bandana halves and gather it together lengthwise, then fold it in half so that you have a loop at one end.
  • Place the open ends of the bandana underneath the wreath form. The open ends will be in the center of the wreath form and the loop will be on the outside.
  • Pass the open ends of the bandana over the wreath form and insert into the loop end then pull tight.
  • Repeat this process with all the bandanas (or as many as you like), tightening and squishing them all together until it suits you.
  • Use hot glue to secure the knots so that they do not loosen.
  • Fluff out the ends of each bandana.
  • Line work surface with plastic trash bags or tablecloth.
  • use paintbrush to apply fabric stiffener to the ends of each bandana. Saturate each piece, but it shouldn't be dripping off.
  • Form each bandana end so that it is open and "poofed" out.
  • Tear each piece of paper in half and crumple into a ball. Place a crumpled ball into the end of each bandana to help hold its shape while the stiffener dries.
  • Allow to dry 24 hours or whatever is recommended on your stiffener bottle then remove crumpled paper and hang your wreath!

Video


This post was originally published on this blog on Jul 29, 2017.

– You might also like this project – Patriotic Bandana Wreath

  • Author
  • Recent Posts
Amanda Davis
Amanda Davis is the crafty, entrepreneurial mother of four children. She loves to bake, cook, make kid's crafts and create decorative items for her home. She is a crafting expert and guru in the kitchen and has appeared online and in print publications many times over the years.
Latest posts by Amanda Davis (see all)
  • Scratch Off Valentine Gift Certificates - February 6, 2026
  • Valentine Hugs - February 3, 2026
  • Mosaic Flower Pot - January 29, 2026
5265 shares
  • Share
  • Tweet
  • Flipboard
  • Email

Filed Under: Beach Crafts, Crafts for Seniors, Home Decor Projects, Spring Crafts, Summer Crafts Tagged With: adult, bandana, bandanna, easy, easy adult crafts, wreath

Reader Interactions

Free CraftsBy email every week

Latest crafts straight to your inbox!

Comments

  1. Amanda says

    June 5, 2022 at 8:13 am

    Made a very cute one for Memorial Day-fourth of July! Looks great on my front door but I just sprayed mine VERY well with spray starch and it seems to hold them up great!

    Reply
  2. Olive says

    June 16, 2021 at 11:07 pm

    I’m having trouble finding the video. : (

    Reply
  3. Beth Belflower says

    June 9, 2019 at 7:46 am

    Do you put the bandanas around all 4 wires or just the middle one?

    Reply
    • Amanda Formaro says

      June 17, 2019 at 11:09 am

      Yes around all of them. There’s a video in the post that shows you how to make it! :)

      Reply
  4. Tera says

    August 27, 2018 at 3:22 pm

    I made some for door prizes . A red white and blue one and also a blue and gold one as that is our club colors . Will send thought a picture. Thank you for the beautiful idea. I love the way they turned out.

    Reply
  5. Pat says

    July 7, 2018 at 10:42 am

    How big were the bandanas you used, thinking of trying it out of plastic grocery bags but need a size

    Reply
    • Amanda Formaro says

      July 15, 2018 at 9:04 am

      The bandanas are roughly 22-inches square.

      Reply
  6. Maranda Serrano says

    June 30, 2018 at 1:47 pm

    Turned out great!
    Made it for my daughters college dorm door at SFA. How can i send a pic?

    Reply
    • Amanda Formaro says

      July 2, 2018 at 9:05 am

      Hi Maranda! You can email it to me amanda @ craftsbyamanda . com :)

      Reply
  7. Terry Buhler says

    June 23, 2018 at 8:03 pm

    I made two of these bandanna wreaths with the 30 plus bandannas my Dog Bailey had over the 14 1/2 years we had her. She recently passed on and this wreath was the perfect memorial wreath to honor our poo boder dog! Thanks for the idea!

    Reply
    • Amanda Formaro says

      July 2, 2018 at 9:07 am

      Oh my gosh, what a sweet idea!!

      Reply
  8. Char says

    June 17, 2018 at 10:09 pm

    How much Stiffener did you use on the one wreath?

    Reply
    • Amanda Formaro says

      June 20, 2018 at 8:09 am

      There isn’t a specific measurement. Here’s what step 9 says in the printable version of this post:

      use paintbrush to apply fabric stiffener to the ends of each bandana. Saturate each piece, but it shouldn’t be dripping off.

      Hope that helps!

      Reply
  9. Ruth says

    June 11, 2018 at 10:03 am

    I have made these and had them in my home and then you wouldn’t have to put the stiffener on them. Also you can make it to match your bedroom spread or whatever.
    Very cute and I will make more for gifts. A nice project for the kids no that they are out of school and maybe sell them at craft fairs and make a little extra money.

    Reply
    • Amanda Formaro says

      June 20, 2018 at 8:12 am

      Hmm I found that mind still drooped no matter if it was inside or out. Would love to know your secret ;)

      Reply
  10. Michelle says

    June 3, 2018 at 1:53 pm

    You say 15 bandanas,5/5/3, but that’s only 13. Also, could you use the spray water resistant fabric stiffner instead?

    Reply
    • Amanda Formaro says

      June 7, 2018 at 3:01 pm

      Hi Michelle and thanks so much for pointing that out, I can totally see how that would be confusing. :) I changed it to say 12-15 bandanas. it just depends on how tight you make them (next to each other).

      Reply
    • Amanda Formaro says

      June 7, 2018 at 3:05 pm

      Sorry just noticed the other question on the fabric stiffener. I cannot say for sure as I have not tried it, but I would imagine it would do the same job.

      Reply
  11. jennifer Hatton says

    June 1, 2018 at 12:12 pm

    This popped up on my facebook feed! So excited to leave work and get the wreath form and bandanas to make this tonight! I ordered the fabric stiffener off Amazon. I am thinking about red, white and blue since its will be July 4 soon. this reminds me of little mason jar ring wreaths we made in elementary school, it was such a cool project. Can’t wait to make this!

    Reply
    • Amanda Formaro says

      June 7, 2018 at 3:04 pm

      Sounds fun, hope you enjoy it!

      Reply
5 from 9 votes (6 ratings without comment)

Leave a Reply Cancel reply

Your email address will not be published. Required fields are marked *

Rate This Project


The maximum upload file size: 640 MB. You can upload: image, video. Links to YouTube, Facebook, Twitter and other services inserted in the comment text will be automatically embedded. Drop files here


Primary Sidebar

Hi! I’m Amanda and I’m the founder and head designer of Crafts by Amanda. I have spent over 25 years creating projects to share, but it’s not just me anymore! It’s turned into a complete family affair. Come and meet the Creative Team!

Free CraftsBy email every week

Latest crafts straight to your inbox!

All Time Favorites

snowy pinecone candle jar luminaries

Winter Luminaries: Snowy Pinecone…

Make pretty winter luminaries that appear to be covered ... Go To project

Make this wonderful deco mesh pumpkin wreath to hang on your door this fall!

Deco Mesh Pumpkin Wreath…

Adorn your door this fall with a pretty deco mesh ... Go To project

Learn to make these adorable ladybug painted rocks. use special outdoor paint for this adorable garden craft so you can keep garden ladybugs all summer!

Ladybug Painted Rocks…

These colorful little ladybug painted rocks are the ... Go To project

Reuse those empty prescription pill bottles in all sorts of ways. From organizing to making cookies. Yes, cookies! See how to use your empty pill bottles!

20 Uses for Prescription Pill…

You've been collecting prescription pill bottles for ... Go To project

Meet the Family

Amanda

Founder and Designer

Kristen

Editorial Manager

Lindsay

Social Media Manager

As seen on:

Footer

Favorites

  • Jar Photo Frames
  • No-Sew Roman Shade
  • Paper Flowers
  • How to Make a Scrunchie
  • Mermaid Slime

About

  • Home
  • Meet the Creative Team
  • Work with Us
  • Privacy Policy
  • Accessibility
  • Contact Us

Images/text copyright Amanda Davis 2025. To feature a post from Crafts by Amanda, you may use one photo credited and linked back directly to the project post.

Free CraftsBy email every week

Latest crafts straight to your inbox!

Copyright ©2026, Crafts by Amanda. All Rights Reserved.
Design by Pixel Me Designs

Rate This Tutorial

Your vote:


To share a photo with your comment click here!

A rating is required
A name is required
An email is required

Recipe Ratings without Comment

Something went wrong. Please try again.