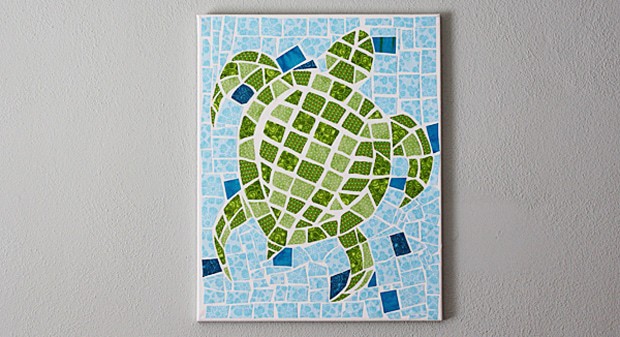
I designed this mosaic turtle project to fit into my coastal decor. I wanted it to be lightweight, inexpensive and a way to use up fabric scraps. Follow below to see how you can make one!
Need more beach crafts in your life? We have just the collection for you, check out our list of 55+ Beach Crafts for Adults and Kids!

Mosaic Turtle Using Fabric and Canvas
I have a soft spot for mosaics. I’ve always loved them, but you really have to be careful when decorating with mosaic designs. You can really only have one per room, two tends to really be pushing it, or things start to look way too busy. Mosaics have the ability to start a conversation. They are so interesting to look at and can truly become the focal point of a room.
True mosaics, made with tile and grout, are costly to make and are very heavy. Hanging a tile and grout mosaic on the wall isn’t very feasible. That’s when I decided I would use fabric scraps and decoupage.
As always, a full printable supply list and instructions are at the end of this post.
For this project you will need the following supplies:
- 16×20 stretched canvas

- Acrylic paint – white
- Green fabric in three shades (a light shade, a medium and a bright shade)
Blue fabric in three shades (mostly light blue with a few pieces of two dark shades) - Americana Decou-page Satin or Mod Podge Satin
- Parchment paper
- Scissors
- Masking tape
- Print the patterns by clicking here
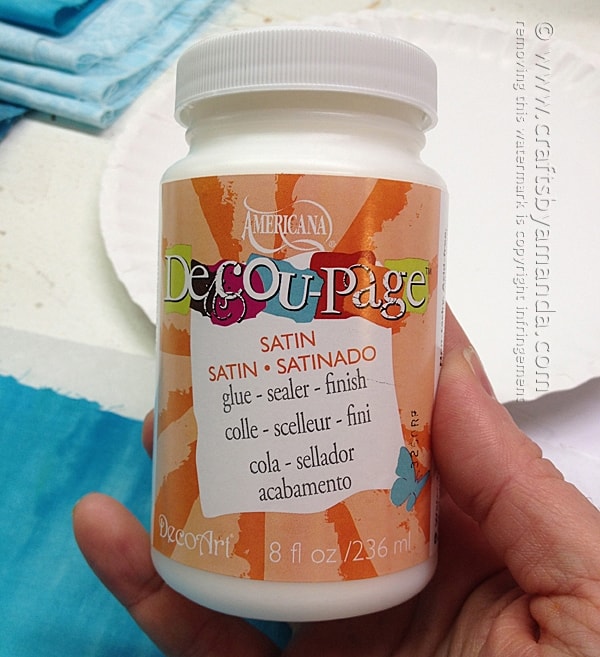
I used Americana Decoup-Page in Satin finish. Mod Podge works great too, but I wouldn’t recommend using a homemade decoupage on this project. Homemade decoupage has a tendency to yellow over time.
This is not the first time I’ve mentioned that I’m switching my décor over to a more coastal feel. I love the calming colors of the coast; blues and greens make me happy. Two years ago I was finally able to visit Florida, my first time ever…
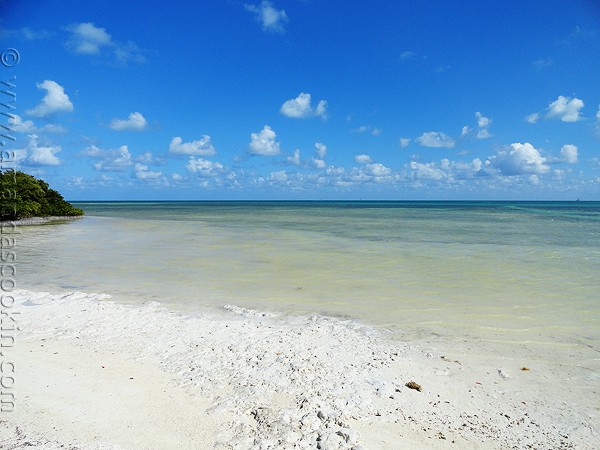
For a long, long time I’ve wanted to go to Florida, specifically The Keys. When I was in high school everyone went to Florida for spring break, except for me. My parents were divorced and we simply couldn’t afford a lavish family vacation like the kids I went to school with. So each year they would all return tan and rested and I vowed that one day I would be able to mark Florida off of my Bucket List. Quoted from my food blog, Amanda’s Cookin’.
We stayed with my awesome friend, Jodi, she opened her home to us. This picture is in her backyard:
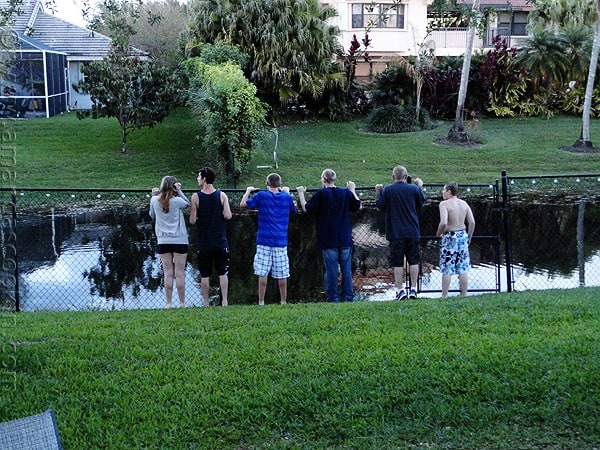
The rest of the evening was spent kicking back in the backyard, checking out the canal that ran through the back, and just enjoying time with good friends. Quoted from my food blog Amanda’s Cookin’.
This is one of my favorite pictures from the trip. My kids walking in the ocean.
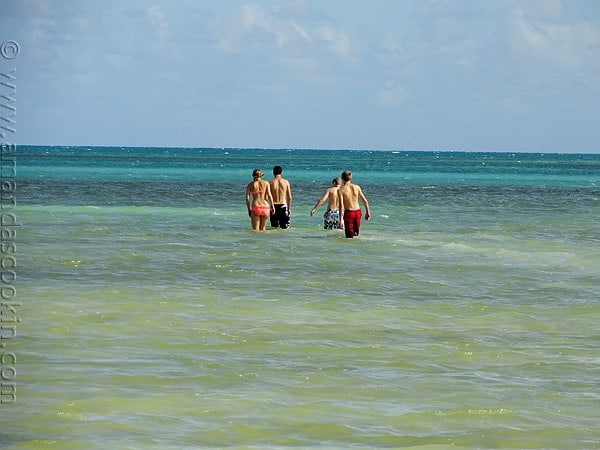
If you’ve ever driven down to Key Largo toward The Keys you know that basically it’s ocean on both sides and a bit of land and that’s about it. So if you happen upon an empty parking space, it’s best you grab it! Quoted from my food blog Amanda’s Cookin’
I drew a lot of inspiration from that trip. It’s impossible for me to let go of the feeling I had while I was there. In fact, do you remember this painting?
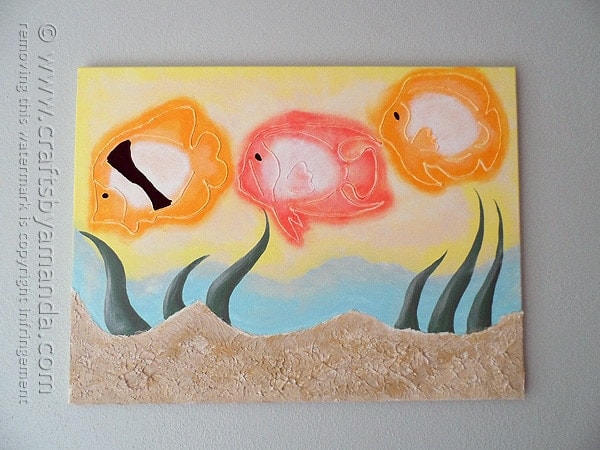
During that trip I was inspired by a piece of art Jodi had hanging in her guest bath.
For this mosaic turtle, I had a design in mind, I just needed to create the pattern.
NOTE: The printable pattern is marked with the letters M, B and L. These letters represent the shade of fabric to use. M = medium, B = bright, and L = light.
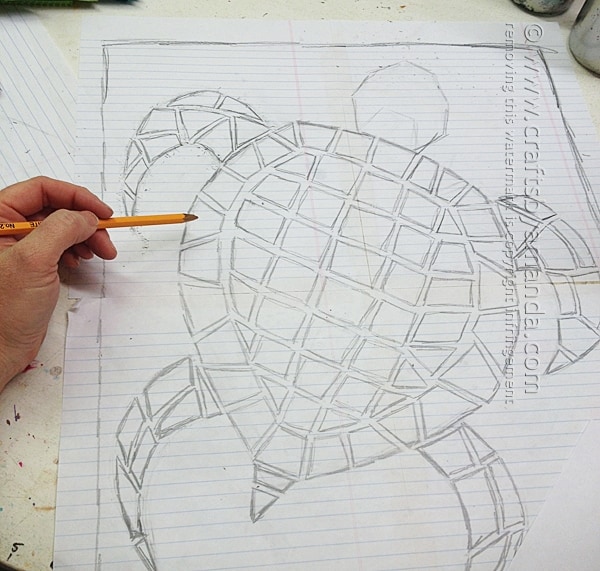
Because my canvas was much larger than one piece of paper, I taped four together and drew my pattern on that.
- First you will need to paint your canvas completely with a coat of white paint. This will help keep any dust, dirt and smudges from collecting on the canvas, as it creates a seal.
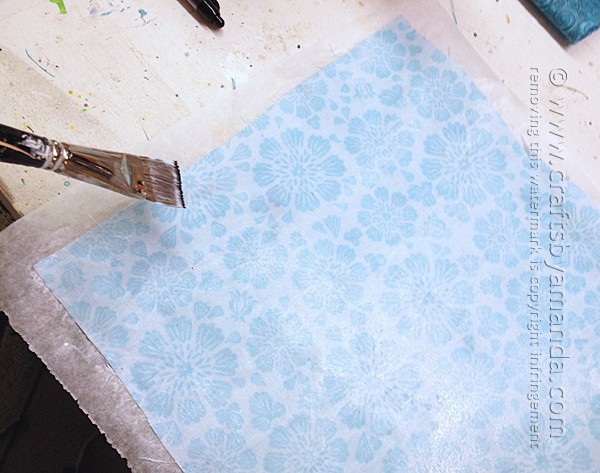
- Prep your fabric by laying out sheets of parchment paper and placing fabric on top of it. Apply a layer of decoupage to the fabric. This will keep the fabric from fraying when you cut it. When dry, peel fabric off of the parchment paper.
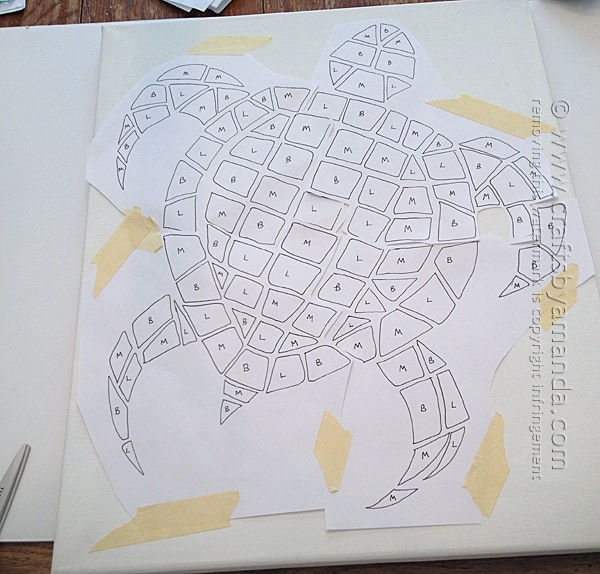
- Print off the four-page pattern, trim and tape them together. Once you’ve done that, position your pattern on the canvas and tape in place.
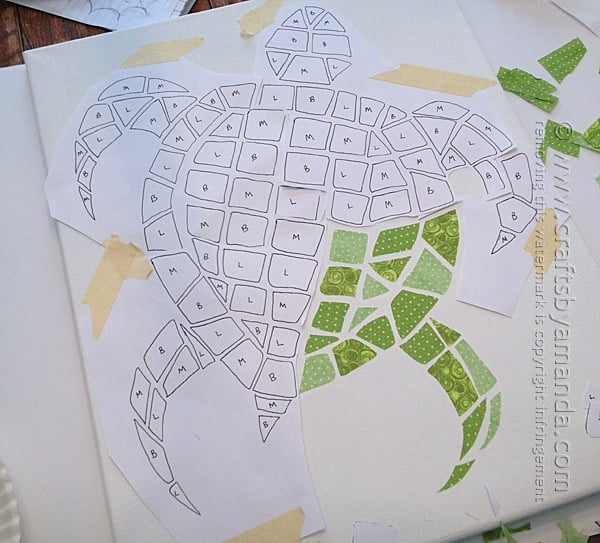
- Cut out one section of the turtle’s back fin from the pattern. Using the corresponding fabric, place pattern piece over the fabric and cut out. Apply decoupage to the backside of the fabric piece. Press onto the canvas and smooth out.
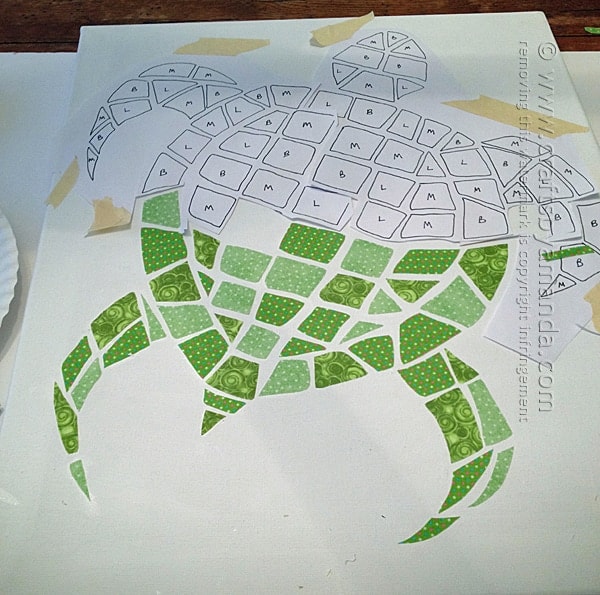
- Continue this process, working your way up the turtle one piece at a time. Continue working your way all the way up until the turtle is complete.
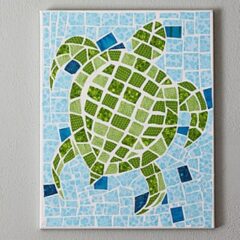
- There is no pattern for the water. Simple start at the outer corner and cut squares and rectangles from the light blue fabric, attaching them to the canvas in the same manner as the turtle. As you get close to the turtle, cut pieces to fit the curves around the animal. Use mostly light blue but insert a few darker shades here and there for visual interest.

- When all done, wait 20 minutes after the last piece has been applied, then paint the entire surface with a medium layer of decoupage to seal it. Let dry in a dust free area overnight before hanging.
Hope you like it and it gives you some inspiration!
More beach crafts
If you like coastal decor and beach crafts, check out all of my beach craft ideas here. Otherwise, I’ve picked out a few of my favorites below for you to peruse :)
- Beach Starfish Plaque
- Weathered Paint Stick Beach Flag
- Striped Beach Luminaries
- Weathered Beach Signs
- More Beach Wall Art ideas
Mosaic Turtle Using Fabric and Canvas
Supplies
- 16 x20 stretched canvas
- Americana acrylic paint - white
- Green fabric in three shades a light shade, a medium and a bright shade
- Blue fabric in three shades mostly light blue with a few pieces of two dark shades
- Americana Decou-page Satin
- Parchment paper
- Patterns click the link in the post to print
- Scissors
- Masking tape
Instructions
- First you will need to paint your canvas completely with a coat of white paint. This will help keep any dust, dirt and smudges from collecting on the canvas, as it creates a seal.
- Prep your fabric by laying out sheets of parchment paper and placing fabric on top of it. Apply a layer of decoupage to the fabric. This will keep the fabric from fraying when you cut it. When dry, peel fabric off of the parchment paper.
- Print off the four-page pattern, trim and tape them together. Once you’ve done that, position your pattern on the canvas and tape in place.
- Cut out one section of the turtle's back fin from the pattern. Using the corresponding fabric, place pattern piece over the fabric and cut out. Apply decoupage to the backside of the fabric piece. Press onto the canvas and smooth out.
- Continue this process, working your way up the turtle one piece at a time. Continue working your way all the way up until the turtle is complete.
- There is no pattern for the water. Simple start at the outer corner and cut squares and rectangles from the light blue fabric, attaching them to the canvas in the same manner as the turtle. As you get close to the turtle, cut pieces to fit the curves around the animal. Use mostly light blue but insert a few darker shades here and there for visual interest.
- When all done, wait 20 minutes after the last piece has been applied, then paint the entire surface with a medium layer of decoupage to seal it. Let dry in a dust free area overnight before hanging.
This project was originally published here on May 31, 2014
- Tie Dye Beach Towels - July 24, 2026
- Swirling Twirling Ladybugs - July 21, 2026
- Drip Tie Dye Backpack - July 17, 2026


Melissa says
When I click on the link for the printable turtle pattern, it just takes me to a photo of the pattern. Do you have an actual pattern available or do I just use the photo of the pattern?
Amanda Formaro says
Hi Melissa. When you click the link for the pattern, it should take you down to a green box in the post saying “free pattern”. Fill in your name and email address and it will download the pattern for you.
Violet Markle says
Can I use glossy mod podge that I already have instead of satin mod podge?Do I even need mod podge at all?If so why??Will my picture be just fine if I don’t use it?
Violet Markle says
also with the white paint does it matter if you are using acrylic versus fabric paint?
Violet Markle says
sorry about all the questions.I am writing these as I read the craft.Do you need to put the mod podge around the entire piece of fabric or just the top layer?
Amanda Formaro says
In the step where you lay the fabric on parchment paper, you apply a single layer of Mod Podge and let it dry. It will soak through to the back side.
Amanda Formaro says
Acrylic is fine
Amanda Formaro says
Mod Podge seals your project and keep dirt or dust from collecting along the edge of the fabric pieces. If you prefer a glossy finish, you can certainly use gloss mod podge.
Dena says
My daughter has decided on a sea turtle theme for her 8th birthday……….I HAVE to carve out some time to make this.. it’s awesome! so glad I found it with just over 2 months to spare before the big day. Thanks!
Amy says
This is beautiful .. Love it .. I just wanted to know what kind of fabric you have used ? Is it cotton or something else ?
Amanda Formaro says
Hi Amy, just cotton. I used the little fat quarters you can find at WalMart and JoAnns :)
Mally Hatch says
Love, love, love this. I may use it in Jan for “looking forward to beach weather”. It is fantastic! My question is this: Can I download/copy/whatever the word is the pattern for the turtle? This is great! Thanks in advance!
Mally
Alabama
Amanda Formaro says
Hi Mally! There’s a link to the patterns right above the first photo. Please go ahead and print them out to use with this project. Thanks for the compliments!
Lisa Hall says
Oh Amanda! This is SO pretty! I really love that you used fabric instead of tiles. I have so much scrap fabric laying around and this project is perfect for using up those small scraps! Thanks so much for sharing and giving such a good tutorial!
Amanda Formaro says
Thank you so much Lisa! I hope you make something fun!
kim n says
I love your turtle, it is so creative and lovely!
Amanda Formaro says
Thanks so much Kim, I really appreciate that!