• Home
  • About
    • About Crafts by Amanda
    • Visit Our Recipe Site
  • Work With Us
  • Join
    • Free Newsletters
    • Join our Facebook craft group
↑
  • Tutorials
    • Tutorial Index
    • Adult Crafts
    • Crafts for Kids
    • Crafts for Seniors
    • Recycled Crafts
    • Seasonal Crafts
    • Holiday Crafts
    • Free Printables
    • Craft Collections
  • Adult Crafts
    • Bath & Body
    • Beach Crafts
    • Clay Pot Crafts
    • Crafts for Seniors
    • Decoupage Crafts for Adults
    • DIY Gift ideas
    • Garden Crafts
    • Home Decor Projects
    • Kitchen Crafts
    • Light Bulb Crafts
    • Luminary Crafts
    • Mason Jar Crafts
    • Needlework
    • Photo Display Ideas
    • Recycled Crafts for Adults
    • Wearable Crafts for Adults
  • Crafts for Kids
    • Animal Crafts for Kids
    • Back to School Crafts
    • Beach Crafts for Kids
    • Camp Crafts
    • Cardboard Tube Crafts for Kids
    • Decoupage Crafts for Kids
    • Easy Crafts for Kids
    • Nature Crafts for Kids
    • Other Kid’s Crafts
    • Paper Plate Crafts for Kids
    • Recycled Crafts for Kids
    • Slimes, Doughs, & Clay
    • Wearable Crafts for Kids
  • Holiday Crafts
    • 4th of July Crafts
    • Christmas Crafts
    • DIY Gift ideas
    • Earth Day Crafts
    • Easter Crafts
    • Father’s Day Crafts
    • Halloween Crafts
    • Memorial Day Crafts
    • Mother’s Day Crafts
    • New Year’s
    • Other Holidays
    • Patriot Day Crafts
    • St. Patrick’s Day Crafts
    • Thanksgiving Crafts
    • Valentine’s Day Crafts
  • Seasonal Crafts
    • Winter Crafts
    • Spring Crafts
    • Summer Crafts
    • Fall Crafts
  • Skip to primary navigation
  • Skip to main content
  • Skip to primary sidebar
  • Skip to footer

Crafts by Amanda

crafts for adults and kid's crafts

  • Tutorials
    • Tutorial Index
    • Adult Crafts
    • Crafts for Kids
    • Crafts for Seniors
    • Recycled Crafts
    • Seasonal Crafts
    • Holiday Crafts
    • Free Printables
    • Craft Collections
  • Adult Crafts
    • Bath & Body
    • Beach Crafts
    • Clay Pot Crafts
    • Crafts for Seniors
    • Decoupage Crafts for Adults
    • DIY Gift ideas
    • Garden Crafts
    • Home Decor Projects
    • Kitchen Crafts
    • Light Bulb Crafts
    • Luminary Crafts
    • Mason Jar Crafts
    • Needlework
    • Photo Display Ideas
    • Recycled Crafts for Adults
    • Wearable Crafts for Adults
  • Crafts for Kids
    • Animal Crafts for Kids
    • Back to School Crafts
    • Beach Crafts for Kids
    • Camp Crafts
    • Cardboard Tube Crafts for Kids
    • Decoupage Crafts for Kids
    • Easy Crafts for Kids
    • Nature Crafts for Kids
    • Other Kid’s Crafts
    • Paper Plate Crafts for Kids
    • Recycled Crafts for Kids
    • Slimes, Doughs, & Clay
    • Wearable Crafts for Kids
  • Holiday Crafts
    • 4th of July Crafts
    • Christmas Crafts
    • DIY Gift ideas
    • Earth Day Crafts
    • Easter Crafts
    • Father’s Day Crafts
    • Halloween Crafts
    • Memorial Day Crafts
    • Mother’s Day Crafts
    • New Year’s
    • Other Holidays
    • Patriot Day Crafts
    • St. Patrick’s Day Crafts
    • Thanksgiving Crafts
    • Valentine’s Day Crafts
  • Seasonal Crafts
    • Winter Crafts
    • Spring Crafts
    • Summer Crafts
    • Fall Crafts
Craft Tutorials | Crafts for Kids | Easy Crafts for Kids | How to Make a Clothespin Car
Easy Crafts for Kids

How to Make a Clothespin Car

Author by Amanda Davis on January 26, 2019 Updated on March 20, 2020

4.67 from 9 votes
This little cars craft is so fun to wheel across the floor or roll down a homemade ramp. Perfect for a rainy afternoon!
Jump to Project
Today I'm going to show you how to make a clothespin car with clothespins (of course), buttons and some imagination.
7039 shares
  • Share
  • Tweet
  • Flipboard
  • Email

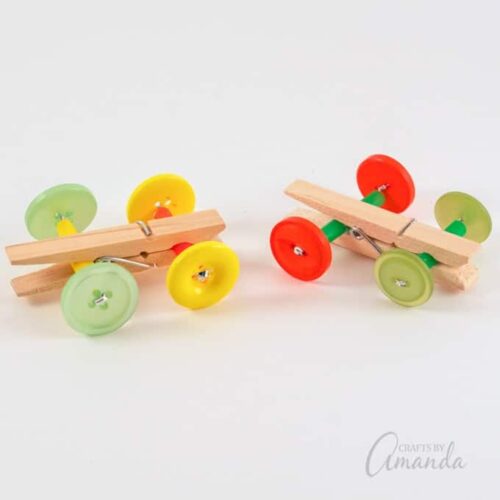
Today I’m going to show you how to make a clothespin car with clothespins (of course), buttons and some imagination. So if you’re ready to make a car from a clothespin and create your very own DIY toys, let’s get started!

I’ve spent years making crafts for kids, and clothespin crafts are definitely among them. Kids will love playing with these clothespin cars all afternoon!

Today I'm going to show you how to make a clothespin car with clothespins (of course), buttons and some imagination.


How to make a clothespin car

This little cars craft is so fun to wheel across the floor or roll down a homemade ramp. You can even decorate them if you like using paint or markers and are a great craft idea for preschool art time. This project comes from my book, Button Mania, be sure to grab a copy before they’re gone!

Here are the supplies you’ll need:

  • Wooden clothespin
  • 2 twist bread ties
  • 4 buttons (matching pairs)
  • 2 pieces of a drinking straw (1 ½” each)
  • White craft glue


Here’s how you make it:

Insert one of the twist ties into a hole in one of the buttons.

Insert one of the twist ties into a hole in one of the buttons.

Thread about an inch or so of the twist tie through a second hole and back through the other side of the button.

Thread about an inch or so of the twist tie through a second hole and back through the other side of the button.

Twist the two pieces at the back of the button together tightly.

Twist the two pieces at the back of the button together tightly.

Thread one of the straw pieces onto the twist tie.

Thread one of the straw pieces onto the twist tie.

Thread the open end of the twist tie through the second button, then thread it back through the second hole and twist together like you did in step 3.

Thread the open end of the twist tie through the second button, then thread it back through the second hole and twist together like you did in step 3.

Repeat steps 1-5 for the second pair of buttons.

Repeat steps 1-5 for the second pair of buttons.

Open the clothespin and place the straw from one set of wheels in the hole of the clothespin opening. Close the clothespin

Open the clothespin and place the straw from one set of wheels in the hole of the clothespin opening. Close the clothespin. The clothespin should not flatten the straw; the twist tie should be able to turn freely inside the straw.

Add a dab of white glue to the back of the clothespin near the spring.

Add a dab of white glue to the back of the clothespin near the spring.

Insert the second set of wheels into the handle end of the clothespin and push it toward the spring into the glue.

Insert the second set of wheels into the handle end of the clothespin and push it toward the spring into the glue.

how to make a clothespin car

Your clothespin car is now complete and ready to race! These are lots of fun, they are easy for kids to make, and are a great boredom buster for a rainy afternoon.

how to make homemade toys - clothespin cars!

A clothespin car would make a great camp craft too. The kids can have races with their newly created toys. Speaking of camp, everyone remembers making a God’s Eye craft right? Find this and all sorts of easy crafts for kids on this blog and pin or bookmark them for hours of fun!

After you make this clothespin car, you might want to add this clothespin airplane and this rubber band car to your homemade toy collection as well. While these clothespin toys and crafts are for both boys and girls, we know that some kids enjoy animal crafts too. So check out these fun clothespin fish as well as these butterfly clothespins to add some color to your new toy collection!

Another project from my button book that you and the kids will like is my Rainbow Button Wind Chime. Have fun!

Today I'm going to show you how to make a clothespin car with clothespins (of course), buttons and some imagination.
Print Project
4.67 from 9 votes

How to Make a Clothespin Car

This little cars craft is so fun to wheel across the floor or roll down a homemade ramp. Perfect for a rainy afternoon!
Author: Amanda Formaro

Supplies

  • Wooden clothespin
  • 2 twist bread ties
  • 4 buttons matching pairs
  • 2 pieces of a drinking straw 1 ½” each
  • White craft glue

Instructions

  • Insert one of the twist ties into a hole in one of the buttons.
  • Thread about an inch or so of the twist tie through a second hole and back through the other side of the button.
  • Twist the two pieces at the back of the button together tightly.
  • Thread one of the straw pieces onto the twist tie.
  • Thread the open end of the twist tie through the second button, then thread it back through the second hole and twist together like you did in step 3.
  • Repeat steps 1-5 for the second pair of buttons.
  • Open the clothespin and place the straw from one set of wheels in the hole of the clothespin opening. Close the clothespin. The clothespin should not flatten the straw; the twist tie should be able to turn freely inside the straw.
  • Add a dab of white glue to the back of the clothespin near the spring.
  • Insert the second set of wheels into the handle end of the clothespin and push it toward the spring into the glue.

This post was originally published on this blog on Jul 10, 2017.

  • Author
  • Recent Posts
Amanda Davis
Amanda Davis is the crafty, entrepreneurial mother of four children. She loves to bake, cook, make kid's crafts and create decorative items for her home. She is a crafting expert and guru in the kitchen and has appeared online and in print publications many times over the years.
Latest posts by Amanda Davis (see all)
  • Paper Plate Aquarium Craft - June 17, 2025
  • Patriotic Bandana Wreath - June 13, 2025
  • Ladybug Painted Rocks - June 10, 2025
7039 shares
  • Share
  • Tweet
  • Flipboard
  • Email

Filed Under: Camp Crafts, Easy Crafts for Kids Tagged With: boys, button, buttons, camp, car, clothespin, clothespins, toy

Reader Interactions

Free CraftsBy email every week

Latest crafts straight to your inbox!

Comments

  1. Sharon says

    April 8, 2025 at 2:43 pm

    Did not have good luck with this project even though I reworked it a number of times. Wheels fall over or don’t move right. I don’t know what I’m doing wrong!

    Reply
  2. Jul says

    July 6, 2024 at 10:23 am

    Did with a 5 & 6 yr old. This is not stable enough for that age. They were done playing with them in 2 minutes.

    Reply
  3. Jackie Dohlman says

    July 1, 2019 at 4:02 pm

    My grand daughter would like to show kids how to make these cars at our 4-H fair next week. May we have your permission to do so? We will not be charging and money for this activity and we will acknowledge your website on her poster. Thank you

    Reply
    • Amanda Formaro says

      July 10, 2019 at 7:27 am

      Of course! Sorry i’m late responding, i hope you went ahead and did it! :)

      Reply
  4. Heather Williams says

    November 11, 2018 at 7:13 pm

    What size buttons are best?

    Reply
    • Amanda Formaro says

      December 3, 2018 at 5:37 pm

      Any size button is fine, as long as they are big enough to turn and clear the clothespins. Just make sure they are the same size as each other!

      Reply
4.67 from 9 votes (8 ratings without comment)

Leave a Reply Cancel reply

Your email address will not be published. Required fields are marked *

Rate This Project


The maximum upload file size: 640 MB. You can upload: image, video. Links to YouTube, Facebook, Twitter and other services inserted in the comment text will be automatically embedded. Drop files here

Primary Sidebar

Hi! I’m Amanda and I’m the founder and head designer of Crafts by Amanda. I have spent over 25 years creating projects to share, but it’s not just me anymore! It’s turned into a complete family affair. Come and meet the Creative Team!

Free CraftsBy email every week

Latest crafts straight to your inbox!

All Time Favorites

Learn to make these adorable ladybug painted rocks. use special outdoor paint for this adorable garden craft so you can keep garden ladybugs all summer!

Ladybug Painted Rocks…

These colorful little ladybug painted rocks are the ... Go To project

snowy pinecone candle jar luminaries

Winter Luminaries: Snowy Pinecone…

Make pretty winter luminaries that appear to be covered ... Go To project

Make this wonderful deco mesh pumpkin wreath to hang on your door this fall!

Deco Mesh Pumpkin Wreath…

Adorn your door this fall with a pretty deco mesh ... Go To project

Reuse those empty prescription pill bottles in all sorts of ways. From organizing to making cookies. Yes, cookies! See how to use your empty pill bottles!

20 Uses for Prescription Pill…

You've been collecting prescription pill bottles for ... Go To project

Meet the Family

Amanda

Founder and Designer

Kristen

Editorial Manager

Lindsay

Social Media Manager

As seen on:

Footer

Favorites

  • Jar Photo Frames
  • No-Sew Roman Shade
  • Paper Flowers
  • How to Make a Scrunchie
  • Mermaid Slime

About

  • Home
  • Meet the Creative Team
  • Work with Us
  • Privacy Policy
  • Accessibility
  • Contact Us

Images/text copyright Amanda Formaro 2020. To feature a post from Crafts by Amanda, you may use one photo credited and linked back directly to the project post.

Free CraftsBy email every week

Latest crafts straight to your inbox!

Copyright ©2025, Crafts by Amanda. All Rights Reserved.
Design by Pixel Me Designs

Rate This Tutorial

Your vote:


To share a photo with your comment click here!

A rating is required
A name is required
An email is required

Recipe Ratings without Comment

Something went wrong. Please try again.