
You ever have those days where an idea just pops into your head? Jut out of nowhere? That’s what happened with this Christmas tree craft! I was actually thinking about making some coffee filter angels with these natural coffee filters. That got me thinking about how you use the filter as a dress, and the ruffled look got me thinking about trees, and bam! There was the idea. Love that. :)
I have an entire box of these brown coffee filters, better known as natural coffee filters. I bought them when the store was out of Bunn filters. Regular filters just don’t cut it for a Bunn though, they just aren’t tall enough. I knew I could use them up sometime, so into the craft supplies they went.
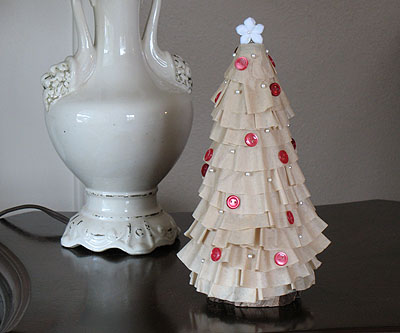
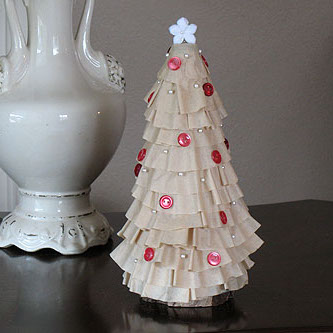
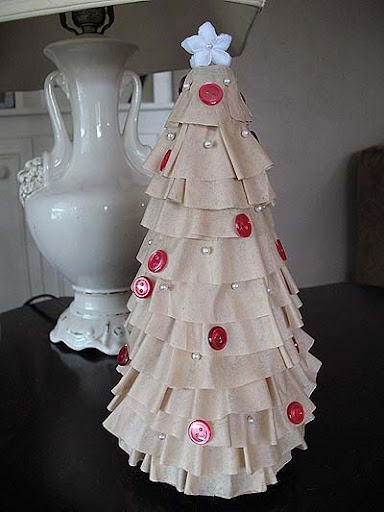
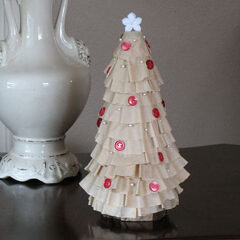
I love the vintage look the natural coffee filters give to this tree. You could use old vintage buttons, but I chose red to add a bit of color. I had a couple of white flowers left over from another project, and used white round topped stick pins to use as ornaments as well. For the base, I used a round slice of wood I had left over from the rustic north woods ornaments I made last year.
Want to make one of these trees? You could even use white filters for a pretty white tree, or paint the filters with green water color paints for a green tree. If you paint the filters, they may lose some of their ruffle, so be prepared for that.
Coffee Filter Christmas Tree
designed by Amanda Formaro
You will need
foam cone
regular stick pins
9-10 natural coffee filters
white round topped stick pins
red buttons
2 white flowers glued back to back
scissors
hot glue gun
something flat for the base (optional but adds a little weight)
What you do
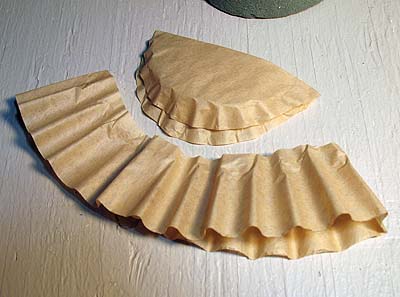
First, fold a few coffee filters in half and cut the center circle out.
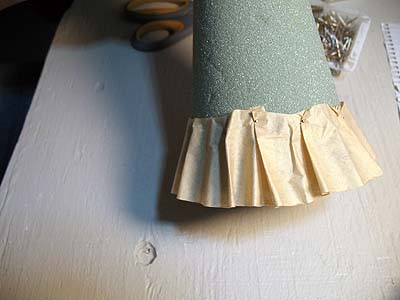
Open a filter and place it over the top of the foam cone, like a ring, and bring it all the way down to the base of the cone. Use the stick pins to tack the filter to the cone, pushing the pins in at the top of the filter, not down by the ruffles.
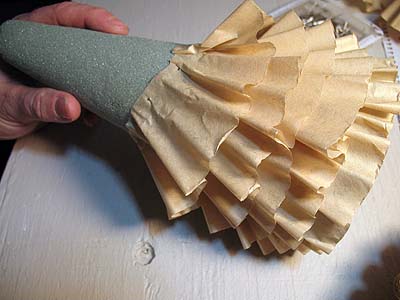
Repeat this step, working your way up the cone.
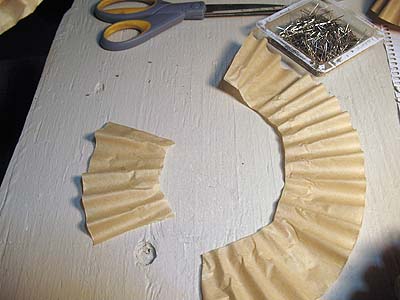
When you get about half way up the cone you will need to trim a little off the filter ring. Since the cone will naturally get smaller toward the top, you will need less and less filter as you work upward. Just trim off what you don’t need, but set those pieces aside and use them at the top of the tree.
Use one of the center circles that you cut out of the filters to cover the top of the cone, securing with stick pins.
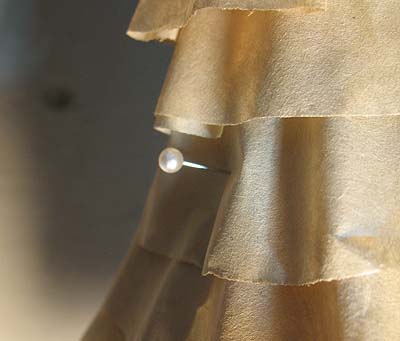
To decorate the tree, push round topped pins into the tree in various places, but don’t push the pin all the way in. This will allow the ruffles to look more natural. If you push the pin in all the way it will flatten the ruffles against the cone. So push the pin in halfway or three quarters of the way, then gently pull the filter toward you to hide the pin section.
Use hot glue to add buttons. I glued the two flowers together, back to back, so that either side of the tree had a flower face. Glue that to the top of the tree. Then just glue it to your base (I used a round slice of wood).
:)
Coffee Filter Christmas Tree
Supplies
- foam cone
- regular stick pins
- 9-10 natural coffee filters
- white round topped stick pins
- red buttons
- 2 white flowers glued back to back
- scissors
- hot glue gun
- something flat for the base optional but adds a little weight
Instructions
- First, fold a few coffee filters in half and cut the center circle out.
- Open a filter and place it over the top of the foam cone, like a ring, and bring it all the way down to the base of the cone. Use the stick pins to tack the filter to the cone, pushing the pins in at the top of the filter, not down by the ruffles.
- Repeat this step, working your way up the cone.
- When you get about half way up the cone you will need to trim a little off the filter ring. Since the cone will naturally get smaller toward the top, you will need less and less filter as you work upward. Just trim off what you don't need, but set those pieces aside and use them at the top of the tree.
- Use one of the center circles that you cut out of the filters to cover the top of the cone, securing with stick pins.
- To decorate the tree, push round topped pins into the tree in various places, but don't push the pin all the way in. This will allow the ruffles to look more natural. If you push the pin in all the way it will flatten the ruffles against the cone. So push the pin in halfway or three quarters of the way, then gently pull the filter toward you to hide the pin section.
- Use hot glue to add buttons. I glued the two flowers together, back to back, so that either side of the tree had a flower face. Glue that to the top of the tree. Then just glue it to your base (I used a round slice of wood).
![]()

- A Watering Can That Pours Crystals - May 12, 2026
- How to Make Lavender Soap - April 28, 2026
- Plastic Spoon Bugs on a Branch - April 24, 2026


Sheryl says
Dang it! I used about 30 white filters for a project a few weeks ago. Using only the centers, I was left with the nicest ruffles. For the life of me, I couldn’t imagine what to do with them so, in a moment of weakness, I tossed them in the trash. Yeah… I don’t know what I was thinking since crafters seldom throw ANYTHING away. Lesson learned! These are so cute I may just have a go at them anyway.
Kristy says
I use the brown filters all the time. I then dump the grounds out and rinse them off and allow them to dry. Then I can use them for crafts.
Martha Lofton says
I will put this on my list for next year. thanks for the idea.
Martha Lofton
Amanda Formaro says
Thanks Martha, hope you enjoy it!
Charlotte from AZ says
Very cute idea! Thanks for the awesome tutorial!
Amanda Formaro says
Thanks Charlotte!
Barbara Johnson says
I love this idea and would love to print out instructions. Is there a print option I did not see? I have a lot of spools that are cone shaped that yarn came on. I may try to use one of them May be hard to stick pins thru.
Amanda Formaro says
Hi Barbara! If you go back to the post you will see a link that says “printable version” just above the list of supplies. Enjoy!
Carrie says
I wonder what these would look like with dyed filters like green for xmas? Or even like pink for a little girl?
Coleen Tepper says
These are absolutely adorable. They don’t look like filters, they look more like a fabric, love the ruffly look, too cute. I’m definitely making these. Keep up the good work, always looking for a new craft to do.
admin says
Thank you Coleen, so nice of you to say! :)
Jean Breedlove says
These are simply adorable! I was searching for a project that some of our Senior Adults might be able to handle, and this is it! I can hardly wait to begin the project. So many possibilities with this one.
Lorraine says
I love that tree you created using coffee filters. How clever and so very pretty. I might get up the nerve to try this. Thanks so much for sharing! ~ lorraine ~
LeAnn says
I love, love, love this idea. I am thinking about using the different colored pearl push pins for a little more color.
Now tell me how to use the other type of coffee filters – the cone shaped ones. I bought some but they didnt’t fit. I know there has to be a way to “recycle” them
Amanda Formaro says
Oh there have to be tons of ways to use those! For Christmas my first thought is with kids, glue an open cone filter on top of a toilet tube. Then use water color paints to add color and make Christmas trees!
Amanda says
Yours came out beautiful Mamma! Thank you for sharing that!
MammaPaola says
It's fabulous! I love it! I've made one too, you can find it here (sorry, but it's an italian blog):
http://lecreazionidaimillecoloridimammapaola.blogspot.com/2010/12/decorazioni-natalizie-07-albero-di.html
Thanks a lot and Merry Christmas!
Amanda says
dnicolle – I just love how the white one looks, so classy! And the darker one for your sister is gorgeous too! Thanks so much for the shout out, so glad you liked the project. Merry Christmas! :)
Renee thank you so much, and thanks everyone!!
dnicolle says
Amanda, I love your tree, and was inspired to try it myself. Check out my version at http://www.lifeisaparty.ca Thanks for sharing the great idea!
Dannyelle
Renee @ where the grass is greener says
So funny, I saw this on another blog and wanted to click, but forgot and I looked and looked and then it appeared on Transformation Thursday! So, happy because I definitely want to do this … lots of unused brown filters.
Mod Podge Amy says
This is awesome!
maggy, red ted art says
Oh wow, very festive and pretty. To think you made those out of coffee filters!!
Thank you for linking up to Kids Get Crafty!
Maggy
Throw Open the Windows says
So cute!! Thanks for sharing your inspiration and a tutorial. Visiting from The CSI Project. Rebecca
Julie B says
This is a VERY cute project. I think I've got some old coffee filters around some place. . . .
Erin says
How pretty!! I would have never guessed that was made with coffee filters. :)
Kim says
This is one of the prettiest trees I've seen with coffee filters and no messing hot glue. Very nice.
Shauna {SK Studios} says
saw you on The CSI Project… oh my goodness, i HAVE to try this now!!! such a creative idea- i love it!!! the stick pins and buttons just make the whole tree too :) thanks for the inspiration :D
Corinna says
absolutely freaking adorable! :)
Heather - Dollarstorecrafts.com says
This is so cute, Amanda!! Love it!
Jana says
Turned out so cute!!
Come link up at Giggles, Glitz & Glam!
http://gigglesglitzandglam.blogspot.com/2010/12/glam-party-5.html
Michelle @Shellsshabbyshack says
I love the ruffled look! Such a cute twist on the coffee filter tree! I made one, too, but I'm going to give this a try. Love it! I'm addicted to making wreaths and trees w/ coffee filters.
Happy Holidays!
Michelle
Carmie of the Single Nester says
This looks so sweet and rustic and lovely!
Kimberlee says
That came out soooo cute! I love how you used the pins, and they are decoration too.
~Kimberlee
http://www.TheSpunkyDiva.com
jndmann87 says
oh these are so cute… until i read what you used I thought it was made with painters drop cloth. Love 'em.
Stephanie says
What a fun and cute idea! And half the work is already done for you with the coffee filters being ruffled. Thanks for sharing this wonderful tutorial.
Lana @ Never Enough Thyme says
Who could have ever thought of this but you, Amanda! So clever!!
TidyMom says
So adorable!!
thanks for linking up!!…..I featured you in the wrap up! http://tidymom.net/2010/im-lovin-it-wrap-up-12-4-10/
Tami says
Amanda, That is such a pretty tree. I love it. That would make great teacher's gift, too. ;)
Jaimee says
This is SO cute!!! Thanks for posting this tutorial. I'm bookmarking it!
Its So Very Cheri says
THAT is adorable.
cheri
Ali Richardson says
I am IN LOVE with this!! It is SO pretty!!
Liz says
I'm loving coffee filters lately, so this is great!
Alison says
GENIUS!! I love the natural ruffled look. I've seen so many styrofoam trees out there, but this has got to be one of my fav's!
raggygirlvintage says
Such a neat idea, love the ruffles!
Tracey
Beverly @ FlamingoToes.com says
Amanda this is so cute!! I love it – and the pins and little buttuns look just adorable. :)
Amy @ Increasingly Domestic says
It looks like fabric! Gorgeous:)
Melissa says
Oh, these are cute…I know my girls would enjoy making these (along with the twenty-million other things on my list).
I really like the natural look of them.
Audrey says
A very easy and inexpensive way to decorate.The tree is very pretty.
Amanda Formaro says
Thanks Audrey!
Jen @ tatertotsandjello.com says
Adorable, adorable!!! I shared it on my TT&J FB page and linked to you. LOVE it!
xox
Jen
Lisa's Creative Home says
Very Cute little Christmas Tree! GReat idea!
Erin @ The Little Apartment says
What a great idea! (: It's so simple and it looks easy.
rachel sparling says
would like to try with people at my moms nursing home. u can also dip coffee filters in food coloring looks like tie dye. Would be great with this!
Amanda Formaro says
That would be fun!