• Home
  • About
    • About Crafts by Amanda
    • Visit Our Recipe Site
  • Work With Us
  • Join
    • Free Newsletters
    • Join our Facebook craft group
↑
  • Tutorials
    • Tutorial Index
    • Adult Crafts
    • Crafts for Kids
    • Crafts for Seniors
    • Recycled Crafts
    • Seasonal Crafts
    • Holiday Crafts
    • Free Printables
    • Craft Collections
  • Adult Crafts
    • Bath & Body
    • Beach Crafts
    • Clay Pot Crafts
    • Crafts for Seniors
    • Decoupage Crafts for Adults
    • DIY Gift ideas
    • Garden Crafts
    • Home Decor Projects
    • Kitchen Crafts
    • Light Bulb Crafts
    • Luminary Crafts
    • Mason Jar Crafts
    • Needlework
    • Photo Display Ideas
    • Recycled Crafts for Adults
    • Wearable Crafts for Adults
  • Crafts for Kids
    • Animal Crafts for Kids
    • Back to School Crafts
    • Beach Crafts for Kids
    • Camp Crafts
    • Cardboard Tube Crafts for Kids
    • Decoupage Crafts for Kids
    • Easy Crafts for Kids
    • Nature Crafts for Kids
    • Other Kid’s Crafts
    • Paper Plate Crafts for Kids
    • Recycled Crafts for Kids
    • Slimes, Doughs, & Clay
    • Wearable Crafts for Kids
  • Holiday Crafts
    • 4th of July Crafts
    • Christmas Crafts
    • DIY Gift ideas
    • Earth Day Crafts
    • Easter Crafts
    • Father’s Day Crafts
    • Halloween Crafts
    • Memorial Day Crafts
    • Mother’s Day Crafts
    • New Year’s
    • Other Holidays
    • Patriot Day Crafts
    • St. Patrick’s Day Crafts
    • Thanksgiving Crafts
    • Valentine’s Day Crafts
  • Seasonal Crafts
    • Winter Crafts
    • Spring Crafts
    • Summer Crafts
    • Fall Crafts
  • Skip to primary navigation
  • Skip to main content
  • Skip to primary sidebar
  • Skip to footer

Crafts by Amanda

crafts for adults and kid's crafts

  • Tutorials
    • Tutorial Index
    • Adult Crafts
    • Crafts for Kids
    • Crafts for Seniors
    • Recycled Crafts
    • Seasonal Crafts
    • Holiday Crafts
    • Free Printables
    • Craft Collections
  • Adult Crafts
    • Bath & Body
    • Beach Crafts
    • Clay Pot Crafts
    • Crafts for Seniors
    • Decoupage Crafts for Adults
    • DIY Gift ideas
    • Garden Crafts
    • Home Decor Projects
    • Kitchen Crafts
    • Light Bulb Crafts
    • Luminary Crafts
    • Mason Jar Crafts
    • Needlework
    • Photo Display Ideas
    • Recycled Crafts for Adults
    • Wearable Crafts for Adults
  • Crafts for Kids
    • Animal Crafts for Kids
    • Back to School Crafts
    • Beach Crafts for Kids
    • Camp Crafts
    • Cardboard Tube Crafts for Kids
    • Decoupage Crafts for Kids
    • Easy Crafts for Kids
    • Nature Crafts for Kids
    • Other Kid’s Crafts
    • Paper Plate Crafts for Kids
    • Recycled Crafts for Kids
    • Slimes, Doughs, & Clay
    • Wearable Crafts for Kids
  • Holiday Crafts
    • 4th of July Crafts
    • Christmas Crafts
    • DIY Gift ideas
    • Earth Day Crafts
    • Easter Crafts
    • Father’s Day Crafts
    • Halloween Crafts
    • Memorial Day Crafts
    • Mother’s Day Crafts
    • New Year’s
    • Other Holidays
    • Patriot Day Crafts
    • St. Patrick’s Day Crafts
    • Thanksgiving Crafts
    • Valentine’s Day Crafts
  • Seasonal Crafts
    • Winter Crafts
    • Spring Crafts
    • Summer Crafts
    • Fall Crafts
Craft Tutorials | Adult Crafts | Home Decor Projects | Doily Wreath
Home Decor Projects

Doily Wreath

Author by Aimee Page on April 15, 2019 Updated on February 16, 2023

5 from 4 votes
Come learn how to make a simple doily wreath. Customize this paper wreath with different bows or decorations, and watch your wreath last all year long.
Jump to Project
Learn how to make a simple doily wreath. Customize this paper wreath with different bows or decorations, and watch your wreath last all year long. #doilycraft #doilies #easycrafts #diywreath #wreath #adultcrafts #homedecor #diyhomedecor #doily #craftsforseniors
4182 shares
  • Share
  • Tweet
  • Flipboard
  • Email

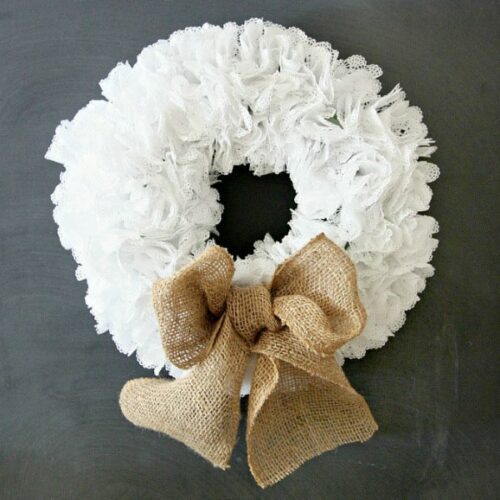
Come learn how to make a simple doily wreath. Doilies make great craft supplies. They allow tons of versatility within the craft world. Customize this paper wreath with different bows or decorations, and enjoy your wreath all year long.

They even add a touch of romance like in these Doily Luminaries.

Beautiful wreath made out of doilies


Doily Wreath

Changing out my seasonal decor is one of my favorite things, especially wreaths – like these DIY Dollar Store Wreaths for Every Season. But then you have to put everything away and store it all. My favorite activity quickly becomes my least favorite activity.

That’s why multi-functional seasonal projects make me so happy. You only have to store one item, but you get to enjoy it through multiple holidays or seasons. This doily wreath is the perfect base for changing out your seasonal decorating. You could do something as easy as change out the bow and instantly have decor for the next season.

Do you need a double-duty decor project for this fall? Try these Halloween to Thanksgiving mini succulent planters.

Wreath made out of doilies with burlap bow

Supplies to make this doily wreath

  • Paper doilies – purchase them at the dollar store or order in bulk online
  • Foam wreath form
  • Pen or another pointed object
  • Hot glue gun and hot glue sticks
  • (optional) burlap bow and long pins

How many paper doilies do I need? Well, it depends on the size of your foam wreath form and how closely you space your doilies. For reference, I used about 150 paper doilies to cover a 9-inch round foam wreath form.


How to make a simple doily wreath

First, start by poking shallow holes in the foam wreath form, evenly spaced about an inch apart, all the way around.

Next, fold your paper doilies into eighths, and pinch the folded point.

scrunching your doilies

Working in batches of 4-5 doilies, begin adding hot glue to the holes in the wreath form. Use a pen or other pointed object to push one folded doily into the wreath form. Repeat this process until wreath is covered.

Hot gluing doilies to wreath form

Tip – I used a retractable pen that was “unclicked.” I folded the doily around the pen and then used the pen to push the doily into the foam. Once I got going, the process actually went pretty quickly.

Finally, go back and fill in any gaps or holes that may remain.

Tie burlap into a bow. Add the bow to the wreath and secure with long pins.

How to make a doily wreath 3

I opted to add a burlap bow to my wreath. You could easily add any color or style of bow, depending on the season and your decor. If you swap out bows or add different styles of decorations, this wreath will last through the seasons and holidays all year long!

wreath made from doilies with burlap bow

Enjoy your doily wreath all year long! Want more awesome ways to use doilies? Check out this boho-chic doily dreamcatcher! Or for a fun kid-friendly craft using doilies, hop over and see these adorable paper doily butterflies.

For fall, don’t miss our burlap pumpkin wreath!

More Wreath Projects

  • Tulip Wreath
  • Burlap Wreath
  • Halloween Ribbon Wreath
  • Deco Mesh Pumpkin Wreath
  • How to Make A Forsythia Wreath
Learn how to make a simple doily wreath. Customize this paper wreath with different bows or decorations, and watch your wreath last all year long. #doilycraft #doilies #easycrafts #diywreath #wreath #adultcrafts #homedecor #diyhomedecor #doily #craftsforseniors
Print Project
5 from 4 votes

Doily Wreath

Come learn how to make a simple doily wreath. Customize this paper wreath with different bows or decorations, and watch your wreath last all year long.
Author: Amanda Formaro

Supplies

  • Paper doilies
  • Foam wreath form
  • Pen or other pointed object
  • Hot glue gun and hot glue sticks
  • optional burlap bow and long pins

Instructions

  • Start by poking shallow holes in the foam wreath form, evenly spaced about an inch apart, all the way around.
  • Fold your paper doilies into eighths, pinching the folded point.
  • Working in batches of 4-5 doilies, begin adding hot glue to the holes in the wreath form. Use a pen or other pointed object to push one folded doily into the wreath form. Repeat this process until wreath is covered.
  • Go back and fill in any gaps or holes that may remain.
  • Tie burlap into a bow. Add the bow to the wreath and secure with long pins.

This post was originally published on this blog on Sept 22, 2017.

doily wreath pin image

  • Author
  • Recent Posts
Aimee Page
Aimee Page
Blogger at The Crazy Craft Lady
Aimee is a twin mom, lawyer, and creativity junkie.She is dedicated to helping busy women and their families live more creative and inspired lives by sharing simple crafts, decor, recipes, and organizing solutions on her blog, The Crazy Craft Lady.
Aimee Page
Latest posts by Aimee Page (see all)
  • Black Cat Pumpkins - October 15, 2024
  • Lavender Sugar Scrub - April 23, 2024
  • Decoupage Wood Slice Ornaments - November 11, 2022
4182 shares
  • Share
  • Tweet
  • Flipboard
  • Email

Filed Under: Crafts for Seniors, Home Decor Projects Tagged With: adult crafts, diy wreath, doily, home decor, wreath

Reader Interactions

Free CraftsBy email every week

Latest crafts straight to your inbox!

Comments

  1. linda says

    January 18, 2023 at 12:19 pm

    I love this project and am using it for a craft at our Library. I just found the instructions for putting in the doilies was confusing. When it said working in batches of 4-5 doilies, I thought it meant to put that many in each hole. It took me a few read throughs to figure out it was 1 doily at a time… I would have been using an amazing number of doilies!

    Maybe I’m the only one having this confusion, but maybe just state that it’s one at a time.

    Reply
    • Amanda Formaro says

      February 16, 2023 at 3:14 pm

      Sorry for the confusion. I have updated the instructions.

      Reply
  2. Vicki says

    March 9, 2022 at 6:28 am

    Love it! Would be great for weddings!

    Reply
  3. Brenda says

    July 4, 2019 at 7:46 am

    What size of dollies for the wreath and about how many did you use?

    Reply
    • Amanda Formaro says

      July 10, 2019 at 7:25 am

      Roughly 5-6 inches – the number that you use depends on your wreath form and how fluffy you make it. I always buy more than I think I need and just return the extra unopened packages.

      Reply
5 from 4 votes (3 ratings without comment)

Leave a Reply Cancel reply

Your email address will not be published. Required fields are marked *

Rate This Project


The maximum upload file size: 640 MB. You can upload: image, video. Links to YouTube, Facebook, Twitter and other services inserted in the comment text will be automatically embedded. Drop files here

Primary Sidebar

Hi! I’m Amanda and I’m the founder and head designer of Crafts by Amanda. I have spent over 25 years creating projects to share, but it’s not just me anymore! It’s turned into a complete family affair. Come and meet the Creative Team!

Free CraftsBy email every week

Latest crafts straight to your inbox!

All Time Favorites

snowy pinecone candle jar luminaries

Winter Luminaries: Snowy Pinecone…

Make pretty winter luminaries that appear to be covered ... Go To project

Make this wonderful deco mesh pumpkin wreath to hang on your door this fall!

Deco Mesh Pumpkin Wreath…

Adorn your door this fall with a pretty deco mesh ... Go To project

Learn to make these adorable ladybug painted rocks. use special outdoor paint for this adorable garden craft so you can keep garden ladybugs all summer!

Ladybug Painted Rocks…

I'm going to show you how to make these adorable ... Go To project

Reuse those empty prescription pill bottles in all sorts of ways. From organizing to making cookies. Yes, cookies! See how to use your empty pill bottles!

20 Uses for Prescription Pill…

You've been collecting prescription pill bottles for ... Go To project

Meet the Family

Amanda

Founder and Designer

Kristen

Editorial Manager

Lindsay

Social Media Manager

As seen on:

Footer

Favorites

  • Jar Photo Frames
  • No-Sew Roman Shade
  • Paper Flowers
  • How to Make a Scrunchie
  • Mermaid Slime

About

  • Home
  • Meet the Creative Team
  • Work with Us
  • Privacy Policy
  • Accessibility
  • Contact Us

Images/text copyright Amanda Formaro 2020. To feature a post from Crafts by Amanda, you may use one photo credited and linked back directly to the project post.

Free CraftsBy email every week

Latest crafts straight to your inbox!

Copyright ©2025, Crafts by Amanda. All Rights Reserved.
Design by Pixel Me Designs

Rate This Tutorial

Your vote:


To share a photo with your comment click here!

A rating is required
A name is required
An email is required

Recipe Ratings without Comment

Something went wrong. Please try again.