
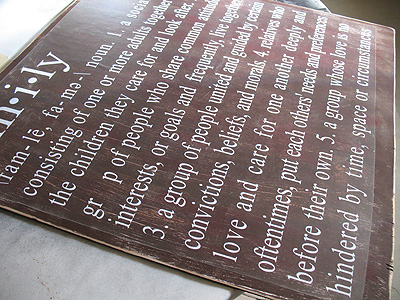
I had a space to fill on my living room wall, a piece of plywood, some paint and a cool piece of vinyl I bought with the definition of family on it. Because the other things hanging on that wall are dark brown, I decided to distress the wood with some dark brown and burgundy red. This makes a great addition to the wall and the definition of family fits perfectly in the room we spend so much time in.

I’ve had this piece of plywood lying around for quite a while now. We originally were going to use it to fix a mess under the kitchen sink, but ended up needing a thicker, sturdier piece for the job. That meant that this piece sat and sat until inspiration struck me.
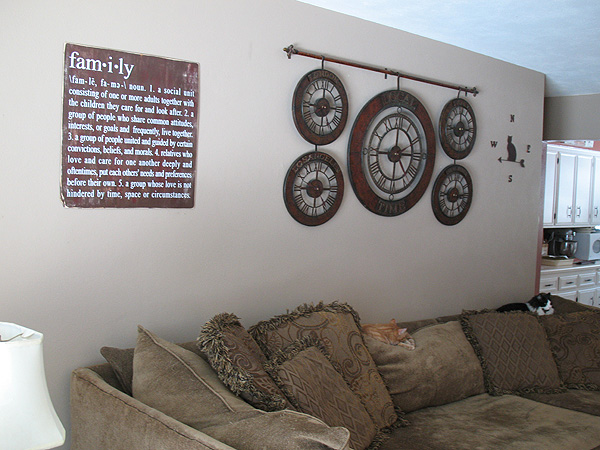
As you can see, the wall also holds my time zone clock and the rusty wall hanging I repurposed from my broken weathervane.
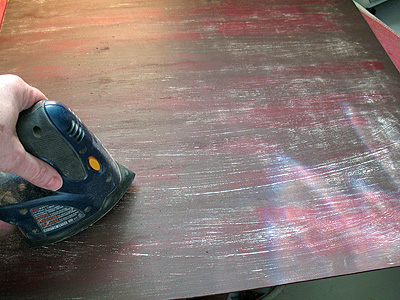
As I show you how to distress a piece of wood I will be using a power sander. Mine is a Ryobi sander![]() . While you don’t have to use power tools, this can most certainly be done by hand, but my belief is that every woman crafter should have a sander in her craft room. :) This speeds up the process and makes things so much easier. Sometimes I use masking tape as part of the distressing process, though I didn’t in this particular case. You can see that technique used on my Distressed Eat Sign.
. While you don’t have to use power tools, this can most certainly be done by hand, but my belief is that every woman crafter should have a sander in her craft room. :) This speeds up the process and makes things so much easier. Sometimes I use masking tape as part of the distressing process, though I didn’t in this particular case. You can see that technique used on my Distressed Eat Sign.

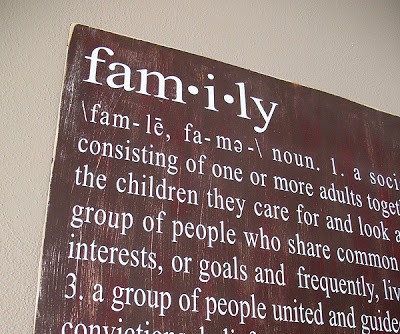
I bought the “family definition” vinyl from the online shop Sayitonthewall.com. It measures a hefty 24″ x 24″.
First I laid out the vinyl sheet onto the board to see if the plywood needed a trim.
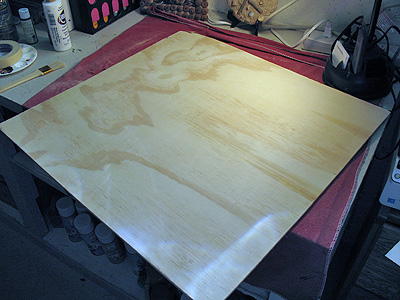
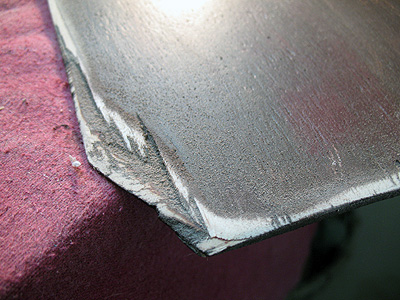
I used my Ryobi hand saw![]() to trim off the excess plywood, then I sanded both sides and all of the edges until smooth.
to trim off the excess plywood, then I sanded both sides and all of the edges until smooth.

Using white acrylic paint I used a large brush and back and forth strokes to add a coat. Just slap it on, it doesn’t have to be pretty.
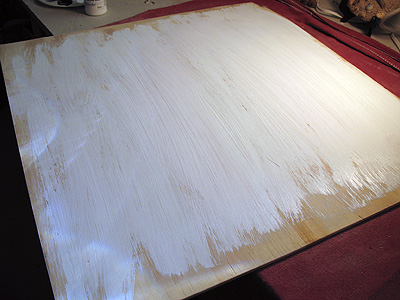
I don’t paint the entire board completely because when I’m all finished I want some areas to show bare wood, some to show bare and white, and some just white. Let the white dry completely.


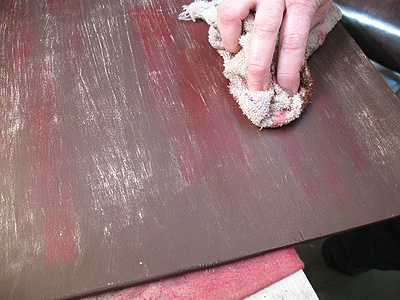
The harder you rub the more will come off, so you have the ability to change the aged look as you go. Work in small sections at a time.

Let the antiquing gel settle and dry a little bit, about 15-20 minutes.
Using the sander again, rough up anywhere you see fit, but especially on the edges. If you have any areas that the splintered like mine, be sure to smooth those out to avoid splinters in your hands or fingers. Dust the whole thing off to remove any loose particles left over from sanding.
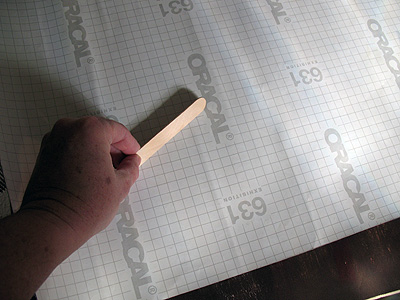
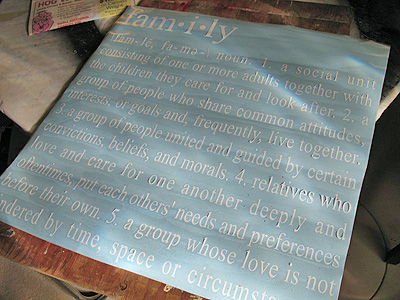
When using a large piece of vinyl like this one I highly recommend having someone help you. It can be difficult to hold one end of the vinyl still while peeling the other. Prepare your vinyl by rubbing a straight edged item (credit card, jumbo craft stick, etc) all over the transfer paper backing.

Carefully peel back the transfer paper a little at a time, watching to see if any letters come up with the paper. If that happens simply rub that area with your straight edge and continue until the transfer paper has been removed.
Position the vinyl on your sign board, again with the help of a friend if possible. You’ll want to hover it over the board until you are ready to set it down as it may stick once set in place. If any letters came off during the peeling process, just carefully set them aside and add them last (see the word “group” fourth line down from the top?). Use your straight edge to rub the vinyl letters onto your board, rolling the backing back off as you go until all the letters are stuck to the board.
When you are all finished, give the entire project 2-3 coats with a clear acrylic sealer in matte finish. I attached a very simple hanger to the back using a piece of twine, some scrap cardboard and some Gorilla Glue super glue.

Hang!
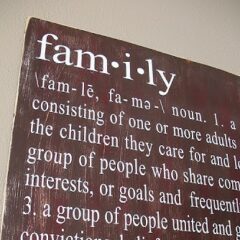
Distressed Family Definition Sign
Supplies
- Plywood
- “Family Definition” vinyl
- Ryobi Sander
- Antiquing Gel
- Rag
- Straight-Edged Item
- Clear Acrylic Sealer in Matte Finish
- Gorilla Glue
- Twine
- Scrap Cardboard
Paint
- White Acrylic
- Dark Brown
- Dark Burgundy Red
Instructions
- First I laid out the vinyl sheet onto the board to see if the plywood needed a trim.
- I used my Ryobi hand saw to trim off the excess plywood, then I sanded both sides and all of the edges until smooth.
- Using white acrylic paint I used a large brush and back and forth strokes to add a coat. Just slap it on, it doesn’t have to be pretty.
- I don’t paint the entire board completely because when I’m all finished I want some areas to show bare wood, some to show bare and white, and some just white. Let the white dry completely.
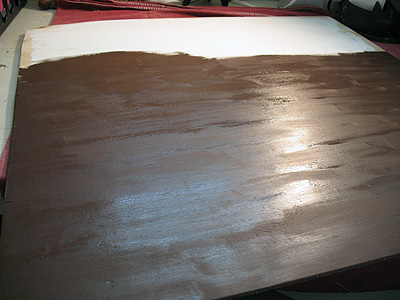
- When the white paint has dried (make sure it’s dry!), paint over it with dark brown.
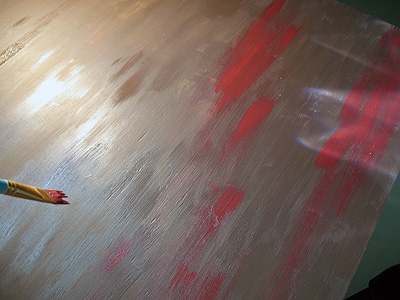
- For the secondary top coat I used a dark burgundy red. You don’t want your paintbrush to be really wet. Dip the brush in the red then dab off some of the excess.
- Brush the red on lightly in random areas, keeping it in the same direction as the brown brushstrokes.
- This needs to dry completely, so go check your email or do a load of laundry.
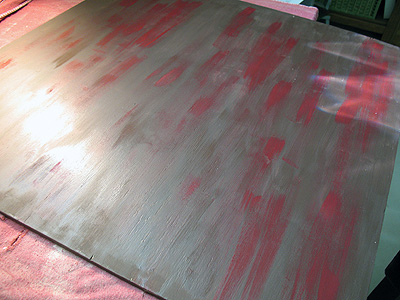
- Using my handy dandy Ryobi sander and a medium grit sandpaper, using a light hand sand the surface, going with the grain of the brushstrokes. You’ll want to sand off the color in some areas down to the white, and in other areas just lightly. There’s no perfect science to it, just sand until you’re happy with it.
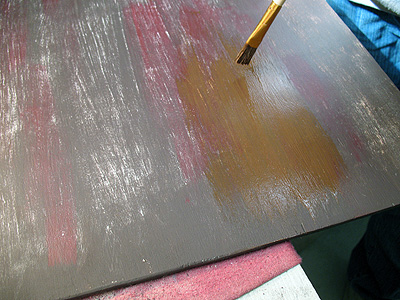
- Next use antiquing gel over the top, especially where the white shows through, to tone it down and give it an aged look. Apply the gel with a paintbrush and wipe it off with a dry rag.
- The harder you rub the more will come off, so you have the ability to change the aged look as you go. Work in small sections at a time.
- Let the antiquing gel settle and dry a little bit, about 15-20 minutes.
- Using the sander again, rough up anywhere you see fit, but especially on the edges. If you have any areas that the splintered like mine, be sure to smooth those out to avoid splinters in your hands or fingers. Dust the whole thing off to remove any loose particles left over from sanding.
- When using a large piece of vinyl like this one I highly recommend having someone help you. It can be difficult to hold one end of the vinyl still while peeling the other. Prepare your vinyl by rubbing a straight edged item (credit card, jumbo craft stick, etc) all over the transfer paper backing.
- Carefully peel back the transfer paper a little at a time, watching to see if any letters come up with the paper. If that happens simply rub that area with your straight edge and continue until the transfer paper has been removed.
- Position the vinyl on your sign board, again with the help of a friend if possible. You’ll want to hover it over the board until you are ready to set it down as it may stick once set in place. If any letters came off during the peeling process, just carefully set them aside and add them last. Use your straight edge to rub the vinyl letters onto your board, rolling the backing back off as you go until all the letters are stuck to the board.
- When you are all finished, give the entire project 2-3 coats with a clear acrylic sealer in matte finish. I attached a very simple hanger to the back using a piece of twine, some scrap cardboard and some Gorilla Glue super glue.
- Hang!

Did you enjoy this post? Why not subscribe to my feed, or better yet, to my free newsletter – Foodie in the Craftroom, which provides not only crafts but recipes from my other blog, Amanda’s Cookin’ as well!
- DIY Mosquito Repellent Candles - July 10, 2026
- Mason Jar Solar Lights - July 3, 2026
- Patriotic Pinwheels - June 23, 2026


Seth says
I always wanted to try this. Great tutorial and I also like the pics; they've given me some ideas.
Amanda says
Hi Anon :) The vinyl piece itself measures 24"x24", therefore the plywood is only slightly bigger, enough to leave a border that's less than an inch wide. However, that's completely up to you and how you want your final product to look. I cut my plywood to fit what I wanted, so I didn't measure it. If you wanted to have one cut for you, I would estimate 26" square to be safe, or even larger. This is a standard sheet of plywood, 1/8".
Anonymous says
You don't give the size of the chip board, 24 x 24 x ? It would be helpful to know what depth you used.
【ツ】 ⒶⓃⓃⒺ 【ツ】 says
I love how you distressed your sign…looks so aged!!! Fantastic job!!!
moneysavingenthusiast says
I am blown away. I love the family sign too. You make this seem like a manageable project. It looks so unique and profe$$ional.
Lillian Pearl Designs says
Great tutorial and idea! I've been considering something similar for my home and this is just what I wanted! Thanks for the inspiration and tutorial!
Megan says
Very nice job. That would look great in my hallway! :)
MJ @ MD School Mrs says
Great idea! We live in an apartment right now with (gag me) textured walls. I love vinyls but couldn't apply them due to the texture….now using this I totally can! Thanks so much!
Cajun Chef Ryan says
Amanda,
I really like this piece! You should start making them and selling en mass!
radn says
Love the tutorial!
I am having a giveaway on my blog. $35 credit + free shipping from Paige Holliday designs to get any one custom designed trendy backpack.
All you have to do is leave a comment.
http://houseonashwelllane.blogspot.com/2011/03/35-store-credit-free-shipping-to-get.html
Kristen @ ladybug-blessings.com says
this looks amazing!! I definitely want to do this! would love if you ever have a chance to come link up to handmade tuesdays @ ladybug blessings. http://www.ladybug-blessings.com
Deals and Dishes says
That is so cute! I would like to invite you to link up with me at Deals and Dishes Link Up Lounge! Each day a new link up is offered (every Wednesday is for DIY / Craft Project and every Thursday is for Recipes)! I am now a follower!
Tami says
Love the whole look on your wall! The vinyl saying is super cool and I love what you've done with it.
Arlene @At Home with the Grimms says
Thanks for sharing all your crafts with us bloggers!! My little granddaughter and I are busy painting toilet paper rolls and paper towel rolls to make Easter bunnies for our Easter Table. We are making 12…one for each person in the family. We are having a really good time and making a memory!!
Amanda says
Thanks you guys!
[email protected] says
great tute amanda! This looks so much better on a distressed board. It just looks perfect!
great job girl!
gail
Avanika [YumsiliciousBakes] says
I'm not really into crafts, but this is awesome. Love it :)
Katrina says
Likey!
Jennifer says
That looks amazing. Can you make me one?
Beverly @ FlamingoToes.com says
That is so cool Amanda!! I love the tutorial for the distressing and for the vinyl. So helpful! Thanks!!
Tasty Eats At Home says
Amanda, this looks EXCELLENT. Can you come decorate my house?
≼mE aNd mY tℎrIfTy IdEaS≽ says
Awesome tutorial!! I absolutely love how it turned out! Your wall has me swooning. Love it!