• Home
  • About
    • About Crafts by Amanda
    • Visit Our Recipe Site
  • Work With Us
  • Join
    • Free Newsletters
    • Join our Facebook craft group
↑
  • Tutorials
    • Tutorial Index
    • Adult Crafts
    • Crafts for Kids
    • Crafts for Seniors
    • Recycled Crafts
    • Seasonal Crafts
    • Holiday Crafts
    • Free Printables
    • Craft Collections
  • Adult Crafts
    • Bath & Body
    • Beach Crafts
    • Clay Pot Crafts
    • Crafts for Seniors
    • Decoupage Crafts for Adults
    • DIY Gift ideas
    • Garden Crafts
    • Home Decor Projects
    • Kitchen Crafts
    • Light Bulb Crafts
    • Luminary Crafts
    • Mason Jar Crafts
    • Needlework
    • Photo Display Ideas
    • Recycled Crafts for Adults
    • Wearable Crafts for Adults
  • Crafts for Kids
    • Animal Crafts for Kids
    • Back to School Crafts
    • Beach Crafts for Kids
    • Camp Crafts
    • Cardboard Tube Crafts for Kids
    • Decoupage Crafts for Kids
    • Easy Crafts for Kids
    • Nature Crafts for Kids
    • Other Kid’s Crafts
    • Paper Plate Crafts for Kids
    • Recycled Crafts for Kids
    • Slimes, Doughs, & Clay
    • Wearable Crafts for Kids
  • Holiday Crafts
    • 4th of July Crafts
    • Christmas Crafts
    • DIY Gift ideas
    • Earth Day Crafts
    • Easter Crafts
    • Father’s Day Crafts
    • Halloween Crafts
    • Memorial Day Crafts
    • Mother’s Day Crafts
    • New Year’s
    • Other Holidays
    • Patriot Day Crafts
    • St. Patrick’s Day Crafts
    • Thanksgiving Crafts
    • Valentine’s Day Crafts
  • Seasonal Crafts
    • Winter Crafts
    • Spring Crafts
    • Summer Crafts
    • Fall Crafts
  • Skip to primary navigation
  • Skip to main content
  • Skip to primary sidebar
  • Skip to footer

Crafts by Amanda

crafts for adults and kid's crafts

  • Tutorials
    • Tutorial Index
    • Adult Crafts
    • Crafts for Kids
    • Crafts for Seniors
    • Recycled Crafts
    • Seasonal Crafts
    • Holiday Crafts
    • Free Printables
    • Craft Collections
  • Adult Crafts
    • Bath & Body
    • Beach Crafts
    • Clay Pot Crafts
    • Crafts for Seniors
    • Decoupage Crafts for Adults
    • DIY Gift ideas
    • Garden Crafts
    • Home Decor Projects
    • Kitchen Crafts
    • Light Bulb Crafts
    • Luminary Crafts
    • Mason Jar Crafts
    • Needlework
    • Photo Display Ideas
    • Recycled Crafts for Adults
    • Wearable Crafts for Adults
  • Crafts for Kids
    • Animal Crafts for Kids
    • Back to School Crafts
    • Beach Crafts for Kids
    • Camp Crafts
    • Cardboard Tube Crafts for Kids
    • Decoupage Crafts for Kids
    • Easy Crafts for Kids
    • Nature Crafts for Kids
    • Other Kid’s Crafts
    • Paper Plate Crafts for Kids
    • Recycled Crafts for Kids
    • Slimes, Doughs, & Clay
    • Wearable Crafts for Kids
  • Holiday Crafts
    • 4th of July Crafts
    • Christmas Crafts
    • DIY Gift ideas
    • Earth Day Crafts
    • Easter Crafts
    • Father’s Day Crafts
    • Halloween Crafts
    • Memorial Day Crafts
    • Mother’s Day Crafts
    • New Year’s
    • Other Holidays
    • Patriot Day Crafts
    • St. Patrick’s Day Crafts
    • Thanksgiving Crafts
    • Valentine’s Day Crafts
  • Seasonal Crafts
    • Winter Crafts
    • Spring Crafts
    • Summer Crafts
    • Fall Crafts
Craft Tutorials | Holiday Crafts | Halloween Crafts | Egg Monster

Egg Monster

Author by Amanda Davis on September 25, 2011 Updated on October 4, 2020

5 from 3 votes
Jump to Project
egg monster
46 shares
  • Share
  • Tweet
  • Flipboard
  • Email

egg monster


I’m a monster freak. I love how cute they are, and coming up with different faces, expressions and body shapes is all part of the fun. With Halloween right around the corner, my monster creativity is really in high gear, but monsters aren’t just for Halloween. Boys love monsters any time of year, so why not make one of these little cuties?

This particular project is one I made for Michael’s Craft Store though my DecoArt designer gig. DecoArt has this cool new product called MagiKote. It adds a layer on top of Styrofoam that allows you to sand and paint it without little flakes of Styrofoam flying everywhere. Genius!

MagiKote does require 2-3 hours dry time between coats, so make sure you plan for that if you decide to make this project.

I used a cardboard egg carton as a stand to hold the foam pieces.

After sanding the dry surface, you’ll be able paint the pieces…

After everything is dry you can assemble your monster. The great thing about MagiKote is while it does provide a solid surface to paint on, you can still easily poke a pin or toothpick through it. Have fun!
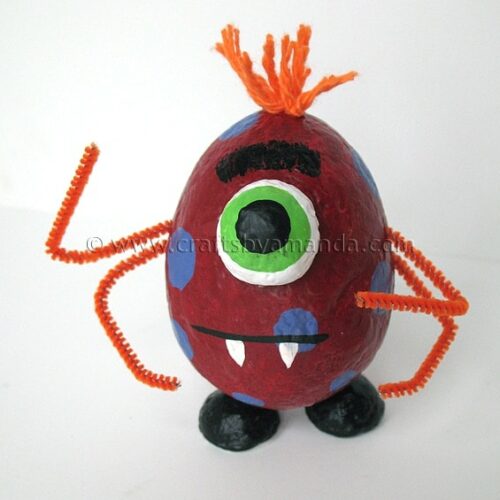
egg monster
Print Project
5 from 3 votes

Egg Monster

Author: Amanda Formaro

Supplies

Supplies:

  • Americana Sour Apple
  • Americana Cherry Red
  • Americana Purple Wave
  • Americana Black
  • Americana White
  • Duraclear Matte Varnish
  • Styrofoam egg 2 5/16” x 3 1/16”
  • 2 1- inch Styrofoam balls
  • 1 orange skinny chenille stem
  • 8 " length of orange yarn

Tools:

  • Flat paintbrush
  • Liner paintbrush
  • Empty egg carton for stand
  • 2 to othpicks
  • Scissors
  • White craft glue
  • Black marker

Instructions

  • Cut two 1-inch Styrofoam balls in half. Save one of the halves for another project, you will need three halves for your monster.
  • Paint the egg and all three ball-halves with Magikote. A total of three coats is ideal.
  • When completely dry, sand the Styrofoam pieces lightly to smooth out the Magikote. Dust off with a soft brush.
  • Paint the egg with two coats of Americana Cherry Red.
  • Paint two of the ball-halves with Americana Black.
  • Paint the third ball half with Americana White. When dry, use a flat paintbrush and Americana Sour Apple to paint a circle onto the white ball to create the iris. When dry, use the handle end of your paintbrush dipped in Americana Black to add the pupil.
  • Use the handle end of a paintbrush dipped in Americana Purple Wave to add polka dots to the red egg.
  • Use a flat paintbrush with Americana White to add the fangs and a liner with Americana Black to add the mouth.
  • Use a black marker to draw on the eyebrow.
  • Cut a toothpick in half. Line up the black feet with the bottom of the red egg. Poke a toothpick into the bottom of the red egg where you want the feet to go. Insert the toothpick almost all the way in, then remove it. Insert the pointed end of the toothpick into the round side of the black foot. Add some white craft glue to the toothpick at the base of the foot then insert the toothpick into the hole you created in the red egg. Repeat for the other foot.
  • Cut second toothpick in half (you only need one half) and repeat the process for the eye that you did for the feet.
  • Add a coat of Duraclear Matte Varnish to the entire monster.
  • Cut the orange skinny chenille stem into four equal pieces. Insert two into each side of the monster and bend into arms.
  • Cut orange yarn into 4 pieces approximately 2" in length. Use the extra toothpick half to poke a hole in the top of the monster’s head. Add a dot of glue to the hole, then place the yarn over the hole at the halfway point. Using the toothpick, push the center of the yarn into the hole. This will cause the yarn to double and stand up. Repeat for the other pieces.

Expert Tips & FAQs

Use an empty cardboard egg carton placed upside down to hold your Styrofoam pieces as they dry. Be sure to plan ahead for this project. Magikote require 2-3 hours dry time between coats.


egg monster


');

  • Author
  • Recent Posts
Amanda Davis
Amanda Davis is the crafty, entrepreneurial mother of four children. She loves to bake, cook, make kid's crafts and create decorative items for her home. She is a crafting expert and guru in the kitchen and has appeared online and in print publications many times over the years.
Latest posts by Amanda Davis (see all)
  • Spring Scavenger Hunt - May 9, 2025
  • How to Make Lip Scrub - May 2, 2025
  • How to Make Lavender Soap - April 22, 2025
46 shares
  • Share
  • Tweet
  • Flipboard
  • Email

Filed Under: Halloween Crafts, Other Kid's Crafts Tagged With: halloween, holidays, kid's crafts, magikote, Monster Crafts

Reader Interactions

Free CraftsBy email every week

Latest crafts straight to your inbox!

Comments

  1. Allison @ House of Hepworths says

    October 7, 2011 at 10:37 pm

    Hey! I featured this today! Check it out here.

    Grab a “featured” if you’d like.

    Have a great weekend!

    xoxo

    Allison @ House of Hepworths

    Reply
    • Amanda Formaro says

      October 8, 2011 at 2:59 am

      Thank you Allison for the feature!

      Reply
  2. angeal says

    September 28, 2011 at 3:59 pm

    Very cool, love it!

    Reply
  3. maggy, red ted art says

    September 28, 2011 at 1:14 pm

    This guy is simply the CUTEST!!! LOVE!!!!!!

    Thank you for sharing on Kids Get Crafty!

    Maggy

    Reply
    • Amanda Formaro says

      September 29, 2011 at 2:46 pm

      Thanks Maggy!

      Reply
  4. Erin @ Making Memories says

    September 27, 2011 at 7:25 pm

    How fun is that?!?!? Awesome!

    Reply
  5. Katrina says

    September 26, 2011 at 3:40 am

    Cute!

    Reply
  6. Deb Westbury says

    September 25, 2011 at 5:54 pm

    You had me fooled, I thought it was a real egg….

    Reply
  7. Crafty Mischief says

    September 25, 2011 at 4:45 am

    Umm…wait…no I didn’t. I just came from there. I still love it though!

    Reply
    • Amanda Formaro says

      September 27, 2011 at 1:30 am

      haha! i was like… what? I haven’t entered it there yet LOL ;-)

      Reply
  8. Crafty Mischief says

    September 25, 2011 at 4:44 am

    How fun! I’ll have to try this with my kids. Thanks for sharing. I saw this on The Sunday Showcase at Under the Table and Dreaming.

    Reply
    • Amanda Formaro says

      September 27, 2011 at 1:30 am

      Thank you!

      Reply
5 from 3 votes (2 ratings without comment)

Leave a Reply Cancel reply

Your email address will not be published. Required fields are marked *

Rate This Project


The maximum upload file size: 640 MB. You can upload: image, video. Links to YouTube, Facebook, Twitter and other services inserted in the comment text will be automatically embedded. Drop files here

Primary Sidebar

Hi! I’m Amanda and I’m the founder and head designer of Crafts by Amanda. I have spent over 25 years creating projects to share, but it’s not just me anymore! It’s turned into a complete family affair. Come and meet the Creative Team!

Free CraftsBy email every week

Latest crafts straight to your inbox!

All Time Favorites

snowy pinecone candle jar luminaries

Winter Luminaries: Snowy Pinecone…

Make pretty winter luminaries that appear to be covered ... Go To project

Make this wonderful deco mesh pumpkin wreath to hang on your door this fall!

Deco Mesh Pumpkin Wreath…

Adorn your door this fall with a pretty deco mesh ... Go To project

Learn to make these adorable ladybug painted rocks. use special outdoor paint for this adorable garden craft so you can keep garden ladybugs all summer!

Ladybug Painted Rocks…

I'm going to show you how to make these adorable ... Go To project

Reuse those empty prescription pill bottles in all sorts of ways. From organizing to making cookies. Yes, cookies! See how to use your empty pill bottles!

20 Uses for Prescription Pill…

You've been collecting prescription pill bottles for ... Go To project

Meet the Family

Amanda

Founder and Designer

Kristen

Editorial Manager

Lindsay

Social Media Manager

As seen on:

Footer

Favorites

  • Jar Photo Frames
  • No-Sew Roman Shade
  • Paper Flowers
  • How to Make a Scrunchie
  • Mermaid Slime

About

  • Home
  • Meet the Creative Team
  • Work with Us
  • Privacy Policy
  • Accessibility
  • Contact Us

Images/text copyright Amanda Formaro 2020. To feature a post from Crafts by Amanda, you may use one photo credited and linked back directly to the project post.

Free CraftsBy email every week

Latest crafts straight to your inbox!

Copyright ©2025, Crafts by Amanda. All Rights Reserved.
Design by Pixel Me Designs

Rate This Tutorial

Your vote:


To share a photo with your comment click here!

A rating is required
A name is required
An email is required

Recipe Ratings without Comment

Something went wrong. Please try again.