• Home
  • About
    • About Crafts by Amanda
    • Visit Our Recipe Site
  • Work With Us
  • Join
    • Free Newsletters
    • Join our Facebook craft group
↑
  • Tutorials
    • Tutorial Index
    • Adult Crafts
    • Crafts for Kids
    • Crafts for Seniors
    • Recycled Crafts
    • Seasonal Crafts
    • Holiday Crafts
    • Free Printables
    • Craft Collections
  • Adult Crafts
    • Bath & Body
    • Beach Crafts
    • Clay Pot Crafts
    • Crafts for Seniors
    • Decoupage Crafts for Adults
    • DIY Gift ideas
    • Garden Crafts
    • Home Decor Projects
    • Kitchen Crafts
    • Light Bulb Crafts
    • Luminary Crafts
    • Mason Jar Crafts
    • Needlework
    • Photo Display Ideas
    • Recycled Crafts for Adults
    • Wearable Crafts for Adults
  • Crafts for Kids
    • Animal Crafts for Kids
    • Back to School Crafts
    • Beach Crafts for Kids
    • Camp Crafts
    • Cardboard Tube Crafts for Kids
    • Decoupage Crafts for Kids
    • Easy Crafts for Kids
    • Nature Crafts for Kids
    • Other Kid’s Crafts
    • Paper Plate Crafts for Kids
    • Recycled Crafts for Kids
    • Slimes, Doughs, & Clay
    • Wearable Crafts for Kids
  • Holiday Crafts
    • 4th of July Crafts
    • Christmas Crafts
    • DIY Gift ideas
    • Earth Day Crafts
    • Easter Crafts
    • Father’s Day Crafts
    • Halloween Crafts
    • Memorial Day Crafts
    • Mother’s Day Crafts
    • New Year’s
    • Other Holidays
    • Patriot Day Crafts
    • St. Patrick’s Day Crafts
    • Thanksgiving Crafts
    • Valentine’s Day Crafts
  • Seasonal Crafts
    • Winter Crafts
    • Spring Crafts
    • Summer Crafts
    • Fall Crafts
  • Skip to primary navigation
  • Skip to main content
  • Skip to primary sidebar
  • Skip to footer

Crafts by Amanda

crafts for adults and kid's crafts

  • Tutorials
    • Tutorial Index
    • Adult Crafts
    • Crafts for Kids
    • Crafts for Seniors
    • Recycled Crafts
    • Seasonal Crafts
    • Holiday Crafts
    • Free Printables
    • Craft Collections
  • Adult Crafts
    • Bath & Body
    • Beach Crafts
    • Clay Pot Crafts
    • Crafts for Seniors
    • Decoupage Crafts for Adults
    • DIY Gift ideas
    • Garden Crafts
    • Home Decor Projects
    • Kitchen Crafts
    • Light Bulb Crafts
    • Luminary Crafts
    • Mason Jar Crafts
    • Needlework
    • Photo Display Ideas
    • Recycled Crafts for Adults
    • Wearable Crafts for Adults
  • Crafts for Kids
    • Animal Crafts for Kids
    • Back to School Crafts
    • Beach Crafts for Kids
    • Camp Crafts
    • Cardboard Tube Crafts for Kids
    • Decoupage Crafts for Kids
    • Easy Crafts for Kids
    • Nature Crafts for Kids
    • Other Kid’s Crafts
    • Paper Plate Crafts for Kids
    • Recycled Crafts for Kids
    • Slimes, Doughs, & Clay
    • Wearable Crafts for Kids
  • Holiday Crafts
    • 4th of July Crafts
    • Christmas Crafts
    • DIY Gift ideas
    • Earth Day Crafts
    • Easter Crafts
    • Father’s Day Crafts
    • Halloween Crafts
    • Memorial Day Crafts
    • Mother’s Day Crafts
    • New Year’s
    • Other Holidays
    • Patriot Day Crafts
    • St. Patrick’s Day Crafts
    • Thanksgiving Crafts
    • Valentine’s Day Crafts
  • Seasonal Crafts
    • Winter Crafts
    • Spring Crafts
    • Summer Crafts
    • Fall Crafts
Craft Tutorials | Holiday Crafts | St. Patrick's Day Crafts | End of the Rainbow Loot Buckets
St. Patrick's Day Crafts

End of the Rainbow Loot Buckets

Author by Amanda Davis on February 27, 2024 Updated on February 27, 2024

5 from 2 votes
These adorable end of the rainbow treat cups are perfect for passing out as St. Patrick's Day favors or for kids' classroom exchanges. Made with green paper cups, sequins, and rainbow duct tape!
Jump to Project
972 shares
  • Share
  • Tweet
  • Flipboard
  • Email

Fill these St. Patrick’s Day Treat Cups with toys, trinkets, and candy to send home with party guests. All you need are a few basic supplies and rainbow duct tape!

green cups with rainbow duct tape handles and a shamrock on front


St. Patrick’s Day Treat Cups

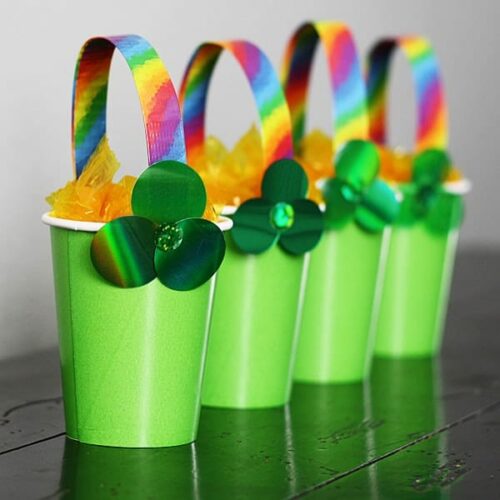
A little rainbow duct tape and green cups adorned with jumbo green sequins make a fun party favor. St. Patrick’s Day is a fun time for celebrations and kids love throwing a party! A party means treat cups, so I’ve put together these easy end of the rainbow loot buckets for you to have fun with.

Fill the loot buckets with sweet treats or trinkets and pass them out as party favors or during classroom exchanges.

Related – make our leprechaun trap from a cereal box!

shamrock and rainbow themed treat cups craft

Supplies you need

  • Green paper cups
  • Rainbow duct tape
  • 3 large green sequins
  • 1 medium green sequin
  • Glue dots
  • Treats to fill the cup
green and rainbow treat cups

Instructions for St. Patrick’s Day Treat Cups:

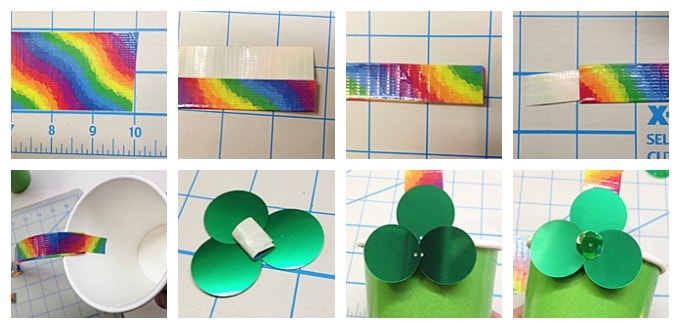
  1. Create a handle for your treat cup using rainbow duct tape.
  2. Stick the handle inside the cup on both sides.
  3. Put three large green sequins together to form a clover shape. 
  4. Used rolled tape to attach to the cup.
  5. Press the medium sized sequin onto a glue dot and pick it up, then press it to the center of the clover.
  6. Fill your cups with toys, trinkets, candy and whatever loot you desire!
loot buckets steps

More St. Patrick’s Day Crafts for Kids

  • 3D Tissue Paper Shamrock
  • Cereal Box Leprechaun Trap
  • Monster Cards for St. Patrick’s Day
  • St. Patrick’s Day Cootie Catcher
  • St. Patricks Day Activity Sheets
Print Project
5 from 2 votes

End of the Rainbow Loot Buckets

These adorable end of the rainbow treat cups are perfect for passing out as St. Patrick's Day favors or for kids' classroom exchanges. Made with green paper cups, sequins, and rainbow duct tape!
Age Group: Adult Crafts, Crafts, Kids Crafts
Project Type: St. Patrick’s Day

Supplies

  • Green paper cup
  • Rainbow duct tape
  • 3 large green sequins
  • 1 medium green sequin
  • Glue dot
  • Treats to fill the cup such as individually wrapped butterscotch discs, Rolos® or Werthers® candies

Instructions

  • To create the handle for your treat cup, measure and cut a 10-inch long piece of rainbow duct tape.
  • Fold the length of the tape by one-third onto itself, leaving one-third of the sticky side showing.
  • Fold the sticky third down onto the first fold of tape so that no sticky tape remains.
  • Cut a small strip of tape and attach it to one end of the handle. Repeat at the other end.
  • Stick the handle inside the cup on both sides.
  • Cut another small strip of tape and roll it up, sticky side facing out. Put the three large sequins together to form a clover shape. Place the rolled tape in the center of all three to hold them all together.
  • Stick the rolled tape side to one side of the handle on the cup.
  • Press the medium sized sequin onto a glue dot and pick it up, then press it to the center of the clover. Fill your cups with toys, trinkets, candy and whatever loot you desire!

I originally made this project for Spoonful. Spoonful has since closed and the instructions were taken down. I am putting the instructions here until such time that Spoonful projects are redirected to a new home. At that time I will remove the instructions and link directly to the project on their site.

This project was originally published here on March 6, 2014

  • Author
  • Recent Posts
Amanda Davis
Amanda Davis is the crafty, entrepreneurial mother of four children. She loves to bake, cook, make kid's crafts and create decorative items for her home. She is a crafting expert and guru in the kitchen and has appeared online and in print publications many times over the years.
Latest posts by Amanda Davis (see all)
  • Rainbow Tie Dye Shirts - July 4, 2025
  • Mason Jar Solar Lights - June 27, 2025
  • Patriotic Pinwheels - June 20, 2025
972 shares
  • Share
  • Tweet
  • Flipboard
  • Email

Filed Under: St. Patrick's Day Crafts Tagged With: holiday, paper crafts, st patricks day

Reader Interactions

Free CraftsBy email every week

Latest crafts straight to your inbox!

5 from 2 votes (2 ratings without comment)

Leave a Reply Cancel reply

Your email address will not be published. Required fields are marked *

Rate This Project


The maximum upload file size: 640 MB. You can upload: image, video. Links to YouTube, Facebook, Twitter and other services inserted in the comment text will be automatically embedded. Drop files here

Primary Sidebar

Hi! I’m Amanda and I’m the founder and head designer of Crafts by Amanda. I have spent over 25 years creating projects to share, but it’s not just me anymore! It’s turned into a complete family affair. Come and meet the Creative Team!

Free CraftsBy email every week

Latest crafts straight to your inbox!

All Time Favorites

Learn to make these adorable ladybug painted rocks. use special outdoor paint for this adorable garden craft so you can keep garden ladybugs all summer!

Ladybug Painted Rocks…

These colorful little ladybug painted rocks are the ... Go To project

snowy pinecone candle jar luminaries

Winter Luminaries: Snowy Pinecone…

Make pretty winter luminaries that appear to be covered ... Go To project

Make this wonderful deco mesh pumpkin wreath to hang on your door this fall!

Deco Mesh Pumpkin Wreath…

Adorn your door this fall with a pretty deco mesh ... Go To project

Reuse those empty prescription pill bottles in all sorts of ways. From organizing to making cookies. Yes, cookies! See how to use your empty pill bottles!

20 Uses for Prescription Pill…

You've been collecting prescription pill bottles for ... Go To project

Meet the Family

Amanda

Founder and Designer

Kristen

Editorial Manager

Lindsay

Social Media Manager

As seen on:

Footer

Favorites

  • Jar Photo Frames
  • No-Sew Roman Shade
  • Paper Flowers
  • How to Make a Scrunchie
  • Mermaid Slime

About

  • Home
  • Meet the Creative Team
  • Work with Us
  • Privacy Policy
  • Accessibility
  • Contact Us

Images/text copyright Amanda Formaro 2020. To feature a post from Crafts by Amanda, you may use one photo credited and linked back directly to the project post.

Free CraftsBy email every week

Latest crafts straight to your inbox!

Copyright ©2025, Crafts by Amanda. All Rights Reserved.
Design by Pixel Me Designs

Rate This Tutorial

Your vote:


To share a photo with your comment click here!

A rating is required
A name is required
An email is required

Recipe Ratings without Comment

Something went wrong. Please try again.