This is such a fun project for kids and adults alike. I made seed paper for the first time about 4 years ago. It was so much easier than I thought it was going to be and I loved the way it turned out! It’s a fun eco-friendly craft that can be given for Valentine’s Day, Mother’s Day, or even Grandparent’s Day. It’s the perfect Earth Day project and a great camp craft too.
Giving the gift of spring is quite fulfilling and the results look absolutely charming. Making your own paper sounds like a daunting task, but the truth is it’s easy and actually quite fun! Mix in some seeds and you have a biodegradable gift that keeps on giving.
Making seeded paper doesn’t require expensive or hard to find materials from a specialty store. You’ll be able to get the basic supplies you need from your local discount department store. If you have a kitchen blender and some cheesecloth, we are on our way to creating a beautiful gift of nature.
Download printable PDF file of this project here
Supplies you will need:
8 jumbo craft sticks
12″x12″ piece of window screen or cheesecloth
White craft glue
Black electrical tape
White copy paper
Water
Flower and/or herb seeds
Tools needed:
Blender
Scissors
13″ x 9″ baking pan
Kitchen towels
Household sponge
The process of making seeded paper includes making a pulp. This pulp is created from sheets of regular paper mixed with water in a blender. That pulp is then strained through a fine mesh screen and dried. Once dry, the pulp binds together to create your homemade paper.
Making the Screen
Don’t be intimidated! Making the screen is simple enough that your kids can do it; in fact you should invite them to help. First, make a square frame using 4 of the jumbo craft sticks, gluing them all together at the corners. Lay the cheesecloth over the craft stick frame, covering it completely.
To make the second layer of craft sticks flush with the first, start by gluing a second layer of craft sticks to two opposite sides of the frame. This will hold the cheesecloth in between the bottom and top layers. Next, use scissors to trim the round ends off of the two remaining craft sticks. Now glue those along the remaining sides of the frame.
Make sure you pull the cheesecloth taut as you glue the sticks down. Place a book on top of the frame to hold it together and let it dry.
Use scissors to trim the edges. Cover the craft stick frame with black electrical tape, tucking in any overlapping cheesecloth under the tape.
Making the Pulp
Tear your paper into 1-2″ squares and drop them into your blender. Cover the paper with warm water and turn the blender on. Process the water and paper until you have a thin paste.
Fill your 13×9 pan halfway with warm water. Add the paste from the blender into the baking pan and stir it gently.
Pour the paper paste from the blender into the warm water in the pan. Stir gently.
Adding the Seeds
No that you have your pull you are ready to add the seeds. If you are making different types of paper such as flowers and herbs, now would be a good time to place some of the pulp in a different bowl or dish so as not to mix them together.
Sprinkle seeds over the top of the pulp in the pan.
Hint: If using herb seeds, you can sprinkle dried herbs onto your pulp as well to add to the look. Same goes for flower seeds, adding dried flower petals looks quite lovely!
The Final Steps
Place a kitchen towel on the counter and keep a second towel and household sponge nearby. Using your screen as a scooper, dip it into the pan and lift some pulp to the surface. Gently wave your screen back and forth so as to even out the layer of pulp on top. Lift your screen straight up and let the excess water drip off.
Place the screen onto the kitchen towel and gently place the second kitchen towel on top of it. Holding everything together, carefully flip it all upside down and place back on the counter. Remove the towel that is now on the top.
Using your household sponge press firmly down on top of the cheesecloth screen releasing as much excess water out as possible.
Lift the frame and loosen your seeded paper. You might have to gently coax a corner loose, but the rest should come right out.
Lay sheets of seeded paper out on wire racks to dry.
What to Make
Now that you have lovely squares of seeded paper, there are several ways to use them and give them as gifts. Some ideas include
- Bookmarks – poke a hole at the top and thread hemp cord through, then tie in a knot.
- Greeting cards – use seeded paper as an embellishment to a larger card, or use the paper itself as the card
- Place cards – great for tea parties, bridal showers, or baby showers
- Invitations – write directly on the paper with biodegradable ink
- Ornaments – add a ribbon hanger and embellish with dried flowers or leaves for a pretty spring decoration
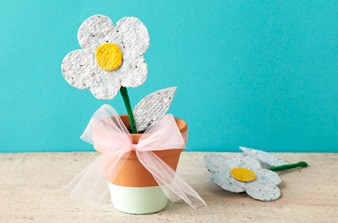
Plant Gift
Fill a 4″ clay pot 3/4 full with potting soil. Cut a piece of seeded paper into the shape of a heart. Attach to a pipe cleaner and insert the pipe cleaner into the dirt in the pot. Give as a fun spring gift! All they have to do is plant the heart and watch it grow!
Shapes
You can cut your paper into shapes to use as embellishments. Hearts, rectangles and other shapes will look very nice against a plain or even striped paper. Remember don’t toss the scraps. You can plant them or even wrap them in wet paper towel and place them in a plastic sandwich bag and wait to see if they sprout!
The Right Paper
There are several different types of paper you can use including copy paper, construction paper, and newspaper. Stay away from glossy papers such as magazines and store flyers. If you aren’t sure, check with your local newspaper to see if they use biodegradable ink. Many large news outlets are using vegetable inks these days.
Add Ins
To add to the beauty of your seeded paper you can toss in flower seeds, herb seeds, dried herbs, and flower petals. Crumbled dried leaves look lovely as well.
Making homemade seeded paper is a fun project that the whole family can enjoy. The results are stunning and make for great gifts.
- Tie Dye Beach Towels - July 24, 2026
- Swirling Twirling Ladybugs - July 21, 2026
- Drip Tie Dye Backpack - July 17, 2026


Leonore Proctor says
Why is there no print option? At least I couldn’t find it.
Amanda Davis says
Ahh yes you’re right, this is an old project that hasn’t been updated to our new format yet. In the meantime, I have created a PDF that you can print here https://craftsbyamanda.com/wp-content/uploads/2025/02/Making-Plantable-Seed-Paper.pdf
Sheila says
Such a good idea. I have made paper on and off for years, adding leaves and petals and using said paper to make Christmas cards. but never thought to use seeds.
randy says
how to make plantable seed paper link does not seem to work can i please get link or info to make. thanks
Amanda Formaro says
Hi Randy. I’ve gone ahead and posted the article here, so if you return you will see it. Thanks for bringing that to my attention!
Karen Howard says
Hi Amanda. Thank You for the Doirections for Homemade Plantable Seed Paper. These make Wonderful Litte Extra Gifts to put into Birthday,Get Well & Thinking of You Cards.I’ll be making some soon!
Tiffiny Felix says
I love this. This is *so* clever! :D