• Home
  • About
    • About Crafts by Amanda
    • Visit Our Recipe Site
  • Work With Us
  • Join
    • Free Newsletters
    • Join our Facebook craft group
↑
  • Tutorials
    • Tutorial Index
    • Adult Crafts
    • Crafts for Kids
    • Crafts for Seniors
    • Recycled Crafts
    • Seasonal Crafts
    • Holiday Crafts
    • Free Printables
    • Craft Collections
  • Adult Crafts
    • Bath & Body
    • Beach Crafts
    • Clay Pot Crafts
    • Crafts for Seniors
    • Decoupage Crafts for Adults
    • DIY Gift ideas
    • Garden Crafts
    • Home Decor Projects
    • Kitchen Crafts
    • Light Bulb Crafts
    • Luminary Crafts
    • Mason Jar Crafts
    • Needlework
    • Photo Display Ideas
    • Recycled Crafts for Adults
    • Wearable Crafts for Adults
  • Crafts for Kids
    • Animal Crafts for Kids
    • Back to School Crafts
    • Beach Crafts for Kids
    • Camp Crafts
    • Cardboard Tube Crafts for Kids
    • Decoupage Crafts for Kids
    • Easy Crafts for Kids
    • Nature Crafts for Kids
    • Other Kid’s Crafts
    • Paper Plate Crafts for Kids
    • Recycled Crafts for Kids
    • Slimes, Doughs, & Clay
    • Wearable Crafts for Kids
  • Holiday Crafts
    • 4th of July Crafts
    • Christmas Crafts
    • DIY Gift ideas
    • Earth Day Crafts
    • Easter Crafts
    • Father’s Day Crafts
    • Halloween Crafts
    • Memorial Day Crafts
    • Mother’s Day Crafts
    • New Year’s
    • Other Holidays
    • Patriot Day Crafts
    • St. Patrick’s Day Crafts
    • Thanksgiving Crafts
    • Valentine’s Day Crafts
  • Seasonal Crafts
    • Winter Crafts
    • Spring Crafts
    • Summer Crafts
    • Fall Crafts
  • Skip to primary navigation
  • Skip to main content
  • Skip to primary sidebar
  • Skip to footer

Crafts by Amanda

crafts for adults and kid's crafts

  • Tutorials
    • Tutorial Index
    • Adult Crafts
    • Crafts for Kids
    • Crafts for Seniors
    • Recycled Crafts
    • Seasonal Crafts
    • Holiday Crafts
    • Free Printables
    • Craft Collections
  • Adult Crafts
    • Bath & Body
    • Beach Crafts
    • Clay Pot Crafts
    • Crafts for Seniors
    • Decoupage Crafts for Adults
    • DIY Gift ideas
    • Garden Crafts
    • Home Decor Projects
    • Kitchen Crafts
    • Light Bulb Crafts
    • Luminary Crafts
    • Mason Jar Crafts
    • Needlework
    • Photo Display Ideas
    • Recycled Crafts for Adults
    • Wearable Crafts for Adults
  • Crafts for Kids
    • Animal Crafts for Kids
    • Back to School Crafts
    • Beach Crafts for Kids
    • Camp Crafts
    • Cardboard Tube Crafts for Kids
    • Decoupage Crafts for Kids
    • Easy Crafts for Kids
    • Nature Crafts for Kids
    • Other Kid’s Crafts
    • Paper Plate Crafts for Kids
    • Recycled Crafts for Kids
    • Slimes, Doughs, & Clay
    • Wearable Crafts for Kids
  • Holiday Crafts
    • 4th of July Crafts
    • Christmas Crafts
    • DIY Gift ideas
    • Earth Day Crafts
    • Easter Crafts
    • Father’s Day Crafts
    • Halloween Crafts
    • Memorial Day Crafts
    • Mother’s Day Crafts
    • New Year’s
    • Other Holidays
    • Patriot Day Crafts
    • St. Patrick’s Day Crafts
    • Thanksgiving Crafts
    • Valentine’s Day Crafts
  • Seasonal Crafts
    • Winter Crafts
    • Spring Crafts
    • Summer Crafts
    • Fall Crafts
Craft Tutorials | Adult Crafts | Garden Crafts | How to Make Herbal Sachets
Garden Crafts

How to Make Herbal Sachets

Author by Amanda Davis on March 31, 2019 Updated on December 6, 2020

1719 shares
  • Share
  • Tweet
  • Flipboard
  • Email

You’ve probably bought at least one herbal sachet in your lifetime. If not, likely you’ve held one in your hand and taken in its intoxicating aroma. Making herbal sachets is a really easy garden craft, they make wonderful handmade gifts, and it’s a great way to use some of the bounty from your garden.

Herbal Sachets


What to Put in Your Herbal Sachet

I personally like to keep a sachet filled with lavender in my lingerie drawer. I absolutely adore the smell of lavender so the longer I can keep savoring it, the better. Making a lavender herbal sachet is a great way to do that, but lavender isn’t the only thing that smells good!

Hint – these would make a beautiful Mother’s Day gift! But don’t forget to print out our free Mother’s Day cards too. 

Dried herbs

Fresh herbs from your garden work great in sachets as well. Hint: it’s good luck if you find a toad in your garden as he’ll keep the bugs away! Be sure and welcome him with this adorable herb garden sign.

If you have an extensive garden, you may want to make these rock garden markers so you remember where everything will come up each year. Don’t have a lot of room for a garden? Make these darling herb pots and keep them on your patio or in the kitchen window!

Did you know that sachets that are filled with lavender, rosemary, dried lemon peels, rose petals, cedar chips and/or thyme will deter moths? Dried lavender has a wonderful scent where fresh rosemary is stronger than dried. Rosemary is easy to grow indoors in a pot, so you can grab your cuttings all year long, not just in the warm months.

Dried lavender

Lavender is a perennial, so you can enjoy its beauty and aromatic scent every year after planting it only once! Cut the stems that have flowers and place them in a tall jar, do not add water. The flower will dry as it stands and can then be kept in an airtight jar to maintain its scent.

Can’t decide what type of herbal sachet to make? Sachets filled with mint, cedar chips, citronella, lemongrass and/or lavender prevent flea manifestation, while those filled with bay leaves, cloves and/or basil ward off flies. Popular herbs for aromatherapy include lavender, mint, lemon verbena and rosemary, thus making them perfect for lingerie drawers.

How to Make Herbal Sachets

You’ll want to use a breathable fabric, such as lightweight cotton, burlap, hemp, linen or tea bag mesh. Simple ribbon or twine works great for keep your herbal sachets closed as well as adding a little rustic elegance. You can make your own little bags using my instructions below, or you can buy bags that are already made. This is especially helpful if you are making multiple sachets.

You will need:

  • Breathable fabric or premade drawstring bags
  • Ribbon or twine
  • Sewing machine or needle and thread
  • Dried herbs and/or aromatic flower petals or dried flowers of your choice
  • essential oils (optional)


How to make herbal sachets

Determine what size you would like your sachet to be and add about 1/2-inch to each side. Cut two pieces of fabric with this measurement (my larger bag is approximately 4” x 7”). Lay the two pieces of fabric so that the right sides are facing each other.

Pin the two pieces together to hold them in place.

Pin the two pieces together to hold them in place. Start by finishing the top of your sachet. Fold down the fabric at one end, folding down by about 1/2-inch.

Sew a straight stitch across the folded fabric.

Sew a straight stitch across the folded fabric.

This will hide any frayed or jagged fabric edges inside the sachet.

This will hide any frayed or jagged fabric edges inside the sachet. Repeat this process for the second top edge.

Sewing a straight stitch

Sew a straight stitch through both pieces of fabric to close the sides and bottom, creating the sachet.

Sewing machine

Remove the straight pins as you go.

How to make herbal sachets

The only end left open should be the top of the bag. Trim off all excess hanging threads.

Turn the fabric inside out.

Turn the fabric inside out.

Iron the fabric to remove any wrinkles.

Iron the fabric to remove any wrinkles.

Tuck herbs inside the sachet.

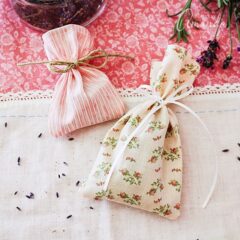
Tuck herbs inside the sachet. For this one, I used fresh rosemary which is very fragrant.

Dried lavender

In another, smaller sachet I used dried lavender buds.

Lavender Herbal Sachets

Simply tuck them inside the sachet and tie it closed with ribbon or twine.

Herbal Sachets with lavender

These make wonderful gifts and can be made in about 30-40 minutes.

How to make herbal sachets

It’s a wonderful way to share your garden’s bounty with a friend!

Herbal sachet DIY

Come spring, remember which sachets were your favorite so you can stock up on the potted plants that you loved in your herbal sachets! Plant them in these adorable Strawberry Terra Cotta Pots or as mentioned before, these distinguishable Herb Pots.

Love garden crafts as much as I do? Don’t forget to swing by some of my most popular garden crafts like my Watering Can That Pours Crystals. This beauty adds a touch of whimsical charm to your garden! Or maybe a simple craft that children can help with as well, like my Ladybug Painted Rocks! Bursting with color and exploding with cuteness, you’ll love stumbling across them throughout your garden. Happy crafting!

If you love simple sewing projects that serve as gifts, try my dammit doll. And here are lots of sewing projects to make as gifts!

How to make herbal sachets
Print Project
5 from 2 votes

How to Make Herbal Sachets

Author: Amanda Formaro

Supplies

  • Breathable fabric
  • Ribbon
  • Sewing machine or needle and thread
  • Herbs and/or aromatic flowers of your choice
  • Essential oils 1-2 drops are optional

Instructions

  • Determine what size you would like your sachet to be and add about 1/2-inch to each side. Cut two pieces of fabric with this measurement (my larger bag is approximately 4” x 7”). Lay the two pieces of fabric so that the right sides are facing each other.
  • Pin the two pieces together to hold them in place. Start by finishing the top of your sachet. Fold down the fabric at one end, folding down by about 1/2-inch.
  • Sew a straight stitch across the folded fabric.
  • This will hide any frayed or jagged fabric edges inside the sachet. Repeat this process for the second top edge.
  • Sew a straight stitch through both pieces of fabric to close the sides and bottom, creating the sachet.
  • Remove the straight pins as you go.
  • The only end left open should be the top of the bag. Trim off all excess hanging threads.
  • Turn the fabric inside out.
  • Iron the fabric to remove any wrinkles.
  • Tuck herbs inside the sachet. For this one I used fresh rosemary which is very fragrant.
  • In another, smaller sachet I used dried lavender buds.
  • Simply tuck them inside the sachet and tie it closed with ribbon or twine.
  • These make wonderful gifts and can be made in about 30-40 minutes.

This post was originally published on this blog on June 28, 2017.

  • Author
  • Recent Posts
Amanda Davis
Amanda Davis is the crafty, entrepreneurial mother of four children. She loves to bake, cook, make kid's crafts and create decorative items for her home. She is a crafting expert and guru in the kitchen and has appeared online and in print publications many times over the years.
Latest posts by Amanda Davis (see all)
  • Rainbow Tie Dye Shirts - July 4, 2025
  • Mason Jar Solar Lights - June 27, 2025
  • Patriotic Pinwheels - June 20, 2025
1719 shares
  • Share
  • Tweet
  • Flipboard
  • Email

Filed Under: Bath & Body, Crafts for Seniors, DIY Gift ideas, Garden Crafts, Mother's Day Crafts, Needlework, Summer Crafts Tagged With: adult, fabric, fresh herbs, garden, gift, gift ideas, herb, herbal, herbal sachets, lavender, sachets, sewing

Reader Interactions

Free CraftsBy email every week

Latest crafts straight to your inbox!

Comments

  1. Jenni says

    November 26, 2023 at 6:04 pm

    Ms. Formaro- You mention optionally adding essential oils, but you don’t explain when or how.
    I suppose the Rosemary will dry without growing “funk”, but should all of the other herbs, and peels, and flowers be pre-dried?

    Reply
5 from 2 votes (2 ratings without comment)

Leave a Reply Cancel reply

Your email address will not be published. Required fields are marked *

Rate This Project


The maximum upload file size: 640 MB. You can upload: image, video. Links to YouTube, Facebook, Twitter and other services inserted in the comment text will be automatically embedded. Drop files here

Primary Sidebar

Hi! I’m Amanda and I’m the founder and head designer of Crafts by Amanda. I have spent over 25 years creating projects to share, but it’s not just me anymore! It’s turned into a complete family affair. Come and meet the Creative Team!

Free CraftsBy email every week

Latest crafts straight to your inbox!

All Time Favorites

Learn to make these adorable ladybug painted rocks. use special outdoor paint for this adorable garden craft so you can keep garden ladybugs all summer!

Ladybug Painted Rocks…

These colorful little ladybug painted rocks are the ... Go To project

snowy pinecone candle jar luminaries

Winter Luminaries: Snowy Pinecone…

Make pretty winter luminaries that appear to be covered ... Go To project

Make this wonderful deco mesh pumpkin wreath to hang on your door this fall!

Deco Mesh Pumpkin Wreath…

Adorn your door this fall with a pretty deco mesh ... Go To project

Reuse those empty prescription pill bottles in all sorts of ways. From organizing to making cookies. Yes, cookies! See how to use your empty pill bottles!

20 Uses for Prescription Pill…

You've been collecting prescription pill bottles for ... Go To project

Meet the Family

Amanda

Founder and Designer

Kristen

Editorial Manager

Lindsay

Social Media Manager

As seen on:

Footer

Favorites

  • Jar Photo Frames
  • No-Sew Roman Shade
  • Paper Flowers
  • How to Make a Scrunchie
  • Mermaid Slime

About

  • Home
  • Meet the Creative Team
  • Work with Us
  • Privacy Policy
  • Accessibility
  • Contact Us

Images/text copyright Amanda Formaro 2020. To feature a post from Crafts by Amanda, you may use one photo credited and linked back directly to the project post.

Free CraftsBy email every week

Latest crafts straight to your inbox!

Copyright ©2025, Crafts by Amanda. All Rights Reserved.
Design by Pixel Me Designs

Rate This Tutorial

Your vote:


To share a photo with your comment click here!

A rating is required
A name is required
An email is required

Recipe Ratings without Comment

Something went wrong. Please try again.