• Home
  • About
    • About Crafts by Amanda
    • Visit Our Recipe Site
  • Work With Us
  • Join
    • Free Newsletters
    • Join our Facebook craft group
↑
  • Tutorials
    • Tutorial Index
    • Adult Crafts
    • Crafts for Kids
    • Crafts for Seniors
    • Recycled Crafts
    • Seasonal Crafts
    • Holiday Crafts
    • Free Printables
    • Craft Collections
  • Adult Crafts
    • Bath & Body
    • Beach Crafts
    • Clay Pot Crafts
    • Crafts for Seniors
    • Decoupage Crafts for Adults
    • DIY Gift ideas
    • Garden Crafts
    • Home Decor Projects
    • Kitchen Crafts
    • Light Bulb Crafts
    • Luminary Crafts
    • Mason Jar Crafts
    • Needlework
    • Photo Display Ideas
    • Recycled Crafts for Adults
    • Wearable Crafts for Adults
  • Crafts for Kids
    • Animal Crafts for Kids
    • Back to School Crafts
    • Beach Crafts for Kids
    • Camp Crafts
    • Cardboard Tube Crafts for Kids
    • Decoupage Crafts for Kids
    • Easy Crafts for Kids
    • Nature Crafts for Kids
    • Other Kid’s Crafts
    • Paper Plate Crafts for Kids
    • Recycled Crafts for Kids
    • Slimes, Doughs, & Clay
    • Wearable Crafts for Kids
  • Holiday Crafts
    • 4th of July Crafts
    • Christmas Crafts
    • DIY Gift ideas
    • Earth Day Crafts
    • Easter Crafts
    • Father’s Day Crafts
    • Halloween Crafts
    • Memorial Day Crafts
    • Mother’s Day Crafts
    • New Year’s
    • Other Holidays
    • Patriot Day Crafts
    • St. Patrick’s Day Crafts
    • Thanksgiving Crafts
    • Valentine’s Day Crafts
  • Seasonal Crafts
    • Winter Crafts
    • Spring Crafts
    • Summer Crafts
    • Fall Crafts
  • Home
  • About
    • About Crafts by Amanda
    • Visit Our Recipe Site
  • Work With Us
  • Join
    • Free Newsletters
    • Join our Facebook craft group
  • Skip to primary navigation
  • Skip to main content
  • Skip to primary sidebar
  • Skip to footer

Crafts by Amanda

crafts for adults and kid's crafts

  • Tutorials
    • Tutorial Index
    • Adult Crafts
    • Crafts for Kids
    • Crafts for Seniors
    • Recycled Crafts
    • Seasonal Crafts
    • Holiday Crafts
    • Free Printables
    • Craft Collections
  • Adult Crafts
    • Bath & Body
    • Beach Crafts
    • Clay Pot Crafts
    • Crafts for Seniors
    • Decoupage Crafts for Adults
    • DIY Gift ideas
    • Garden Crafts
    • Home Decor Projects
    • Kitchen Crafts
    • Light Bulb Crafts
    • Luminary Crafts
    • Mason Jar Crafts
    • Needlework
    • Photo Display Ideas
    • Recycled Crafts for Adults
    • Wearable Crafts for Adults
  • Crafts for Kids
    • Animal Crafts for Kids
    • Back to School Crafts
    • Beach Crafts for Kids
    • Camp Crafts
    • Cardboard Tube Crafts for Kids
    • Decoupage Crafts for Kids
    • Easy Crafts for Kids
    • Nature Crafts for Kids
    • Other Kid’s Crafts
    • Paper Plate Crafts for Kids
    • Recycled Crafts for Kids
    • Slimes, Doughs, & Clay
    • Wearable Crafts for Kids
  • Holiday Crafts
    • 4th of July Crafts
    • Christmas Crafts
    • DIY Gift ideas
    • Earth Day Crafts
    • Easter Crafts
    • Father’s Day Crafts
    • Halloween Crafts
    • Memorial Day Crafts
    • Mother’s Day Crafts
    • New Year’s
    • Other Holidays
    • Patriot Day Crafts
    • St. Patrick’s Day Crafts
    • Thanksgiving Crafts
    • Valentine’s Day Crafts
  • Seasonal Crafts
    • Winter Crafts
    • Spring Crafts
    • Summer Crafts
    • Fall Crafts
Craft Tutorials | Adult Crafts | Mason Jar Crafts | Mason Jar Tissue Holder
Mason Jar Crafts

Mason Jar Tissue Holder

Author by Angie Holden on February 18, 2025 Updated on February 18, 2025

5 from 11 votes
Make your own mason jar tissue holder in the color of your choice with a little bit of paint and some adhesive vinyl!
Jump to Project
Make this mason jar tissue holder with a mason jar and a few supplies!
14982 shares
  • Share
  • Tweet
  • Flipboard
  • Email

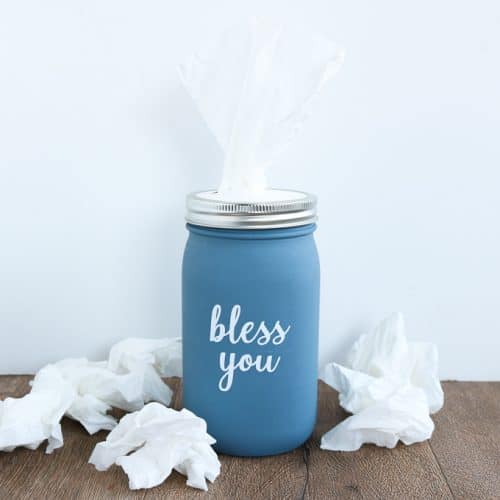
Why settle for a box messing up your decor when you can make this mason jar tissue holder in minutes? Add tissues to the inside and ditch the box! This is perfect for your nightstand or anywhere else in your home where you want to keep tissues on hand at all times.

This project pairs well with our mason jar soap dispenser too!

Mason Jar Tissue Holder


Why we love this project


I added some vinyl to the front of my mason jar tissue holder but you can leave it plain or even add a monogram. Think of all the ways you can paint and decorate mason jars. That is how many ways you can make your own tissue holder! The sky is really the limit.

With the cold season upon us, you might want to get supplies to make a few of these! You might just need one in every room.

Related: Love these and looking for some more mason jar ideas? Try this change jar for the laundry room.

Mason Jar Tissue Holder with kleenex

Supplies needed to make a Mason Jar Tissue Holder


  • Wide mouth mason jar with smooth sides
  • Craft paint in the color of your choice
  • Paintbrush
  • Kleenex Upright tissues
  • Vinyl in the color of your choice (optional)
  • Transfer tape (optional)
  • Cricut or Silhouette cutting machine (optional)
  • Bless you art for cutting (optional)
  • Thick card stock
  • Craft knife
  • Self-healing mat (optional)
Supplies needed for mason jar tissue holder

How to Make a Mason Jar Tissue Holder


  1. Remove the lid from your jar and paint the entire thing with a few coats of craft paint. Allow to dry completely between coats.
  2. While your project is drying you can make any embellishment you want for the front of the jar. To make the “bless you”, download our file by clicking here. Then upload to the software for the cutting machine of your choice.
  3. Cut from any color vinyl.
  4. Once your jar is dry, weed your vinyl and use transfer tape to add to the front of the jar.
  5. Then use your lid as a template and cut a round circle from thick card stock.
  6. Use a craft knife to cut an X in this card stock but stop short of the edges of the circle. You will want to use a self-healing mat under this or a scrap piece of cardboard to protect your surface.
  7. Then add the circle into the band of your mason jar.
  8. Remove the Kleenex tissues from the upright container and place in your jar.
  9. Then screw on the band with the card stock in place.
  10. Pull up on your first tissue and your mason jar tissue holder is ready to place anywhere around your home.
How to make a mason jar tissue holder with kleenex

What will you add to the front of your version of this project?

Mason Jar Tissue Holder craft

Be sure to pick colors and designs that work with your home. After all, you want your mason jar tissue holder to be part of the decor!

More Mason Jar Crafts


  • Mason Jar Canisters
  • Mason Jar Bird Feeder
  • Mason Jar Soap Dispenser
  • Mason Jar Solar Lights
 

Make this mason jar tissue holder with a mason jar and a few supplies!
Print Project
5 from 11 votes

Mason Jar Tissue Holder

Make your own mason jar tissue holder in the color of your choice with a little bit of paint and some adhesive vinyl!
Prep Time0 minutes mins
Crafting Time45 minutes mins
Total Time45 minutes mins
Age Group: Adult Crafts
Project Type: Home Decor
Author: Angie Holden

Supplies

  • Wide mouth mason jar with smooth sides
  • Craft paint in the color of your choice
  • Paintbrush
  • Kleenex Upright tissues
  • Vinyl in the color of your choice optional
  • Transfer tape optional
  • Cricut or Silhouette cutting machine optional
  • Bless you art for cutting optional
  • Thick card stock
  • Craft knife
  • Self-healing mat optional

Instructions

  • Remove the lid from your jar and paint the entire thing with a few coats of craft paint. Allow to dry completely between coats.
  • While your project is drying you can make any embellishment you want for the front of the jar. To make the “bless you”, download our file by clicking here. Then upload the software for the cutting machine of your choice.
  • Cut from any color vinyl.
  • Once your jar is dry, use transfer tape to add the vinyl to the front of the jar.
  • Then use your lid as a template and cut a round circle from thick card stock.
  • Use a craft knife to cut an X in this card stock but stop short of the edges of the circle. You will want to use a self-healing mat under this or a scrap piece of cardboard to protect your surface.
  • Then add the circle into the band of your mason jar.
  • Remove the Kleenex tissues from the upright container and place in your jar.
  • Then screw on the band with the card stock in place.
  • Pull up on your first tissue and your mason jar tissue holder is ready to place anywhere around your home.

Video

This post originally appeared here on Jan 21, 2019. 

  • Author
  • Recent Posts
Follow along
Angie Holden
Blogger at The Country Chic Cottage
Angie Holden is author of The Country Chic Cottage where she shares crafts, recipes, and DIY projects daily.She lives on a farm in rural Tennessee with her husband and three children.She loves creating and sharing her creations on her blog and social media.
Follow along
Latest posts by Angie Holden (see all)
  • Mason Jar Bird Feeder - January 9, 2026
  • Fall Mason Jars - September 16, 2025
  • Burlap Stenciled Pillow Covers - May 16, 2025
14982 shares
  • Share
  • Tweet
  • Flipboard
  • Email

Filed Under: Bath & Body, DIY Gift ideas, Home Decor Projects, Mason Jar Crafts, Recycled Crafts for Adults Tagged With: bathroom, recycled crafts

Reader Interactions

Free CraftsBy email every week

Latest crafts straight to your inbox!

Comments

  1. Olivia says

    September 27, 2021 at 10:03 am

    What type of labels are those. I love that they look like they’re printed/ painted on the jar

    Reply
  2. Sandi says

    May 30, 2021 at 3:03 pm

    Love the font. Can you tell me what font you used?

    Reply
  3. Roxi says

    February 11, 2021 at 1:26 pm

    I am making the mason jar Kleenex holder but am unable to find the cylinders of facial tissues in Mn. Can you tell where you got yours . Thank you!

    Reply
    • Amanda Formaro says

      February 12, 2021 at 11:27 am

      I have seen them at Target and Meijer!

      Reply
  4. kelly fish says

    November 28, 2020 at 11:23 am

    how big is the svg for the vinyl?

    Reply
  5. Patti says

    December 15, 2019 at 8:00 am

    Idk why I’m confused about the painting part, but IAM, ugggh ! Do I paint the inside or outside of the jar😭

    Reply
    • Amanda Formaro says

      December 16, 2019 at 5:55 pm

      Hi Patti! You paint the outside of the jar :) There’s a video in the tutorial that you an watch too! :)

      Reply
  6. Florence says

    November 27, 2019 at 4:47 pm

    Will be trying to make mason jar with tissues. Do you have to buy a certain type of Kleenex box

    Reply
    • Amanda Formaro says

      November 27, 2019 at 5:52 pm

      Yes, you will need the Kleenex Upright tissues :)

      Reply
5 from 11 votes (11 ratings without comment)

Leave a Reply Cancel reply

Your email address will not be published. Required fields are marked *

Rate This Project


The maximum upload file size: 640 MB. You can upload: image, video. Links to YouTube, Facebook, Twitter and other services inserted in the comment text will be automatically embedded. Drop files here


Primary Sidebar

Hi! I’m Amanda and I’m the founder and head designer of Crafts by Amanda. I have spent over 25 years creating projects to share, but it’s not just me anymore! It’s turned into a complete family affair. Come and meet the Creative Team!

Free CraftsBy email every week

Latest crafts straight to your inbox!

All Time Favorites

snowy pinecone candle jar luminaries

Winter Luminaries: Snowy Pinecone…

Make pretty winter luminaries that appear to be covered ... Go To project

Make this wonderful deco mesh pumpkin wreath to hang on your door this fall!

Deco Mesh Pumpkin Wreath…

Adorn your door this fall with a pretty deco mesh ... Go To project

Learn to make these adorable ladybug painted rocks. use special outdoor paint for this adorable garden craft so you can keep garden ladybugs all summer!

Ladybug Painted Rocks…

These colorful little ladybug painted rocks are the ... Go To project

Reuse those empty prescription pill bottles in all sorts of ways. From organizing to making cookies. Yes, cookies! See how to use your empty pill bottles!

20 Uses for Prescription Pill…

You've been collecting prescription pill bottles for ... Go To project

Meet the Family

Amanda

Founder and Designer

Kristen

Editorial Manager

Lindsay

Social Media Manager

As seen on:

Footer

Favorites

  • Jar Photo Frames
  • No-Sew Roman Shade
  • Paper Flowers
  • How to Make a Scrunchie
  • Mermaid Slime

About

  • Home
  • Meet the Creative Team
  • Work with Us
  • Privacy Policy
  • Accessibility
  • Contact Us

Images/text copyright Amanda Davis 2025. To feature a post from Crafts by Amanda, you may use one photo credited and linked back directly to the project post.

Free CraftsBy email every week

Latest crafts straight to your inbox!

Copyright ©2026, Crafts by Amanda. All Rights Reserved.
Design by Pixel Me Designs

Rate This Tutorial

Your vote:


To share a photo with your comment click here!

A rating is required
A name is required
An email is required

Recipe Ratings without Comment

Something went wrong. Please try again.