
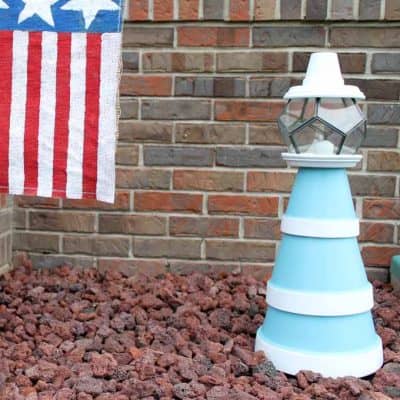
You can make this nautical clay pot lighthouse as a decoration for your garden in just minutes. Make your version any color that you like but we love the beachy feel of this clay pot craft!

Clay Pot Lighthouse
This coastal-themed clay pot lighthouse would also look lovely on a fireplace mantel, coffee table, shelf, or with your outdoor patio set.
Get various-sized clay pots to make your lighthouse as big or as small as you would like. We added a glass dome to the top to add a battery-operated candle as well!
Related: Don’t want to use terra cotta pots? Try this lighthouse made using metal pails!

Supplies to make a clay pot lighthouse
- Terra cotta pots in various sizes (you will need three that fit together, two saucers for the top, and one small one for the very top)
- Glass dome (we love the faceted version shown)
- Outdoor paint
- Paint brush
- Clear glue good for outdoor use
- Battery operated candle
Crafting tips
- Be sure to use a good quality outdoor paint that is made for painting terra cotta. We like Patio Paint and DecoArt’s Outdoor Living the best.
- Need more tips? Try this post on how to paint terra cotta.
- Fit your parts together in the store to ensure they will look like a lighthouse once assembled.
- Paint all of your parts and allow to dry before assembling.
- We used a battery-operated candle but a solar-powered light would work great as well.

How to Make a Clay Pot Lighthouse
- Paint your clay pots with your outdoor paint in the color of your choice. We painted the bands around the top of each pot in white. Allow the paint to dry completely in between coats. Darker colors will require about two coats while lighter colors may require up to four.
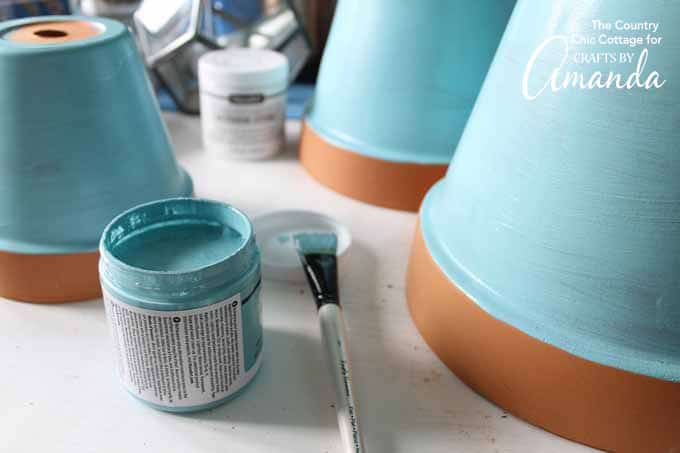
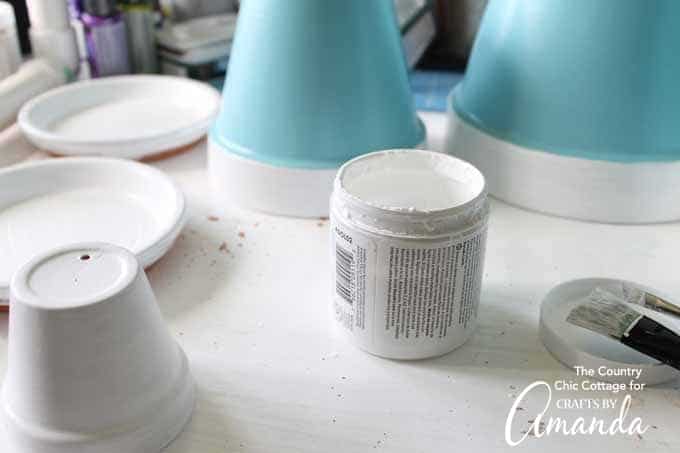
- Paint the bands around the top white along with the saucers and small pot for the top of your lighthouse.
- Once everything has dried completely, you can glue together your lighthouse.
- NOTE: That top pot has a hole in it so you are going to want to allow for drainage of water when gluing the pieces together. Just use your glue in about three places leaving gaps in between.
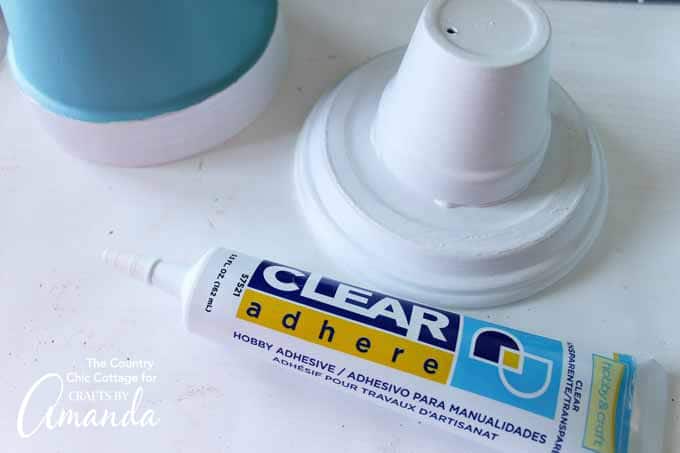
- Allow the glue to set up according to the package directions.
- REMEMBER: The topmost piece should not be glued to the glass dome. You will want to lift this on and off to be able to access the switch on your candle.

- Once the glue has dried, you are ready to move your clay pot lighthouse outdoors and enjoy it in your garden. This is a fun project that will look great in any yard. Pick your colors and make your own version today!

Will you make your version extra large for the garden or a small version for the porch? It is completely up to you and your imagination. The only thing that’s for sure is that this clay pot lighthouse will look great once it’s done!
Love coastal decor? Make a stunning Sea Glass Planter to go alongside your clay pot lighthouse, or check out this stylish beach decor wall art you can make at home.
More Garden Crafts and Projects
- Cheese Grater Owl
- DIY Garden Stepping Stones
- Ladybug Painted Rocks
- Terracotta Pot Wind Chimes
- Clay Pot Toadstools
- Fingerprint Flower Pot
Clay Pot Lighthouse
Supplies
- Terra cotta pots in various sizes you will need three that fit together, two saucers for the top, and one small one for the very top
- Glass dome we love the faceted version shown
- Outdoor paint
- Paint brush
- Clear glue good for outdoor use
- Battery operated candle
Instructions
- Paint your clay pots with your outdoor paint in the color of your choice. We painted the bands around the top of each pot in white. Allow paint to dry completely in between coats. Darker colors will require about two coats while lighter colors may require up to four.
- Paint the bands around the top white along with the saucers and small pot for the top of your lighthouse.
- Once everything has dried completely, you can glue together your lighthouse.
- NOTE: That top pot has a hole in it so you are going to want to allow for drainage of water when gluing the pieces together. Just use your glue in about three places leaving gaps in between.
- Allow the glue to set up according to the package directions.
- REMEMBER: The top most piece should not be glued to the glass dome. You will to be able to lift this piece on and off to sccess the switch on your candle.
- Once the glue has dried, you are ready to move your clay pot lighthouse outdoors and enjoy it in your garden. This is a fun project that will look great in any yard. Pick your colors and make your own version today!
This post originally appeared here on Jun 19, 2017.
- Mason Jar Bird Feeder - January 9, 2026
- Fall Mason Jars - September 16, 2025
- Burlap Stenciled Pillow Covers - May 16, 2025


Beryl Furze says
Could you not just put a jam ( jelly if your from USA) jar on the top ?
Richard Norton says
Where do you get glasses dome at
Amanda Formaro says
We found ours on amazon but I’m sure craft stores have them too https://amzn.to/43wBJVU
V Hoegler says
Will an 8, 7, and 6 in pots work together or should I stagger the sizes for example 10, 8, 6 inch?
Thank you,
Jeanette Thomas says
H. I live in TN as well
Mary says
Such a cute and clever idea! Pinning so I can make one too.
Emily says
Cute! I made a similar one for my dad for his birthday a few years ago. Ever since I’ve been meaning to make one for myself but haven’t gotten around to it yet! Thanks for linking up with Merry Monday this week.
Amy says
I love lighthouses and I love blue, so this Clay Pot Lighthouse jumped off of the page at me. It is so darling. Thank you for sharing at Think Tank Thursday link party. Shared and pinned.
Carol ("Mimi") says
Super-cute project! Thanks for the very clear tutorial.
Carol says
Very cute! I’ve seen similar lighthouses but your glass at the top really makes it stand out.
Kathleen Rupp says
That is an adorable project. I would love to see something like that in my garden! Great project:)