• Home
  • About
    • About Crafts by Amanda
    • Visit Our Recipe Site
  • Work With Us
  • Join
    • Free Newsletters
    • Join our Facebook craft group
↑
  • Tutorials
    • Tutorial Index
    • Adult Crafts
    • Crafts for Kids
    • Crafts for Seniors
    • Recycled Crafts
    • Seasonal Crafts
    • Holiday Crafts
    • Free Printables
    • Craft Collections
  • Adult Crafts
    • Bath & Body
    • Beach Crafts
    • Clay Pot Crafts
    • Crafts for Seniors
    • Decoupage Crafts for Adults
    • DIY Gift ideas
    • Garden Crafts
    • Home Decor Projects
    • Kitchen Crafts
    • Light Bulb Crafts
    • Luminary Crafts
    • Mason Jar Crafts
    • Needlework
    • Photo Display Ideas
    • Recycled Crafts for Adults
    • Wearable Crafts for Adults
  • Crafts for Kids
    • Animal Crafts for Kids
    • Back to School Crafts
    • Beach Crafts for Kids
    • Camp Crafts
    • Cardboard Tube Crafts for Kids
    • Decoupage Crafts for Kids
    • Easy Crafts for Kids
    • Nature Crafts for Kids
    • Other Kid’s Crafts
    • Paper Plate Crafts for Kids
    • Recycled Crafts for Kids
    • Slimes, Doughs, & Clay
    • Wearable Crafts for Kids
  • Holiday Crafts
    • 4th of July Crafts
    • Christmas Crafts
    • DIY Gift ideas
    • Earth Day Crafts
    • Easter Crafts
    • Father’s Day Crafts
    • Halloween Crafts
    • Memorial Day Crafts
    • Mother’s Day Crafts
    • New Year’s
    • Other Holidays
    • Patriot Day Crafts
    • St. Patrick’s Day Crafts
    • Thanksgiving Crafts
    • Valentine’s Day Crafts
  • Seasonal Crafts
    • Winter Crafts
    • Spring Crafts
    • Summer Crafts
    • Fall Crafts
  • Skip to primary navigation
  • Skip to main content
  • Skip to primary sidebar
  • Skip to footer

Crafts by Amanda

crafts for adults and kid's crafts

  • Tutorials
    • Tutorial Index
    • Adult Crafts
    • Crafts for Kids
    • Crafts for Seniors
    • Recycled Crafts
    • Seasonal Crafts
    • Holiday Crafts
    • Free Printables
    • Craft Collections
  • Adult Crafts
    • Bath & Body
    • Beach Crafts
    • Clay Pot Crafts
    • Crafts for Seniors
    • Decoupage Crafts for Adults
    • DIY Gift ideas
    • Garden Crafts
    • Home Decor Projects
    • Kitchen Crafts
    • Light Bulb Crafts
    • Luminary Crafts
    • Mason Jar Crafts
    • Needlework
    • Photo Display Ideas
    • Recycled Crafts for Adults
    • Wearable Crafts for Adults
  • Crafts for Kids
    • Animal Crafts for Kids
    • Back to School Crafts
    • Beach Crafts for Kids
    • Camp Crafts
    • Cardboard Tube Crafts for Kids
    • Decoupage Crafts for Kids
    • Easy Crafts for Kids
    • Nature Crafts for Kids
    • Other Kid’s Crafts
    • Paper Plate Crafts for Kids
    • Recycled Crafts for Kids
    • Slimes, Doughs, & Clay
    • Wearable Crafts for Kids
  • Holiday Crafts
    • 4th of July Crafts
    • Christmas Crafts
    • DIY Gift ideas
    • Earth Day Crafts
    • Easter Crafts
    • Father’s Day Crafts
    • Halloween Crafts
    • Memorial Day Crafts
    • Mother’s Day Crafts
    • New Year’s
    • Other Holidays
    • Patriot Day Crafts
    • St. Patrick’s Day Crafts
    • Thanksgiving Crafts
    • Valentine’s Day Crafts
  • Seasonal Crafts
    • Winter Crafts
    • Spring Crafts
    • Summer Crafts
    • Fall Crafts
Craft Tutorials | Adult Crafts | Home Decor Projects | Painted Twig Wall Letters
Home Decor Projects

Painted Twig Wall Letters

Author by Jane and Sonja on January 10, 2019 Updated on December 6, 2020

5 from 1 vote
These colorful DIY painted twig wall letters are a fun and trendy way to add a personalized touch to your home or rustic wedding decor this fall.
Jump to Project
These colorful DIY painted twig wall letters are a fun and trendy way to add a personalized touch to your home or rustic wedding decor this fall.
914 shares
  • Share
  • Tweet
  • Flipboard
  • Email

Large block letters are a trendy and easy way to add a personal touch to your home decor. Add a unique, one-of-a-kind touch to your home with these painted twig wall letters. Twigs are used in so many different ways in the craft world, for example, this beautiful Coastal Twig Wreath. They are simply nature’s best craft supply! Don’t you agree?

Painted Twig Letters hanging on wall


Painted Twig Wall Letters

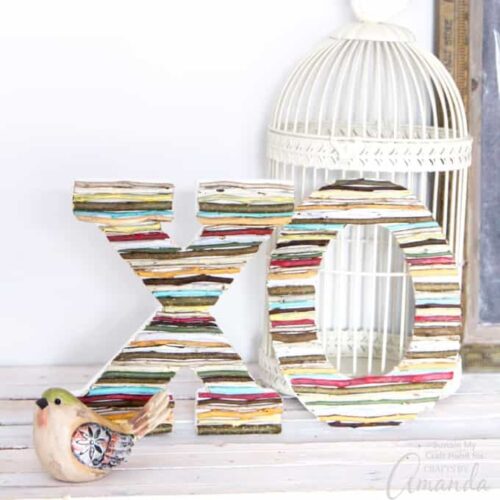
Although you can make any letters, such as initials, a word or even numbers and shapes, we decided to spread some hugs and kisses with an “X” and “O”. This is the perfect craft for autumn, as the bare branches remind us of the leaves about to fall. We chose orange, reds and yellows reminiscent of the leaves changing colours.

These letters are a great way to add some texture and colour to a family wall gallery or on a shelf beside photos and other keepsakes. Moreover, they’d be lovely decor for a rustic, autumn wedding placed on the reception table beside a guest book.

We’ve recently started using wooden block letters in our home decorating and can’t seem to stop. Ever since we made a painted driftwood LAKE sign to go above the rustic DIY wall shelf in our family cottage, we’ve been looking for other ways to use these letters.

As our mom was pruning the pear trees in her backyard, we were reminded of this twig letter craft and this painted twig heart project. So we had to try combining the two to make some painted twig wall letters.

DIY painted twig wall letters decor

Materials Needed for these Painted Twig Wall Letters:

  • Thin branches or twigs (we used pear tree shoots which needed to be pruned)
  • Craft paints in white, orange, yellow, red, green, teal and gold metallic (we used DecoArt Americana Multi-Surface Acrylics in Cotton Ball, Orange Sherbet, Canary, Lipstick, Woodland Green, Coastal Waters and Americana Decor Metallics in Champagne Gold)
  • 9” X and O MDF letters
  • Garden pruning shears
  • Hot glue gun and clear craft glue


supplies needed for painted twig wall letters

Instructions to make Painted Twig Wall Letters:

1. Start by placing generous amounts of the yellow, orange and white paints, side-by-side on a plate or palette. You’ll be blending these three together a bit to create different shades of warm colors. Place the red, green and teal on separate sections of the plate- you don’t want them to mix together.

2. Paint 2-3 twigs with each of the colors to have enough to cover all of the letters. Keep some of the branches unpainted as well. Also, we used the teal sparingly and only needed to paint two of the thinner branches.

painting twigs

3. Starting at the bottom of one letter, snip a branch in any color (maybe start with a thicker one) to size. Glue in place with the hot glue.

4. Continue, up the letter until finished. You’ll want to alternate the colors and thicknesses of the branches to get the nicest effect.

Painted Twig Wall Letters step 3

5. Repeat with the next letter.

Painted Twig Wall Letters step 4

You’re done! Hang your new painted wall letters along a gallery wall, or on their own.

closeup painted twigs on letters

These embellished letters would be super cute in a nursery especially in a pastel color scheme. Or stick with whites and silvers for a neutral winter wedding theme. The possibilities are endless!

painted twigs made into letters

What letters would you use to make these painted twig wall letters?

For an office-friendly wall letter idea, check out this Corkboard Wall Letter. It’s super easy to create and makes a great addition to your office space or dorm room by adding a personalized touch.

For another idea using skinny branches/twigs, these Pom Pom Branches make adorable centerpieces when placed inside a wine bottle or vase!

And don’t miss my String Art Wall Letters, they are so fun!

These colorful DIY painted twig wall letters are a fun and trendy way to add a personalized touch to your home or rustic wedding decor this fall.
Print Project
5 from 1 vote

Painted Twig Wall Letters

These colorful DIY painted twig wall letters are a fun and trendy way to add a personalized touch to your home or rustic wedding decor this fall.
Author: Jane and Sonja

Supplies

  • Thin branches or twigs such as fruit tree off-shoots
  • Craft paints in white orange, yellow, red, green, teal and gold metallic
  • 9 ” X and O MDF letters
  • Garden pruning shears
  • Hot glue gun and clear craft glue

Instructions

  • Place generous amounts of the yellow, orange and white paints, side-by-side on a plate or palette. Place the red, green and teal on separate sections of the plate.
  • Paint 2-3 twigs with each of the colors to have enough to cover all of the letters (keep some of the branches unpainted).
  • Starting at the bottom of one letter, snip a branch in any color (maybe start with a thicker one) to size. Glue in place with the hot glue.
  • Continue, up the letter until finished. Alternate the colors and thicknesses of the branches to get the nicest effect.

Painted Twig Wall Letters

This post was originally published on September 13, 2017

  • Author
  • Recent Posts
Follow Along
Jane and Sonja
Bloggers at Sustain My Craft Habit
Jane and Sonja are sisters, moms and lifelong craft addicts both living near Toronto, Canada with their families. They share their love of creativity, nature and coastal craft and DIY ideas on their blog Sustain My Craft Habit.
Follow Along
Latest posts by Jane and Sonja (see all)
  • Kid-Friendly DIY Stained Glass - February 25, 2025
  • Pressed Flower Resin Magnets - February 21, 2025
  • Fabric Scrap Heart Garland - January 24, 2025
914 shares
  • Share
  • Tweet
  • Flipboard
  • Email

Filed Under: DIY Gift ideas, Home Decor Projects, Recycled Crafts for Adults, Valentine's Day Crafts Tagged With: adult crafts, diy crafts, home decor crafts, recycled projects

Reader Interactions

Free CraftsBy email every week

Latest crafts straight to your inbox!

Comments

  1. Amber says

    February 9, 2020 at 8:46 am

    How do you prep the branches?

    Reply
    • Amanda Formaro says

      February 11, 2020 at 7:59 am

      If they are dirty, be sure to wipe them off well. If you are concerned about bugs, you can bake them in a low temp oven for 30 minutes.

      Reply
5 from 1 vote (1 rating without comment)

Leave a Reply Cancel reply

Your email address will not be published. Required fields are marked *

Rate This Project


The maximum upload file size: 640 MB. You can upload: image, video. Links to YouTube, Facebook, Twitter and other services inserted in the comment text will be automatically embedded. Drop files here

Primary Sidebar

Hi! I’m Amanda and I’m the founder and head designer of Crafts by Amanda. I have spent over 25 years creating projects to share, but it’s not just me anymore! It’s turned into a complete family affair. Come and meet the Creative Team!

Free CraftsBy email every week

Latest crafts straight to your inbox!

All Time Favorites

snowy pinecone candle jar luminaries

Winter Luminaries: Snowy Pinecone…

Make pretty winter luminaries that appear to be covered ... Go To project

Make this wonderful deco mesh pumpkin wreath to hang on your door this fall!

Deco Mesh Pumpkin Wreath…

Adorn your door this fall with a pretty deco mesh ... Go To project

Learn to make these adorable ladybug painted rocks. use special outdoor paint for this adorable garden craft so you can keep garden ladybugs all summer!

Ladybug Painted Rocks…

I'm going to show you how to make these adorable ... Go To project

Reuse those empty prescription pill bottles in all sorts of ways. From organizing to making cookies. Yes, cookies! See how to use your empty pill bottles!

20 Uses for Prescription Pill…

You've been collecting prescription pill bottles for ... Go To project

Meet the Family

Amanda

Founder and Designer

Kristen

Editorial Manager

Lindsay

Social Media Manager

As seen on:

Footer

Favorites

  • Jar Photo Frames
  • No-Sew Roman Shade
  • Paper Flowers
  • How to Make a Scrunchie
  • Mermaid Slime

About

  • Home
  • Meet the Creative Team
  • Work with Us
  • Privacy Policy
  • Accessibility
  • Contact Us

Images/text copyright Amanda Formaro 2020. To feature a post from Crafts by Amanda, you may use one photo credited and linked back directly to the project post.

Free CraftsBy email every week

Latest crafts straight to your inbox!

Copyright ©2025, Crafts by Amanda. All Rights Reserved.
Design by Pixel Me Designs

Rate This Tutorial

Your vote:


To share a photo with your comment click here!

A rating is required
A name is required
An email is required

Recipe Ratings without Comment

Something went wrong. Please try again.