• Home
  • About
    • About Crafts by Amanda
    • Visit Our Recipe Site
  • Work With Us
  • Join
    • Free Newsletters
    • Join our Facebook craft group
↑
  • Tutorials
    • Tutorial Index
    • Adult Crafts
    • Crafts for Kids
    • Crafts for Seniors
    • Recycled Crafts
    • Seasonal Crafts
    • Holiday Crafts
    • Free Printables
    • Craft Collections
  • Adult Crafts
    • Bath & Body
    • Beach Crafts
    • Clay Pot Crafts
    • Crafts for Seniors
    • Decoupage Crafts for Adults
    • DIY Gift ideas
    • Garden Crafts
    • Home Decor Projects
    • Kitchen Crafts
    • Light Bulb Crafts
    • Luminary Crafts
    • Mason Jar Crafts
    • Needlework
    • Photo Display Ideas
    • Recycled Crafts for Adults
    • Wearable Crafts for Adults
  • Crafts for Kids
    • Animal Crafts for Kids
    • Back to School Crafts
    • Beach Crafts for Kids
    • Camp Crafts
    • Cardboard Tube Crafts for Kids
    • Decoupage Crafts for Kids
    • Easy Crafts for Kids
    • Nature Crafts for Kids
    • Other Kid’s Crafts
    • Paper Plate Crafts for Kids
    • Recycled Crafts for Kids
    • Slimes, Doughs, & Clay
    • Wearable Crafts for Kids
  • Holiday Crafts
    • 4th of July Crafts
    • Christmas Crafts
    • DIY Gift ideas
    • Earth Day Crafts
    • Easter Crafts
    • Father’s Day Crafts
    • Halloween Crafts
    • Memorial Day Crafts
    • Mother’s Day Crafts
    • New Year’s
    • Other Holidays
    • Patriot Day Crafts
    • St. Patrick’s Day Crafts
    • Thanksgiving Crafts
    • Valentine’s Day Crafts
  • Seasonal Crafts
    • Winter Crafts
    • Spring Crafts
    • Summer Crafts
    • Fall Crafts
  • Skip to primary navigation
  • Skip to main content
  • Skip to primary sidebar
  • Skip to footer

Crafts by Amanda

crafts for adults and kid's crafts

  • Tutorials
    • Tutorial Index
    • Adult Crafts
    • Crafts for Kids
    • Crafts for Seniors
    • Recycled Crafts
    • Seasonal Crafts
    • Holiday Crafts
    • Free Printables
    • Craft Collections
  • Adult Crafts
    • Bath & Body
    • Beach Crafts
    • Clay Pot Crafts
    • Crafts for Seniors
    • Decoupage Crafts for Adults
    • DIY Gift ideas
    • Garden Crafts
    • Home Decor Projects
    • Kitchen Crafts
    • Light Bulb Crafts
    • Luminary Crafts
    • Mason Jar Crafts
    • Needlework
    • Photo Display Ideas
    • Recycled Crafts for Adults
    • Wearable Crafts for Adults
  • Crafts for Kids
    • Animal Crafts for Kids
    • Back to School Crafts
    • Beach Crafts for Kids
    • Camp Crafts
    • Cardboard Tube Crafts for Kids
    • Decoupage Crafts for Kids
    • Easy Crafts for Kids
    • Nature Crafts for Kids
    • Other Kid’s Crafts
    • Paper Plate Crafts for Kids
    • Recycled Crafts for Kids
    • Slimes, Doughs, & Clay
    • Wearable Crafts for Kids
  • Holiday Crafts
    • 4th of July Crafts
    • Christmas Crafts
    • DIY Gift ideas
    • Earth Day Crafts
    • Easter Crafts
    • Father’s Day Crafts
    • Halloween Crafts
    • Memorial Day Crafts
    • Mother’s Day Crafts
    • New Year’s
    • Other Holidays
    • Patriot Day Crafts
    • St. Patrick’s Day Crafts
    • Thanksgiving Crafts
    • Valentine’s Day Crafts
  • Seasonal Crafts
    • Winter Crafts
    • Spring Crafts
    • Summer Crafts
    • Fall Crafts
Craft Tutorials | Adult Crafts | Beach Crafts | Twig Coastal Wreath
Beach Crafts

Twig Coastal Wreath

Author by Maria Campbell on May 26, 2019 Updated on May 8, 2022

5 from 6 votes
This DIY Coastal Wreath is made from the twigs and seashells you'll find on the beach this summer. A great way to add some beach to your home!
Jump to Project
This DIY Coastal Wreath is made from the twigs and seashells you'll find on the beach this summer.
3149 shares
  • Share
  • Tweet
  • Flipboard
  • Email
coastal wreath pin image

Summer is here and that means I have beach on the brain. I made this twig coastal wreath to add a coastal touch to my home. It brings a fresh, casual, and relaxing feel during the warmer months and rather than having to travel hours to get to the beach, I bring the beach vibe straight into my home.

Coastal twig wreath with seashells and starfish hanging on the wall


Create this inexpensive coastal wreath using minimal craft supplies. This coastal wreath would also look beautiful above these Cottage Style Beach Frames!

DIY Coastal Wreath

If you have a park near your home chances are you can collect a bunch of sticks and create this stunning coastal wreath perfect for your summer home decor. While you’re there, be sure to get enough to make our twig wall letters as well!

DIY coastal decor can either look amazing and elegant or tacky and cheap. If done right, you can create a stunning item for your home, like this beautiful Coastal Ikea Kallax Hack or this Starfish Wall Art.

If done wrong you may be left with a piece of decor you don’t necessarily love. Today I want to show you how to make a statement coastal wreath for your home on a budget while looking gorgeous at the same time!

Coastal twig wreath with starfish and seashells hanging on the wall

Supplies to make your own DIY Coastal Wreath:

  • Branches and Sticks – or you can purchase a Sunburst grapevine wreath
  • Thick cardboard box
  • 2 Lids (find two different sized lids in your kitchen – use a large lid and a medium sized)
  • seashells
  • starfish
  • twine

Helpful Craft Tools

  • Hot glue gun
  • Hot glue sticks
  • Pruning Shears
  • X-Acto Knife or scissors
  • Pen or pencil (to mark two circles)


Coastal wreath with starfish and seashells

How To Make A Coastal Wreath:

  1. Start by cutting out the wreath form by measuring out a large and small circle on the cardboard you are using.
  2. Get two different sized lids from cooking pots, place them on the cardboard and mark an outline with a pen. I used a pair of scissors to cut out the outside and inside of the circle I marked in order to make a ring.

cut your template from cardboard

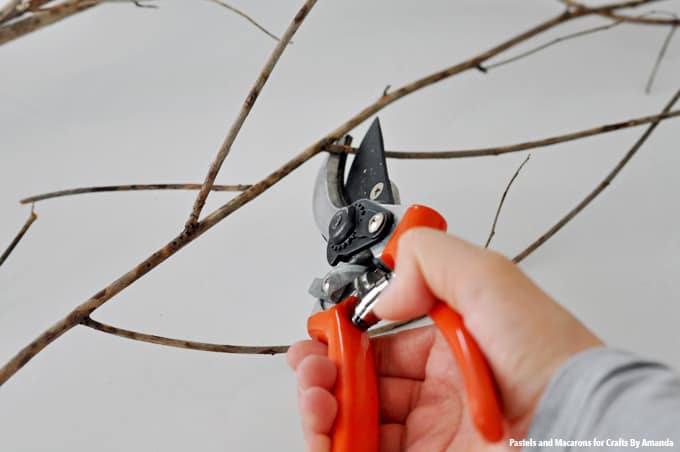
  1. Next, you need to use pruning shears and cut down all the sticks and branches you collected to the desired length you want for the wreath. I made a large wreath, so I made sure to keep all my sticks long.
  2. If I needed to reduce them in size, I would cut them as I was putting the wreath together. I actually found cutting the branches quite therapeutic! haha.

Cut twigs into desired length

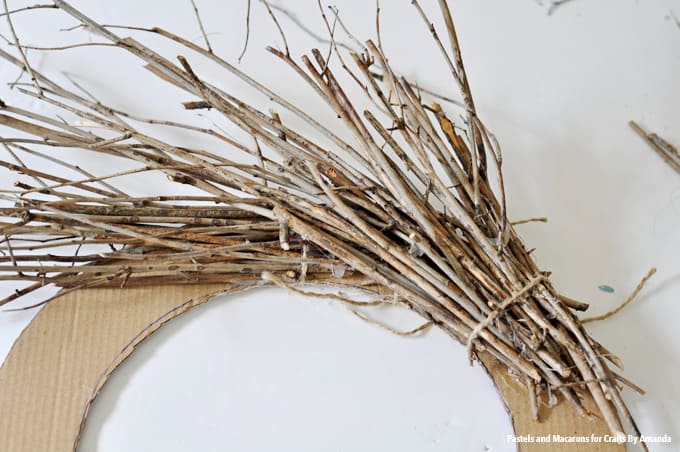
  1. Once the wreath form has been cut and all branches have been trimmed to the desired length, it’s time to assemble the wreath. Start by gathering a bunch of branches and apply a very generous amount of hot glue to the cardboard wreath form.

Adding hot glue

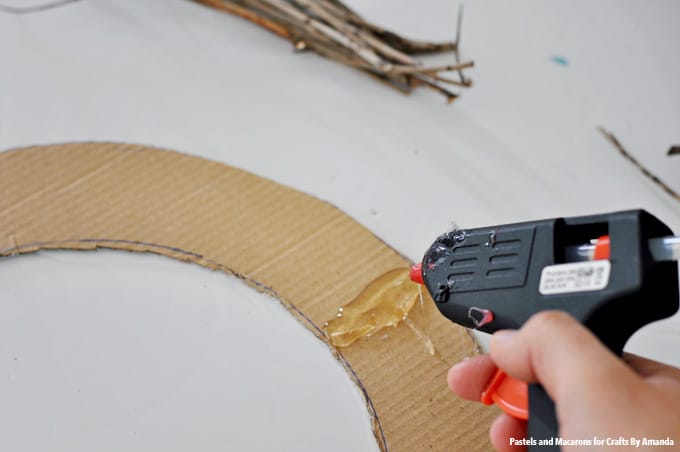
  1. I placed a bunch of branches down making sure they faced on an angle. Hold the branches firmly down until the glue completely sets.
  2. Hot glue sets very fast, but it can take a little longer when you are using such a generous amount of glue. Add extra glue for the twigs that do not adhere properly to make sure they all firmly stick together.

Use hot glue to add twigs to wreath form

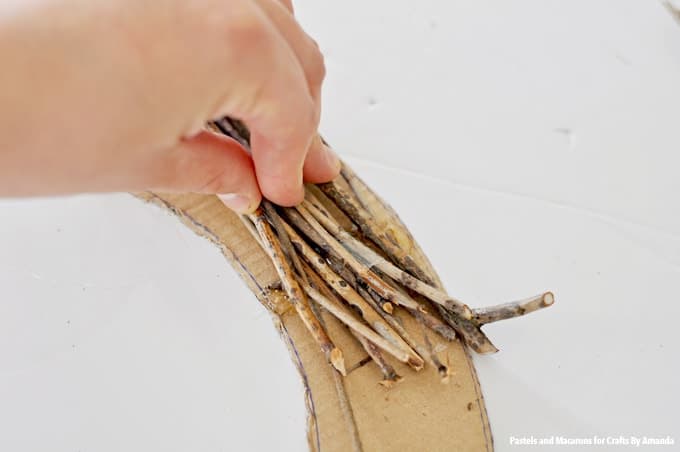
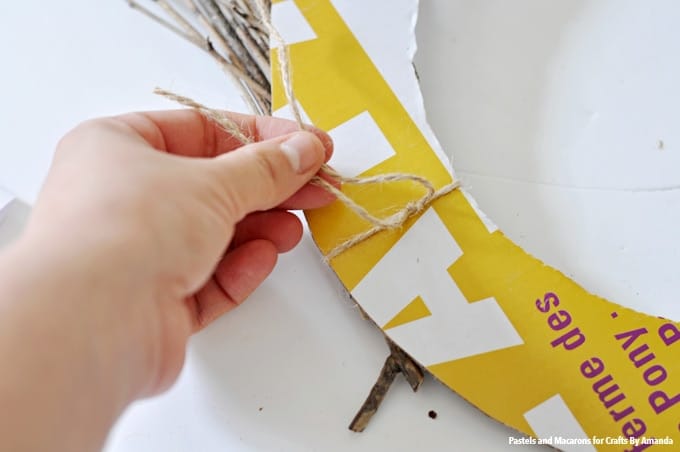
  1. To add extra security I used some twine to tie down the sticks.

Securing twigs with twine

Adding Thickness

Repeat the above but this time, don’t worry too much if the branches do not stick to the glue straight away. After adding the glue quickly tie the branches down with twine and then focus on sticking all of the branches down properly.

This makes it easier than trying to hold the branches in place while waiting for the glue to set. Don’t forget to work backwards, adding more sticks overlapping on top of the ones already stuck down. Continue this process all the way around the wreath until it is full and covered.

You will find that that once you have completed adding all of the stick bunches there will still be spots missing sticks that need to look more full. Not to worry.

Grab individual sticks, add a little hot glue to the end of them and press them in between branches into you get your wreath looking exactly how you want.

Securing twigs with twine

So that no cardboard is visible, cut thicker pieces of sticks into shorter lengths (cut them on an angle- pictured below). Then individually glue them around the inside of the wreath.

adding starfish to the wreath

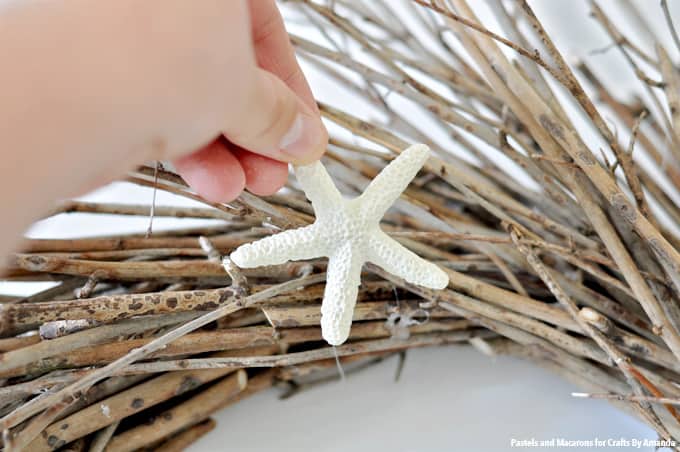
Adding the Starfish and Seashells

Now that your coastal wreath is looking full, it’s time to add starfish, shells and whatever other prettiness you would love all around.

Scatter them around the wreath until you are happy with what you have created. I took the “less is more” approach with my wreath but you can add as much or as little as you like!

Coastal twig wreath with starfish and seashells

RELATED: If you love wreaths, you won’t want to miss this burlap wreath made using a coat hanger!

I hope you love this coastal wreath as much as I do! Now it’s time to display your stunning coastal wreath and showcase a statement piece you DIY’ed all by yourself on a minimal budget. I can guarantee an item like this would be very expensive if you purchased it in a homeware store!

Looking for more beautiful beach craft ideas? Check out…

  • Sea Glass Terra Cotta Planter
  • Driftwood Art with a Starfish
  • Coastal Branch Tree for Christmas
  • Mosaic Turtle Canvas
  • Striped Beach Luminaries
  • Coastal Wood Slice Coasters

More Wreath Projects

  • Tulip Wreath
  • Burlap Wreath
  • Burlap Pumpkin Wreath
  • Halloween Ribbon Wreath
  • Deco Mesh Pumpkin Wreath
  • How to Make A Forsythia Wreath
This DIY Coastal Wreath is made from the twigs and seashells you'll find on the beach this summer.
Print Project
5 from 6 votes

DIY Coastal Wreath

This DIY Coastal Wreath is made from the twigs and seashells you'll find on the beach this summer. A great way to add some beach to your home!
Author: Maria Campbell

Supplies

  • SUPPLIES
  • Branches and Sticks - and lots of them! Collect them at a local park on a bush or beach walk or purchase similar online.
  • Thick Cardboard Box
  • Pruning Shears
  • X-Acto Knife or scissors
  • Pen or pencil to mark two circles
  • 2 Lids find two different sized lids in your kitchen- Use a large lid and a medium sized
  • Hot Glue Gun
  • Hot Glue Sticks
  • Sea Shells in assorted shapes sizes and colors
  • Starfish
  • twine

Instructions

  • DIRECTIONS
  • Mark two circles on the cardboard. A larger circle and a smaller one in the centre of the large circle to create the outline of a ring. Cut the outside of the circle and then the inside of the circle. You will end up with a ring which is what you will you as the wreath form.
  • Cut all branches to desired length.
  • Bunch the sticks together in thick bunches then using your hot glue gun glue down the sticks on an angle on the wreath form. Use twine to tie down the sticks to the wreath from and add extra hot glue wherever you need until all sticks are securely adhered to the cardboard. Continue this process working backwards as you layer more sticks in top of each other.
  • Once all bunches have been glued down, full the wreath further to create the desired look. Do this by individually cutting and adding sticks around the wreath to further fill it and cover any exposed cardboard. Cut little pieces and stick them around the inside of the wreath making sure to completely cover any exposed cardboard.
  • Finish off by adorning it with seashells, starfish and any other pretty beach items you love.
  • Hang and enjoy your beautiful new coastal wreath!

This post was originally published on this blog on May 5, 2017.

  • Author
  • Recent Posts
Maria Campbell
Blogger at Pastels and Macarons
Maria is a wife and stay at home mom to two active toddler boys. She is the creative mind behind Pastels and Macarons a blog all about Home Ideas, DIY's, Crafts and Home Tips. She shares quick and easy projects and tutorials for the home as well as her best tips for maintaining a clean and organized home while running around after small children. A self confessed Pinnaholic and lover of laughter and happiness. You can usually find her with a hot glue gun or a paint brush in one hand and a cup of coffee (or a toddler) in the other!
Latest posts by Maria Campbell (see all)
  • Twig Coastal Wreath - May 26, 2019
3149 shares
  • Share
  • Tweet
  • Flipboard
  • Email

Filed Under: Beach Crafts, Crafts for Seniors, DIY Gift ideas, Home Decor Projects, Summer Crafts Tagged With: adult crafts, beach, coastal, diy wreath, seashell, seashells, wreath

Reader Interactions

Free CraftsBy email every week

Latest crafts straight to your inbox!

Comments

  1. LuAnne Siwiec says

    August 7, 2021 at 1:22 pm

    Amanda, you are so talented, this coastal wreath is so beautiful!
    I cannot make it, is there any way I can purchase it?

    Reply
  2. Theresa Flurchick says

    August 24, 2018 at 11:02 am

    I am not good in crafts or anything that requires putting things together. However, I really love this coastal wreath and would love to try creating it. I have read the directions, but I don’t see where the other box lid comes into play. I want to thank you for sharing this beautiful wreath and I hope to make it for some of my family members who lives down the shore.
    Thank you.

    Reply
    • Amanda Formaro says

      August 27, 2018 at 10:11 am

      Hi Theresa! The two lids are cooking pot lids – they are used to trace around onto the cardboard box. This will create your wreath form. I hope that makes sense!

      Reply
  3. Brenda J Rose says

    July 7, 2017 at 1:33 pm

    I have just taken on the role of the activity and craft leader. Some of the residents are all over 70/80, I tried making cards with them but they just sit there and I find I am actually making the card myself. what kind of crafts would you think suitable for these lovely old ladies. I want them to move their hands etc, and some are even deaf. As I am new to this ideas would be wonderful

    Reply
    • Amanda Formaro says

      July 13, 2017 at 9:35 am

      Hi, Brenda! We’ve actually created a new section on the blog specifically dedicated to seniors crafts. Find senior crafts here! I hope that helps :)

      Reply
  4. Nancy says

    May 8, 2017 at 6:45 am

    It’s lovely! Thanks for sharing.

    Reply
5 from 6 votes (4 ratings without comment)

Leave a Reply Cancel reply

Your email address will not be published. Required fields are marked *

Rate This Project


The maximum upload file size: 640 MB. You can upload: image, video. Links to YouTube, Facebook, Twitter and other services inserted in the comment text will be automatically embedded. Drop files here

Primary Sidebar

Hi! I’m Amanda and I’m the founder and head designer of Crafts by Amanda. I have spent over 25 years creating projects to share, but it’s not just me anymore! It’s turned into a complete family affair. Come and meet the Creative Team!

Free CraftsBy email every week

Latest crafts straight to your inbox!

All Time Favorites

Learn to make these adorable ladybug painted rocks. use special outdoor paint for this adorable garden craft so you can keep garden ladybugs all summer!

Ladybug Painted Rocks…

These colorful little ladybug painted rocks are the ... Go To project

snowy pinecone candle jar luminaries

Winter Luminaries: Snowy Pinecone…

Make pretty winter luminaries that appear to be covered ... Go To project

Make this wonderful deco mesh pumpkin wreath to hang on your door this fall!

Deco Mesh Pumpkin Wreath…

Adorn your door this fall with a pretty deco mesh ... Go To project

Reuse those empty prescription pill bottles in all sorts of ways. From organizing to making cookies. Yes, cookies! See how to use your empty pill bottles!

20 Uses for Prescription Pill…

You've been collecting prescription pill bottles for ... Go To project

Meet the Family

Amanda

Founder and Designer

Kristen

Editorial Manager

Lindsay

Social Media Manager

As seen on:

Footer

Favorites

  • Jar Photo Frames
  • No-Sew Roman Shade
  • Paper Flowers
  • How to Make a Scrunchie
  • Mermaid Slime

About

  • Home
  • Meet the Creative Team
  • Work with Us
  • Privacy Policy
  • Accessibility
  • Contact Us

Images/text copyright Amanda Formaro 2020. To feature a post from Crafts by Amanda, you may use one photo credited and linked back directly to the project post.

Free CraftsBy email every week

Latest crafts straight to your inbox!

Copyright ©2025, Crafts by Amanda. All Rights Reserved.
Design by Pixel Me Designs

Rate This Tutorial

Your vote:


To share a photo with your comment click here!

A rating is required
A name is required
An email is required

Recipe Ratings without Comment

Something went wrong. Please try again.