• Home
  • About
    • About Crafts by Amanda
    • Visit Our Recipe Site
  • Work With Us
  • Join
    • Free Newsletters
    • Join our Facebook craft group
↑
  • Tutorials
    • Tutorial Index
    • Adult Crafts
    • Crafts for Kids
    • Crafts for Seniors
    • Recycled Crafts
    • Seasonal Crafts
    • Holiday Crafts
    • Free Printables
    • Craft Collections
  • Adult Crafts
    • Bath & Body
    • Beach Crafts
    • Clay Pot Crafts
    • Crafts for Seniors
    • Decoupage Crafts for Adults
    • DIY Gift ideas
    • Garden Crafts
    • Home Decor Projects
    • Kitchen Crafts
    • Light Bulb Crafts
    • Luminary Crafts
    • Mason Jar Crafts
    • Needlework
    • Photo Display Ideas
    • Recycled Crafts for Adults
    • Wearable Crafts for Adults
  • Crafts for Kids
    • Animal Crafts for Kids
    • Back to School Crafts
    • Beach Crafts for Kids
    • Camp Crafts
    • Cardboard Tube Crafts for Kids
    • Decoupage Crafts for Kids
    • Easy Crafts for Kids
    • Nature Crafts for Kids
    • Other Kid’s Crafts
    • Paper Plate Crafts for Kids
    • Recycled Crafts for Kids
    • Slimes, Doughs, & Clay
    • Wearable Crafts for Kids
  • Holiday Crafts
    • 4th of July Crafts
    • Christmas Crafts
    • DIY Gift ideas
    • Earth Day Crafts
    • Easter Crafts
    • Father’s Day Crafts
    • Halloween Crafts
    • Memorial Day Crafts
    • Mother’s Day Crafts
    • New Year’s
    • Other Holidays
    • Patriot Day Crafts
    • St. Patrick’s Day Crafts
    • Thanksgiving Crafts
    • Valentine’s Day Crafts
  • Seasonal Crafts
    • Winter Crafts
    • Spring Crafts
    • Summer Crafts
    • Fall Crafts
  • Home
  • About
    • About Crafts by Amanda
    • Visit Our Recipe Site
  • Work With Us
  • Join
    • Free Newsletters
    • Join our Facebook craft group
  • Skip to primary navigation
  • Skip to main content
  • Skip to primary sidebar
  • Skip to footer

Crafts by Amanda

crafts for adults and kid's crafts

  • Tutorials
    • Tutorial Index
    • Adult Crafts
    • Crafts for Kids
    • Crafts for Seniors
    • Recycled Crafts
    • Seasonal Crafts
    • Holiday Crafts
    • Free Printables
    • Craft Collections
  • Adult Crafts
    • Bath & Body
    • Beach Crafts
    • Clay Pot Crafts
    • Crafts for Seniors
    • Decoupage Crafts for Adults
    • DIY Gift ideas
    • Garden Crafts
    • Home Decor Projects
    • Kitchen Crafts
    • Light Bulb Crafts
    • Luminary Crafts
    • Mason Jar Crafts
    • Needlework
    • Photo Display Ideas
    • Recycled Crafts for Adults
    • Wearable Crafts for Adults
  • Crafts for Kids
    • Animal Crafts for Kids
    • Back to School Crafts
    • Beach Crafts for Kids
    • Camp Crafts
    • Cardboard Tube Crafts for Kids
    • Decoupage Crafts for Kids
    • Easy Crafts for Kids
    • Nature Crafts for Kids
    • Other Kid’s Crafts
    • Paper Plate Crafts for Kids
    • Recycled Crafts for Kids
    • Slimes, Doughs, & Clay
    • Wearable Crafts for Kids
  • Holiday Crafts
    • 4th of July Crafts
    • Christmas Crafts
    • DIY Gift ideas
    • Earth Day Crafts
    • Easter Crafts
    • Father’s Day Crafts
    • Halloween Crafts
    • Memorial Day Crafts
    • Mother’s Day Crafts
    • New Year’s
    • Other Holidays
    • Patriot Day Crafts
    • St. Patrick’s Day Crafts
    • Thanksgiving Crafts
    • Valentine’s Day Crafts
  • Seasonal Crafts
    • Winter Crafts
    • Spring Crafts
    • Summer Crafts
    • Fall Crafts
Craft Tutorials | Recycled Crafts | Paper Plate Crafts for Kids | Paper Plate Frisbees
Paper Plate Crafts for Kids

Paper Plate Frisbees

Author by Amanda Davis on July 27, 2020 Updated on July 28, 2020

5 from 17 votes
Turn ordinary paper plates into a fun frisbee! This paper plate frisbee craft is great for spring, summer, or as a group project.
Jump to Project
two frisbees from paper plates
17064 shares
  • Share
  • Tweet
  • Flipboard
  • Email

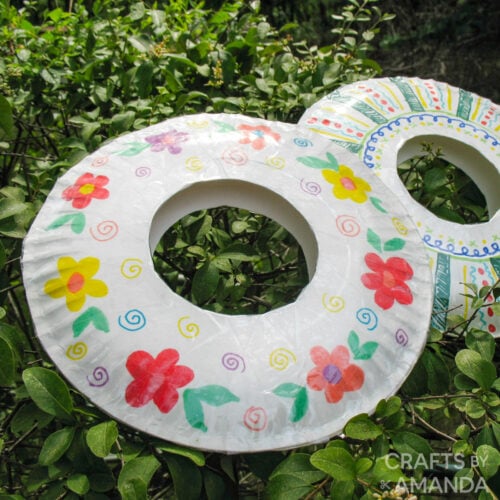
Summer is here and the kids are outside more and more. Whether it’s summer camp, playing in the park, or just hanging out in the neighborhood, outdoors is where it’s at! This is a fun project that can be made (outside if you want to!) easily and with little supervision. When done, have fun tossing your new paper plate frisbee around with your friends, but don’t let the dog get it!

a paper plate frisbee


Paper Plate Frisbee

This easy kids craft will keep them occupied throughout the summer. Kids will love personalizing their frisbees with their artwork and fun ideas! It also makes a great camp craft to do with a group. All you need are paper plates, tape, scissors, and crayons or markers to decorate with.

two frisbees made from paper plates

How to Make Paper Plate Frisbees

One package of paper plates will make a LOT of frisbees, so if your kids have friends over, or you’re looking for a project for camp or a classroom, this frisbee craft is perfect. This project is easy for kids, but younger children may need a little help from a grown-up. 

Paper Plate Frisbees

  1. Place both plates right side up, as if you were going to put food on them. Cover them with clear shipping tape, allowing the excess tape to overlap, but do not fold it over. Use scissors to cut off the excess around the plate.
  2. Turn the plates upside down and use markers or crayons to decorate as you wish.
  3. Place both plates together so that the decorated sides are facing out. Holding the plates together, cut a circle out of the center of each plate.
  4. Place both plates, decorated side facing up, onto the work surface. Using the clear shipping tape, cover the decorated side, overlapping the center circle. Fold the edges over through the center circle and trim the edges of the outside of the plate.

Paper Plate Frisbees

When the kids are done, have a throwing competition to see whose goes the farthest. You can also have art competitions and award ribbons or pins to most creative, most colorful, most unique, and so on.

two frisbees from paper plates

Have a lot of leftover paper plates?

We have ideas for you to put them to use!

  • These colorful Paper Plate Tropical Fish are a fun painting craft the kids will love.
  • A great summer project using paper plates would be these beautiful Watermelon Suncatchers. Hang them up in the window for a pretty display the kids will be proud of.
  • Or you can check out our entire collection of paper plate crafts for kids!
two frisbees from paper plates
Print Project
5 from 17 votes

Paper Plate Frisbees

Turn ordinary paper plates into a fun frisbee! This paper plate frisbee craft is great for spring, summer, or as a group project.
Age Group: Kids Crafts
Project Type: Crafts

Supplies

  • 2 paper plates for each frisbee
  • colorful markers or crayons
  • clear shipping tape

Craft tools

  • Scissors

Instructions

  • Place both plates right side up, as if you were going to put food on them. Cover them with clear shipping tape, allowing the excess tape to overlap, but do not fold it over. Use the scissors to cut off the excess around the plate.
  • Turn the plates upside down and use markers or crayons to decorate as you wish.
  • Place both plates together so that the decorated sides are facing out. Holding the plates together, cut a circle out of the center of each plate.
  • Place both plates, decorated side facing up, onto the work surface. Using the clear shipping tape, cover the decorated side, overlapping the center circle. Fold the edges over through the center circle and trim the edges of the outside of the plate.
  • Place the two plates together, decorative side facing outward, and tape all of the edges together.

Expert Tips & FAQs

When the kids are done, have a throwing competition to see whose goes the farthest! You can also have art competitions and award ribbons or pins to most creative, most colorful, most unique, and so on.

paper plate frisbees outside

This post originally appeared here on Jun 24, 2012.

  • Author
  • Recent Posts
Amanda Davis
Amanda Davis is the crafty, entrepreneurial mother of four children. She loves to bake, cook, make kid's crafts and create decorative items for her home. She is a crafting expert and guru in the kitchen and has appeared online and in print publications many times over the years.
Latest posts by Amanda Davis (see all)
  • Cinnamon Ornaments - December 9, 2025
  • Waterless Snow Globes - December 5, 2025
  • Deco Mesh Poinsettia Flower - December 2, 2025
17064 shares
  • Share
  • Tweet
  • Flipboard
  • Email

Filed Under: Camp Crafts, Easy Crafts for Kids, Paper Plate Crafts for Kids, Summer Crafts Tagged With: boys, outdoors, paper plates, toys

Reader Interactions

Free CraftsBy email every week

Latest crafts straight to your inbox!

Comments

  1. Pdwheel says

    July 15, 2024 at 6:49 pm

    I was having trouble understanding the tape that is cut out and then folded over, but if we can staple them or glue them together, I can use this for a “take-home” project as I never know if the kids have access to wide shipping tape. I am sure they will love them.

    Reply
  2. William Simancas says

    July 8, 2024 at 10:15 am

    Can we use duct tape?

    Reply
  3. Amb Ambs says

    July 2, 2023 at 4:23 pm

    Great! I am apart of a missions trip arts and crafts section and can’t wait for the kids to use these!!! And can’t wait to use more of your guys crafts! They look so fun!!!❤

    Reply
  4. Beth says

    July 21, 2017 at 10:35 am

    I love this idea. Sounds expensive though with all the tape. I need to have crafts for about 100 kids. Is there a cheaper way to do?

    Reply
    • Amanda Formaro says

      July 30, 2017 at 10:12 am

      Hi Beth! I only covered the plates in tape in case they were left outside or got wet somehow. Aside from attaching them together, you don’t need to cover the plates with tape :)

      Reply
  5. Jessie says

    July 5, 2015 at 7:44 am

    HI, did this with my daughter weeks ago
    it was so easy.
    she took the frisbee with her to school and they adapted it into crafting class :D
    thanks for sharing :D

    Reply
    • Amanda Formaro says

      July 7, 2015 at 9:45 am

      How fun!

      Reply
  6. Ehsan says

    April 10, 2015 at 7:01 pm

    Can you send me a video of you making it so that I can understand it better. I am a visual person. Thanks !!

    Reply
    • Amanda Formaro says

      April 15, 2015 at 10:50 am

      Sorry I don’t have a video for this project

      Reply
    • Jessie says

      July 5, 2015 at 7:42 am

      Ehsan, it is not so hard to understand even without a video…. simple draw on two paperplates and then glue or tape them together :D

      Reply
  7. Andrea says

    July 21, 2013 at 3:09 am

    Hi I run a saturday club for 3 to 9 year olds in Tenerife in the Canary Islands, (of the coast of Africa)! great idea but just one question, What is Shipping tape? is it sticky? and why do you use t? I hope these are’nt dumb questions, i’ve had a go at making them and just used a tacky glue to stick them together, but I’m still curious, so could you please put me out of my misery!!!

    Reply
    • Amanda Formaro says

      July 21, 2013 at 9:16 am

      Hi Andrea! Shipping tape, or mailing tape, is just a clear tape used when closing boxes for shipping and mailing purposes. The reason I used the shipping tape was twofold: 1) to hold everything together, and 2) to protect the drawings and the paper plates from any rain or spills from the kids. :)

      Reply
      • Andrea says

        August 5, 2013 at 9:53 am

        Ahhh, thanks Amanda! since writing this I have actually made one using a strong thick clear tape, and it works great, my craft club will be making them in the autumn so will post a picture if that’s possible!.

        Reply
        • Amanda Formaro says

          August 9, 2013 at 8:50 am

          Looking forward to it!

          Reply
  8. Shelly says

    July 19, 2013 at 1:35 pm

    Amanda, Thanks for this really cute idea. I work for an after school youth program and one of my duties is craft instructor. I’m always looking for crafts projects that can be done in 1/2 hours time and with 10 t0 12 students at a time , kindergarten thru 5th grade. And on a limited budget. I haven’t done these yet because it’s summer break but can’t wait to give it try.

    Thanks again, Shelly

    Reply
    • Amanda Formaro says

      July 21, 2013 at 9:18 am

      Thanks so much Shelly! Sounds like a fun job! :)

      Reply
  9. valleygirl says

    July 11, 2013 at 11:24 am

    Wow, we read these directions a few times and we are totally lost. Just going off the picture and going to do our own thing but the tape directions make no sense at all. I’m not sure how everyone else hasn’t noticed? Or are we just having an off day over here? Great idea, just really poorly written (and with spelling errors, ugh).

    Reply
    • Amanda Formaro says

      July 12, 2013 at 5:21 pm

      Hi Valley girl. I wrote to you via email but didn’t receive a response. I went over the instructions again and they look fine to me, though I did correct the spelling errors, thanks for pointing that out. Let me know where you are having trouble and I will do my best to help.

      Reply
    • Anna says

      June 12, 2016 at 10:17 am

      It looks like the entire plate, inside and out are being covered with tape before the edges are taped together with some tape being folded over the center circles to make it more durable. I don’t know how it changes how they fly. If you are doing this as a one time thing, you could probably just staple the plates together. You could probably use clear contact paper as well, but it is a thicker mil and may weigh it down too much… It could make a good science experiment to see how different methods fly. It appears that the objective is to just cover it all without any big amounts of excess getting in the way by trimming the outside edges.

      Reply
      • Anna says

        June 12, 2016 at 10:18 am

        And I have typos, too… ?

        Reply
    • CeCe of twins says

      December 17, 2021 at 6:05 pm

      Can’t believe you were having problems doing this. She even stated in a different post that she was doing the tape incase the kids left them outside in the rain . Simple as pie to understand her directions. And really, calling out her typo errors? You could have replied back to her tho, since she did reach out

      Reply
    • SMGK91 says

      April 28, 2022 at 2:46 am

      Valleygirl, I find your comment extremely rude and uncalled for. The instructions are perfectly clear, as you stated, I think it is more of a problem on your side and not being able to follow simple instructions rather than the way the post has been written. As we teach kids, if you have nothing nice to say, don’t say anything at all, especially when somene is trying to help.

      Reply
    • Charles Masterson says

      January 18, 2023 at 4:10 pm

      Or you can just look at the photo.

      Reply
  10. Kelsey says

    December 12, 2012 at 3:38 pm

    These were great! This helped me and my son get his homework done! He is in Kindergarten and this was the perfect thing for him to do on his own with my supervision! My Preschool daughter made one too (I just had to do the cutting)!

    Reply
    • Amanda says

      December 13, 2012 at 6:44 am

      That’s great Kelsey, so glad you had fun with it!

      Reply
  11. barbara burns says

    July 24, 2012 at 6:02 pm

    so clever

    Reply
  12. jet says

    June 25, 2012 at 9:49 am

    wooow this is a cool awesome idea!!!
    Loved it!!!!
    Thank you for sharing it, and the great tute as well;-D

    Reply
  13. Hallie says

    June 24, 2012 at 10:12 pm

    Cute! :)

    Reply
    • Amanda says

      June 27, 2012 at 12:41 am

      Thank Hallie :)

      Reply
  14. Nancy says

    June 24, 2012 at 8:28 pm

    I love doing RECYCED CRAFTS ,SEASONAL CRAFTS.

    Reply
    • Amanda says

      June 27, 2012 at 12:41 am

      Thanks Nancy :)

      Reply
5 from 17 votes (13 ratings without comment)

Leave a Reply Cancel reply

Your email address will not be published. Required fields are marked *

Rate This Project


The maximum upload file size: 640 MB. You can upload: image, video. Links to YouTube, Facebook, Twitter and other services inserted in the comment text will be automatically embedded. Drop files here

Primary Sidebar

Hi! I’m Amanda and I’m the founder and head designer of Crafts by Amanda. I have spent over 25 years creating projects to share, but it’s not just me anymore! It’s turned into a complete family affair. Come and meet the Creative Team!

Free CraftsBy email every week

Latest crafts straight to your inbox!

All Time Favorites

snowy pinecone candle jar luminaries

Winter Luminaries: Snowy Pinecone…

Make pretty winter luminaries that appear to be covered ... Go To project

Make this wonderful deco mesh pumpkin wreath to hang on your door this fall!

Deco Mesh Pumpkin Wreath…

Adorn your door this fall with a pretty deco mesh ... Go To project

Learn to make these adorable ladybug painted rocks. use special outdoor paint for this adorable garden craft so you can keep garden ladybugs all summer!

Ladybug Painted Rocks…

These colorful little ladybug painted rocks are the ... Go To project

Reuse those empty prescription pill bottles in all sorts of ways. From organizing to making cookies. Yes, cookies! See how to use your empty pill bottles!

20 Uses for Prescription Pill…

You've been collecting prescription pill bottles for ... Go To project

Meet the Family

Amanda

Founder and Designer

Kristen

Editorial Manager

Lindsay

Social Media Manager

As seen on:

Footer

Favorites

  • Jar Photo Frames
  • No-Sew Roman Shade
  • Paper Flowers
  • How to Make a Scrunchie
  • Mermaid Slime

About

  • Home
  • Meet the Creative Team
  • Work with Us
  • Privacy Policy
  • Accessibility
  • Contact Us

Images/text copyright Amanda Davis 2025. To feature a post from Crafts by Amanda, you may use one photo credited and linked back directly to the project post.

Free CraftsBy email every week

Latest crafts straight to your inbox!

Copyright ©2025, Crafts by Amanda. All Rights Reserved.
Design by Pixel Me Designs

Rate This Tutorial

Your vote:


To share a photo with your comment click here!

A rating is required
A name is required
An email is required

Recipe Ratings without Comment

Something went wrong. Please try again.