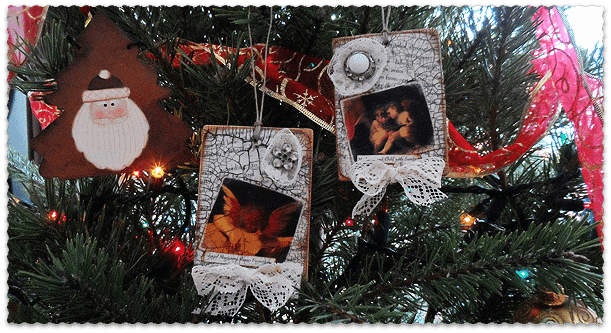

Cherubs and Christmas certainly go together, though they often make appearances during Valentine’s Day and Easter as well. These adorable little angels are always among us and there are varying beliefs on what their powers behold. Many artists over the centuries have captured these little cherubs in paintings, and so I’ve decided to capture that in these ornaments.
In case anyone is curious, the paintings that you see on these ornaments are titled “Angel Musician” (1520) and “Madonna and Child with Saints” (1518) both by Rosso Fiorentino. The latter is actually only a portion of the full painting where the cherubs are sitting at the foot of Madonna, child and the saints.
 A couple months ago as the weather was cooling and the last of the garage sales were popping up everywhere, I found a couple of angel calendars. Cherubs are cute for sure, but have never really been something I was big on, as far as decor or crafting went. But after finding One Step Crackle and seeing what it could do, I knew these calendars were ideal candidates for ornaments and other art.

It was kind of funny that DecoArt asked if I wanted to offer you guys a giveaway of their products since I already had this project planned. It’s a stocking full of goodies for you to try out! I know you’ll love them :) They are celebrating the 12 Days of Christmas on their website and have a new project everyday for you to try. So be sure to check it out! I’ll give you the details of the giveaway at the end of this post.

In hindsight, since it seems that so many of my projects are an experiment, I would have done a couple of things differently, but overall I’m thrilled with the results. One thing I would have done was used a more subtle stain, gray perhaps.

Another would have been to make the cracks smaller, which you can do by applying a thinner coat of the One Step Crackle. However, I’m still happy with them and my daughter really liked them too, so I’m keeping one and so is she.
 To make these ornaments, I started with some wood rectangle signs I’ve had forever. You can find them in the aisle that has all the wooden balls, wood hearts, etc. I cut some text out of the calendars that explained all about angels in three different languages.
 To make the holes for the hangers I covered the top of each rectangle with painter’s tape then drilled a small hole. I used a toothpick to bore it out and sandpaper to smooth it.
 Next I took the text that I cut for the rectangles and trimmed it so that some of the wood still showed and distressed the edges of the paper with Distress Ink. Note that I cut 4 pieces, one for each side. On the back I used the French text.
 I cut two cherub pictures from the back of the calendar to use on the ornaments. I sanded the edges of the pictures to rough them up and decoupaged them over the text rectangles. I also cut out the title of the cherub painting and decoupaged that on as well. When the decoupage medium was dry I added a coat of One Step Crackle.
 The crackle has to dry for a while, so I pulled out some old costume jewelry I bought at the flea market and added a little lace trim.
 See the cracks? You’ll start to see those develop as the medium dries.
 The next step is staining. I used antiquing gel and a reddish brown color at first. I ended up not really liking it so I mixed in a little black and went over it again. If I had it to do over again I would probably choose a gray or grayish blue. But as you can see you just paint over the crackle once it’s dry and wipe it back. It will leave the stain in the cracks.

And of course the final step is to add your hanger, I used twine.

Go to the end of this post for a more detailed and printable version of these instructions.

The Giveaway
There are lots of chances to win this fabulous prize pack from DecoArt, just use the entry form below! You must have a U.S. shipping address and be 18 or older. Entries will be accepted through 12/17/12!
More Ornament Crafts
- Cinnamon Ornaments
- Scrabble Tile Ornaments
- Pom Pom Ornaments
- Beach Sign Ornaments
- Twisted Paper Ornaments
- Decoupage Wood Slice Ornaments

Vintage Crackled Cherub Ornaments
Supplies
- 2 wood rectangles
- Pictures of cherubs and text cold use old book pages
- Distress Ink
- Costume jewelry
- Lace trim
- Decoupage medium
- One Step Crackle
- Antiquing gel
- Paint to mix with gel brown, black, gray, etc
- E6000 glue
- Twine
Instructions
- Cut cherub pictures and text out of the calendars.
- To make the holes for the hangers cover the top of each rectangle with painter's tape and drill a small hole. Use a toothpick to bore it out and sandpaper to smooth it.
- Trace rectangles onto the text sheets on an angle. You will need 4 all together, 2 for each rectangle, front and back. Trim the paper so that some of the wood still shows and distress the edges of the paper with Distress Ink. Allow ink to dry then decoupage the text onto the rectangles.
- Sand the edges of the cherub pictures to rough them up and decoupaged them over the text on the rectangles.When the decoupage medium is dry apply a coat of One Step Crackle. A thick coat will produce larger cracks, while a thin coat will produce finer cracks. Do not overwork, paint it on and leave it. The crackle coat needs 2-4 hours to dry.
- Add lace trim around the back of the costume jewelry using a hot glue gun.
- Mix your antiquing gel and preferred color of paint together. Paint the mixture directly over the entire rectangle and use a soft cloth to wipe it back. This will remove the stain from the surface and leave the stain in the cracks. Use can use a damp cloth and gently rub it over to make the stain more subtle.
- Hot glue the lace trimmed jewel to the corner of the ornament and make a lace bow to attach to the bottom. Use E6000 for this step.
- Add a twine hanger.
- Tie Dye Beach Towels - July 24, 2026
- Swirling Twirling Ladybugs - July 21, 2026
- Drip Tie Dye Backpack - July 17, 2026


Ruth Warren says
Always looking for new crafty ways! These are adorable.
Shellie Thompson McGlone says
so pretty, great give away
Michelle Looi says
Love the crackle! The outcome Is absolutely gorgeous! Thank you for the chance!
Maria U says
This is beautiful! I would be privileged to have such beautiful ornaments on my tree :-)
Jessica Wright says
Your crafts are so awesome!! Love everything you do; you are so talented!
Amanda says
Thanks so much Jessica! :)
sandi allen says
Love these sweet ornaments!
Anne says
These are so pretty! Thanks for sharing the instructions and thanks for sharing about the giveaway too. Awesome!
Tracy says
I love that crackle look on your ornaments….the possibilities are endless! Thanks ♥
Nancy D says
I love to crackle! These are great! I have most of the supplies for this project too! I’m so glad I found your site, so many of the projects are my style! I’ve already subbed with my email so I won’t miss any posts!
Amanda says
Thank you so much Nancy! :)
Linda says
These are so cute!! I would use them in lots of different ways…
Cindi says
I decorate our home all year round with vintage, country and
shabby chic items…Your Cracked Cherub Ornaments and fabulous
and when they were done on the Christmas tree, I would hang them
on peg racks and other things, year around!
Many thanks, Cindi
beverly carter says
love all the crafts
beverly carter says
love all the crafts you do
Sunny C says
Hey Amanda;
These Ornaments are just Stunning!!! You are so talented.
I Love Cherubs!!!
Thank-You for such easy instructions. I must try to many some of these soon!!!!
Happy Holidays, Everyone!!!! :-)
Linda Darden says
Those are adorable. I’m anxious to try it!
Sheila says
What a neat effect the Crackle paint gives. Will need to look for some to experiment with.
Kristi says
I love love love this!!! I’m going through a vintage-inspired craft phase currently so I’m going to have to draw inspiration from this and try something similar! Thanks for sharing!
Faye Jones says
I love the Vintage Crackled Cherub Ornaments. I am always looking for new things to make. This sounds perfect.
Faye
Dot Ness says
This is a lovely project. Looking forward to making it. Thank you for sharing
Leslie says
Great giveaway. THanks!
sandra k williams says
i love angels so guess what i will be making tomorrow?
Nancy Carr says
I must do these. Thanks for telling us how. Happy Holidays!