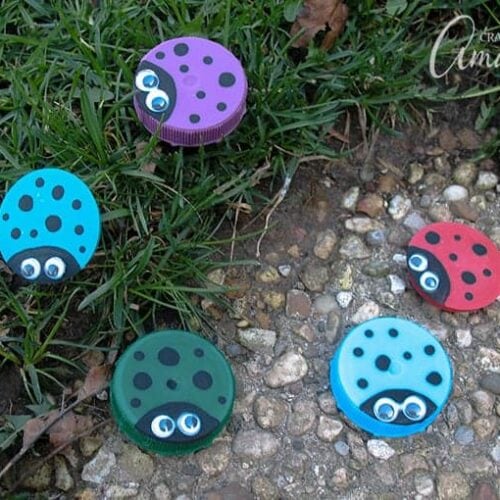
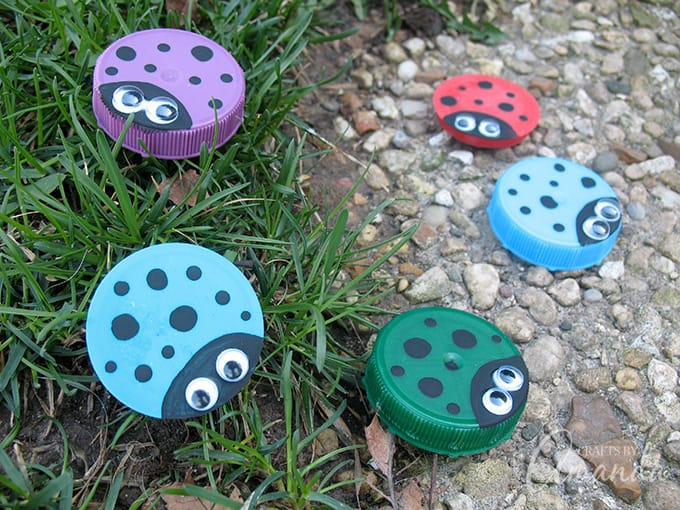
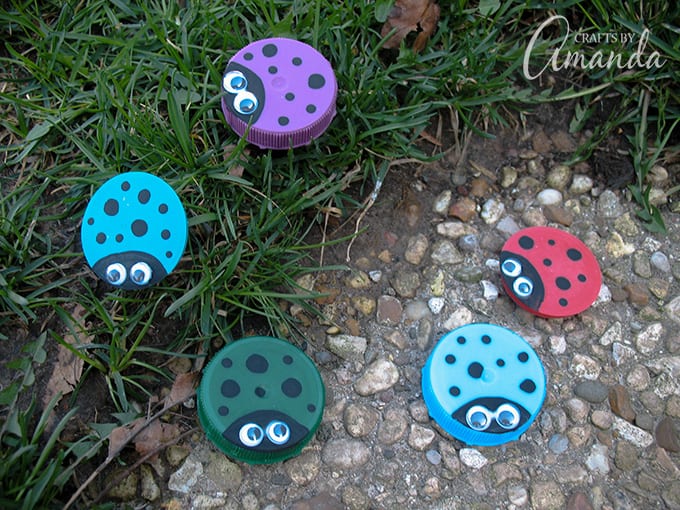
I’ve been saving the lids from my milk jugs just to make these little Plastic Lid Ladybugs, they make a very simple kid’s craft and fit perfectly in the recycled crafts category! You might recognize my Ladybug Painted Rocks, or the multitude of other ladybug crafts I’ve done in the past. They are just so adorable, and make a perfectly simple craft project for every age!
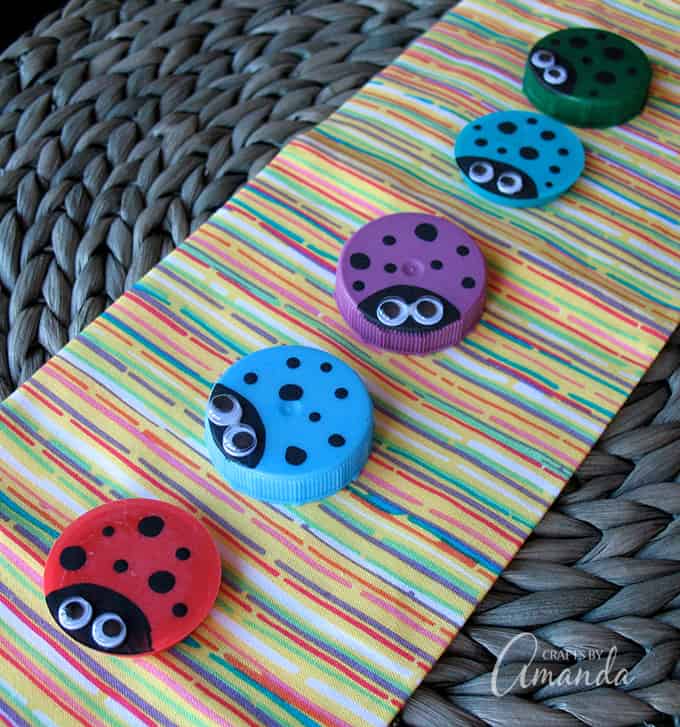
Plastic Lid Ladybugs
I didn’t take any step by step photos of these as they are so easy, step by steps just aren’t necessary. These plastic lid ladybugs are a really easy craft for kids, and you only need a few supplies.
Optional: You could make these into ladybug magnets, but you would need to fill the lid with something first. I would recommend using something lightweight, like cardboard. Cut it into a circle and glue it inside the cap, then add a magnet.
Tools to make Plastic Lid Ladybugs
- plastic lid from milk/juice jug
- black acrylic craft paint
- 2 small wiggle eyes
- paintbrush
- white craft glue
This plastic lid ladybugs craft is a great project to do with kids, or as a group project. A great opportunity for teaching kids to reuse and repurpose things in unique ways, all while having fun and being creative! Another great recycled ladybug project is these Egg Carton Ladybugs, or you might also be interested in the super adorable Recycled Jar Lid Owl Craft!
This post was originally published on this blog on April 10, 2010.

Plastic Lid Ladybugs
Supplies
- plastic lid from milk jug
- black acrylic craft paint
- 2 small wiggle eyes
- paintbrush
- white craft glue
Instructions
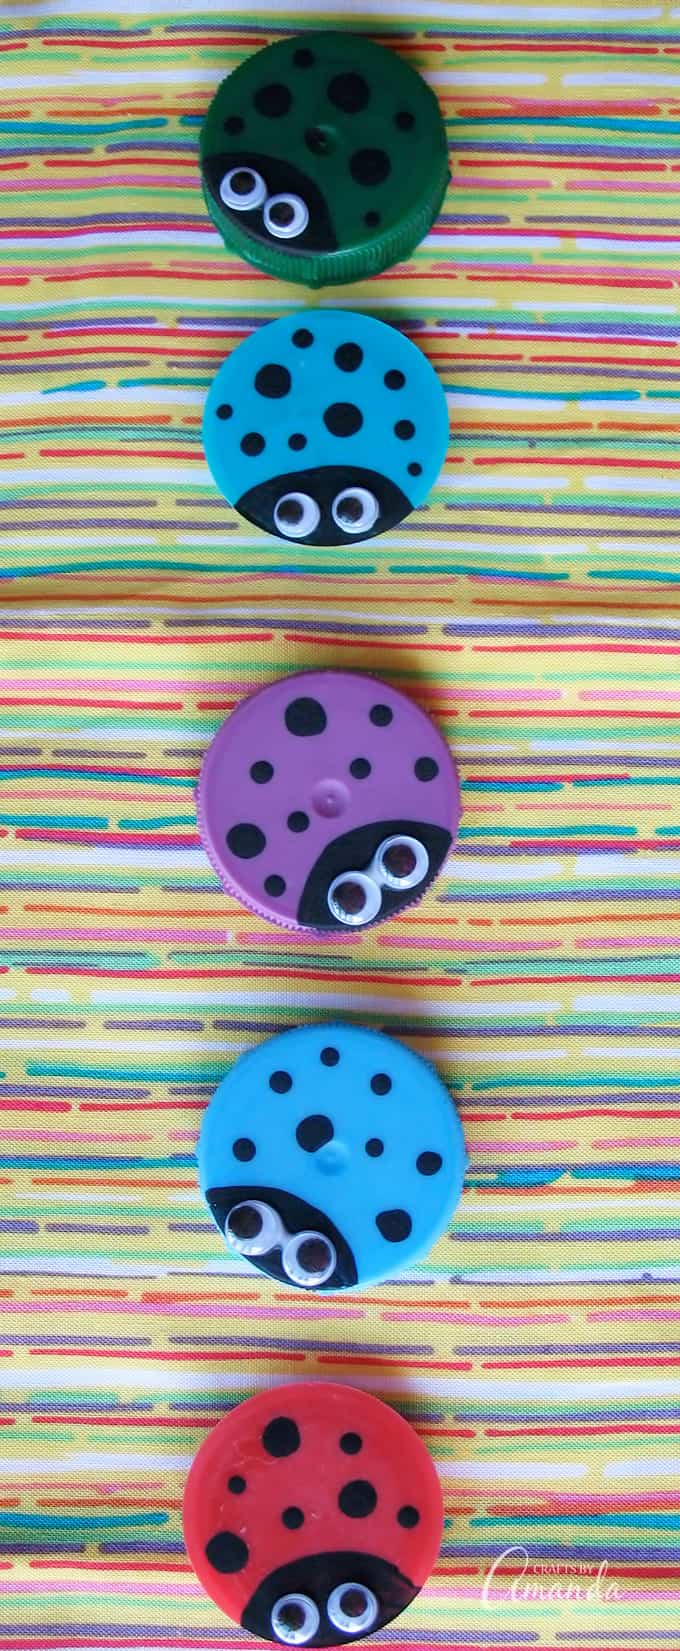
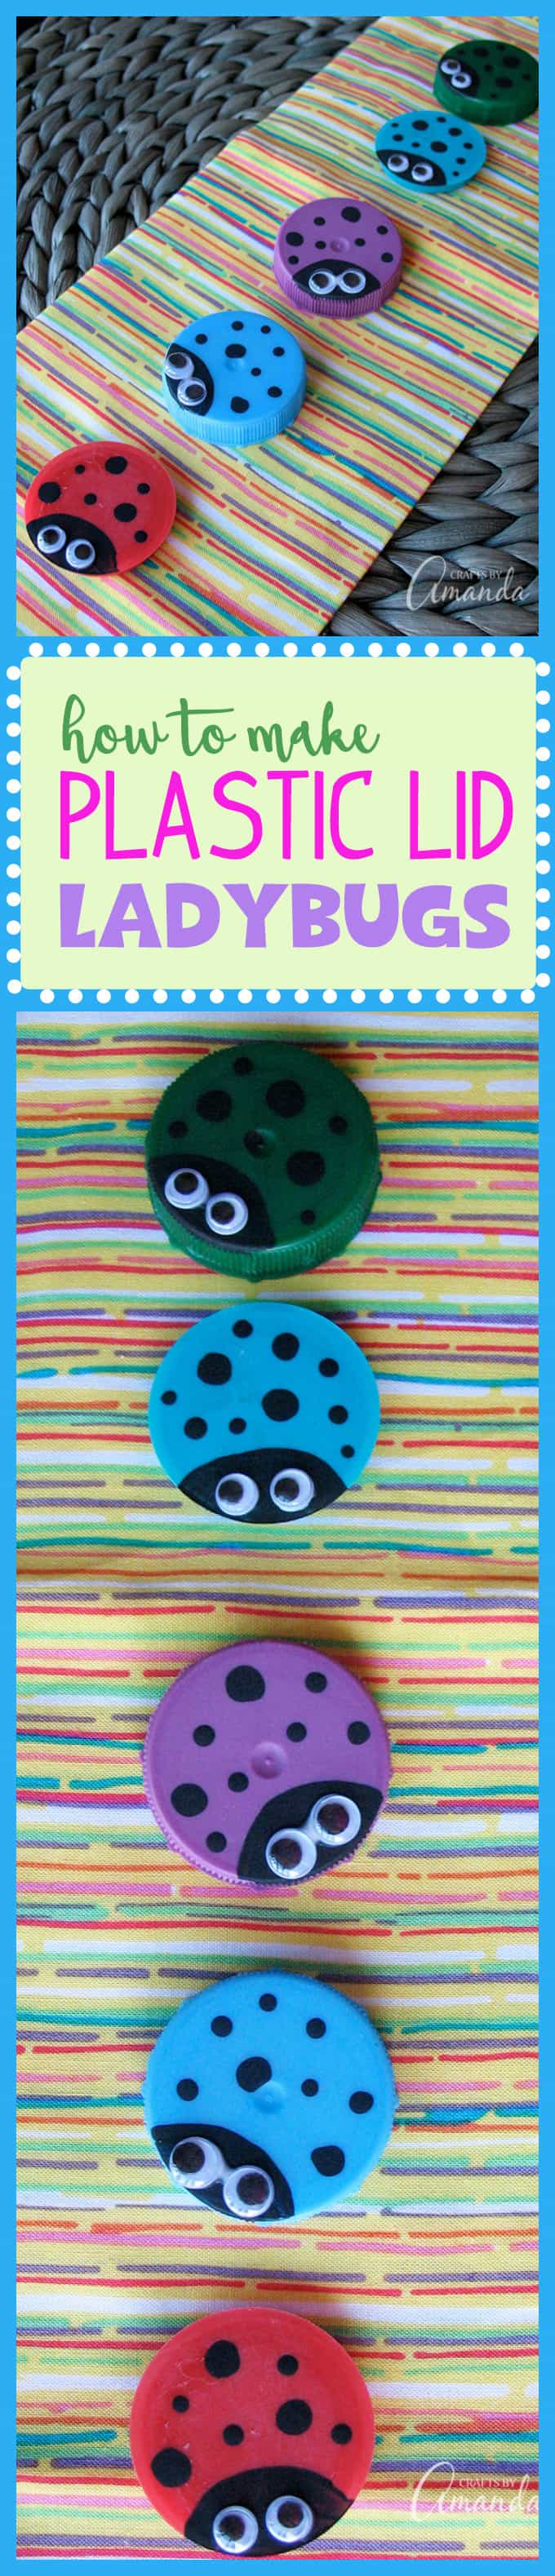
- Wash and dry the plastic lid. Paint on the head by using a paintbrush to add an almond shape at one end of the lid.
- Use the handle end of a paintbrush dipped in black paint to add the spots. Make some spots larger than others. Let all the paint dry.
- Use white craft glue to add the wiggle eyes.
- Optional: You could make these into magnets, but you would need to fill the lid with something first. I would recommend using something lightweight, like cardboard. Cut it into circle and glue it inside the cap, then add a magnet.
- Swirling Twirling Ladybugs - July 21, 2026
- Drip Tie Dye Backpack - July 17, 2026
- Mini Coastal Clay Houses - July 14, 2026


Kathy says
I knew if I kept saving lids a “creative mind” somewhere would come up with a “Soooo Cute” idea. These are going to be so fun to make and play with. Thanks “Creative Mind.” Kathy
Monie says
Awwww, they are so cute! But the country I leave in doesn’t have the same type of lid,will try to invent something,though…
Amanda Formaro says
Let me know what you come up with, Monie! :)
Jodie Harper says
I want to use this idea with a child I work with who’s autistic. I want to make it a maths activity by making them with this child and drawing a different amount of dots on each bug. He could then pull two out of the container and add the amount of dots all together! Thanks x
Tina Truelove says
These are so cute! I think my preschool kids would love making these! We might just get to work on them right away!
Amanda Formaro says
Thanks so much Tina!
Bonnie says
We named my 8 month old great-granddaughter “Ladybug” although most of the time she gets “Bug” so this will be perfect for her room. You mentioned making magnets out of them but they’re too tall. You can buy cards of magnets at A.C.Moore & other craft shops that are about 1/4″ thick.
Edie Fagg says
Love the lady bug idea. Looks like a great project for the grand kids before they start school the following week. They love doing crafts and the girls love lady bugs. These would be cute with push pins glued to the inside and used on a cork board too.
Amanda Formaro says
That would be cute! Thanks Edie :)
Shelley Halverson says
These are going to work perfect with our Sunday morning program at church “Going Buggie for Jesus” where each week a bug is featured. For our Lady Bug week the kids will discover that God even had a purpose for the Lady Bug so He must have a great plan for you.
Also hitting the concept of how much Lady Bugs help farmers and how we can be helpers too.
Amanda Formaro says
Sounds so fun Shelley!
Masi says
Very nice.thank you.
Danette Griego Trujillo says
These are so Fabulous and adorable! You can use them for a checker board game . Making them two different colors.
elaine says
So cute! I have a nother lady bug thought as a person who cans her food every fall ee have tons of canning lids after we open the jars. If we paint the jar lids like a lady bug we can put magnets on the back and presto gifto a half a dozen bugs for grandma.
Thanks for the inspiration!
Barb says
the Brownies will love these for their camp hats and for SWAPS
Karen Howard says
These are so cute & easy to do. I used Juice can lids. You could attach a magnet & have a Nice Lady Bug for the Fridge or Microwave.Or punch a hole in the tops & hang on tree branches ot make a mobile with an embroidery hoop-(Just remember to Paint & put Eyes on both sides).Thanks for sharing this.
Used Cars Dalton Georgia says
How cute! So many bottle caps get thrown in the trash…
Kate says
Hi Amanda,
My girls and I had a go making these and the monsters too. Great idea and lots of fun. Check out the results here: http://kaetoo.blogspot.com.au/2012/09/toddler-art-adventures-with-bottle-caps.html
Thanks for sharing.
– Kate
Amanda says
Too cute, thanks for sharing Kate! I shared your post on my FB fan page :) https://www.facebook.com/CraftsbyAmanda
jennifer says
these are soooo soooo cute i cant wait to make them with my kids :) and with the kids in sunday school :) thanks for the awesome idea- god bless
Amanda says
Thank you Jennifer!
Karen Howard says
Really cut Idea for what to do with jar lids! I’ll be making some for my Garden this year! Thanks!
lily says
I shared your ideas on pintrest… I also applied the link to this site with it:) Thanx for the ideas.
Tabitha says
Hey Amanda! So cute! I’m the teacher who did a math activity with your monster caps. I’m starting a green classroom and would love permissionto add this post, crediting you and linking back to this post. Thanks!
FlapJack Educational Resources
Ruth says
This is such a cool idea!! My mum has a ton of lids she's been saving. I shall go 'borrow' some from her craft box at once! :o)
Winna says
They are so cute and easy to make. Will get it done quick once I collect many lids. Thanks for sharing such a wonderful idea.
http://www.liangwin.com
Becky says
Loved these and made some of my own!1 I linked back to you, although they're not nearly as cute :)
http://rubsomedirtblog.com/2011/06/crafty-critters/
Have a great weekend!
Colleen says
I think these are great! With two small milk loving children, I have a ton of these. Now I have something creative to do with them. Awesome idea! Thank you!
Mom of Two says
These were so fun & so quick to make. We made them too. Thanks for all your wonderful craft ideas. I have linked them all on my daughter's blog: http://makesthree.blogspot.com/2010/07/more-crafts.html
Arushi Nayar says
Great job, You will hear from me often as I love to teach simple crafts to young kids.
Thanks a lot.
Arushi
Amanda says
Hi Garden Lily :) It's still hanging in there on mine, but they are in the kid's bathroom, not outdoors. You could also spray them with acrylic sealer before adding the eyes. Thanks for the compliments!
Garden Lily says
I'm looking for ideas, since I've saved a huge box of these lids… Yours is the cutest yet. Although I wonder if the black acrylic paint could rub off too easily?
Amanda says
Thank you all for your wonderful comments! :)
Sandy@Pretty Nice Thing says
My son is looking forward to making these, he like them very much. Thank you for sharing these.
Teena says
These are great! An excellent recycled and educational toy for young children, well done! Happy Transformation Thursday <3
Tammy says
This is very creative. I will definitely make these.
Annaxandria says
Hi, Im Annaxandria. I have a link to your blog. I like this idea. Please check my blog out at
http://annaxandria-storygirl.blogspot.com/.
:)
Bobbie says
That looks great. Thanks for sharing at check me out saturday http://www.iamonly1woman.blogspot.com
Kristi Flanagan says
These are so darn cute…. another great one for my kiddos to do!
Thanks for planting your creative seed! Come plant again on Friday!
Kristi
Punkin Seed Productions
Jenn @ Delicious Ambiguity says
I featured you today! :)
redtedart says
OMG how cute (and simple!) are these… I know you already take part in so many craft carnivals, but would you be interested in taking part in my (monthly themed) one: Get Crafty http://redtedart.wordpress.com/get-crafty/ – this month's theme is Red and the ladybirds would be SO perfect and would most definitely inspire others (I know we will be making some!!!!)
Do let me know!
Maggy
Jessica Hills says
Oh my daughter would love those! Thanks so much for linking to Favorite Things Friday!
Jen says
Stopping by from Dollar Store Crafts! Glad to find you- great ideas. The lady bug lids are sooo cute.
Jen from Creative and Curious Kids!
Stephanie Lynn says
Super cute! I love recycled crafts and my little guy would love these! Thanks so much for joining the Sunday Showcase! Hope you have a great week! ~ Stephanie Lynn
MessyMissy says
That's really cute. My Munchkin will adore this craft!!
Fawn says
What a great idea! my 5-yr-old daughter is alway pestering me to do crafts, and she loves ladybugs! This is definitely on the to-do list…. thanks for the awesome (cheap) idea!!
Carolyn @ My Backyard Eden says
I love ladybugs too! They are really cute and a great recycled project!
Thanks for linking up to Make it Yours day! Enjoy the rest of your weekend!
craftlicious says
wow these are beautiful
wonderful idea,i would love to make few for my daughter
stepping in from Life in the Pitts
i will be following you.
do visit me sometimes
Shahana
Lori says
This is so cute. I might have to try this.
Thanks for joining Get Your Craft on Thursday. Please join me next week for another great party!
Holly Renee says
So cute! I like the different colors. These seems so easy too. I bet you could do other bugs as well. I like the ladybug plates on the side too.
Lanie Ree says
Hey there! I'm featuring this today. Because it's awesome.
http://lanieree.blogspot.com/2010/04/featuring-you_16.html
Beansieleigh says
It feels like a sickness, I tell you, when I save everything the way I do! I can't throw something AWAY without wondering if I can MAKE something with it first! I have a container full of these, and will definitely be making at least couple or so for MY fridge! Thanks for the very cute idea! ~tina
Jenn @ Delicious Ambiguity says
Thanks so much for linking up to Tot Tuesdays this week! What a cute project. I am hosting my first giveaway which ends on Tuesday. I hope you’ll stop by. Have a great week! ☺
Fawnda says
Very cute idea! I love repurposing! These lady bugs are too cute! :)
Kim @ seven thirty three says
Oh my! Those are adorable!
Thanks for linking up with What are little boys made of?
Pati @ A Crafty Escape says
Love these and I'm thinking they would make a great Earth Day craft!
Santa's Gift Shoppe and Ideas says
Hi Amanda..Barb coming over from My backyard eden..Love these.. they are too cute!! Great job!!
I just became your newsest Follower… Hope you can take a peek at my blog @
santasgiftshoppe.blogspot.com
& see if there is anything that might inspire you for your Family/Home. I do a little bit of everything..Vinyl,Wood,Glass,Aprons,Hair Bows, recipes, Home Decorating/makeovers..I'd love for you to become a follower of mine too. Have a great day!! Thanks for sharing..Barb
Laura says
These are so cute. I love them!
I would love it if you joined my "Saturday is Crafty Day" party on April 24th! Stop by my blog for details.
Sarah says
What a fantastic way to repurpose! Love it!
Lanie Ree says
Adorable! What a perfect kids craft. Or, you know, 25-year-old-girl craft. I could see these showing up on my bookshelf…
Thank you for linking this to A Little Craft Therapy with Life in the Pitts.
Al says
How fun, I am going to make them with my nephew
Angie @ The Country Chic Cottage says
CUTE CUTE CUTE!!! Thanks so much!!
Amy Bowman says
My daughter just walked in, looked at the picture and said "Hey, WE could make those!" Love the simplicity of this one, so cute!
Thanks for linking up to "Anti-Procrastination Tuesdays!"
*This would be a perfect craft to link up to The Mother Huddles Crafty Kids. They have a monthly go green craft link party every first wednesday of the month…here is the link. http://www.themotherhuddle.com/?p=2836
Missy (Two Little Monkeys) says
How adorable! I am always looking for craft ideas to share with my blog readers so I hope you do not mind – I linked up your blog post today on my blog. I love this idea and my daughters and I will make this today!
Tere says
Very, very cute! My girls will love making these. I've been saving lids for a lid toss game I want to use at my daughter's bday party this month. I want to use fruit cups (empty of course) and space them out and put them in a box and let the kids toss the lids to try to get them in them for a prize. Anyway, thanks for sharing…..love it!
Sandra says
These are so cute. What a great idea.
Kathryn says
Very cute! Our curbside recycling doesn't take plastic caps so I have a ton saved up and I am going to try to make one these.
Thanks for sharing this with us!
Mandy says
Perfect reuse – love it! I am having a link party tomorrow (Tuesday) and I'd love to see you there! http://www.craftedition.blogspot.com
CraftyMummy says
So cute and easy! I'm going to start saving lids today. My daughter will love to make them!
Allison Shops says
So cute! I love ladybugs. Came over from BNOTP.
Bianca Elena says
Great! I love these! :)
Condo Blues says
How cute! I'm a little sad that I turned in a bag full of hard plastic bottle caps in for recycling yesterday. I had a bunch of red caps that would have made very cute lady bugs.
Tif says
These are wonderful!!
Amanda says
Cute rocks! I made some like that for Kaboose several years ago :)
Aiming – cool, never heard of that game!
Creative Jewish mom – thanks, just joined!
creativejewishmom.com says
Hi Amanda, this is so cute, now i Know what to do with all those lids I've been saving! I'd love it if you'd visit my linking party (thru Tues) and link to this so i can share it with my readers next week! all the best and hope to see you there
Aiming4Simple says
We've got to do these adorable bugs! I also remember seeing a version of these that was used for a game. You put a marble under each ladybug and push them toward a circle.
DOEHLER DAYS says
Found you through The Girl Creative…was late to the party, but I was going to share my ladybug craft made of rocks.
http://doehlerdays.blogspot.com/2010/04/kid-krafts-ladybug-rocks.html
Amanda says
Thank you everyone!
Rachel – Thank you for the feature!!
Kristen – Thank you so much, I've added your featured button! :)
The Mommy Teacher says
Hi Amanda,
I just love all of your ideas!! I wanted to give you the link, so you could choose what Craft Gossip featured button you would like.
http://craftgossip.com/link-to-us/
Thanks!
Kristen
Leanne says
Those are so cute. Yay, now I have something else to do with the kids while they're off track. Thanks for the new craft idea.
Dianna@DecorMadeSimple says
Cut idea, they would make great refrigerator magnets.
Deeba PAB says
What a great idea Amanda; colourful and attractive too!! Who would have thought?? LOVELY!!
Anonymous says
oh i forget to type my name i m dona Kindergarten Teacher of Sumatra Indonesia *)
Anonymous says
Thanks for the wonderfull idea
Kathryn says
Cute!
Megan says
These are adorable!
sunnymama says
These are so cute! What a great idea. :)
[email protected] says
Those are so cute Amanda. I love the first picture. I would get such a kick out of seeing those in someone's yard! Thanks so much for the how-to, I'll be linking.
l.a.r.k. says
Cute! :)
Veronica says
These are so cute.
beth kruse custom creations says
very cute! i'm trying to think of what else we could do with them…..
Suzanne says
Those are adorable, I have to make those for my garden with my little boy. Thanks for much for the nice comment on the mother huddle.