• Home
  • About
    • About Crafts by Amanda
    • Visit Our Recipe Site
  • Work With Us
  • Join
    • Free Newsletters
    • Join our Facebook craft group
↑
  • Tutorials
    • Tutorial Index
    • Adult Crafts
    • Crafts for Kids
    • Crafts for Seniors
    • Recycled Crafts
    • Seasonal Crafts
    • Holiday Crafts
    • Free Printables
    • Craft Collections
  • Adult Crafts
    • Bath & Body
    • Beach Crafts
    • Clay Pot Crafts
    • Crafts for Seniors
    • Decoupage Crafts for Adults
    • DIY Gift ideas
    • Garden Crafts
    • Home Decor Projects
    • Kitchen Crafts
    • Light Bulb Crafts
    • Luminary Crafts
    • Mason Jar Crafts
    • Needlework
    • Photo Display Ideas
    • Recycled Crafts for Adults
    • Wearable Crafts for Adults
  • Crafts for Kids
    • Animal Crafts for Kids
    • Back to School Crafts
    • Beach Crafts for Kids
    • Camp Crafts
    • Cardboard Tube Crafts for Kids
    • Decoupage Crafts for Kids
    • Easy Crafts for Kids
    • Nature Crafts for Kids
    • Other Kid’s Crafts
    • Paper Plate Crafts for Kids
    • Recycled Crafts for Kids
    • Slimes, Doughs, & Clay
    • Wearable Crafts for Kids
  • Holiday Crafts
    • 4th of July Crafts
    • Christmas Crafts
    • DIY Gift ideas
    • Earth Day Crafts
    • Easter Crafts
    • Father’s Day Crafts
    • Halloween Crafts
    • Memorial Day Crafts
    • Mother’s Day Crafts
    • New Year’s
    • Other Holidays
    • Patriot Day Crafts
    • St. Patrick’s Day Crafts
    • Thanksgiving Crafts
    • Valentine’s Day Crafts
  • Seasonal Crafts
    • Winter Crafts
    • Spring Crafts
    • Summer Crafts
    • Fall Crafts
  • Skip to primary navigation
  • Skip to main content
  • Skip to primary sidebar
  • Skip to footer

Crafts by Amanda

crafts for adults and kid's crafts

  • Tutorials
    • Tutorial Index
    • Adult Crafts
    • Crafts for Kids
    • Crafts for Seniors
    • Recycled Crafts
    • Seasonal Crafts
    • Holiday Crafts
    • Free Printables
    • Craft Collections
  • Adult Crafts
    • Bath & Body
    • Beach Crafts
    • Clay Pot Crafts
    • Crafts for Seniors
    • Decoupage Crafts for Adults
    • DIY Gift ideas
    • Garden Crafts
    • Home Decor Projects
    • Kitchen Crafts
    • Light Bulb Crafts
    • Luminary Crafts
    • Mason Jar Crafts
    • Needlework
    • Photo Display Ideas
    • Recycled Crafts for Adults
    • Wearable Crafts for Adults
  • Crafts for Kids
    • Animal Crafts for Kids
    • Back to School Crafts
    • Beach Crafts for Kids
    • Camp Crafts
    • Cardboard Tube Crafts for Kids
    • Decoupage Crafts for Kids
    • Easy Crafts for Kids
    • Nature Crafts for Kids
    • Other Kid’s Crafts
    • Paper Plate Crafts for Kids
    • Recycled Crafts for Kids
    • Slimes, Doughs, & Clay
    • Wearable Crafts for Kids
  • Holiday Crafts
    • 4th of July Crafts
    • Christmas Crafts
    • DIY Gift ideas
    • Earth Day Crafts
    • Easter Crafts
    • Father’s Day Crafts
    • Halloween Crafts
    • Memorial Day Crafts
    • Mother’s Day Crafts
    • New Year’s
    • Other Holidays
    • Patriot Day Crafts
    • St. Patrick’s Day Crafts
    • Thanksgiving Crafts
    • Valentine’s Day Crafts
  • Seasonal Crafts
    • Winter Crafts
    • Spring Crafts
    • Summer Crafts
    • Fall Crafts
Craft Tutorials | Crafts for Kids | Animal Crafts for Kids | Recycled Ladybug Jar

Recycled Ladybug Jar

Author by Amanda Davis on April 17, 2010 Updated on July 18, 2019

5 from 1 vote
Jump to Project
11 shares
  • Share
  • Tweet
  • Flipboard
  • Email


I love ladybugs. :) Ladybug crafts are always cute, they make you smile, and they are easy for kids too. I have a tendency to give everything that’s round and red a second look. Could that be turned into some sort of ladybug?? You’ve probably already seen my plastic lid ladybugs, and my paper plate ladybugs, so it’s probably no surprise that I’m posting yet another ladybug project.

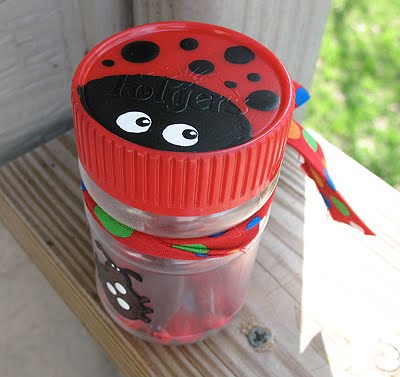
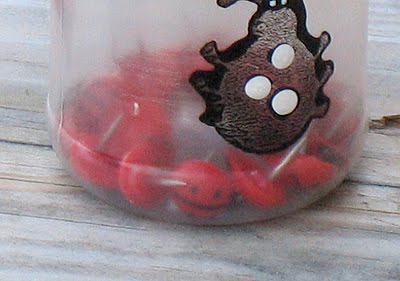
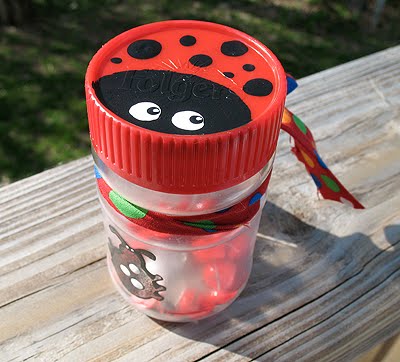
My daughter, Kristen, is 16, so making crafts that she’ll use or display in her room is a bit trickier than it was, say, 10 years ago! Used to be that anything cutesy was welcomed in with open arms. Now? Not so much. She seems to have the same love of ladybugs that her mom does though, so I knew this would be put to good use. Can you see what’s inside the jar? Those are little ladybug shaped thumbtacks I found on clearance at WalMart, cute!

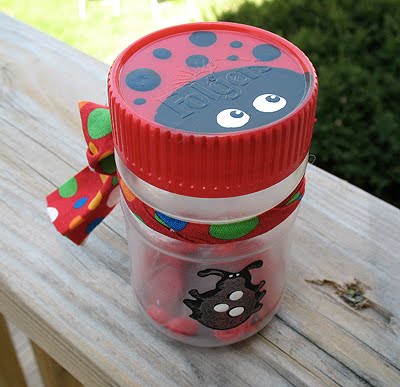
Kristen and I love to make homemade mocha frappacinos, and because of that, we tend to go through quite a few of those little plastic jars of instant coffee. As soon as I saw the empty jar with the red lid, I knew exactly what I was going to turn it into! The only real issue I ran into was some sticky glue from the label that just didn’t want to budge. I was able to get it off with Goo Gone, but I scratched the plastic surface using my kitchen scrubber sponge getting the goo off.

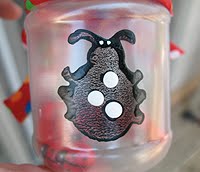
So I remedied that by using a simple foam stamp and black paint to add a bug to the scratchy spot.

Recycled Ladybug Jar


Print Project
5 from 1 vote

Recycled Ladybug Jar

Author: Amanda Formaro

Supplies

  • plastic or glass jar with lid
  • red black and white acrylic craft paint
  • paintbrush
  • bug foam stamp
  • red polka dot fabric
  • scissors
  • sealer spray

Instructions

  • Put lid on jar. If the lid is not red, paint it red. I added a thin coat of red to mine because it was a little cloudy looking.  Paint a black semicircle at one end of the lid. Use the handle end of the paintbrush dipped in black paint to add different sized spots. Let dry.
  • While that is drying, paint the surface of your foam stamp with black paint and press it onto the surface of the front of the jar. For mine, since I was using the bug to cover up a boo boo, I made sure that I painted the ladybug head (semicircle) on the lid to line up with the boo boo. Let dry.
  • use the handle end of the paintbrush dipped in white paint to add eyes. Let dry. Use a small paintbrush, handle end, dipped in black to dot on pupils. Let dry. For the tiny whites on the eyes, you can dip a toothpick in white paint, or use a white paint pen.
  • Use the handle end of a small paintbrush to add white dots to the back of the stamped bug. Let dry.
  • Wrap a piece of red polka dot fabric around the jar and tie in a bow, trim the ends. Give everything a quick burst spray of sealer.

I’m participating in the following craft carnivals. To see some other awesome projects, be sure to visit them!

  • Author
  • Recent Posts
Amanda Davis
Amanda Davis is the crafty, entrepreneurial mother of four children. She loves to bake, cook, make kid's crafts and create decorative items for her home. She is a crafting expert and guru in the kitchen and has appeared online and in print publications many times over the years.
Latest posts by Amanda Davis (see all)
  • Paper Plate Aquarium Craft - June 17, 2025
  • Patriotic Bandana Wreath - June 13, 2025
  • Ladybug Painted Rocks - June 10, 2025
11 shares
  • Share
  • Tweet
  • Flipboard
  • Email

Filed Under: Animal Crafts for Kids, Back to School Crafts, Earth Day Crafts, Easy Crafts for Kids, Fall Crafts, Mason Jar Crafts, Recycled Crafts for Kids, Spring Crafts Tagged With: adult, back to school, Crafts Using Recycled Jars, earth day, holidays, kid's crafts, Ladybug Crafts, recycle, recycle crafts, recycled, recycled crafts, spring

Reader Interactions

Free CraftsBy email every week

Latest crafts straight to your inbox!

Comments

  1. Diana says

    April 29, 2012 at 9:03 pm

    I just thought of doing these (I also use the folgers) and hanging them on the wall w/small pic hooks or a small nail, to have a trail of them across my wall :)

    Reply
    • Diana says

      April 29, 2012 at 9:04 pm

      Just the lids that is :)

      Reply
    • Amanda says

      May 5, 2012 at 1:34 pm

      Sounds like a fun idea Diana!

      Reply
  2. Rachel (Lines across my face) says

    August 4, 2011 at 3:12 pm

    I love these! I featured them on my blog.
    http://linesacrossmyface.blogspot.com/2011/08/adorable-ladybug-crafts.html

    Reply
  3. Kayla @ MPM School Supplies Blog says

    May 11, 2011 at 12:48 pm

    Hi Amanda! We just loved this ladybug jar and featured it at our blog today! You can find it here >> Lovely Lively Ladybugs | Crafts, Science & More!. We were sure to give photo credit and a link back to your website, but we'd love for you to take a look at it and if there are any problems, we'll take the feature down immediately!

    Thanks so much!
    Kayla Johnson
    [email protected]

    Reply
  4. Anonymous says

    June 23, 2010 at 4:12 am

    to get sticky labels off just smear with a little bit of peanut butter and let set over night is loosens the glue and washes right off.

    Reply
  5. Baby Girl says

    May 13, 2010 at 1:10 am

    These are SO cute! Great idea for the rainy days we've been having in the midwest! Thanks!

    Reply
  6. Rory says

    April 27, 2010 at 2:17 pm

    Hi,
    I followed you over from the Life As Lori link party. I am now a follower of yours. I would really love it if you stopped by and visited me too. Be sure to enter the drawing if you do. Keep up the good work. Rory http://toolsareforwomentoo.blogspot.com/

    Reply
  7. Room to Inspire says

    April 27, 2010 at 5:41 am

    This is a great project as well! Thanks for linking this up last week too.

    Chelsea

    Reply
  8. Tracey @ My House of Giggles says

    April 24, 2010 at 1:46 pm

    sooo cute! You are so talented, girl! How do you come up with these ideas ? :)

    Reply
  9. Andy Porter says

    April 23, 2010 at 5:58 pm

    CUte CUTE CUTe!!!

    Reply
  10. Fawnda says

    April 23, 2010 at 1:45 pm

    That ladybug is SO CUTE! I love it! :)

    Reply
  11. Amy @ Positively Splendid says

    April 22, 2010 at 6:25 pm

    How cute! I love ladybugs, too!

    Reply
  12. Sammy says

    April 22, 2010 at 5:41 pm

    So cute! It would be perfect for our Bring Spring Linky party over at Scraps N' Strings. Adorable!

    Reply
  13. Lanie Ree says

    April 22, 2010 at 5:20 pm

    I love your ladybugs! I think it's the eyes. you make them so cute.

    Thank you for linking this to A Little Craft Therapy, with Life in the Pitts.

    Reply
  14. Kim @ seven thirty three says

    April 22, 2010 at 12:40 pm

    You have some of the cutest projects and this is no exception!

    Thanks for linking with What are little boys made of?

    Reply
  15. Amanda says

    April 22, 2010 at 12:10 am

    Thank you all so much for your wonderful comments!

    Lanie thank you for the feature, so nice of you! I am displaying your button proudly ;)

    Reply
  16. Lanie says

    April 21, 2010 at 11:37 pm

    Hi Amanda! This project was featured on Trendy Treehouse today.

    http://thetrendytreehouse.blogspot.com/2010/04/feature-favorites-from-around.html

    Hope you will stop by for a "featured" button! ~Lanie J.

    Reply
  17. Megan says

    April 21, 2010 at 1:49 pm

    So cute! I did a ladybug birthday party for my daughter a couple of years ago and I STILL can't stop considering how I can incorporate everyday items into a ladybug theme. Your jars are a great idea!

    Reply
  18. Kristi says

    April 21, 2010 at 12:15 pm

    Too cute! I love ladybugs too. My daughter is 11 and I've already begun having problems decorating her room. Why does she have to have an opinion about it? What can't I just decorate like I want to? ha ha

    Reply
  19. Molly @ A Bit O' Shine says

    April 21, 2010 at 12:17 am

    Cute, cute, cute!

    Reply
  20. Maria says

    April 20, 2010 at 10:20 pm

    Cutest jar EVER! I have to make these!

    Reply
  21. Denise Marie says

    April 20, 2010 at 6:32 pm

    Dang, that is cute. your projects are just adorable.

    Reply
  22. Marie says

    April 20, 2010 at 6:08 pm

    Hello sweet Amanda – I'm new to your blog via Tip Junkie! Your lady bug jar is adorable! My Emma would love something like this. She has been using my bud vases to collect her rolly polly bugs in! Thank you for sharing!

    Blessings,
    Marie
    http://emmacallsmemama.com

    Reply
  23. Linda@Coastal Charm says

    April 20, 2010 at 4:33 pm

    What a stinkin cute idea…luv it! Hope you have a FUN week:)

    Blessings,
    Linda

    I’m having a GIVEAWAY…come by and check it out…I think you will like it!

    Reply
  24. Amy Bowman says

    April 20, 2010 at 2:38 pm

    you are full of great ideas. my daughter saw this and said "i wanna make one!! i know where to come when we are in a crafty mood!!

    Reply
  25. Liz says

    April 20, 2010 at 1:22 am

    CUTE!!! When I was little I would have loved this. I always had a thing for Ladybugs. :)

    ~Liz

    Reply
  26. The Nichols Fam says

    April 19, 2010 at 5:24 pm

    precious! We are fellow ladybug lovers!

    Reply
  27. Stephanie Lynn says

    April 19, 2010 at 5:21 am

    Thanks again so much for stopping by and joining the Sunday Showcase! You have such creative projects to share. Thank you! Hope you have a great week! ~ Stephanie Lynn

    Reply
  28. Stephanie Lynn says

    April 18, 2010 at 7:21 pm

    Super cute! This would be perfect for my little guy to catch some bugs {just poke a few holes in the top} Stop by the Sunday Showcase party if you get a chance. This is adorable – thanks for sharing!

    Reply
  29. Katrina says

    April 17, 2010 at 10:41 pm

    That's really cute, Amanda! SU'd

    Reply
  30. Heather - Dollar Store Crafts says

    April 17, 2010 at 8:28 pm

    I like your ladybug crafts!

    Reply
5 from 1 vote (1 rating without comment)

Leave a Reply Cancel reply

Your email address will not be published. Required fields are marked *

Rate This Project


The maximum upload file size: 640 MB. You can upload: image, video. Links to YouTube, Facebook, Twitter and other services inserted in the comment text will be automatically embedded. Drop files here

Primary Sidebar

Hi! I’m Amanda and I’m the founder and head designer of Crafts by Amanda. I have spent over 25 years creating projects to share, but it’s not just me anymore! It’s turned into a complete family affair. Come and meet the Creative Team!

Free CraftsBy email every week

Latest crafts straight to your inbox!

All Time Favorites

Learn to make these adorable ladybug painted rocks. use special outdoor paint for this adorable garden craft so you can keep garden ladybugs all summer!

Ladybug Painted Rocks…

These colorful little ladybug painted rocks are the ... Go To project

snowy pinecone candle jar luminaries

Winter Luminaries: Snowy Pinecone…

Make pretty winter luminaries that appear to be covered ... Go To project

Make this wonderful deco mesh pumpkin wreath to hang on your door this fall!

Deco Mesh Pumpkin Wreath…

Adorn your door this fall with a pretty deco mesh ... Go To project

Reuse those empty prescription pill bottles in all sorts of ways. From organizing to making cookies. Yes, cookies! See how to use your empty pill bottles!

20 Uses for Prescription Pill…

You've been collecting prescription pill bottles for ... Go To project

Meet the Family

Amanda

Founder and Designer

Kristen

Editorial Manager

Lindsay

Social Media Manager

As seen on:

Footer

Favorites

  • Jar Photo Frames
  • No-Sew Roman Shade
  • Paper Flowers
  • How to Make a Scrunchie
  • Mermaid Slime

About

  • Home
  • Meet the Creative Team
  • Work with Us
  • Privacy Policy
  • Accessibility
  • Contact Us

Images/text copyright Amanda Formaro 2020. To feature a post from Crafts by Amanda, you may use one photo credited and linked back directly to the project post.

Free CraftsBy email every week

Latest crafts straight to your inbox!

Copyright ©2025, Crafts by Amanda. All Rights Reserved.
Design by Pixel Me Designs

Rate This Tutorial

Your vote:


To share a photo with your comment click here!

A rating is required
A name is required
An email is required

Recipe Ratings without Comment

Something went wrong. Please try again.