• Home
  • About
    • About Crafts by Amanda
    • Visit Our Recipe Site
  • Work With Us
  • Join
    • Free Newsletters
    • Join our Facebook craft group
↑
  • Tutorials
    • Tutorial Index
    • Adult Crafts
    • Crafts for Kids
    • Crafts for Seniors
    • Recycled Crafts
    • Seasonal Crafts
    • Holiday Crafts
    • Free Printables
    • Craft Collections
  • Adult Crafts
    • Bath & Body
    • Beach Crafts
    • Clay Pot Crafts
    • Crafts for Seniors
    • Decoupage Crafts for Adults
    • DIY Gift ideas
    • Garden Crafts
    • Home Decor Projects
    • Kitchen Crafts
    • Light Bulb Crafts
    • Luminary Crafts
    • Mason Jar Crafts
    • Needlework
    • Photo Display Ideas
    • Recycled Crafts for Adults
    • Wearable Crafts for Adults
  • Crafts for Kids
    • Animal Crafts for Kids
    • Back to School Crafts
    • Beach Crafts for Kids
    • Camp Crafts
    • Cardboard Tube Crafts for Kids
    • Decoupage Crafts for Kids
    • Easy Crafts for Kids
    • Nature Crafts for Kids
    • Other Kid’s Crafts
    • Paper Plate Crafts for Kids
    • Recycled Crafts for Kids
    • Slimes, Doughs, & Clay
    • Wearable Crafts for Kids
  • Holiday Crafts
    • 4th of July Crafts
    • Christmas Crafts
    • DIY Gift ideas
    • Earth Day Crafts
    • Easter Crafts
    • Father’s Day Crafts
    • Halloween Crafts
    • Memorial Day Crafts
    • Mother’s Day Crafts
    • New Year’s
    • Other Holidays
    • Patriot Day Crafts
    • St. Patrick’s Day Crafts
    • Thanksgiving Crafts
    • Valentine’s Day Crafts
  • Seasonal Crafts
    • Winter Crafts
    • Spring Crafts
    • Summer Crafts
    • Fall Crafts
  • Skip to primary navigation
  • Skip to main content
  • Skip to primary sidebar
  • Skip to footer

Crafts by Amanda

crafts for adults and kid's crafts

  • Tutorials
    • Tutorial Index
    • Adult Crafts
    • Crafts for Kids
    • Crafts for Seniors
    • Recycled Crafts
    • Seasonal Crafts
    • Holiday Crafts
    • Free Printables
    • Craft Collections
  • Adult Crafts
    • Bath & Body
    • Beach Crafts
    • Clay Pot Crafts
    • Crafts for Seniors
    • Decoupage Crafts for Adults
    • DIY Gift ideas
    • Garden Crafts
    • Home Decor Projects
    • Kitchen Crafts
    • Light Bulb Crafts
    • Luminary Crafts
    • Mason Jar Crafts
    • Needlework
    • Photo Display Ideas
    • Recycled Crafts for Adults
    • Wearable Crafts for Adults
  • Crafts for Kids
    • Animal Crafts for Kids
    • Back to School Crafts
    • Beach Crafts for Kids
    • Camp Crafts
    • Cardboard Tube Crafts for Kids
    • Decoupage Crafts for Kids
    • Easy Crafts for Kids
    • Nature Crafts for Kids
    • Other Kid’s Crafts
    • Paper Plate Crafts for Kids
    • Recycled Crafts for Kids
    • Slimes, Doughs, & Clay
    • Wearable Crafts for Kids
  • Holiday Crafts
    • 4th of July Crafts
    • Christmas Crafts
    • DIY Gift ideas
    • Earth Day Crafts
    • Easter Crafts
    • Father’s Day Crafts
    • Halloween Crafts
    • Memorial Day Crafts
    • Mother’s Day Crafts
    • New Year’s
    • Other Holidays
    • Patriot Day Crafts
    • St. Patrick’s Day Crafts
    • Thanksgiving Crafts
    • Valentine’s Day Crafts
  • Seasonal Crafts
    • Winter Crafts
    • Spring Crafts
    • Summer Crafts
    • Fall Crafts
Craft Tutorials | Adult Crafts | Home Decor Projects | Reversible Scrap Wood Pumpkins
Home Decor Projects

Reversible Scrap Wood Pumpkins

Author by Angie Holden on September 23, 2019 Updated on August 10, 2020

5 from 2 votes
These reversible scrap wood pumpkins are super easy to make. One side has adorable pumpkins for fall and the other side has cheery snowmen for winter time!
Jump to Project
These reversible scrap wood pumpkins are super easy to make. One side has adorable pumpkins for fall and the other side has cheery snowmen for winter time! #wood #reversible #snowman #pumpkincrafts #snowmencrafts #adultcrafts #homedecor #falldecor #winterdecor
2725 shares
  • Share
  • Tweet
  • Flipboard
  • Email

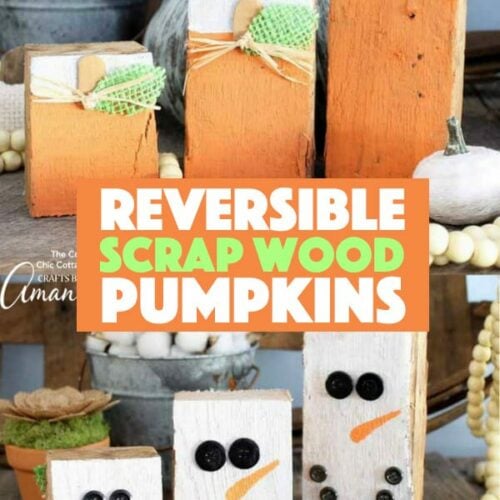
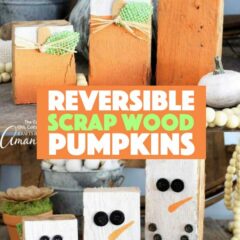
Add these reversible scrap wood pumpkins to your decor this fall and you can leave them up all the way through winter.  You see we added pumpkins on one side but snowmen on the other.  I love decor that can last multiple seasons and that is easy to make as well, just like our Reversible Scarecrow Snowman Sign!

Use these in the fall for your Pumpkin Painting Party and then in the winter for Christmas and New Year’s!

Adorable Reversible Scrap Wood Pumpkins


Reversible Scrap Wood Pumpkins

I started with a few boards from my scrap wood pile and a mission to create something rustic yet cute for my home for autumn.  I think I succeeded!  Plus with my idea for making them reversible, I have a cute item for my winter decor as well.

Related:  Love using scrap wood and found objects for decor?  You might also like decorating with sticks and leaves for Halloween or making these wood slice Santa ornaments.

Pumpkin side: reversible scrap wood pumpkins

Supplies needed to make some reversible scrap wood pumpkins:

  • Scrap wood (any that you have on hand)
  • Craft paint in white, orange, and brown
  • Craft sticks
  • Green burlap
  • Raffia
  • Black buttons
  • Paintbrushes
  • Scissors
  • Hot glue and glue gun


Supplies you'll need for reversible scrap wood pumpkins

How to make reversible scrap wood pumpkins:

  • Start on one side and decorate to look like a pumpkin.
  • Paint this side orange with a few inches of white at the top as shown below.
  • NOTE:  Do not paint the sides as we do not want the orange to be visible on the snowman side of the project.

Reversible scrap wood pumpkins step 2

  • Set those aside to dry.
  • Snip the ends off of some craft sticks with scissors.
  • Give those a coat of brown paint and then allow to dry.

Painting craft sticks

  • Cut the green burlap into a leaf like shape.

Making leafs out of burlap

  • Once the paint is dry on everything, use hot glue to secure the craft stick stem to the pumpkin.
  • Then add the burlap leaf on top again with hot glue.
  • Tie some raffia into a knot and add that on top of the leaf.
  • Use scissors to trim the raffia so that it does not show around the edges of your pumpkin.

Reversible scrap wood pumpkins step 5

  • Once everything is in place and dry, you can flip your project over.
  • For the snowman side, paint the entire thing in white and allow to dry.
  • Once again, leave the edges unpainted.
  • Paint on an orange nose as shown below.
  • Add button eyes and a mouth by using hot glue to secure.

Reversible scrap wood pumpkins step 6

  • Repeat all of these steps as many times as you would like to create as many of these reversible holiday decor items as you want.  They are so inexpensive that there is no reason not to create multiple pieces.

Snowman side: Reversible scrap wood pumpkins

Set the pumpkin side out for fall as a rustic addition to your home decor.

Pumpkins made from scrap wood

Once the seasons change, reverse them and have some happy snowmen to brighten up those winter days.

One side- scrap wood snowmen

These reversible scrap wood pumpkins are sure to light up your home for several months.  How many will you make for your home?

Reversible scrap wood pumpkins and snowmen

Dig through your wood pile for some pieces perfect for this project.  Any sized board will do and you can cut them to length if they are too long, however, board ends work perfectly!  Get started on your own reversible scrap wood pumpkins today.

For more cute DIY fall and winter crafts be sure to check out these cute Mason Jar Lid Pumpkins. They make perfect fall decor that looks adorable anywhere you put them. For a winter craft, check out one of the most popular crafts on this blog, Snowy Pinecone Mason Jars. These luminaries are simply perfect for winter themed weddings or as a pretty staple for around the house during the winter months.

These reversible scrap wood pumpkins are super easy to make. One side has adorable pumpkins for fall and the other side has cheery snowmen for winter time! #wood #reversible #snowman #pumpkincrafts #snowmencrafts #adultcrafts #homedecor #falldecor #winterdecor
Print Project
5 from 2 votes

Reversible Scrap Wood Pumpkins

These reversible scrap wood pumpkins are super easy to make. One side has adorable pumpkins for fall and the other side has cheery snowmen for winter time!
Age Group: Adult Crafts
Project Type: Fall
Author: Angie Holden

Supplies

  • Scrap wood any that you have on hand
  • Craft paint in white orange, and brown
  • Craft sticks
  • Green burlap
  • Raffia
  • Black buttons
  • Paint brushes
  • Scissors
  • Hot glue and glue gun

Instructions

  • Start on one side and decorate to look like a pumpkin.
  • Paint this side orange with a few inches of white at the top as shown.
  • NOTE: Do not paint the sides as we do not want the orange to be visible on the snowman side of the project.
  • Set those aside to dry.
  • Snip the ends off of some craft sticks with scissors.
  • Give those a coat of brown paint and then allow to dry.
  • Cut the green burlap into a leaf like shape.
  • Once the paint is dry on everything, use hot glue to secure the craft stick stem to the pumpkin.
  • Then add the burlap leaf on top again with hot glue.
  • Tie some raffia into a knot and add that on top of the leaf.
  • Use scissors to trim the raffia so that it does not show around the edges of your pumpkin.
  • Once everything is in place and dry, you can flip your project over.
  • For the snowman side, paint the entire thing in white and allow to dry.
  • Once again, leave the edges unpainted.
  • Paint on an orange nose as shown.
  • Add button eyes and a mouth by using hot glue to secure.
  • Repeat all of these steps as many times as you would like to create as many of these reversible holiday decor items as you want. They are so inexpensive that there is no reason not to create multiple pieces.

This post originally appeared here on Sep 18, 2017.

  • Author
  • Recent Posts
Follow along
Angie Holden
Blogger at The Country Chic Cottage
Angie Holden is author of The Country Chic Cottage where she shares crafts, recipes, and DIY projects daily.She lives on a farm in rural Tennessee with her husband and three children.She loves creating and sharing her creations on her blog and social media.
Follow along
Latest posts by Angie Holden (see all)
  • Burlap Stenciled Pillow Covers - May 16, 2025
  • Mason Jar Tissue Holder - February 18, 2025
  • Scrap Wood Frames - November 15, 2024
2725 shares
  • Share
  • Tweet
  • Flipboard
  • Email

Filed Under: Christmas Crafts, Fall Crafts, Halloween Crafts, Home Decor Projects, Winter Crafts Tagged With: DIY home decor, pumpkin, pumpkin crafts, snowmen crafts

Reader Interactions

Free CraftsBy email every week

Latest crafts straight to your inbox!

Comments

  1. Tamara LeFevre says

    September 27, 2017 at 10:28 am

    What a cute and clever idea. That would make a perfect kids craft for fall or winter. Thank you for sharing and an awesome day!

    Tamara

    Reply
  2. Theresa says

    September 25, 2017 at 3:54 pm

    Super cute and easy to do. Thanks for sharing at the Inspiration Spotlight Party @DearCreatives Sharing

    Reply
  3. Mrs. K @ Mrs Kringle's Kitchen says

    September 24, 2017 at 8:20 am

    LOVE this! I just did this with a sign I have up the rest of the year but flipped it for pumpkin season. Double duty crafts are the BEST and save space when you live in a shoebox like I do! Thanks so much for sharing!

    Reply
  4. Jelica says

    September 23, 2017 at 3:26 pm

    This is such a clever way to use scrap wood. Angie really nailed it with this one! Simply adorable :)

    Reply
    • Amanda Formaro says

      September 24, 2017 at 9:25 am

      Yes, she did!! So cute!

      Reply
  5. Jess says

    September 20, 2017 at 3:05 pm

    Pinned! SUCH a cute idea!

    I would love for you to share this with my Facebook Group for recipes, crafts, tips, and tricks: https://www.facebook.com/groups/pluckyrecipescraftstips/

    Thanks for joining Cooking and Crafting with J & J!

    Reply
5 from 2 votes (1 rating without comment)

Leave a Reply Cancel reply

Your email address will not be published. Required fields are marked *

Rate This Project


The maximum upload file size: 640 MB. You can upload: image, video. Links to YouTube, Facebook, Twitter and other services inserted in the comment text will be automatically embedded. Drop files here

Primary Sidebar

Hi! I’m Amanda and I’m the founder and head designer of Crafts by Amanda. I have spent over 25 years creating projects to share, but it’s not just me anymore! It’s turned into a complete family affair. Come and meet the Creative Team!

Free CraftsBy email every week

Latest crafts straight to your inbox!

All Time Favorites

Learn to make these adorable ladybug painted rocks. use special outdoor paint for this adorable garden craft so you can keep garden ladybugs all summer!

Ladybug Painted Rocks…

These colorful little ladybug painted rocks are the ... Go To project

snowy pinecone candle jar luminaries

Winter Luminaries: Snowy Pinecone…

Make pretty winter luminaries that appear to be covered ... Go To project

Make this wonderful deco mesh pumpkin wreath to hang on your door this fall!

Deco Mesh Pumpkin Wreath…

Adorn your door this fall with a pretty deco mesh ... Go To project

Reuse those empty prescription pill bottles in all sorts of ways. From organizing to making cookies. Yes, cookies! See how to use your empty pill bottles!

20 Uses for Prescription Pill…

You've been collecting prescription pill bottles for ... Go To project

Meet the Family

Amanda

Founder and Designer

Kristen

Editorial Manager

Lindsay

Social Media Manager

As seen on:

Footer

Favorites

  • Jar Photo Frames
  • No-Sew Roman Shade
  • Paper Flowers
  • How to Make a Scrunchie
  • Mermaid Slime

About

  • Home
  • Meet the Creative Team
  • Work with Us
  • Privacy Policy
  • Accessibility
  • Contact Us

Images/text copyright Amanda Formaro 2020. To feature a post from Crafts by Amanda, you may use one photo credited and linked back directly to the project post.

Free CraftsBy email every week

Latest crafts straight to your inbox!

Copyright ©2025, Crafts by Amanda. All Rights Reserved.
Design by Pixel Me Designs

Rate This Tutorial

Your vote:


To share a photo with your comment click here!

A rating is required
A name is required
An email is required

Recipe Ratings without Comment

Something went wrong. Please try again.