• Home
  • About
    • About Crafts by Amanda
    • Visit Our Recipe Site
  • Work With Us
  • Join
    • Free Newsletters
    • Join our Facebook craft group
↑
  • Tutorials
    • Tutorial Index
    • Adult Crafts
    • Crafts for Kids
    • Crafts for Seniors
    • Recycled Crafts
    • Seasonal Crafts
    • Holiday Crafts
    • Free Printables
    • Craft Collections
  • Adult Crafts
    • Bath & Body
    • Beach Crafts
    • Clay Pot Crafts
    • Crafts for Seniors
    • Decoupage Crafts for Adults
    • DIY Gift ideas
    • Garden Crafts
    • Home Decor Projects
    • Kitchen Crafts
    • Light Bulb Crafts
    • Luminary Crafts
    • Mason Jar Crafts
    • Needlework
    • Photo Display Ideas
    • Recycled Crafts for Adults
    • Wearable Crafts for Adults
  • Crafts for Kids
    • Animal Crafts for Kids
    • Back to School Crafts
    • Beach Crafts for Kids
    • Camp Crafts
    • Cardboard Tube Crafts for Kids
    • Decoupage Crafts for Kids
    • Easy Crafts for Kids
    • Nature Crafts for Kids
    • Other Kid’s Crafts
    • Paper Plate Crafts for Kids
    • Recycled Crafts for Kids
    • Slimes, Doughs, & Clay
    • Wearable Crafts for Kids
  • Holiday Crafts
    • 4th of July Crafts
    • Christmas Crafts
    • DIY Gift ideas
    • Earth Day Crafts
    • Easter Crafts
    • Father’s Day Crafts
    • Halloween Crafts
    • Memorial Day Crafts
    • Mother’s Day Crafts
    • New Year’s
    • Other Holidays
    • Patriot Day Crafts
    • St. Patrick’s Day Crafts
    • Thanksgiving Crafts
    • Valentine’s Day Crafts
  • Seasonal Crafts
    • Winter Crafts
    • Spring Crafts
    • Summer Crafts
    • Fall Crafts
  • Home
  • About
    • About Crafts by Amanda
    • Visit Our Recipe Site
  • Work With Us
  • Join
    • Free Newsletters
    • Join our Facebook craft group
  • Skip to primary navigation
  • Skip to main content
  • Skip to primary sidebar
  • Skip to footer

Crafts by Amanda

crafts for adults and kid's crafts

  • Tutorials
    • Tutorial Index
    • Adult Crafts
    • Crafts for Kids
    • Crafts for Seniors
    • Recycled Crafts
    • Seasonal Crafts
    • Holiday Crafts
    • Free Printables
    • Craft Collections
  • Adult Crafts
    • Bath & Body
    • Beach Crafts
    • Clay Pot Crafts
    • Crafts for Seniors
    • Decoupage Crafts for Adults
    • DIY Gift ideas
    • Garden Crafts
    • Home Decor Projects
    • Kitchen Crafts
    • Light Bulb Crafts
    • Luminary Crafts
    • Mason Jar Crafts
    • Needlework
    • Photo Display Ideas
    • Recycled Crafts for Adults
    • Wearable Crafts for Adults
  • Crafts for Kids
    • Animal Crafts for Kids
    • Back to School Crafts
    • Beach Crafts for Kids
    • Camp Crafts
    • Cardboard Tube Crafts for Kids
    • Decoupage Crafts for Kids
    • Easy Crafts for Kids
    • Nature Crafts for Kids
    • Other Kid’s Crafts
    • Paper Plate Crafts for Kids
    • Recycled Crafts for Kids
    • Slimes, Doughs, & Clay
    • Wearable Crafts for Kids
  • Holiday Crafts
    • 4th of July Crafts
    • Christmas Crafts
    • DIY Gift ideas
    • Earth Day Crafts
    • Easter Crafts
    • Father’s Day Crafts
    • Halloween Crafts
    • Memorial Day Crafts
    • Mother’s Day Crafts
    • New Year’s
    • Other Holidays
    • Patriot Day Crafts
    • St. Patrick’s Day Crafts
    • Thanksgiving Crafts
    • Valentine’s Day Crafts
  • Seasonal Crafts
    • Winter Crafts
    • Spring Crafts
    • Summer Crafts
    • Fall Crafts
Craft Tutorials | Adult Crafts | Home Decor Projects | Burlap Stenciled Pillow Covers
Home Decor Projects

Burlap Stenciled Pillow Covers

Author by Angie Holden on May 16, 2025 Updated on May 16, 2025

No ratings yet
Brighten up your porch with some DIY burlap stenciled pillow covers in the color of your choice!
Jump to Project
Stenciled burlap pillow covers are easy to make and will look great in any room of your home.  Here we are using an outdoor paint to add some embellishment so we can spruce up a porch or patio. 
210 shares
  • Share
  • Tweet
  • Flipboard
  • Email

Burlap stenciled pillow covers are easy to make and will look great in any room of your home.  Here we are using an outdoor paint to add some embellishment so we can spruce up a porch or patio.  Choose from a wide variety of stencils and colors to customize these to your home decor.

Stenciled Burlap Pillow Covers for your outdoor space


Burlap Stenciled Pillow Covers


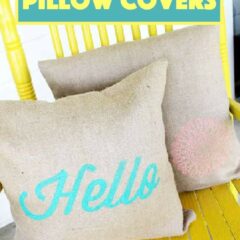
I was looking for a way to brighten up my porch.  Plus who doesn’t love a quick and easy craft project?  So, I made a few of these burlap stenciled pillow covers and I love the way they turned out.

Related: Love burlap?  You might also like this beautiful burlap wreath, this farmhouse sign from burlap or this post on how to make burlap flowers.

How to make stenciled burlap pillow covers

Supplies to make these burlap stenciled pillow covers


  • Burlap pillow covers (I found mine at Hobby Lobby)
  • Stencils of your choice (I am using two from DecoArt)
  • Outdoor paint in the colors of your choice (be sure to choose a good quality paint)
  • Sponge pouncer brush
  • Paintbrush
  • Stencil adhesive
  • Iron
  • Scrap paper or cardboard
  • Outdoor pillow forms
Stenciled Burlap Pillow Covers supplies.

How to make burlap stenciled pillow covers


  1. Start by washing your burlap pillow covers then iron them to remove any wrinkles.
  2. Then insert scrap paper or cardboard into the pillow cover to protect it if any paint seeps through.
  3. Set aside pillow cover and turn stencil over to the back side.  Spray well with a stencil adhesive and allow to dry completely.
  4. Once dry, press down well into place on your pillow cover.
  5. Load up your sponge pouncer brush with your outdoor paint. 

    NOTE: You can use an indoor paint or even fabric ink if you are going to be using these pillows inside.

  6. Then paint over the stencil making sure that all areas are covered with paint.  You may have to go over some areas twice.
  7. Peel back stencil to reveal your design.
  8. For some stencils, you may want to use a regular paint brush at this point to fill in some of the stencil lines.  This is especially true of words or letters.
  9. Allow to dry completely.  Be sure to read the back of any paint that you are using to see if a heat set is required after drying.
  10. Remove the scrap paper from the inside of the pillow cover and add in an outdoor pillow form.
  11. These stenciled burlap pillow covers are ready for your porch or patio!
Stenciled burlap pillow covers on yellow chair

With so many stencils on the market, it is easy to come up with some designs that will be perfect for your space.  Whether you are welcoming them with a friendly hello or just adding some color, these stenciled burlap pillow covers are easy to make and you will love how they look!

Stenciled Burlap Pillow Covers

See other ways you can use your array of stencils, like this distressed garden sign you can use to mark plants, flowers or even put a fun quote on. Or even these stenciled DVD/CD coasters you can make into colorful pieces to add to your screened porch or outdoor space as well.


More Summer Projects


  • Drip Paint Pots
  • Clay Pot Lighthouse
  • Mason Jar Solar Lights
  • DIY Garden Stepping Stones
  • DIY Mosquito Repellent Candles
  • Bird Seed Ornaments
Stenciled burlap pillow covers are easy to make and will look great in any room of your home.  Here we are using an outdoor paint to add some embellishment so we can spruce up a porch or patio. 
Print Project
No ratings yet

Stenciled Burlap Pillow Covers

Brighten up your porch with some DIY burlap stenciled pillow covers in the color of your choice!
Author: Angie Holden

Supplies

  • Burlap pillow covers I found mine at Hobby Lobby
  • Stencils of your choice I am using two from DecoArt
  • Outdoor paint in the colors of your choice be sure to choose a good quality paint
  • Sponge pouncer brush
  • Paintbrush
  • Stencil adhesive
  • Iron
  • Scrap paper or cardboard
  • Outdoor pillow forms

Instructions

  • Start by washing your burlap pillow covers then iron them to remove any wrinkles.
  • Then insert scrap paper or cardboard into the pillow cover to protect it if any paint seeps through.
  • Set aside pillow cover and turn stencil over to the back side.  Spray well with a stencil adhesive and allow to dry completely.
  • Once dry, press down well into place on your pillow cover.
  • Load up your sponge pouncer brush with your outdoor paint.  NOTE: You can use an indoor paint or even fabric ink if you are going to be using these pillows inside.
  • Then paint over the stencil making sure that all areas are covered with paint.  You may have to go over some areas twice.
  • Peel back stencil to reveal your design.
  • For some stencils, you may want to use a regular paint brush at this point to fill in some of the stencil lines.  This is especially true of words or letters.
  • Allow to dry completely.  Be sure to read the back of any paint that you are using to see if a heat set is required after drying.
  • Remove the scrap paper from the inside of the pillow cover and add in an outdoor pillow form.
  • These stenciled burlap pillow covers are ready for your porch or patio!

Video

This post originally appeared on the blog on May 16, 2018.

  • Author
  • Recent Posts
Follow along
Angie Holden
Blogger at The Country Chic Cottage
Angie Holden is author of The Country Chic Cottage where she shares crafts, recipes, and DIY projects daily.She lives on a farm in rural Tennessee with her husband and three children.She loves creating and sharing her creations on her blog and social media.
Follow along
Latest posts by Angie Holden (see all)
  • Fall Mason Jars - September 16, 2025
  • Burlap Stenciled Pillow Covers - May 16, 2025
  • Mason Jar Tissue Holder - February 18, 2025
210 shares
  • Share
  • Tweet
  • Flipboard
  • Email

Filed Under: DIY Gift ideas, Home Decor Projects, Summer Crafts Tagged With: burlap, outdoor, paint, patio, stencil

Reader Interactions

Free CraftsBy email every week

Latest crafts straight to your inbox!

Leave a Reply Cancel reply

Your email address will not be published. Required fields are marked *

Rate This Project


The maximum upload file size: 640 MB. You can upload: image, video. Links to YouTube, Facebook, Twitter and other services inserted in the comment text will be automatically embedded. Drop files here

Primary Sidebar

Hi! I’m Amanda and I’m the founder and head designer of Crafts by Amanda. I have spent over 25 years creating projects to share, but it’s not just me anymore! It’s turned into a complete family affair. Come and meet the Creative Team!

Free CraftsBy email every week

Latest crafts straight to your inbox!

All Time Favorites

Make this wonderful deco mesh pumpkin wreath to hang on your door this fall!

Deco Mesh Pumpkin Wreath…

Adorn your door this fall with a pretty deco mesh ... Go To project

Learn to make these adorable ladybug painted rocks. use special outdoor paint for this adorable garden craft so you can keep garden ladybugs all summer!

Ladybug Painted Rocks…

These colorful little ladybug painted rocks are the ... Go To project

snowy pinecone candle jar luminaries

Winter Luminaries: Snowy Pinecone…

Make pretty winter luminaries that appear to be covered ... Go To project

Reuse those empty prescription pill bottles in all sorts of ways. From organizing to making cookies. Yes, cookies! See how to use your empty pill bottles!

20 Uses for Prescription Pill…

You've been collecting prescription pill bottles for ... Go To project

Meet the Family

Amanda

Founder and Designer

Kristen

Editorial Manager

Lindsay

Social Media Manager

As seen on:

Footer

Favorites

  • Jar Photo Frames
  • No-Sew Roman Shade
  • Paper Flowers
  • How to Make a Scrunchie
  • Mermaid Slime

About

  • Home
  • Meet the Creative Team
  • Work with Us
  • Privacy Policy
  • Accessibility
  • Contact Us

Images/text copyright Amanda Davis 2025. To feature a post from Crafts by Amanda, you may use one photo credited and linked back directly to the project post.

Free CraftsBy email every week

Latest crafts straight to your inbox!

Copyright ©2025, Crafts by Amanda. All Rights Reserved.
Design by Pixel Me Designs

Rate This Tutorial

Your vote:


To share a photo with your comment click here!

A rating is required
A name is required
An email is required