
I have a very good friend who absolutely loves that up north, log cabin look.
You know the decor…
Bears, moose, deer, logs, mountains, wolves, anything up north-y with a rustic cabin feel and she’s in Heaven.
This year for Christmas, she really wanted to deck out her tree with bears, moose, and other up north type ornaments, but to her dismay the prices were outrageous.
With ornaments starting at $5.00-7.00 a piece, decorating an entire tree would have been a rather expensive undertaking.
So she passed on the idea and hung a few older ornaments along with some pinecones instead.
Of course, my creative gears started turning and I knew I had to make her some. I hated hearing how bummed out she sounded when she was talking about it, and there’s no better way to spread Christmas cheer than by making someone else happy, so I set about my task.

The first design I thought of was simple enough.
I looked in the backyard at the pile of limbs sitting next to our fire pit from the trees we had trimmed this year. Surely there had to be a decent limb in that pile that I could slice into disks.
With the help of a kind neighbor, who just happens to be a carpenter, I found myself with about a dozen 1/2″ round slices, ready to decorate.
The other design in my head involved twigs, burlap and flannel or gingham of some sort.
I knew I would need something sturdy, but I’m sooooo not into complicated, so cardboard was my medium of choice.
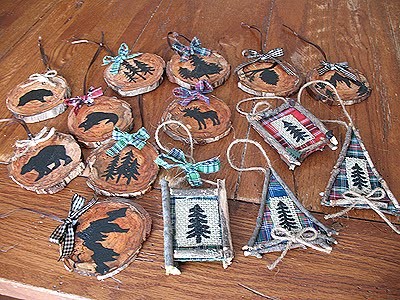
And from these two ideas, these ornaments were born.
My friend loved them, so did her family. It made me happy to be able to give them to her, knowing how much she appreciated it. It’s the giving. The warm feeling in your heart that you get.
That’s what Christmas is all about. :)
Rustic North Woods Log Ornaments

Note: I was lucky and my disks had natural holes in which I ran the ribbon through for the hangers. You may need to drill a hole. Run ribbon through the hole and tie to create a hanger.

More Ornament Crafts
- Cinnamon Ornaments
- Scrabble Tile Ornaments
- Pom Pom Ornaments
- Beach Sign Ornaments
- Twisted Paper Ornaments
- Decoupage Wood Slice Ornaments
Rustic North Woods Ornaments - moose, bear, fish, cabin favorites
Supplies
- 1/2 ″ disks of wood
- black paint
- thin paint brush
- pencil
- ribbon for hangers
- jute gingham ribbon or checkered material for bows
- Clear glaze spray
- hot glue gun
Instructions
- If bark around wood is healthy you can leave it in place. Mine were weak and falling off, so I just removed the bark all together and tapped the disks on the table to knock off any excess dust and grit.
- You can either freehand your designs with a pencil like I did, or use mini cookie cutters for stencils. Another idea is to google some north woods decorations and print out a few designs to use. You can even use black transfer paper to add the designs to the wood.
- Paint the designs black and let dry.
- The beauty of this craft is that silhouettes require no details, you just have to make sure your outlines are recognizable.
- When they are dry, spray with clear glaze. Repeat on the other side. Do a total of 2-3 coats.
- Create bows out of jute or ribbon.
- I used material strips from the leg section of boxer shorts that my boys had outgrown.
- Hot glue to the front of the ornament, above your design.
Rustic Twig Framed Pine Ornaments
designed by Amanda Formaro

Cut rectangles and triangles from cardboard, mine were roughly 2″ x 3″.
Cut a piece of gingham or flannel fabric twice the size of your cardboard. Cover one side of the cardboard with the glue stick. Place sticky side down on to the fabric and smooth it out with your hand. Cover the exposed side of the cardboard with glue and fold the remaining fabric onto the glued side. Smooth out with your hand. Trim the excess fabric, feeling the sides of the cardboard as a guide.
Cut a piece of burlap about 1/3 the size of your cardboard. The idea is to be able to see the flannel fabric background after your twig frame is attached. Cover one side of the burlap with white glue, gently spreading it out with your finger. Glue on to the center of the flannel fabric.
Use a thin paint brush and a generous amount of black paint to add a vertical line up the center of the burlap. Because burlap is not a smooth surface, you will need a fair amount of paint and the least amount of detail. Add simple limbs on both side of the “tree trunk”, finishing with a point at the top.
Cut a piece of jute for the hanger. Break twigs to fit along all four sides of your fabric, you will need enough for both sides of the ornament.
Hot glue the twigs onto the fabric, make sure you insert the jute hanger as your are adding the twigs so that it ends up sandwiched between the twigs. Tie a bow from jute and add to the bottom of the ornament with hot glue.
You can use mini north wood themed buttons to decorate the edges of your ornaments as well.

- thin cardboard (from the back of a writing tablet, cereal box, etc)
- gingham material (again, I used the legs of recycled boxer shorts)
- glue stick
- scissors
- burlap
- black acrylic paint
- thin paint brush
- twigs
- hot glue gun
- jute
- gingham ribbon or fabric
- small woodland buttons (optional)
- Cut rectangles and triangles from cardboard, mine were roughly 2″ x 3″.
- Cut a piece of gingham or flannel fabric twice the size of your cardboard. Cover one side of the cardboard with the glue stick. Place sticky side down on to the fabric and smooth it out with your hand. Cover the exposed side of the cardboard with glue and fold the remaining fabric onto the glued side. Smooth out with your hand. Trim the excess fabric, feeling the sides of the cardboard as a guide.
- Cut a piece of burlap about 1/3 the size of your cardboard. The idea is to be able to see the flannel fabric background after your twig frame is attached. Cover one side of the burlap with white glue, gently spreading it out with your finger. Glue on to the center of the flannel fabric.
- Use a thin paint brush and a generous amount of black paint to add a vertical line up the center of the burlap. Because burlap is not a smooth surface, you will need a fair amount of paint and the least amount of detail. Add simple limbs on both side of the “tree trunk”, finishing with a point at the top.
- Cut a piece of jute for the hanger. Break twigs to fit along all four sides of your fabric, you will need enough for both sides of the ornament.
- Hot glue the twigs onto the fabric, make sure you insert the jute hanger as your are adding the twigs so that it ends up sandwiched between the twigs. Tie a bow from jute and add to the bottom of the ornament with hot glue.
- You can use mini north wood themed buttons to decorate the edges of your ornaments as well.

- Clay Pot Toadstools - June 2, 2026
- Spring Activity Sheets and Coloring Pages - May 29, 2026
- Paper Plate Ladybugs Craft - May 19, 2026


Babs says
Amanda, thank you for sharing your ideas of the great outdoors. God willing one day I will move back to the north for the beautiful scenery of the four seasons.
Amanda Formaro says
Thanks Babs, I appreciate that~
Barbara says
I love these Rustic Northwoods Ornaments. My husband entire family is from Northern Maine by Canadian border and I know they will love these. I am excited to make these.
Amanda Formaro says
Thanks Barbara! They were really fun to make, I hope you enjoy it!
Julia @ FaveCrafts says
What a cute project! I love it so much that I decided to feature it in our roundup of rustic crafts! Check it out here: http://www.favecraftsblog.com/link-love-country-style-crafts/
Thanks!
Amanda says
Thank you so much for the feature Julia, much appreciated!
Linda Jarvi says
How much do you sell these for? Or do you even sell them?
Amanda says
Hi Linda :) I could – they would be $7.00 each plus shipping. Thanks for asking!
Susan says
Just found your blog tonight and will be a follower from here on…..
What a wonderful friend you are…
I love lovE loVE lOVE LOVE these ornies….so inspired to make some…i to love the up North outdoorsy look so i MUST make some too!!
Did I mention i LOVE these ornies?? lol
Thank you for the inspiration!
kristin says
these are wonderful!! thanks for sharing your tutorial :)
themagiconions says
So cute!!! I'm hoping you'll share this on our Nature Collective by linking on Friday's Nature Table… Pop on over to my blog to post your link. Blessings and magic,
Donni
Amanda says
Thanks for all your kind comments everyone! They were a lot of fun to make and my friend really loved them :)
kathi says
These are so cute! Thanks for sharing how you made them! I'm going to try to make some for my tree and to give as gifts! LOVE handmade ornaments!
Kim -today's creative blog says
You know I love burlap.
Katy @ Pie Bird says
I love these! They will look wonderful in our little Wyoming log cabin :) Thanks so much!
Wendy Piersall says
Amanda, these are seriously *adorable*!!!
Bird learning to fly... says
Amanda,
Firstly, thank you for your visit and comment at Bird Crafts! You are too sweet :D
What an awesome blog!!!!! How do you do with 4 children, 7 blogs, crafting…Superwoman no doubt!
I am absolutely loving these rustic ornaments! I love rustic too. And this lightbulb snowman and penguin…It's just toooo muck creativit! I am not worthy!!
I have become a follower (you've twisted my arm…)
Rene says
I love all of your rustic ideas… especially the twig frames!
Amanda says
Thanks! Would love to hear about them/see them if you do!
Shirley says
I have tons of twigs so I LOVE the twig ornaments with the burlap, flannel, wool etc. I'm going to try these!
Amanda says
Thank you EB :)
EB says
Very cool! I love the whole series of ornament tutorials in general!
Amanda says
Yep :) I painted them. In fact, I tried using a mini cookie cutter for the first one and wasn't really happy with how it looked, so I ended up freehanding the designs by looking at some print outs that I made :) Thank you Katrina!
Katrina says
These look awesome! I figured you just stensiled the pictures on them, but you painted them, didn't you?!
Amanda says
Thanks Beth! I love Colorado too, my favorite state. Some day i will live there!
Beth@The Stories of A to Z says
I love these! They are adorable and remind me of being in a cabin in Colorado. The Rocky Mountains is one of my all-time favorite places to be and these so remind me of them. I'll have to try making some.