• Home
  • About
    • About Crafts by Amanda
    • Visit Our Recipe Site
  • Work With Us
  • Join
    • Free Newsletters
    • Join our Facebook craft group
↑
  • Tutorials
    • Tutorial Index
    • Adult Crafts
    • Crafts for Kids
    • Crafts for Seniors
    • Recycled Crafts
    • Seasonal Crafts
    • Holiday Crafts
    • Free Printables
    • Craft Collections
  • Adult Crafts
    • Bath & Body
    • Beach Crafts
    • Clay Pot Crafts
    • Crafts for Seniors
    • Decoupage Crafts for Adults
    • DIY Gift ideas
    • Garden Crafts
    • Home Decor Projects
    • Kitchen Crafts
    • Light Bulb Crafts
    • Luminary Crafts
    • Mason Jar Crafts
    • Needlework
    • Photo Display Ideas
    • Recycled Crafts for Adults
    • Wearable Crafts for Adults
  • Crafts for Kids
    • Animal Crafts for Kids
    • Back to School Crafts
    • Beach Crafts for Kids
    • Camp Crafts
    • Cardboard Tube Crafts for Kids
    • Decoupage Crafts for Kids
    • Easy Crafts for Kids
    • Nature Crafts for Kids
    • Other Kid’s Crafts
    • Paper Plate Crafts for Kids
    • Recycled Crafts for Kids
    • Slimes, Doughs, & Clay
    • Wearable Crafts for Kids
  • Holiday Crafts
    • 4th of July Crafts
    • Christmas Crafts
    • DIY Gift ideas
    • Earth Day Crafts
    • Easter Crafts
    • Father’s Day Crafts
    • Halloween Crafts
    • Memorial Day Crafts
    • Mother’s Day Crafts
    • New Year’s
    • Other Holidays
    • Patriot Day Crafts
    • St. Patrick’s Day Crafts
    • Thanksgiving Crafts
    • Valentine’s Day Crafts
  • Seasonal Crafts
    • Winter Crafts
    • Spring Crafts
    • Summer Crafts
    • Fall Crafts
  • Skip to primary navigation
  • Skip to main content
  • Skip to primary sidebar
  • Skip to footer

Crafts by Amanda

crafts for adults and kid's crafts

  • Tutorials
    • Tutorial Index
    • Adult Crafts
    • Crafts for Kids
    • Crafts for Seniors
    • Recycled Crafts
    • Seasonal Crafts
    • Holiday Crafts
    • Free Printables
    • Craft Collections
  • Adult Crafts
    • Bath & Body
    • Beach Crafts
    • Clay Pot Crafts
    • Crafts for Seniors
    • Decoupage Crafts for Adults
    • DIY Gift ideas
    • Garden Crafts
    • Home Decor Projects
    • Kitchen Crafts
    • Light Bulb Crafts
    • Luminary Crafts
    • Mason Jar Crafts
    • Needlework
    • Photo Display Ideas
    • Recycled Crafts for Adults
    • Wearable Crafts for Adults
  • Crafts for Kids
    • Animal Crafts for Kids
    • Back to School Crafts
    • Beach Crafts for Kids
    • Camp Crafts
    • Cardboard Tube Crafts for Kids
    • Decoupage Crafts for Kids
    • Easy Crafts for Kids
    • Nature Crafts for Kids
    • Other Kid’s Crafts
    • Paper Plate Crafts for Kids
    • Recycled Crafts for Kids
    • Slimes, Doughs, & Clay
    • Wearable Crafts for Kids
  • Holiday Crafts
    • 4th of July Crafts
    • Christmas Crafts
    • DIY Gift ideas
    • Earth Day Crafts
    • Easter Crafts
    • Father’s Day Crafts
    • Halloween Crafts
    • Memorial Day Crafts
    • Mother’s Day Crafts
    • New Year’s
    • Other Holidays
    • Patriot Day Crafts
    • St. Patrick’s Day Crafts
    • Thanksgiving Crafts
    • Valentine’s Day Crafts
  • Seasonal Crafts
    • Winter Crafts
    • Spring Crafts
    • Summer Crafts
    • Fall Crafts
Craft Tutorials | Holiday Crafts | Christmas Crafts | Sea Glass Christmas Tree
Christmas Crafts

Sea Glass Christmas Tree

Author by Jane and Sonja on November 19, 2021 Updated on November 19, 2021

5 from 21 votes
Learn how to make a beautiful DIY sea glass Christmas tree topped with pretty starfish ornament.
Jump to Project
DIY seaglass Christmas tree
21378 shares
  • Share
  • Tweet
  • Flipboard
  • Email
DIY seaglass Christmas tree

Hi friends! 
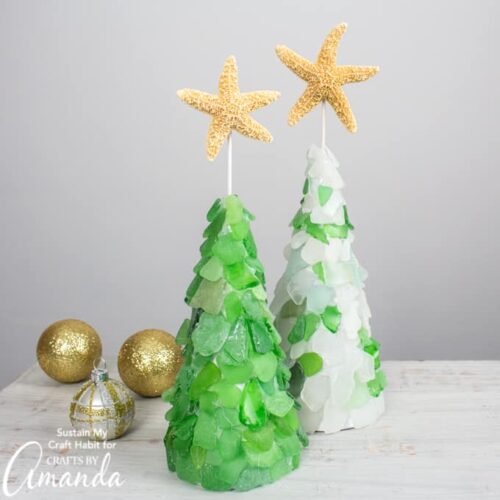
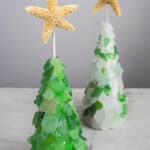
We’re excited to share this beach-inspired DIY sea glass Christmas tree craft using your sea glass collection that you’ll want to display every holiday season.

DIY seaglass Christmas trees topped with starfish


A simple and elegant DIY Sea Glass Christmas Tree

Collecting sea glass with the kids is one of our favorite things to do when we’re at the cottage. Technically, it’s called beach glass since we’re at the lake (and not the sea) but we’ve gotten accustomed to saying sea glass over the years. Each of the kids takes a little baggie with them to hold all their finds until they can sort them by color when they return home. We could undoubtedly walk for hours combing the beach for treasures.

We normally share DIY tutorials for making driftwood crafts such as our driftwood crab wall art, concrete and driftwood sailboat decor, driftwood reindeer ornaments and large driftwood Christmas tree so we were excited to share this simple sea glass craft for a change. If you don’t have enough sea glass in your collection, it can also be purchased at a local nursery or craft store.

DIY seaglass Christmas tree

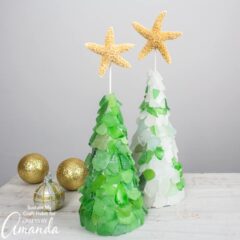
We love the way these sea glass Christmas trees turned out. They are cute and fun with the starfish topper but also elegant with all the natural glass. For other ways to use your sea glass collection, consider making a pretty macrame seaglass necklace or seaglass planter or even simply add them loosely in a beach-themed terrarium.
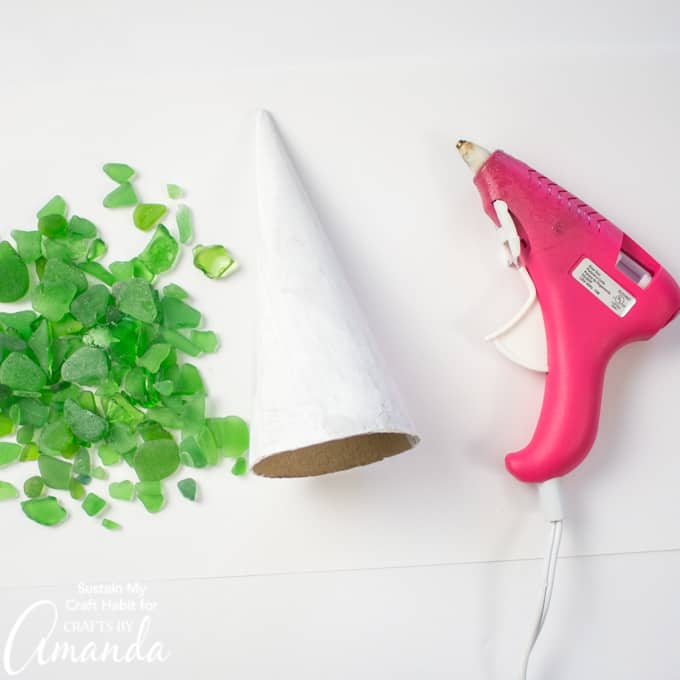
Supplies needed to make a sea glass Christmas tree

How to make a DIY Sea Glass Christmas Tree:

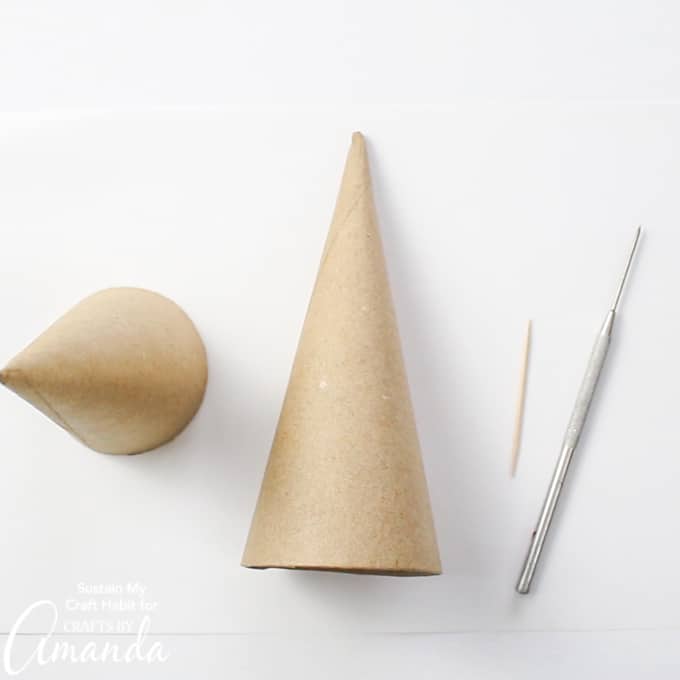
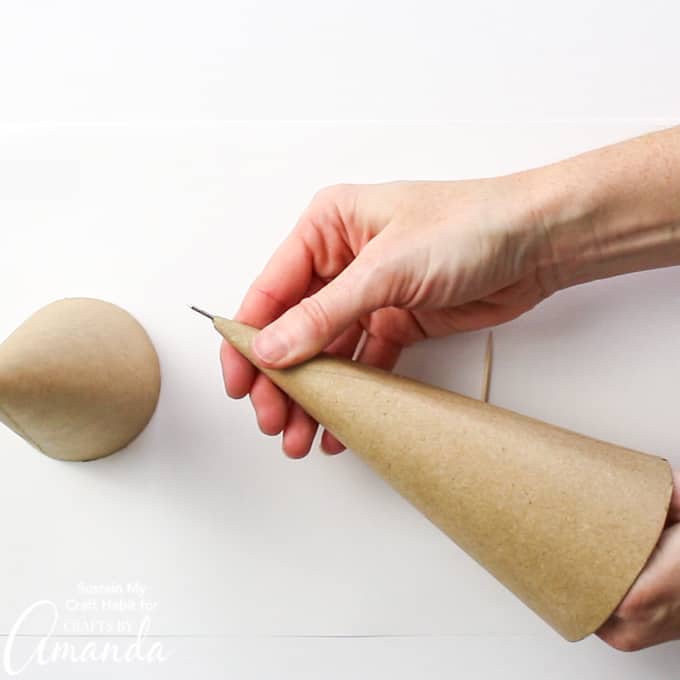
Preparing the Cones:

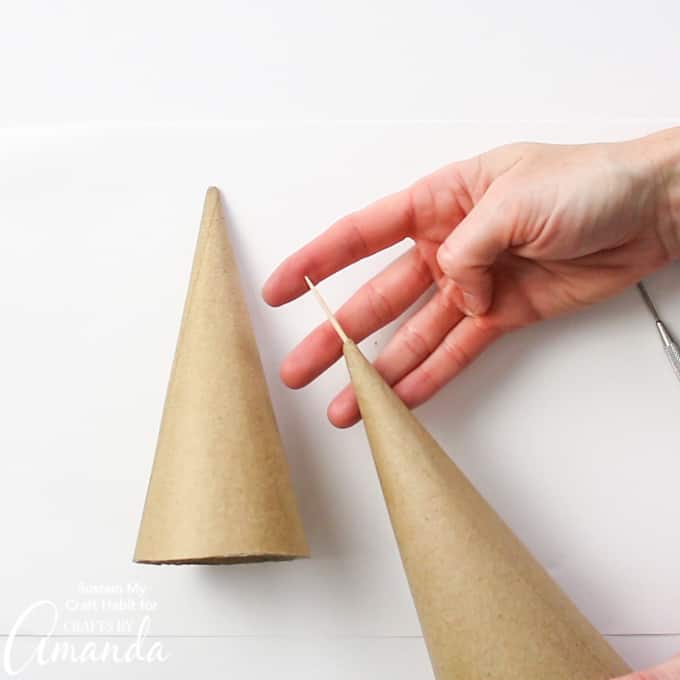
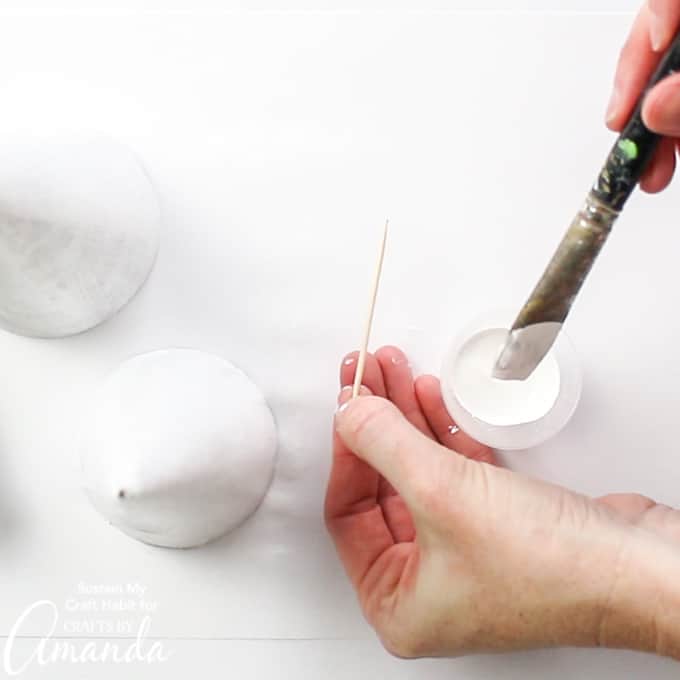
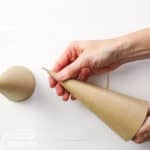
Poke a hole through the top of the cone using a sharp-pointed tool such as an awl or a wooden skewer. The toothpick is likely not strong enough to break through the paper mache.

  • DIY seaglass Christmas tree

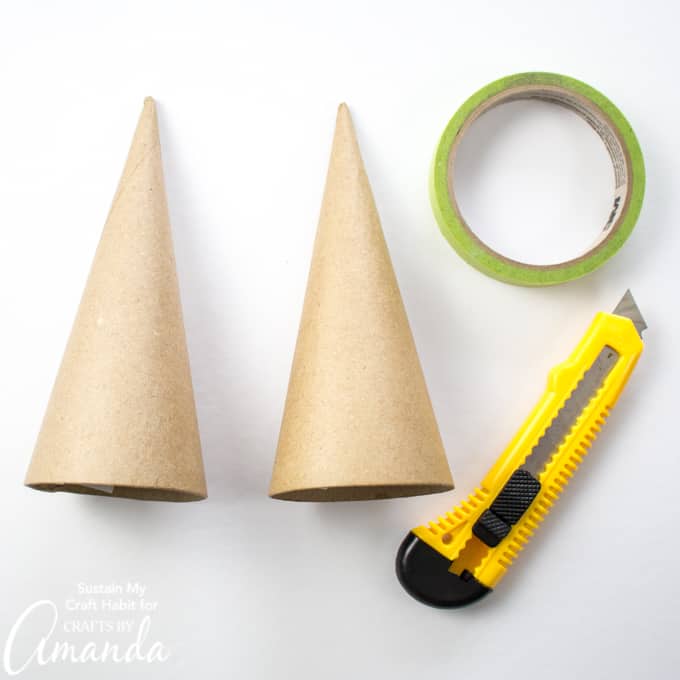
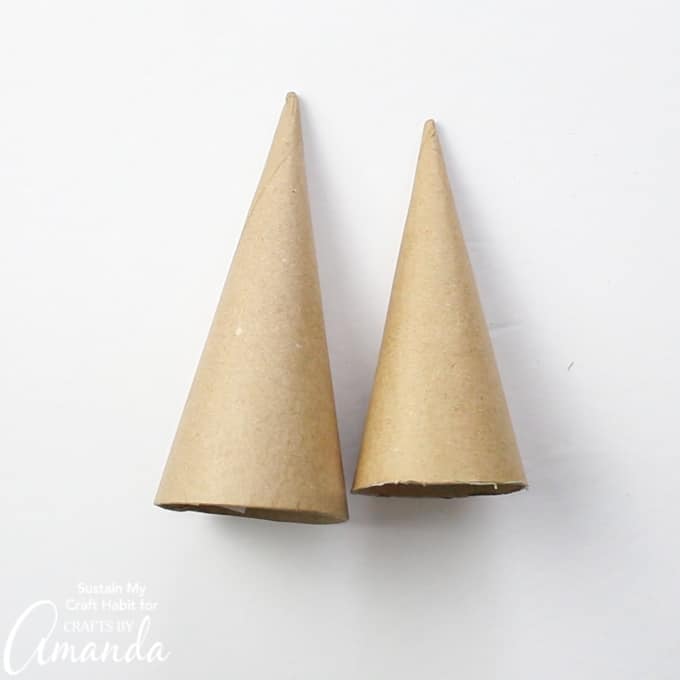
To alter the size of the cones so the trees are at differing heights, simply cut off some of the height at the bottom of one of the cones. Wrap a piece of scotch tape approximately ¾” from the base. Using a utility knife or a good pair of scissors, cut along the taped edge to reduce the height of the cone. Remove the tape before moving on.

  • DIY Seaglass Christmas tree

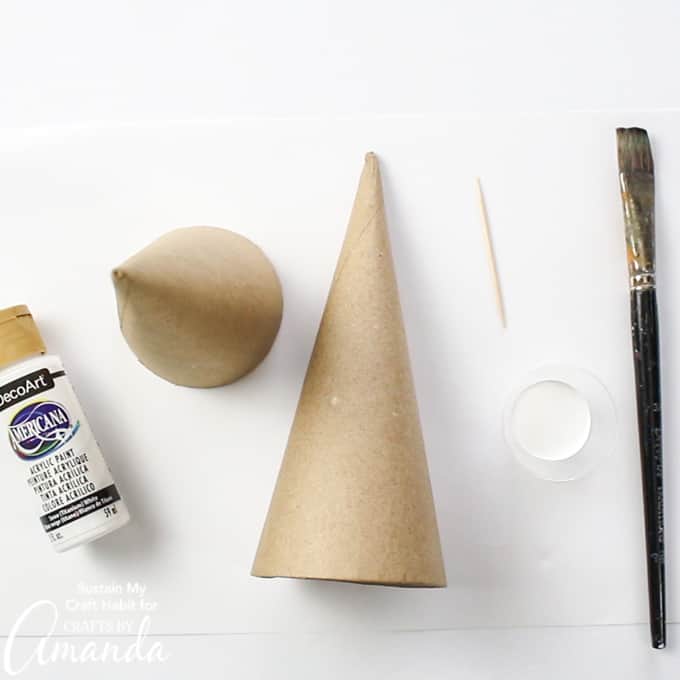
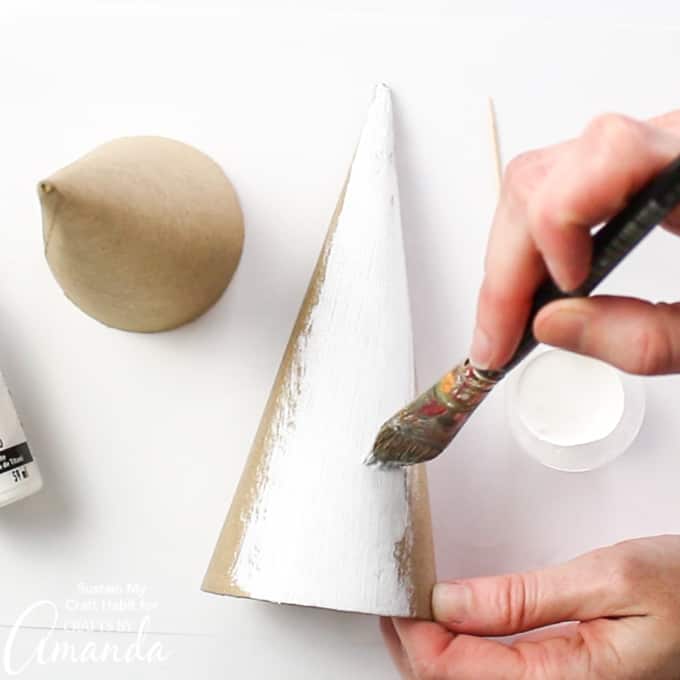
Next, paint the cones and toothpicks using acrylic paint in white. Leave the paint to dry fully before moving on to the next step.

  • IY seaglass Christmas tree

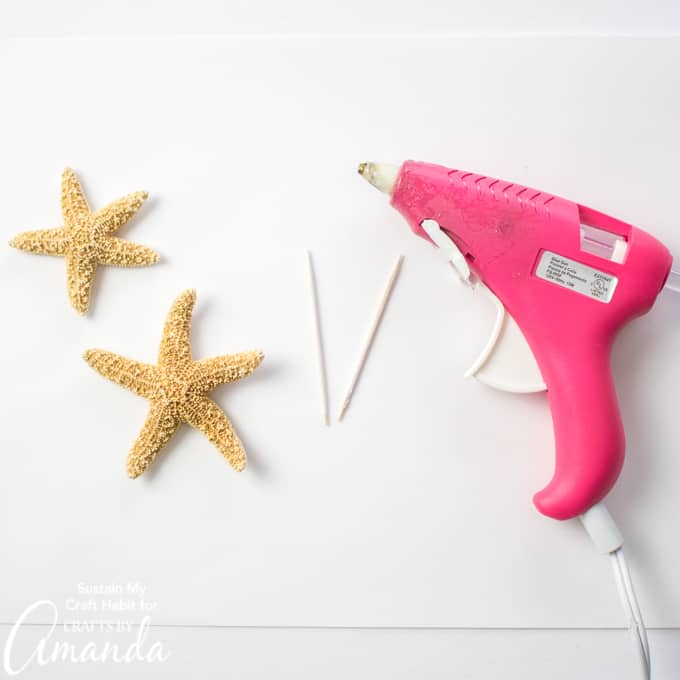
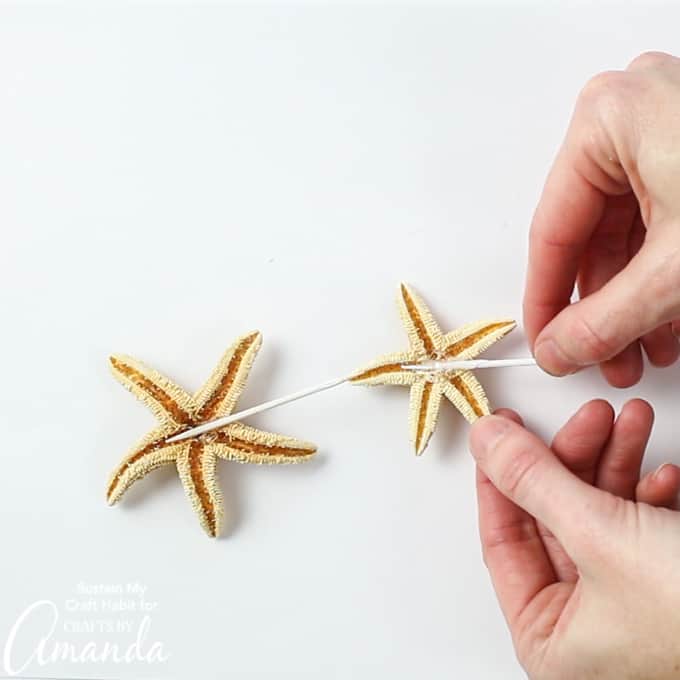
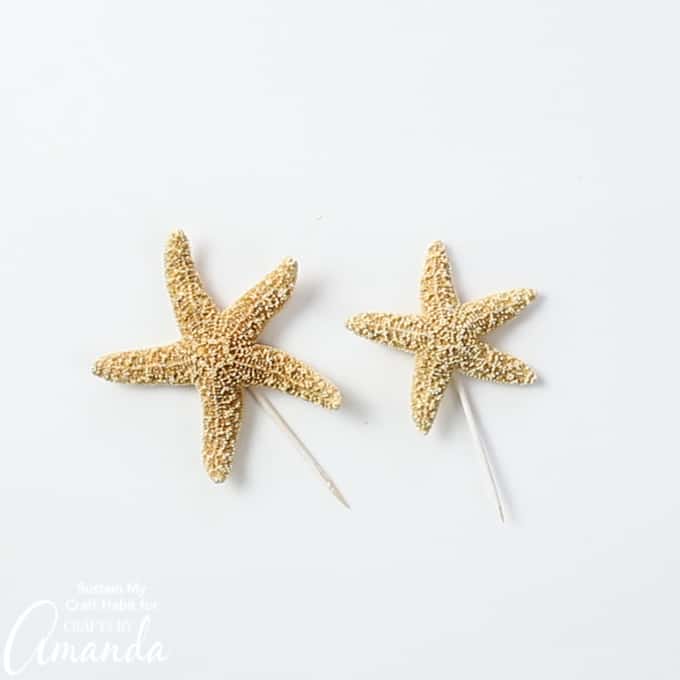
Preparing the Star Topper:

Turn the starfish embellishments with the backside facing up.
Apply a dab of glue to the backside of the starfish and place one of the painted toothpicks down on top so one end hangs past the starfish. Hold the toothpick in place until the glue sets. Put aside for the time being.

  • DIY seaglass Christmas tree

Applying the Sea Glass:

If you’re using actual sea glass collected at the beach, be sure to thoroughly wash and dry it before gluing.
Preheat the hot glue gun and remember to work quickly as the glue from the glue gun sets quickly but work carefully to avoid injury from the hot glue.

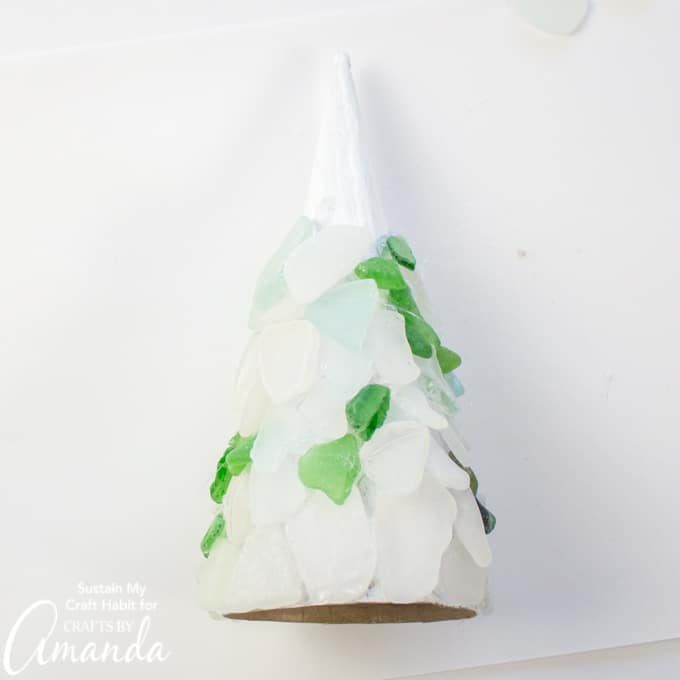
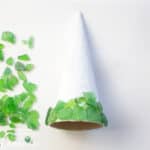
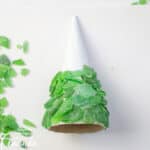
For this first Christmas tree, we used only green glass. Starting at the base of the cone, apply a dab of glue as shown and press one piece of sea glass over the glue. Don’t extend the sea glass past the base of the cone. Continue around the rim of the cone gluing one piece of glass at a time.

  • DIY seaglass Christmas tree

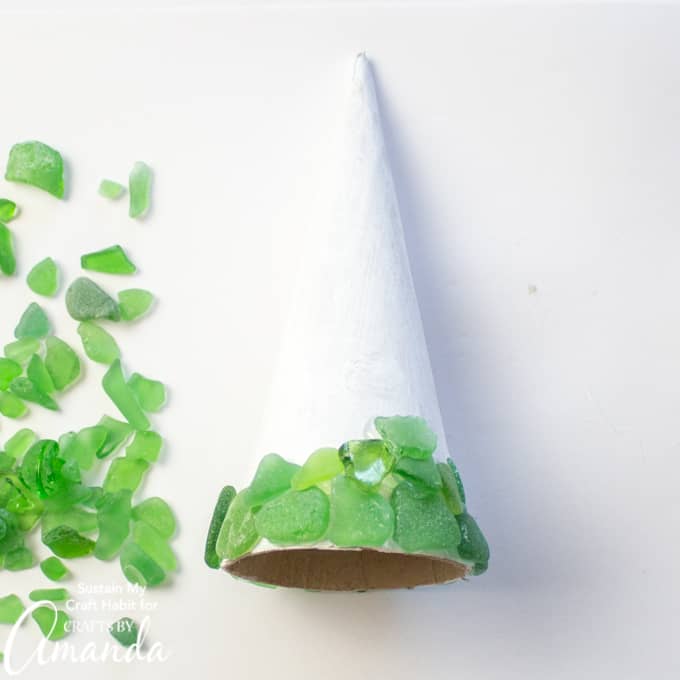
For the second row, overlap the bottom edge of the pieces with the top each of the sea glass from the previous row.

adding sea glass to cone

Continue working one sea glass at a time and one row at a time.

  • DIY seaglass Christmas tree

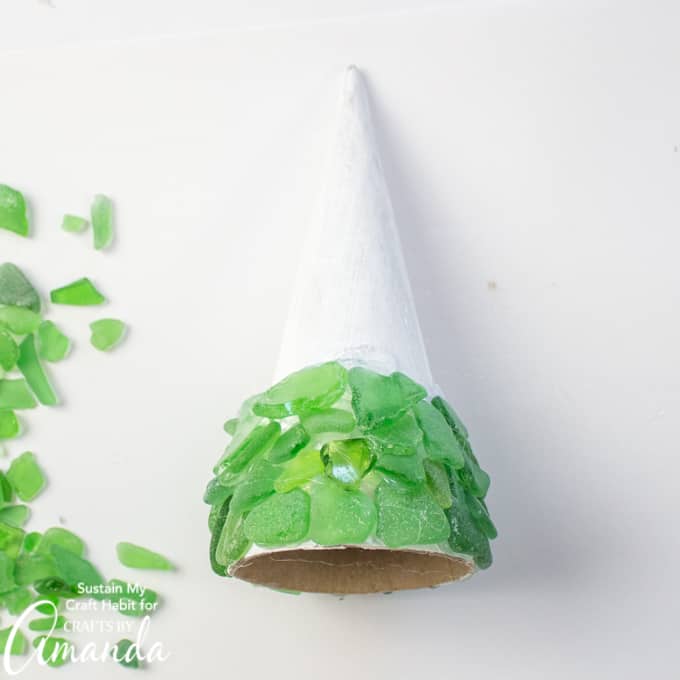
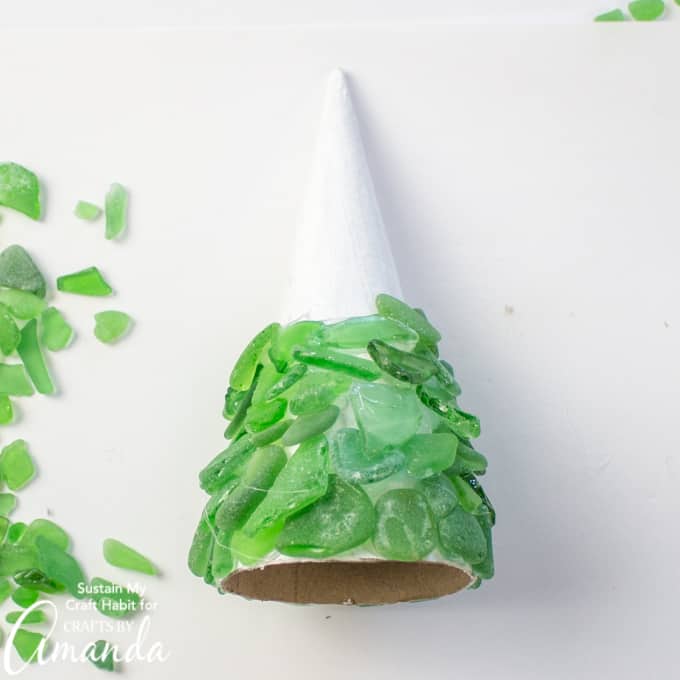
Work your way up to the top of the cone, using different sizes and colors.

  • DIY seaglass Christmas tree

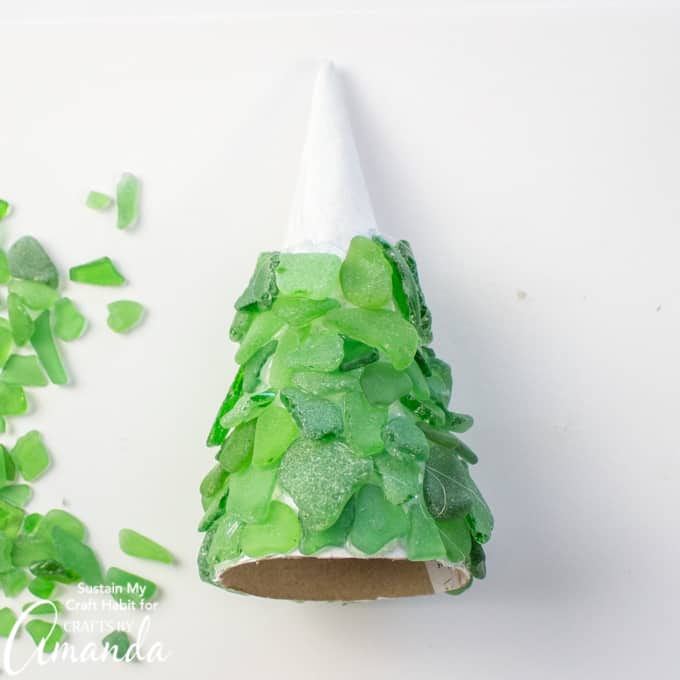
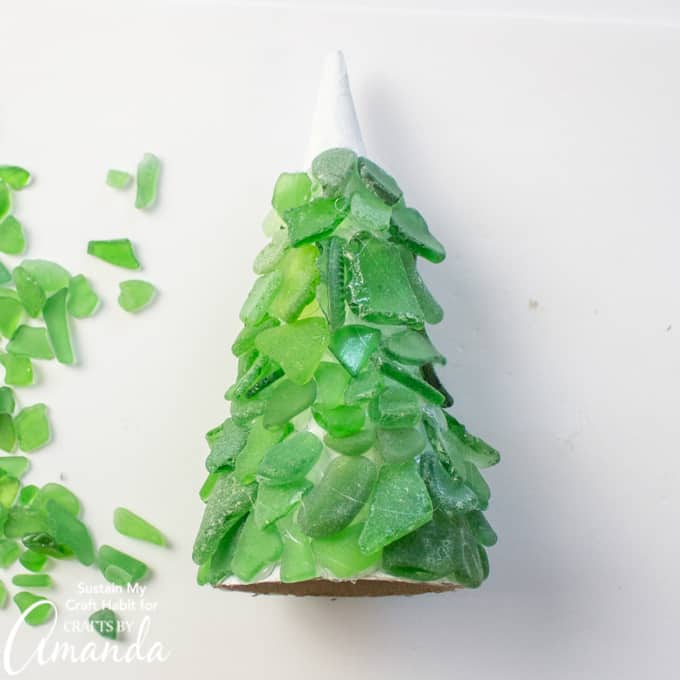
At the top, avoid covering the hole you made earlier with glue or glass. 

adding hot glue to the tip of the cones

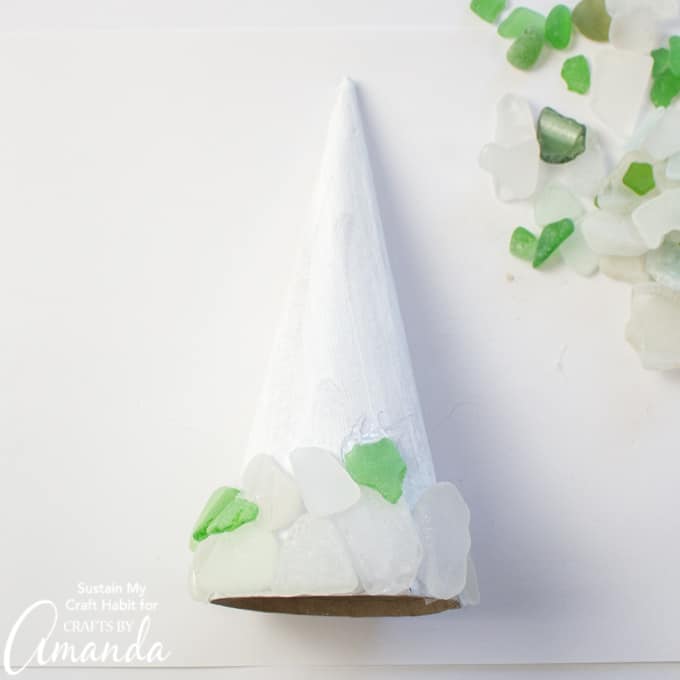
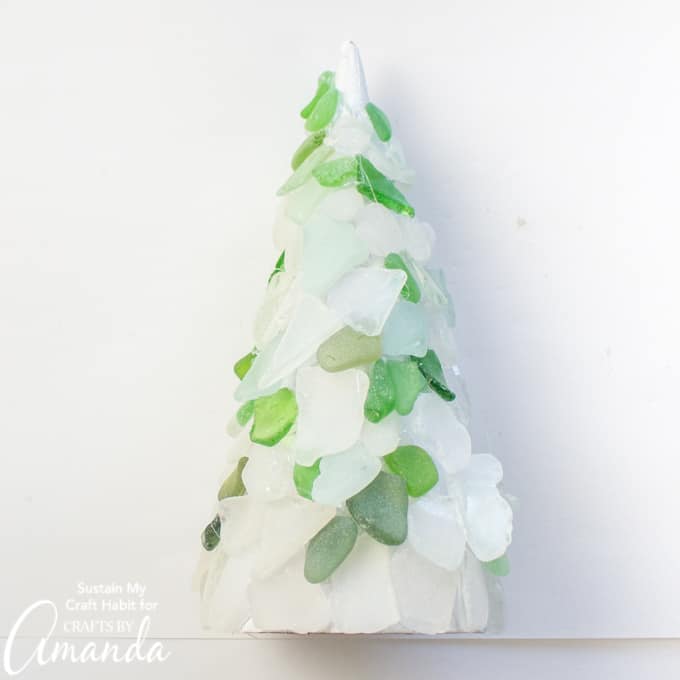
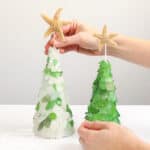
For our second Christmas tree, we used a mix of white, green and blue glass but you can use any combination of sea glass you like.

  • DIY seaglass Christmas tree

Finishing the Sea Glass Christmas Tree:

Once the glue has fully set, clean off any loose glue strands. Lastly, place the star on the top of each tree by inserting the end of the toothpick into the hole at the top of the cone.

topping the seaglass Christmas tree with a starfish

How do you like to display your sea glass collection?

DIY seaglass Christmas tree with starfish toppers

Speaking of Christmas trees, we have another adorable tree craft we think you’d love. These Wood Slice Trees are super easy to make using foam cones and rustic wood slices! 

Lastly, for those of you with a coastal themed home, this Coastal Branch Tree for Christmas is the perfect addition to your beach themed holiday decor!

DIY seaglass Christmas tree
Print Project
5 from 21 votes

Sea Glass Christmas Tree

Learn how to make a beautiful DIY sea glass Christmas tree topped with pretty starfish ornament.
Age Group: Adult Crafts
Project Type: Christmas

Supplies

  • Sea glass in assorted shapes, sizes and colors and with enough to cover cone fully.
  • 1 Paper Mache cone 7" high
  • 1 starfish embellishment
  • 1 toothpick
  • Acrylic paint in white
  • paintbrush
  • hot glue gun with clear glue sticks
  • awl

Instructions

  • Poke a hole through the top of the paper mache cone.
  • Using a medium sized paint brush, paint the paper mache cone and toothpick in white.
  • Glue the painted toothpick to the back side of the starfish.
  • Glue the seaglass pieces to the cone starting at the base.
  • Continue glueing the seaglass by layering over top of the previous row of seaglass.
  • Continue until the cone is covered with seaglass.
  • Insert the starfish toothpick into the hole at the top.
    DIY seaglass Christmas tree

Video

This post originally appeared here on Oct 14, 2019.

  • Author
  • Recent Posts
Follow Along
Jane and Sonja
Bloggers at Sustain My Craft Habit
Jane and Sonja are sisters, moms and lifelong craft addicts both living near Toronto, Canada with their families. They share their love of creativity, nature and coastal craft and DIY ideas on their blog Sustain My Craft Habit.
Follow Along
Latest posts by Jane and Sonja (see all)
  • Kid-Friendly DIY Stained Glass - February 25, 2025
  • Pressed Flower Resin Magnets - February 21, 2025
  • Fabric Scrap Heart Garland - January 24, 2025
21378 shares
  • Share
  • Tweet
  • Flipboard
  • Email

Filed Under: Beach Crafts, Christmas Crafts, Crafts for Seniors, DIY Gift ideas, Home Decor Projects, Winter Crafts Tagged With: beach craft, christmas, christmas craft, diy, sea glass

Reader Interactions

Free CraftsBy email every week

Latest crafts straight to your inbox!

Comments

  1. Izabelle says

    March 2, 2024 at 7:46 pm

    I want to put lights under the sea glass. Any certain kind of lights need to be used?

    Reply
  2. Rynee says

    December 15, 2023 at 3:53 pm

    About how many oz of sea glass did u use for 7 in foam tree please. My friends and I want to do but not sure how much glass we need?
    Thank you

    Reply
  3. Dc says

    October 8, 2021 at 3:37 pm

    Do you shine your sea glass with something

    Reply
  4. Dawn C says

    December 13, 2020 at 11:09 am

    I used foam cover rd and they worked great! This was a bit challenging but I made for my daughter who lives on the water and she’s super excited! Thank you

    Reply
  5. Carlene Bernadette Nitkowski says

    December 22, 2019 at 10:24 am

    Do you bake it after or use a hairdryer?

    Reply
    • Amanda Formaro says

      December 23, 2019 at 8:51 am

      There’s no need to bake or use a dryer as hot glue sets within seconds :)

      Reply
  6. Rhonda says

    December 11, 2019 at 9:20 am

    Why can’t or can a foam cone be used instead of cardboard?

    Rhonda

    Reply
    • Amanda Formaro says

      December 12, 2019 at 9:01 am

      Yes you can use foam. However, when using hot glue on foam it can melt the foam and make it more difficult to adhere the glass.

      Reply
  7. Griselda Dominguez says

    November 27, 2019 at 11:41 am

    I work with first grader and using a glue gun would be dangerous and impossible with 23 kids. Do you think tacky glue would work just as well.

    Reply
    • Amanda Formaro says

      November 27, 2019 at 5:53 pm

      I don’t think it will. You could try a low temp glue gun, or try one of our kid’s crafts instead! :) https://craftsbyamanda.com/category/craft-tutorials/kids-crafts-2/

      Reply
5 from 21 votes (19 ratings without comment)

Leave a Reply Cancel reply

Your email address will not be published. Required fields are marked *

Rate This Project


The maximum upload file size: 640 MB. You can upload: image, video. Links to YouTube, Facebook, Twitter and other services inserted in the comment text will be automatically embedded. Drop files here

Primary Sidebar

Hi! I’m Amanda and I’m the founder and head designer of Crafts by Amanda. I have spent over 25 years creating projects to share, but it’s not just me anymore! It’s turned into a complete family affair. Come and meet the Creative Team!

Free CraftsBy email every week

Latest crafts straight to your inbox!

All Time Favorites

snowy pinecone candle jar luminaries

Winter Luminaries: Snowy Pinecone…

Make pretty winter luminaries that appear to be covered ... Go To project

Make this wonderful deco mesh pumpkin wreath to hang on your door this fall!

Deco Mesh Pumpkin Wreath…

Adorn your door this fall with a pretty deco mesh ... Go To project

Learn to make these adorable ladybug painted rocks. use special outdoor paint for this adorable garden craft so you can keep garden ladybugs all summer!

Ladybug Painted Rocks…

I'm going to show you how to make these adorable ... Go To project

Reuse those empty prescription pill bottles in all sorts of ways. From organizing to making cookies. Yes, cookies! See how to use your empty pill bottles!

20 Uses for Prescription Pill…

You've been collecting prescription pill bottles for ... Go To project

Meet the Family

Amanda

Founder and Designer

Kristen

Editorial Manager

Lindsay

Social Media Manager

As seen on:

Footer

Favorites

  • Jar Photo Frames
  • No-Sew Roman Shade
  • Paper Flowers
  • How to Make a Scrunchie
  • Mermaid Slime

About

  • Home
  • Meet the Creative Team
  • Work with Us
  • Privacy Policy
  • Accessibility
  • Contact Us

Images/text copyright Amanda Formaro 2020. To feature a post from Crafts by Amanda, you may use one photo credited and linked back directly to the project post.

Free CraftsBy email every week

Latest crafts straight to your inbox!

Copyright ©2025, Crafts by Amanda. All Rights Reserved.
Design by Pixel Me Designs

Rate This Tutorial

Your vote:


To share a photo with your comment click here!

A rating is required
A name is required
An email is required

Recipe Ratings without Comment

Something went wrong. Please try again.