• Home
  • About
    • About Crafts by Amanda
    • Visit Our Recipe Site
  • Work With Us
  • Join
    • Free Newsletters
    • Join our Facebook craft group
↑
  • Tutorials
    • Tutorial Index
    • Adult Crafts
    • Crafts for Kids
    • Crafts for Seniors
    • Recycled Crafts
    • Seasonal Crafts
    • Holiday Crafts
    • Free Printables
    • Craft Collections
  • Adult Crafts
    • Bath & Body
    • Beach Crafts
    • Clay Pot Crafts
    • Crafts for Seniors
    • Decoupage Crafts for Adults
    • DIY Gift ideas
    • Garden Crafts
    • Home Decor Projects
    • Kitchen Crafts
    • Light Bulb Crafts
    • Luminary Crafts
    • Mason Jar Crafts
    • Needlework
    • Photo Display Ideas
    • Recycled Crafts for Adults
    • Wearable Crafts for Adults
  • Crafts for Kids
    • Animal Crafts for Kids
    • Back to School Crafts
    • Beach Crafts for Kids
    • Camp Crafts
    • Cardboard Tube Crafts for Kids
    • Decoupage Crafts for Kids
    • Easy Crafts for Kids
    • Nature Crafts for Kids
    • Other Kid’s Crafts
    • Paper Plate Crafts for Kids
    • Recycled Crafts for Kids
    • Slimes, Doughs, & Clay
    • Wearable Crafts for Kids
  • Holiday Crafts
    • 4th of July Crafts
    • Christmas Crafts
    • DIY Gift ideas
    • Earth Day Crafts
    • Easter Crafts
    • Father’s Day Crafts
    • Halloween Crafts
    • Memorial Day Crafts
    • Mother’s Day Crafts
    • New Year’s
    • Other Holidays
    • Patriot Day Crafts
    • St. Patrick’s Day Crafts
    • Thanksgiving Crafts
    • Valentine’s Day Crafts
  • Seasonal Crafts
    • Winter Crafts
    • Spring Crafts
    • Summer Crafts
    • Fall Crafts
  • Skip to primary navigation
  • Skip to main content
  • Skip to primary sidebar
  • Skip to footer

Crafts by Amanda

crafts for adults and kid's crafts

  • Tutorials
    • Tutorial Index
    • Adult Crafts
    • Crafts for Kids
    • Crafts for Seniors
    • Recycled Crafts
    • Seasonal Crafts
    • Holiday Crafts
    • Free Printables
    • Craft Collections
  • Adult Crafts
    • Bath & Body
    • Beach Crafts
    • Clay Pot Crafts
    • Crafts for Seniors
    • Decoupage Crafts for Adults
    • DIY Gift ideas
    • Garden Crafts
    • Home Decor Projects
    • Kitchen Crafts
    • Light Bulb Crafts
    • Luminary Crafts
    • Mason Jar Crafts
    • Needlework
    • Photo Display Ideas
    • Recycled Crafts for Adults
    • Wearable Crafts for Adults
  • Crafts for Kids
    • Animal Crafts for Kids
    • Back to School Crafts
    • Beach Crafts for Kids
    • Camp Crafts
    • Cardboard Tube Crafts for Kids
    • Decoupage Crafts for Kids
    • Easy Crafts for Kids
    • Nature Crafts for Kids
    • Other Kid’s Crafts
    • Paper Plate Crafts for Kids
    • Recycled Crafts for Kids
    • Slimes, Doughs, & Clay
    • Wearable Crafts for Kids
  • Holiday Crafts
    • 4th of July Crafts
    • Christmas Crafts
    • DIY Gift ideas
    • Earth Day Crafts
    • Easter Crafts
    • Father’s Day Crafts
    • Halloween Crafts
    • Memorial Day Crafts
    • Mother’s Day Crafts
    • New Year’s
    • Other Holidays
    • Patriot Day Crafts
    • St. Patrick’s Day Crafts
    • Thanksgiving Crafts
    • Valentine’s Day Crafts
  • Seasonal Crafts
    • Winter Crafts
    • Spring Crafts
    • Summer Crafts
    • Fall Crafts
Craft Tutorials | Adult Crafts | Beach Crafts | Driftwood Crab Wall Art
Beach Crafts

Driftwood Crab Wall Art

Author by Jane and Sonja on June 6, 2019 Updated on December 6, 2020

5 from 2 votes
Next time you're at the beach, don't forget to collect some driftwood for making your own crab coastal decor, like this driftwood crab wall art!
Jump to Project
Next time your at the beach, don't forget to collect some driftwood for making your own crab coastal decor, like this driftwood crab wall art! #driftwood #beachcrafts #wallart #beachdecor #beach #cottage #beachart
2757 shares
  • Share
  • Tweet
  • Flipboard
  • Email
crab wall art pin image

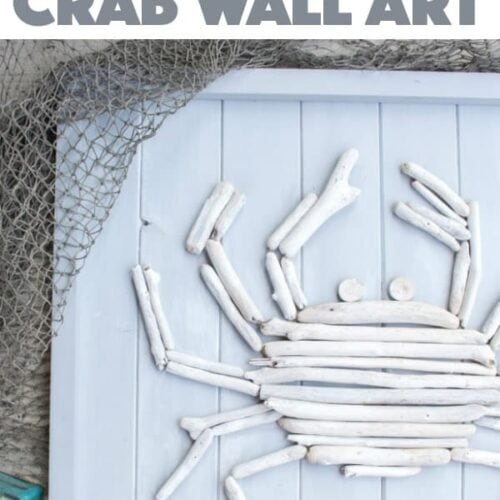
Our latest coastal wall art idea is this DIY driftwood crab wall art. We’ll show you how to make your very own crab art piece to add some coastal flare to your space.

When you’re done you can make this Twig Coastal Wreath!

Driftwood Crab Wall Art surrounded by fishing net


Driftwood Crab Wall Art

Hi friends! This is Sonja from Sustain My Craft Habit, a DIY, craft and home decor blog I co-author with my sister Jane. Collecting driftwood at the beach near our family cottage is one of our favorite pastimes.

We collect all different sizes varying in lengths and widths and hold on to them for our next crafting project. Next time you’re at the beach, don’t miss your chance to collect beautiful pieces of driftwood to use for all types of driftwood wall decor, such as:

  • this large painted driftwood wall art;
  • driftwood art with a starfish;
  • a DIY driftwood wreath;
  • hand-lettered driftwood door signs; or even a
  • driftwood clock.

Just thinking about all these beachy decor ideas is bringing about some creative vibes. This finished driftwood wall decor measures 28″ wide by 24″ high making it an impressive stand-alone showpiece on your wall or fireplace mantel. We actually used pine pieces left over from our farmhouse inspired DIY memo board.

driftwood crab wall decor

Materials Needed to make this Driftwood Crab Wall Decor:

  • Crab Template for Printing, measures 21.5″ wide x 16″ high
  • 8 pieces of Tongue and Groove Pine boards (3 1/2″ wide x 5/16″ thick ), cut to 24” long
  • 1″ x 1″ wood trim (2 x 24″ long, 2 x 28″ long)
  • Decoart Americana Chalky Paint, Yesteryear
  • Decoart Americana White Creme Wax
  • Paintbrush, 1” angled and small sized
  • Cotton rag
  • Driftwood pieces, assorted lengths and widths
  • Airgun Nailer
  • Wood Glue (Lepage, no-clamp, clear drying)


How to Make your Own “Crabby” Driftwood Wall Decor:

The Prep Work – Artboard

Cut 8 pieces of tongue and groove pine boards measuring 24″ long.

Pieces of wood getting measured

Next, cut 4 pieces of 1×1 square trim: two to measure 24” long and two to measure 28” long.

Paint the surface of all pine boards and trim in yesteryear and leave to dry. You can repeat if additional coverage is needed.

Painting wood slats for driftwood crab wall art

Working with one pine board at a time and in small sections, paint on a layer of white crème wax and quickly rub away excess using a cotton cloth. Continue with the remaining pine boards and leave to dry fully before moving on to next step.

Painting wood slats for driftwood crab wall artPainting wood slats for driftwood crab wall art

The white creme wax finish will serve two purposes:

  1.       it will protect the chalky painted surface and
  2.       it will leave a nice rustic white wash effect over the yesteryear paint.

See the soft subtle difference after the creme wax is applied:

Finished painted slabs for driftwood crab wall art

The Assembly – Artboard

Assemble the painted tongue and groove boards to create your backing (or “canvas”). Run a bead of wood glue along the tongue and groove edges and join boards together. Make sure all edges are square and even.

Position the trim work along the outer edges of the joined pine boards. Attach the trim work carefully using a nail gun making sure the nails are not longer than the combined thickness of the trim and pine boards. Be sure to use the proper protective gear when operating any tools. In order for the nail holes to not be visible, you can flip the piece over and nail from the back side.

Assembling wood to make a plaque

The Prep Work – Driftwood Crab

Print off the crab template on 4 sheets of 8.5″ x 11″. Place the papers together to form crab art and tape along joining edges.

Crab drawing on paper

Begin selecting the driftwood pieces to fit inside the crab template, working from the center of the crab to the outer legs. It’s a bit like putting a puzzle piece together so take your time and enjoy:)

crab made out of driftwood

Once you’re happy with the set up, paint the surface of each driftwood using a white crème wax. Replace the driftwood one piece at a time and continue until each driftwood is painted. Again, leave the pieces to dry fully before moving on to the next step.

Painting the driftwood crabPainting the driftwood crab

The Assembly: Making the Driftwood Crab Wall Art

Print off the crab template again, tape and cut out.

Place on top of the prepared artboard (aka canvas) and use a pencil to faintly trace around the crab. This will be your guide for placing the driftwood pieces directly onto the artboard.

Drawing a line around the template of driftwood crab

Transfer the prepared crab from one section onto the same section on the artboard. Using wood glue, apply a thick coat of glue with a paintbrush to the back side of each driftwood. Press down and hold in place and then continue until all the pieces are on the artboard.

Creating driftwood crab wall art

Weigh the driftwood pieces down with a heavy object or as in our case, with large rocks. Leave it to set fully before hanging.

Weighing down the crab with rocks so it sits

Add the hanging hardware to the backside of the art piece to display your new driftwood crab wall art on the wall. And enjoy!

Driftwood Crab Wall Art

Looking for more beachy project ideas? Check out this post packed with 38+ beach craft ideas for adults and kids.

Add this driftwood art to your summer mantel as a nod to the beach that will leave you dreaming of waves splashing on the sand! A pretty home decor project!

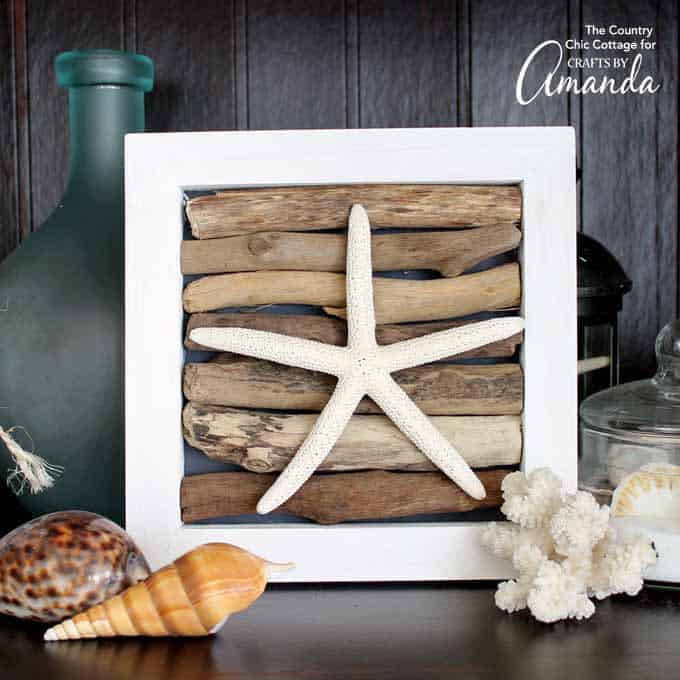
Have leftover driftwood? Try this adorable Driftwood Art with a Starfish! or this gorgeous Concrete Driftwood Sailboat. Want a different more vibrant beach look? Try this cool Sun Print Wall Art.

Watch the video below to see how to make this driftwood crab wall art!


Next time your at the beach, don't forget to collect some driftwood for making your own crab coastal decor, like this driftwood crab wall art! #driftwood #beachcrafts #wallart #beachdecor #beach #cottage #beachart
Print Project
5 from 2 votes

A Crabby Piece of Driftwood Wall Decor

Next time you're at the beach, don't forget to collect some driftwood for making your own crab coastal decor, like this driftwood crab wall art!
Author: Jane & Sonja

Supplies

  • Crab Template for Printing measures 21.5" wide x 16" high
  • 8 pieces of Tongue and Groove Pine boards 3 1/2" wide x 5/16" thick , cut to 24” long
  • 1 " x 1" wood trim 2 x 24" long, 2 x 28" long
  • Decoart Americana Chalky Paint Yesteryear
  • Decoart Americana White Creme Wax
  • Paint brush 1” angled and small sized
  • Cotton rag
  • Driftwood pieces assorted lengths and widths
  • Airgun Nailer
  • Wood Glue Lepage, no-clamp, clear drying

Instructions

  • Prepare and paint the backboard wood frame with grey chalky paint and white creme wax.
  • Print out the crab template and select appropriate driftwood pieces to fit the template.
  • Paint the selected driftwood pieces with white creme wax.
  • Trace the crab template onto the backboard.
  • Assemble and glue the driftwood pieces onto the backboard to create the crab.

Video

This post originally published here on Aug 28, 2018.

  • Author
  • Recent Posts
Follow Along
Jane and Sonja
Bloggers at Sustain My Craft Habit
Jane and Sonja are sisters, moms and lifelong craft addicts both living near Toronto, Canada with their families. They share their love of creativity, nature and coastal craft and DIY ideas on their blog Sustain My Craft Habit.
Follow Along
Latest posts by Jane and Sonja (see all)
  • Cheese Grater Owl - July 8, 2025
  • Seashell Wreath - July 1, 2025
  • Patriotic Painted Rocks - June 24, 2025
2757 shares
  • Share
  • Tweet
  • Flipboard
  • Email

Filed Under: Beach Crafts, DIY Gift ideas, Home Decor Projects, Summer Crafts Tagged With: beach, beach decor, coastal, coastal decor, diy, driftwood

Reader Interactions

Free CraftsBy email every week

Latest crafts straight to your inbox!

Comments

  1. Humaira Zaman says

    June 7, 2019 at 5:52 am

    nice

    Reply
5 from 2 votes (2 ratings without comment)

Leave a Reply Cancel reply

Your email address will not be published. Required fields are marked *

Rate This Project


The maximum upload file size: 640 MB. You can upload: image, video. Links to YouTube, Facebook, Twitter and other services inserted in the comment text will be automatically embedded. Drop files here

Primary Sidebar

Hi! I’m Amanda and I’m the founder and head designer of Crafts by Amanda. I have spent over 25 years creating projects to share, but it’s not just me anymore! It’s turned into a complete family affair. Come and meet the Creative Team!

Free CraftsBy email every week

Latest crafts straight to your inbox!

All Time Favorites

Learn to make these adorable ladybug painted rocks. use special outdoor paint for this adorable garden craft so you can keep garden ladybugs all summer!

Ladybug Painted Rocks…

These colorful little ladybug painted rocks are the ... Go To project

snowy pinecone candle jar luminaries

Winter Luminaries: Snowy Pinecone…

Make pretty winter luminaries that appear to be covered ... Go To project

Make this wonderful deco mesh pumpkin wreath to hang on your door this fall!

Deco Mesh Pumpkin Wreath…

Adorn your door this fall with a pretty deco mesh ... Go To project

Reuse those empty prescription pill bottles in all sorts of ways. From organizing to making cookies. Yes, cookies! See how to use your empty pill bottles!

20 Uses for Prescription Pill…

You've been collecting prescription pill bottles for ... Go To project

Meet the Family

Amanda

Founder and Designer

Kristen

Editorial Manager

Lindsay

Social Media Manager

As seen on:

Footer

Favorites

  • Jar Photo Frames
  • No-Sew Roman Shade
  • Paper Flowers
  • How to Make a Scrunchie
  • Mermaid Slime

About

  • Home
  • Meet the Creative Team
  • Work with Us
  • Privacy Policy
  • Accessibility
  • Contact Us

Images/text copyright Amanda Formaro 2020. To feature a post from Crafts by Amanda, you may use one photo credited and linked back directly to the project post.

Free CraftsBy email every week

Latest crafts straight to your inbox!

Copyright ©2025, Crafts by Amanda. All Rights Reserved.
Design by Pixel Me Designs

Rate This Tutorial

Your vote:


To share a photo with your comment click here!

A rating is required
A name is required
An email is required

Recipe Ratings without Comment

Something went wrong. Please try again.