I have seen some beautiful Christmas themed twig trees, driftwood trees and trees made from sticks over the past couple of years. I’ve gone with a rustic coastal look in my house and wanted to create a coastal branch tree to hang on the wall. I decided that this Christmas I would do it. I have to say though, while I was outside collecting branches for my project, I had no idea what I had gotten myself into.

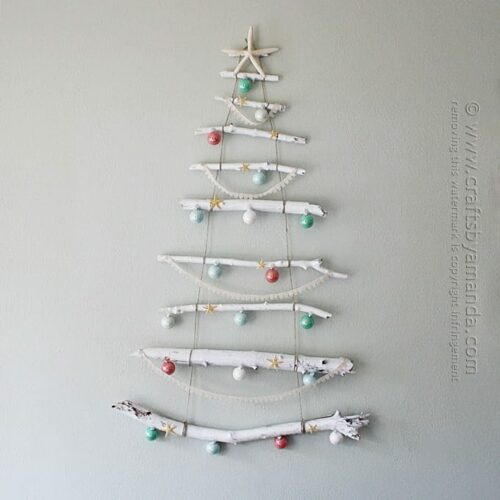
Coastal Branch Tree for Christmas
I love how this branch tree turned out, but I can’t remember the last time I had so many mishaps with a single project. It looks pretty easy, doesn’t it? That’s what I thought too. And really, it was pretty easy in concept, but when working by yourself with something that’s sizable and tricky to maneuver, it can be challenging at best.
Related – be sure to try my sea glass Christmas trees and these beach sign ornaments as well!

Before I take you through all the frustrations I encountered during the making of this tree, I want to say that you should not be discouraged from making something similar. Instead, takes my tips to heart and learn from my mistakes so that you won’t have to do this over again as I did.

I actually bought a couple boxes of white lights that I was going to add to this tree, but honestly after what I went through I was ecstatic just to get it on the wall without it falling off. So it’s staying there until Christmas is over. No lights (maybe next year).

I’m not sure why my branch tree was “chosen” as the project from Hell, but so many things went wrong:
- When connecting the twine to each branch, I started knotting them and then thought it would be faster just to wrap and glue the twine. I was wrong and realized it wasn’t going to hold. Unfortunately, I had already hot glued the twine to all the branches and had to remove it all and start over. Luckily that was the only problem I had with the actual assembly of the tree itself.
- I needed small ornaments. I found a package at Hobby Lobby that were the perfect size. When I got them home and pulled the hangers off to add paint inside, I found that they had the tiniest opening EVER invented. Therefore I couldn’t just squeeze the paint from the bottle into the ornaments. I needed a different solution. I had to use watered down paint fed into an icing tip using a plastic spoon. I went through an entire package of baby wipes in the process because it just didn’t want to work. I finally got a flow going, but it took me over an hour to get them done. And what a mess! Plus I didn’t use plastic friendly paint inside the ornaments so I will probably have to redo them or replace them next year. Not smart from the woman who gives advice on how to paint on plastic!
- When done with the ornaments, I carried them upstairs from the craft room. And of course, I was trying to carry too much (two paint palettes full or freshly painted ornaments, my glue gun, a package of starfish, some lace and a couple other things) so disaster was sure to strike. When I got to the top of the stairs and entered the kitchen, one of the ornaments shifted and I jerked to try and catch it. Half of them fell, splattering paint all over my hardwood floor and kitchen cabinets. The paint came flying out of the hanger opening at the top of the ornaments. Acrylic paint dries FAST so I was on my hands and knees working feverishly to clean it up! Thank goodness these ornaments are plastic and at least I didn’t have to clean up broken glass.
- When all the paint splattered in the kitchen, paint got on the best big starfish I had (for the top of the tree). I did have more luckily, but had to use the second best one.
- After gluing all the ornaments in place I needed to hang the tree so I could tie the fishing line in the back. I stood on a chair in the dining room and proceeded to try and hang it from my curtain rod. Of course, it didn’t work and the tree went crashing to the ground. I literally CRIED when I was on my hands and knees a second time cleaning paint that went from one end of my dining room to the other when three of the ornaments came apart from their hangers. Acrylic paint was all over my floor, baseboards, chair legs, etc.
- In total I dropped this poor branch tree three times, losing bits and pieces of bark along the way, creating several messes to clean up.
- I also accidentally broke half of my small starfish. I knocked the entire little basket of them on the floor when I was gluing ornaments on. The cord from my glue gun grabbed the basket, and yeah.

So what can you learn from my Terrible, Horrible, No Good, Very Bad Day![]() ?
?
- Follow my instructions for knotting the twine on each branch
- Go to the dollar store and get an eye dropper to use to add the paint to the ornaments so you don’t have to water it down
- Use a multi-surface paint that will adhere to the plastic
- Don’t try to carry too many things risking dropping stuff everywhere
- Turn your tree over on the table to tie the strings instead of trying to hang it
- Hot glue all the ornament hangers to the ornaments so they can’t come off
- Add some hot glue to the opening of the hanger so if you DO drop them, paint can’t fly out
- Make sure your work surface is clear so you don’t knock things off the table and break them

So are you ready to give it a go? I’m sure things will go much smoother for you now that I’ve worked out all the kinks! ;)

As always, a full printable supply list and instructions are at the end of this post.
For this project you will need the following supplies:
Pictured here are the supplies that I used. While I adore Americana acrylics, there are several multi-surface paints out there that would probably have worked better on the plastic. The makers of Americana (DecoArt) make one, as does Plaid (Folk Art) and Martha Stewart. It also could have been that I watered the paint down to thin it in order to get it into the ornaments. That may have caused an issue with adhesion. Martha Stewart has a nice sample pack collection of satin multi-surface paints here![]() .
.
- Branches
- White spray paint

- Twine
- Multi-surface craft paint in coastal colors
- Clear plastic ornaments
- Fishing line
- 1 large starfish
- Several small starfish
- Lace ribbon
- Hot glue gun

Select your branches and peel off the bark. Bake the branches in a 250 F oven for two hours. This will help dry them out as well as kill off any little critters that might still be inside.

Use spray paint to paint the branches white. This may take several coats, be sure to allow them to dry for at least an hour between coats.

Lay out your branches how you want them and cut two long pieces of twine, about twice the length of your tree (my tree measures 4-feet, so two 8-inch lengths of twine were used). Connect the branches together using twine by knotting the twine around each branch. Once I had connected the top two branches I did the rest hanging on the wall. Do not just wrap the twine and glue it. They need to be knotted in order to handle the weight of the bottom branches. Secure each knot with hot glue. Tie the two loose ends together at the top of the tree to create a hanger.

Hang it on the wall and make sure it looks like you want it to. This is the only time you will have a chance to change it before decorating. When satisfied, trim off the excess twine from the bottom.

Use a multi-surface paint to color the ornaments. An icing tip works as a great funnel for small openings, but you can try an eyedropper too. Place your finger over the opening and shake the ornament until the paint covers the inside. Put all of the ornament tops back on and secure with hot glue.

Hot glue the large starfish to the top of the tree.

Cut a 10-inch long piece of fishing line and thread it through the ornament hanger. Hot glue the hanger to the branch. Repeat this for all the ornaments. Carefully turn the tree over and tie the fishing line from the ornaments to the back of the tree. Trim excess and secure the knot with hot glue.
Wrap fishing line around the starfish and branches several times to secure it as well.

Turn the tree back over, front side up, and glue lace ribbon on as garland. Glue small starfish to the branches as well.

There! Finished! Despite all the mishaps with this project, I’m still in love with it and am happy I made it.
Have fun!
More new Christmas ideas
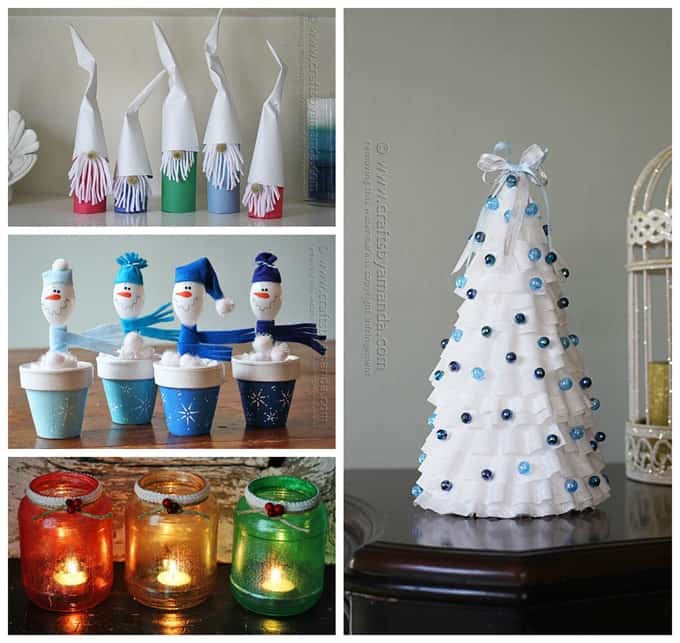
- Cardboard Tube Gnomes
- Plastic Spoon Snowmen
- Glitter Christmas Luminaries
- Blue & White Coffee Filter Christmas Tree
- Christmas Village Shadowbox

Coastal Branch Tree for Christmas
Supplies
- Branches
- White spray paint
- Twine
- Multi-surface craft paint in coastal colors
- Clear plastic ornaments
- Fishing line
- 1 large starfish
- Several small starfish
- Lace ribbon
- Hot glue gun
Instructions
- Select your branches and peel off the bark. Bake the branches in a 250 F oven for two hours. This will help dry them out as well as kill off any little critters that might still be inside.
- Use spray paint to paint the branches white. This may take several coats, be sure to allow them to dry for at least an hour between coats.
- Lay out your branches how you want them and cut too long pieces of twine, about twice the length of your tree (my tree measures 4-feet, so two 8-inch lengths of twine were used). Connect the branches together using twine by knotting the twine around each branch. Do not just wrap the twine and glue it. They need to be knotted in order to handle the weight of the bottom branches. Secure each knot with hot glue. Tie the two loose ends together at the top of the tree to create a hanger.
- Hang it on the wall and make sure it looks like you want it to. This is the only time you will have a chance to change it before decorating. When satisfied, trim off the excess twine from the bottom.
- Use a multi-surface paint to color the ornaments. An icing tip works as a great funnel for small openings, but you can try an eyedropper too. Place your finger over the opening and shake the ornament until the paint covers the inside. Put all of the ornament tops back on and secure with hot glue.
- Hot glue the large starfish to the top of the tree.Wrap the starfish several times around the branches with fishing line to secure it.
- Cut a 10-inch long piece of fishing line and thread it through the ornament hanger. Hot glue the hanger to the branch. Repeat this for all the ornaments. Carefully turn the tree over and tie the fishing line from the ornaments to the back of the tree. Trim excess and secure the knot with hot glue.
- Turn the tree back over, front side up, and glue lace ribbon on as garland. Glue small starfish to the branches as well.

This post was originally published on this blog on Nov 23, 2014.
- Tie Dye Beach Towels - July 24, 2026
- Swirling Twirling Ladybugs - July 21, 2026
- Drip Tie Dye Backpack - July 17, 2026


Lizzie says
I love your honesty. It’s heartening to know that experts don’t always get it right the first time. Sometimes I start a project and nothing I do goes as planned,and I find myself thinking ‘why on earth did I start this?. You have given me heart to continue when all the gremlins from hell are lined up to thwart me. I’ve just discovered your website and I’m loving it. Thank you.
Amanda Formaro says
Thanks so much Lizzie! Yes, we are all human, but if it’s something you love to do you should keep on keeping on :)
Michelle Leslie says
Oh my it looks like the craft fairies were conspiring against you on this one, but you kick their butts :D and I love how your tree turned out. It’s so rustic and perfect for a small apartment where there’s no space for the real thing.
Sharon Hahn says
Using a disposable cake decorating bag with some paint in it may have helped with the ornaments. There is also a small hole in the paint bottle caps to drip paint from instead of taking off the top and pouring it out that way ensuring less of a mess and possibly fitting right over the ornament hole.
kaet njordson says
how do you hang this on the wall?
Amanda Formaro says
I made sure that I hammered into a stud in the wall and hung it from a nail.
pepe botella says
There is simple mariner’s knot, the clove hitch, which uses two turns. It is used many times to hold a boat to the pier. The nice thing is that you can slide the twine and adjust each level to fit your taste. Knot is good enough holding the branches that you may skip the hot glue if you wish
Also I may prefer to use two rolls of twine, one for each side and knot both twines at top.
Another tool I may use is a syringe, one of those used for meat, to supply the paint…
Just my two cents…
Deborah Crosby says
Thank you for this wonderful idea Amanda!! I’m planning on doing this today :)
Enjoy your holidays!!
Debbie
Amanda Formaro says
I hope you enjoyed it Debbie!
Kim @ Sand & Sisal says
I love, love, love your tree! I’ve pinned it a ton and hope to make one for my home next year! Shared on my FB page today too! Merry Christmas Amanda!
~KIM
allison says
This is great! However, the pop-ups are SUPER annoying!!! A liitlr aggravating actually. The ones that you can x away I can deal with, but the one that kept popping up over text I was reading and would stay for like 5 seconds, interrupting my reading of this great post to ask me if I want to install something…grrr!
Amanda Formaro says
Hi Allison. I sent you an email asking whether you were on mobile or desktop so I can try and trouble shoot this. If you could reply I would appreciate it!
Kim @ Cozinest says
Amanda, this turned out precious, but WOW! I’m not sure I would have made it past peeling off the bark; which leads to my question…do you have to peel off the bark? Does paint not adhere or something, because I’m thinking it would look very rustic if you left the bark???? Just curious. I love the starfish. I also love the fact that you shared the whole story. If someone had videoed you, you might have a career in comedy! I know it wasn’t funny when you were cleaning up paint, but in hindsight, this is hilarious! I love this post! It’s the most real thing I’ve read in while!
Amanda Formaro says
Hi Kim! Actually, I peeled the bark on mine because it had been raining here. Many of these branches had been laying in the yard for weeks, so the rain had soaked in and the bark was peeling on many of them. So, I would imagine if the branches are still dry that you are using then you wouldn’t have to peel it :)
Sandy_in_MD says
This turned out wonderful, in spite of your crafting “oopsies”. This is great idea. Thanks so much for the detailed instructions, and for the tips too.
Amanda Formaro says
Thank you Sandy!
[email protected] says
This turned out so beautiful! Pinned!
Cookie17 says
I glad you have good nerves if that been me( temper) not bad use be ,that sucker been in trash ha,ha, Glad see ya stuck with it.. Have Happy ThanksGiving you & your Family…
Amanda Formaro says
LOL Thanks Cookie!